Section 1
Introduction
Section 2
The Maestro Interface
Section 3
Defining a Job
Section 4
Defining Recipients
4.3 Source Details
Section 5
Defining Content
Section 6
Defining Tracking
Section 7
Sender and Delivery Options
Section 8
Outbox
Section 9
Delivered Jobs
Section 10
Reporting and Statistics
Section 11
User Settings
Appendix A
24 Hour Clock
Appendix B
International Character Sets
Appendix C
Comma Separated Files
Appendix D
AOL Rich Text
4.3 Source Details
The Source Details link will only become active if LISTSERV Maestro needs to interpret or quantify data that has been uploaded or otherwise selected. If recipient data is taken from a database or a LISTSERV list, the data has already been interpreted. If a text file is uploaded, LISTSERV Maestro will have to attempt to understand the way the data is arranged. If recipient data is based upon reaction to a previous job, an optional time frame limitation for reaction can be defined. This time frame definition is optional. By default, time will not be considered when determining the reaction. Sometimes a time frame limitation might be needed, for example if a user wishes to offer special bonuses to all recipients that reacted very quickly.
In the case of an uploaded text file, LISTSERV Maestro will try to determine how the columns of data are separated, and how each column or field of data is labeled. In order to send out an e-mail job, LISTSERV Maestro must correctly interpret which column is the name of the recipient and which column is the e-mail address of the recipient. Other fields may be included and will appear in the results table located on the lower half of the screen.
Figure 15 Define Recipients Source Details Parse Recipients
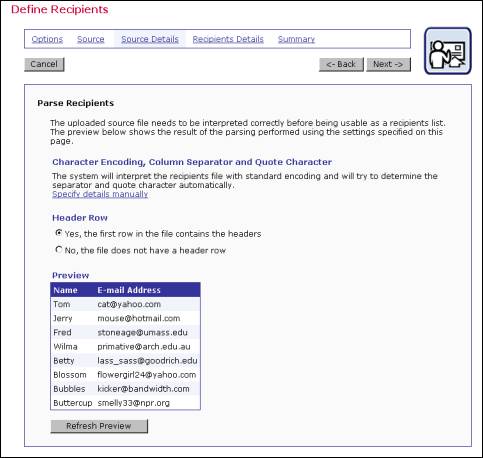
Click the Next -> button to continue if the parsing is correct. If LISTSERV Maestro has not interpreted the data correctly, or an unconventional delimiter and/or quote symbol has been used, click on the link Specify details manually to configure the data manually.
Use the Specify details manually link when the delimiter (separator character) or the quote character is used in some of the data fields. For example, if the NAME field contained Tom "the cool cat" Jones as an entry and double quotes was the quote character for the file, or if the LOCATION field contained the entry "Atlanta, GA" where the comma was the separator character, the details would have to be specified manually. See Appendix C About Comma Separated Format Recipients Files for more information.
Figure 16 Define Recipients Source Details Character Encoding
Maestro has four selections for choosing separator characters:
- Tab (\t)
- Comma (,)
- Semicolon (;)
- Other if this is chosen, type the character into the adjacent box. Columns can be defined as "not enclosed by a quote character" or select the quote character from three choices:
- Double Quotes (")
- Apostrophe (')
- Other if this is chosen, type the character into the adjacent box.
In addition to interpreting the separator character and the quote character, LISTSERV Maestro will select the encoding used to create the text file. If the original data file was created with a specific character set, such as Greek characters, the file encoding will have to be changed to match that character set. Use the pull down menu to select the encoding for the file if it is different than the default. For more information on encoding, see Appendix B E-mail and International Character Sets in this guide.
After separator and quote characters have been entered, and any encoding change made, click Refresh Preview to have LISTSERV Maestro attempt to parse the file again with the new settings. The new columns will then be displayed. If the columns are now separated correctly, proceed. If the columns are not correct, repeat the process and click Refresh Preview to see the new changes.
In the case of a recipients list generated by reaction from a previous job, the Source Details screen opens so that a time frame can be set to define the reactions of the previous recipients in relation to a time period.