Section 1
Introduction
Section 2
The Maestro Interface
Section 3
Defining a Job
Section 4
Defining Recipients
Section 5
Defining Content
Section 6
Defining Tracking
Section 7
Sender and Delivery Options
Section 8
Outbox
Section 9
Delivered Jobs
Section 10
Reporting and Statistics
Section 11
User Settings
Appendix A
24 Hour Clock
Appendix B
International Character Sets
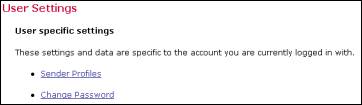
User settings store individual and group settings for Sender Profiles as well as allow the account holder to change his or her password. Click on the User Settings icon to open the "User Settings" page. The Sender Profiles link will only appear on the User Settings page if the system administrator has granted the account holder permission to create sender profiles. The Change Password link will only appear on the User Settings page if the system administrator has granted the account holder permission to change passwords.
Click on the Sender Profiles link to open the "Manage Sender Profiles" screen. This screen displays for a listing of all saved profiles. To add a new profile to the list, click on the New Profile button. To edit an existing profile, click on the profile title.
Figure 63 Managing Sender Profiles
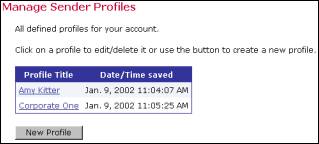
Figure 64 Creating and Editing Sender Profiles
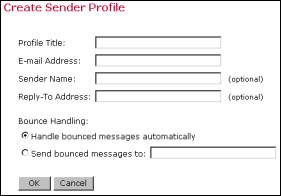
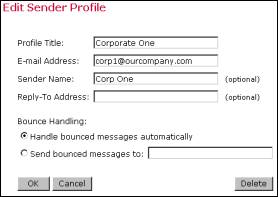
- Profile Title Give the profile a title that will identify it when it appears on the users list of all saved profiles.
- E-mail Address Fill in the e-mail address of the sender of the message.
- Sender Name This is an optional field, but if it is filled in the senders name will appear in the "from" field of the e-mail message. If the sender name is left blank, the "from" field will be filled in by the e-mail address.
- Reply-To Address This is an optional field. Include an e-mail address if replies are an option for recipients and if the reply-to address is different than the senders e-mail address.
- Bounce Handling Select either "Handle bounced messages automatically" in which case LISTSERV® will handle bounced messages, or select "Send bounced messages to:" and type an e-mail address in the text box to send the bounced messages to.
OK to save the profile, Cancel to return to the Manage Sender Profiles screen without saving the profile, or Delete to delete the profile.
Sender profiles can also be created and saved from the "Edit Sender Information" screen available from the Workflow or Summary diagram screens. See Section 7.1 for more information.
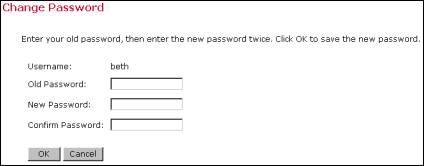
If the account holder has been granted permission to change their password, the Change Password link will appear on the User Settings page. Click the link to open the "Change Password" screen. Enter the old password first, and then type in the new password twice for confirmation. Click OK to save the new password and return to the User Settings Page.
Figure 65 Changing User Password