Section 1
Introduction
Section 2
The Maestro Interface
Section 3
Defining a Job
Section 4
Defining Recipients
Section 5
Defining Content
Section 6
Defining Tracking
Section 7
Sender and Delivery Options
Section 8
Outbox
Section 9
Delivered Jobs
Section 10
Reporting and Statistics
Section 11
User Settings
Appendix A
24 Hour Clock
Appendix B
International Character Sets
Section 7
Sender and Delivery Options
Defining the sender of an e-mail job can take place at any point in the process of creating or editing a job. It is necessary to have sender information added to a job before delivery testing and authorization to deliver the message can take place.
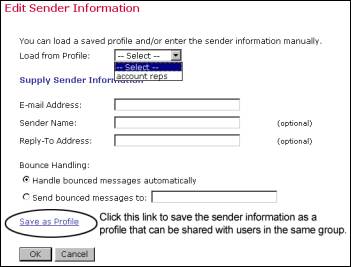
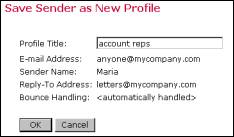
Enter sender information from the Job Details screen by clicking on the Define Sender icon in the Workflow diagram or the Edit link next to "Sender" in the Summary diagram. Enter the sender information by loading a saved sender profile or typing in new information. As a time saving option, save any new sender information as a profile for future use. All saved sender profiles are available to all members of a group. The only required field is the senders e-mail address, but including the sender name makes the message more personalized. Include a reply-to address if replies are an option for recipients and if the reply-to address is different than the senders e-mail address.
Bounced e-mail (e-mail that is not accepted by the server holding the e-mail address) can be handled automatically by LISTSERV® or sent to another address supplied by the sender. If LISTSERV® handles bounces, they are logged in a file called NOLIST-jobname.changelog in LISTSERVs main directory. Click OK to continue.
|
|
|
7.2 Delivery Testing for a Job
It is critically important to thoroughly test an e-mail job before sending it, especially if it is a large job being distributed to many recipients or a message containing a large amount of data. Large jobs take up a lot of server time and space as well as effect many e-mail hosts and individual recipients. Sending out a less than perfect message can create a very negative reaction among recipients and damage an institutions credibility and reputation. As a safeguard LISTSERV® Maestro will not authorize an e-mail job to be delivered before a test of the job has been sent out and approved.
LISTSERV® Maestro will allow the user to use a previously entered group of test recipients, upload and download test recipient lists or type in test recipient names and addresses. The test interface displays a table for entering test data. Each row represents a test recipient and the columns displayed depend on the columns that were defined in the "Define Recipients" stage. If the recipients were defined from an uploaded text file, the columns in the test screen are the same as those present in the text file. If the recipients were defined from a LISTSERV® list, the test screen displays the *TO and *NAME columns that are available in a LISTSERV® list.
Valid Internet e-mail addresses are necessary for the fields of the column that is specified as the e-mail column. The test messages will be sent to these addresses. This works very similarly to the define recipients functions.
The subject line for a test message can be changed. Changing the test subject line will not affect the subject line of the final message. The optional test line allows the user to enter a line of text that will appear above the body of the message when it is delivered. Use this to more easily recognize test messages from final messages. If nothing is entered into the optional test line box, then no text is added to the test messages. A test line will never be added to a final e-mail job.
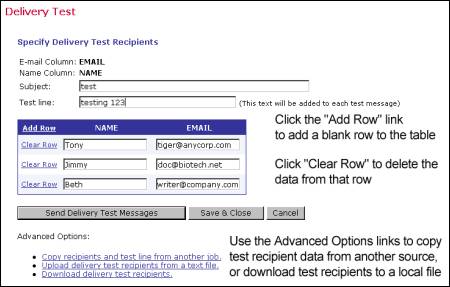
Note: It is not necessary to fill out all rows. Only those rows where the e-mail column field is filled in are used, the other rows are ignored.
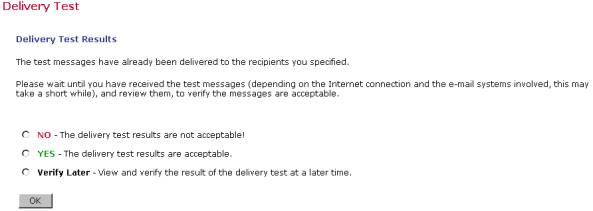
Click Send Delivery Test Messages to continue. Click Save & Close to save the test recipient data but not send the test message. Once the messages have been sent, review the results. It is usually a good idea to include the job owner and any team members in the test recipient list so test results can be viewed firsthand. Select the option button next to "No" and click OK if the test results were not as expected. This will prevent the job from being approved for sending and allow the user to make any necessary changes by bringing up the Job Details screen. Select the option button next to "Yes" and click OK if the test results were as expected. This will allow the job to be authorized for delivery.
Select the option button next to "Verify Later" and click OK to view and verify the delivery test results at a later time. If this option is selected, the job will not be approved for delivery. The next time the Delivery Test icon or link is clicked from the Job Details screen, the user will be returned to the Delivery Test screen. Click the link Go directly to the validation page, without another delivery test under "Advanced Options" to return to the validation screen of the test that was saved for later verification. Click the option button next to "Yes" and then click OK to proceed.
Figure 34 Delivery Test Results
![]() It is useful to have a good understanding of the actual recipients
data when putting together a test. If the message contains
merged fields, then study those fields in the actual data:
what are the shortest and longest instances of those fields?
Are those fields ever empty? Then make sure to send tests
that have values of the shortest and longest lengths, and
empty fields if appropriate, to make sure that the message
layout looks right in all cases. It is sometimes necessary
to change the layout or use conditional blocks to accommodate
special cases. If using conditional blocks, make sure that
the test cases exercise every possible condition, being especially
cautious about the formatting when working with HTML messages.
It is useful to have a good understanding of the actual recipients
data when putting together a test. If the message contains
merged fields, then study those fields in the actual data:
what are the shortest and longest instances of those fields?
Are those fields ever empty? Then make sure to send tests
that have values of the shortest and longest lengths, and
empty fields if appropriate, to make sure that the message
layout looks right in all cases. It is sometimes necessary
to change the layout or use conditional blocks to accommodate
special cases. If using conditional blocks, make sure that
the test cases exercise every possible condition, being especially
cautious about the formatting when working with HTML messages.
![]() Send test messages to e-mail accounts running different e-mail
clients. A message that looks fine in one client may look
messy or unreadable in another.
Send test messages to e-mail accounts running different e-mail
clients. A message that looks fine in one client may look
messy or unreadable in another.
![]() If the recipients are defined as a LISTSERV® list,
sending the job as a standard list message, the recommended
method for testing mailings is to create a clone of that list
within LISTSERV ® (such as TEST-listname), making
sure that the entire list configuration is exactly duplicated,
including customized templates (especially the top and bottom
banners, if these are defined). Subscribe only the test recipients
to the test list. In LISTSERV® Maestro's "Test"
interface, enter the full address of the test list as the
sole test address.
If the recipients are defined as a LISTSERV® list,
sending the job as a standard list message, the recommended
method for testing mailings is to create a clone of that list
within LISTSERV ® (such as TEST-listname), making
sure that the entire list configuration is exactly duplicated,
including customized templates (especially the top and bottom
banners, if these are defined). Subscribe only the test recipients
to the test list. In LISTSERV® Maestro's "Test"
interface, enter the full address of the test list as the
sole test address.
Once a test message containing tracked data has been delivered and the test recipients have opened the message, the "Test Reports" tab, available from the Job Details screen, becomes active. Click on the tab to open up a definition page to generate a "quick report" on the test message data. "Quick Reports" are predefined report types that create a temporary report based on the selected report settings and the active e-mail job.

There are three different report types that are available.
- Event distribution over time A simple line graph showing number of responses over time.
- Sum of events A bar graph that shows the number of recipients that clicked on each URL and/or opened up the e-mail message.
- Event details Displays a table that lists the report type, time period of the report, allows for the selection of encoding for downloading the data, and allows for the selection of the time zone to reference the downloaded data. Click the download link to download the raw data to a local drive. Raw data can be used in Excel or other statistical software to create detailed reports. Event detail reports are only available for personal or anonymously tracked jobs because this report type is linked to recipient profile data.
Figure 36 Event Details Report
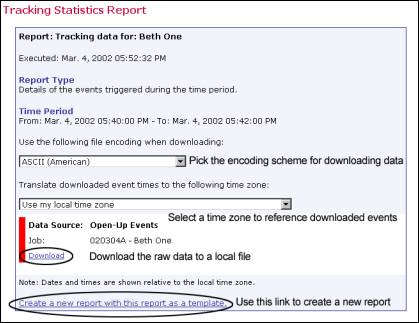
Next select the source data for the report type. There are up to five choices depending on the type of message:
- Open-Up events This option charts all the open-up events for a job. It is only available for HTML messages.
- Click-Through events (all links bundled) This option bundles all click-through events together into one variable charted on the report.
- Click-Through events (all links separate) This option creates separate variables for each click-through event that is tracked.
- Open-Up and Click-Through events (all links bundled) This option puts all the open-up events into one variable and all the click-through events into a second variable charted on the report. It is only available for HTML messages.
- Open-Up and Click-Through events (all links separate) This option creates separate variables for each of the open-up and each of the click-through events. It is only available for HTML messages.
Select a report type and a source data type, then click OK to continue. A temporary report with the settings selected will be generated and displayed on the screen. This report will not be saved (it can always be run again from the Test Reports tab) unless the link Create a new report with this report as a template located at the bottom of the report is clicked. Clicking this link will open the edit report page of tracking reports. Simply save the report in its present form, or change the name of report, the type, or the data sources. For more information on quick reports see Section 9.1 Delivered Jobs Reports in this guide. For more information on creating and editing reports, see Section 10 Tracking Statistics and Reports.
7.4 Scheduling Delivery of a Job
LISTSERV® Maestro allows the user to immediately send out an approved e-mail job or schedule a job for future sending. Scheduling the delivery of a message can take place at any time during the creation of the e-mail job; however, final delivery is still subject to delivery testing and delivery authorization.
The date and time entered are dependent on the time zone selected from the drop down selection box. Local time is relative to the workstation accessing the job, and not the server running LISTSERV® Maestro. See Appendix A for a conversion table for formatting AM and PM times to be compatible with LISTSERV® Maestro.
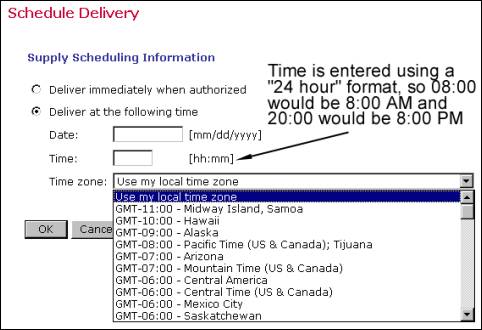
Click OK to continue. Jobs scheduled for future sending will be available in the "Outbox". It is possible to edit jobs in the Outbox up until the delivery time. If a job is changed, test messages must be resent, and final approval will have to occur again before the job can be re-authorized.
7.5 Authorizing a Job for Delivery
In order for an e-mail job to be delivered, final authorization is required. After all previous requirements have been met define recipients, define message, define tracking, define sender, send test and schedule delivery a job may be authorized and delivered. The job owner always has permission to authorize a job as do any other team members that have been granted permission.
Figure 38 Authorizing Delivery
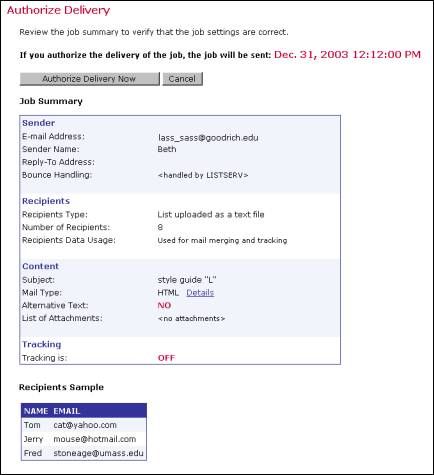
The summary screen lists all the selections that make up the e-mail job. Clicking Authorize Delivery Now will do exactly that, and the job will be sent either immediately or at the scheduled day and time. Clicking Cancel will go back to the Job Details screen so that any part of the job may be edited, or the job can be deleted. The "Details" link will display a copy of the message, alternative text, attachments, and tracking information. The message can be downloaded to a local file as well.
The scheduled time displayed here is always displayed relative to the local time of the user. If the user selected a time zone different from his/her location on the schedule page, then the time displayed in the job summary may, at first glance, appear incorrect. For example, if the user enters the time 10:00 with zone GMT as the scheduled delivery time, but the users location is not in the GMT zone, the delivery time displayed on the authorize page will be different than the 10:00 time selected, because the users local time is in a different time zone than the scheduled delivery time. So the time may look incorrect at first, but when converted to absolute time it is correct. Even more important, this may even show an "incorrect" day. If the user sets the scheduled delivery time to 0:30 at GMT on the first of January, the time may appear as 23:30 on the 31st of December on this page if the local time zone is before GMT.