With every installation of LISTSERV Maestro, a special user account for the system administrator is available. From this account, it is possible to archive delivered jobs and import jobs from the archive back into LISTSERV Maestro. The administrator can also change the ownership of a job, report, sender profile, drop-in content element, or recipients target group.
The Toolbar contains menus and icons that give you quick access to the different functions in LISTSERV Maestro. The menus may vary slightly for the administrator.
The Mail Job menu lets you create a new job, view a list of open jobs (jobs that you have not finished setting up the criteria for), view a list of ongoing jobs (jobs that repeat), and a list of completed jobs. The options available vary depending on where you are in the application and what function you are performing. The possible options are:
|
•
|
Import – Import a previously archived job from the archives.
|
|
•
|
Open Jobs – Display the list of open jobs that have not been authorized for delivery.
|
|
•
|
Ongoing Jobs – Display the list of ongoing jobs that are authorized for delivery and that are currently being processed or awaiting delivery.
|
|
•
|
Completed Jobs – Display the list of completed jobs that have been delivered or closed after a delivery failure.
|
|
•
|
Job Info – Define the general information of the email job, such as the job title.
|
|
•
|
Copy Settings From Other Variant – Copy the job definition settings from another variant job of the same A/B-split job to the current variant job. The copied settings will include the message definition, tracking definition, sender definition, and test delivery definition.
|
|
•
|
Authorize Delivery – Authorize the job for delivery.
|
|
•
|
Team Collaboration – Define the team collaboration settings for the job.
|
|
•
|
Revoke Send Authorization – Revoke the delivery authorization of the job.
|
|
•
|
Stop Sending – Stop delivery of the job.
|
|
•
|
Close Job – Close the job in its failed state.
|
|
•
|
Retry Sending – Retry the delivery of the failed job.
|
|
•
|
Resume Sending – Resume the delivery of the job to the pending recipients.
|
|
•
|
Move Job to Archive – Move the selected mail job to the archive. An archived job will no longer be accessible in the normal LISTSERV Maestro User Interface; it will appear as if the job was deleted. Only the LISTSERV Maestro administrator can import an archived job. Also, an imported job will be “frozen” into the state that it had when it was initially archived (for example, no more tracking events will be collected for this job).
|
|
•
|
Select All – Select all jobs in the current job list.
|
|
•
|
Enable Multiple Job Actions – Enable the multiple job actions. Checkboxes will appear next to every job, allowing multiple job selection, and the Multiple Job Actions menu will be displayed.
|
Notes: By default, multiple job actions are disabled and the menu contains only the
Enable Multiple Job Actions option. By selecting this option, multiple job actions become enabled, which has two effects: The menu now contains more options (with various actions that can be applied to several jobs at once), and in the job list, a checkbox is shown in front of each listed job. Check those jobs that you want to manipulate, then select the desired option from the
Multiple Job Actions menu. This action will then be applied to all selected jobs. For the administrator, the multiple job actions are always enabled and can not be disabled.
The Report menu lets you create a new report, view any existing reports, and open the Delivered Jobs Statistics and Delivered Recipients Statistics reports. The options available vary depending on where you are in the application and what function you are performing. The possible options are:
|
•
|
New Report – Create a new tracking statistic report.
|
|
•
|
Reports – Display the list of currently available tracking statistics reports.
|
The Recipient Warehouse menu lets you create new and manage datasets, lookup tables, and target groups. You can also edit the bounce process settings for the warehouse. The options available vary depending on where you are in the application and what function you are performing. The possible options are:
|
•
|
New Dataset – Create a new recipient dataset.
|
|
•
|
Datasets – Display a list of currently available recipient datasets.
|
|
•
|
Datasets & Lookup Tables – Display the administrator’s page for recipient datasets and lookup tables.
|
|
•
|
New Lookup Table – Create a new lookup table.
|
|
•
|
Lookup Tables – Display the list of currently available lookup tables.
|
|
•
|
New Recipient Target Group – Create a new target group using one of the following options:
|
|
•
|
Based on Dataset – Create a new target group that is based on a recipient dataset.
|
|
•
|
Based on Database Access by LISTSERV Maestro – Create a new target group based on a database accessed by LISTSERV Maestro.
|
|
•
|
Based on Database Access by LISTSERV – Create a new target group based on a database accessed by LISTSERV.
|
|
•
|
Target Groups – Display the list of currently available target groups.
|
|
•
|
Bounce Processing – Define the bounce processing strategy for the Recipient Warehouse.
|
The Utility menu lets you create new and manage drop-in content and sender profiles; plus, it lets you change your account password. The options available vary depending on where you are in the application and what function you are performing. The possible options are:
|
•
|
Upload Template – Create a new content template by uploading a content template definition file (ZIP-file).
|
|
•
|
Drop-Ins – Display the list of currently available drop-ins.
|
The Dashboard menu lets you create new and manage the configuration of your Dashboard(s). This menu is only available from the Dashboard screen. The available options are:
|
•
|
Switch Dashboard – Show the list of available Dashboards. From this list, select which one will be displayed as the current Dashboard in the current session. Once selected, that particular Dashboard will be displayed.
|
|
•
|
Hide/Show Default Sections – Hide or show any of the default Dashboard sections (applies only to the currently selected Dashboard).
|
|
•
|
Create New Dashboard – Create a new Dashboard with all default sections, in default order, without any Dashboard reports.
|
The Dataset menu lets you manage the datasets, categories, and members. The options available vary depending on where you are in the application and what function you are performing. The possible options are:
|
•
|
Edit Category – Edit the settings of the category that is currently selected in the dataset tree.
|
|
•
|
Create – Create hosted lists and categories using one of the following options:
|
|
•
|
Create Category – Create a new category (either in the currently selected category or in the root of the dataset tree).
|
|
•
|
Convert or Clone Standard LISTSERV List – Covert an existing, non-hosted LISTSERV list into a Hosted LISTSERV List or creates a Hosted LISTSERV List as a clone of an existing non-hosted LISTSERV list without changing the original list.
|
|
•
|
Member Import – Add, update, or delete members in the dataset by uploading or importing a file.
|
|
•
|
Import Members Now – Open the Import Members wizard where you can define which members to import at this moment.
|
|
•
|
Refresh and Manage Linked LISTSERV Lists – Define which of the non-hosted LISTSERV lists at the LISTSERV server to include in the dataset as Linked LISTSERV Lists. This option will also refresh the settings of the already linked LISTSERV lists by reading their current settings (as defined in the list headers) from LISTSERV so that LISTSERV Maestro will be aware of any changes to the lists.
|
|
•
|
Tree Structure – Manage operations in a dataset tree using one of the following options:
|
|
•
|
Cut – Cut the selected category from the dataset tree in preparation for a Cut & Paste operation (more precisely, the node will be marked as “cut”, but it will only be removed from its current parent node once you select Paste in another node).
|
|
•
|
Copy (Categories Only) – Copy the selected category (and its subcategories) in the dataset tree in preparation for a Copy & Paste operation (more precisely, the category will be marked as “copied”, but it will only be created once you select Paste in another node).
|
Note: Any hosted lists in the category or sub category will not be copied.
|
•
|
Paste – Paste a node into the currently selected node or root of the dataset tree. The node to paste must have been marked for “cut” or “copy” (see the Cut and Copy options above).
|
|
•
|
Clear Cut/Copy State – Clear the current “cut” or “copy” state and unmarks the node that was to be “cut” or “copied” (see the Cut and Copy options above).
|
|
•
|
Delete Dataset – Delete the dataset, including all members and lists contained within it.
|
|
•
|
Delete Category – Delete the category that is currently selected in the dataset tree.
|
The Hosted List menu contains options that are related to the hosted list currently selected in the dataset tree. The options available vary depending on where you are in the application and what function you are performing. The possible options are:
|
•
|
Subscriber Import – Add, update, and delete subscribers in the hosted list by uploading or importing a file.
|
|
•
|
Import Subscribers Now – Open the Import Subscribers wizard where you can define which subscribers to import at this moment.
|
|
•
|
Delete List – Delete the hosted list with all subscribers.
|
The Linked LISTSERV List menu contains options that are related to the Linked LISTSERV List currently selected in the dataset tree. The options available vary depending on where you are in the application and what function you are performing. The possible options are:
|
•
|
List Configuration – Open the corresponding LISTSERV Web Interface page for management of the selected Linked LISTSERV List.
|
|
•
|
Convert To or Clone As Hosted List – Convert the selected Linked LISTSERV List into a Hosted LISTSERV List or clone a Hosted LISTSERV List from it (cloning will not change the original Linked LISTSERV List).
|
|
•
|
Remove Link to LISTSERV List – Remove the link to this LISTSERV List (removes the Linked LISTSERV List node from the dataset tree and the actual list at LISTSERV will remain the unchanged).
|
The Lookup Table menu contain options for the currently selected lookup table. The possible options are:
|
•
|
Lookup Table Settings – Edit general lookup table settings (name, description, encoding, secondary columns).
|
|
•
|
View References – View the dataset and hosted list profile fields that reference the lookup table.
|
|
•
|
Delete All Entries – Delete all entries from the lookup table (but not the lookup table itself).
|
The LISTSERV menu takes you to specific areas in the LISTSERV Web Interface. The options available vary depending on where you are in the application and what function you are performing. The possible options are:
|
•
|
Server Reports – Contains options for reports in the LISTSERV Web Interface.
|
The Back To menu is a quick way to return to the previous screen or to one of the recently visited screens. The possible options are:
The Preferences menu contains options for defining various user preferences. The possible options are:
|
•
|
User Interface – Contains options for defining preferences for the User Interface.
|
|
•
|
Display – Define the display preferences for the User Interface.
|
|
•
|
Mail Jobs – Contains options for defining job-related preferences.
|
|
•
|
New Mail Job – Define the preferences for a new job, including the team collaboration preferences.
|
|
•
|
Recipients – Define the preferences for the recipient definition of a job.
|
|
•
|
Content – Define the preferences for the content definition of a job.
|
|
•
|
Tracking – Define the preferences for the tracking definition of a job.
|
|
•
|
Delivery Test – Define the preferences for the delivery test of a job.
|
|
•
|
Scheduling – Define the preferences for the schedule definition of a job.
|
|
•
|
Reports – Contains options for defining preferences for reports.
|
|
•
|
New Report – Define the general tracking report preferences.
|
|
•
|
Datasets – Contains options for defining preferences for datasets.
|
|
•
|
Team Collaboration – Define preferences for the team collaboration settings of a recipient dataset.
|
The Logout menu logs you out of the LISTSERV Maestro Interface. For a user account that is not part of an identity, then this menu appears as a single item, which, if you click on it, allows you to log out from LISTSERV Maestro. For a user account that is part of an identity, then this menu has the following options:
|
•
|
Switch Account – Switch to a different account in the same identity (without the need to logout and login again).
|
The Help icon is used to access the help associated with the current screen.
The behavior of the Dataset menu on the Toolbar has been updated to accommodate those who may need to access this menu while working with lists. Because of this, there are several changes to the Toolbar:
|
•
|
As soon as you select a dataset, the Dataset menu is displayed. This menu remains visible the entire time the dataset is selected. Therefore, if you select one of the Hosted Recipient List (HRL), Hosted LISTSERV List (HLL), or Linked LISTSERV List (LLL) nodes in the dataset tree, then the Dataset menu is still displayed.
|
|
•
|
If you select a category node (folder) in the dataset tree, then, as before, only the Dataset menu is visible. However, previously, this Dataset menu only showed the category/folder related menu items. This behavior has been changed. If a category is selected, then the Dataset menu now continues to show the full set of dataset related menu items, and the category specific items are shown in addition to the other menu items.
|
|
•
|
In the Hosted List menu, the following menu items have been removed, as they were duplicates of menu items that already exist in the Dataset menu (they are no longer required in the Hosted List menu because the Dataset menu is now always visible):
|
|
•
|
Similarly, in the Linked LISTSERV List menu, the following duplicate menu items have been removed:
|
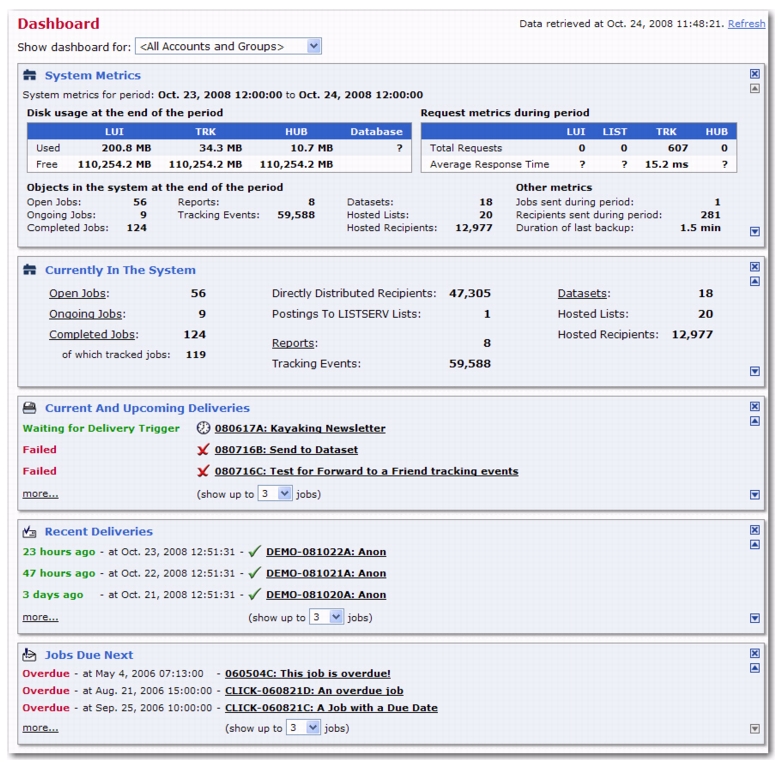
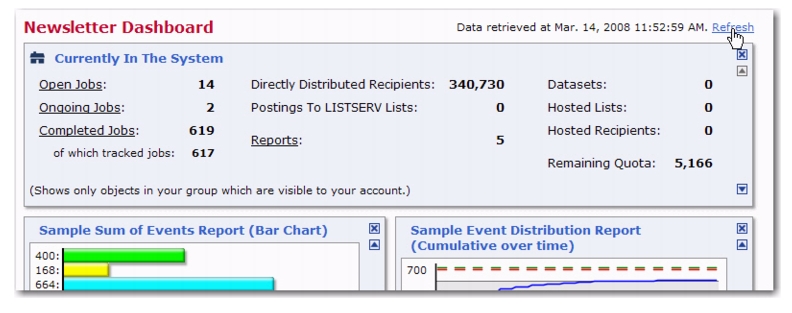
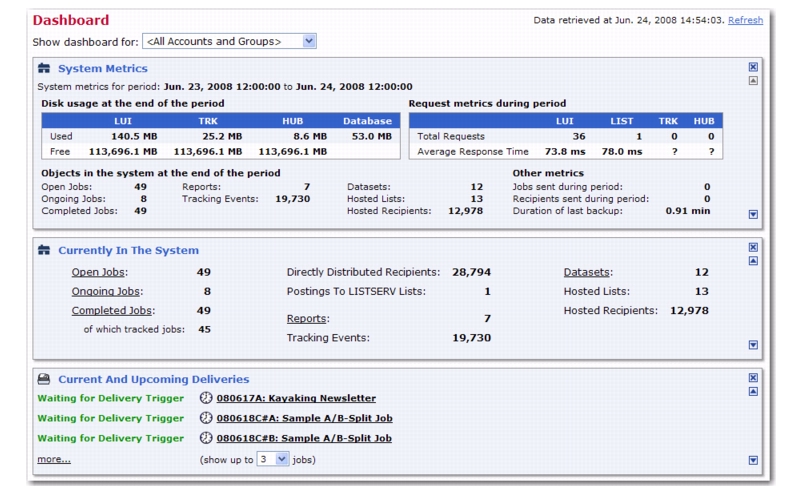
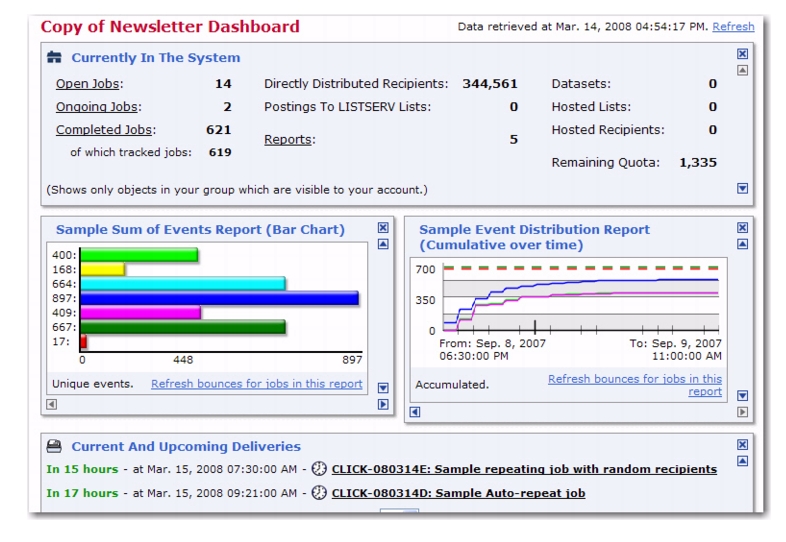
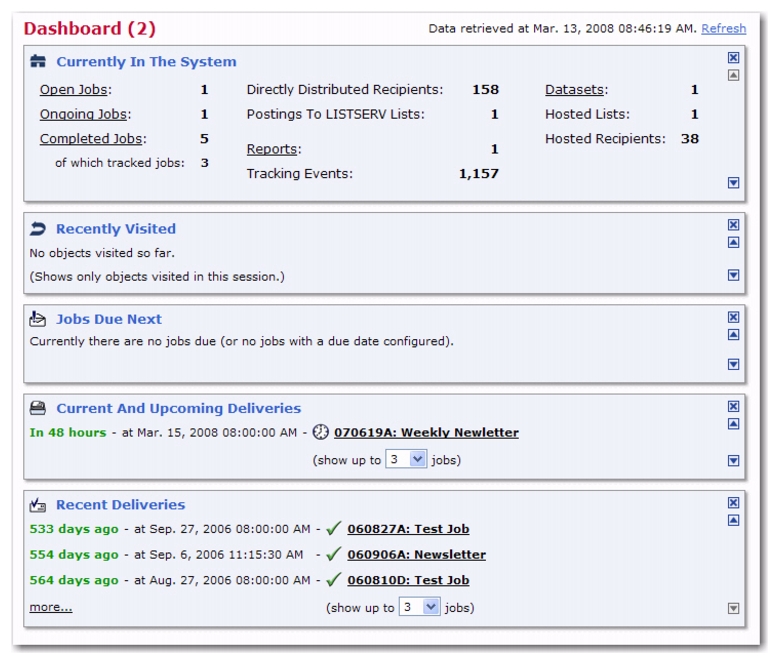
The opening screen of LISTSERV Maestro’s interface is called the Dashboard, providing a quick summary of what has happened recently and what is due to happen in the future.
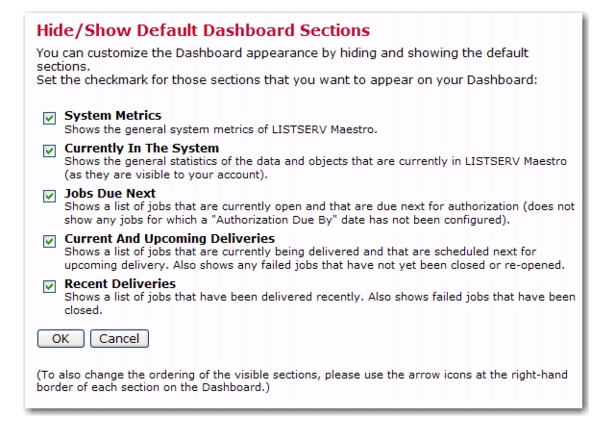
The Dashboard contains five sections that may be displayed, hidden, or rearranged. This allows for a convenient and easy way to customize the information shown, making it possible for you to see what is most important to you. The Dashboard sections are:
|
•
|
System Metrics – This section gives you a complete overview of every group and account for a specific period of time.
|
|
•
|
Currently in the System – This section contains the general statistics for your account, such as jobs in progress, number of jobs completed, etc.
|
|
•
|
Jobs Due Next – This section contains a list of jobs that are currently open and that are due next for authorization. This section does not show any jobs that have a “Authorize Due By” date configured.
|
|
•
|
Current and Upcoming Deliveries – This section contains a list of jobs that are currently being delivered and that are scheduled for an upcoming delivery. From this section, you can also view any failed jobs that have yet to be closed or re-opened.
|
|
•
|
Recent Deliveries – This section contains a list of jobs that have been recently delivered and jobs that have attempted delivery but failed.
|
Note: The administrator has the option to show a summary of all user accounts, certain user accounts, or just your user account on the Dashboard.
In LISTSERV Maestro, you can have several independent Dashboard configurations. Each Dashboard can contain its own unique set of default sections and/or reports. These sections can be easily rearranged and added so that the most important information appears at the top. For example, perhaps you are interested in seeing an overview of all jobs and subscriptions; maybe you want to focus on a particular category of jobs; or perhaps you would like to monitor the activities related to a particular dataset or even a single list. With the LISTSERV Maestro Dashboard, all of this is possible. In fact, you can even add reports to the Dashboard, giving you immediate access to your most important report statistics.
To update the data displayed on the Dashboard, click the Refresh link. The date and time of the data being viewed is shown next to this link.
Note: The Refresh link does not update the data for any Dashboard reports. Dashboard reports will automatically update their data in regular intervals.
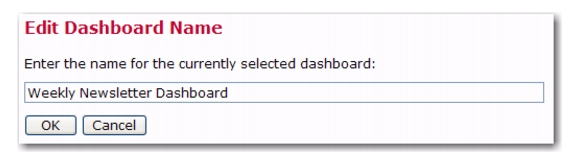
To edit the name of the Dashboard currently being displayed, click on the Dashboard menu, and then select
Edit Dashboard Name. The Edit Dashboard Name screen opens. Enter the new name for the Dashboard and click
[OK].
When using the LISTSERV Maestro Dashboard, you’ll notice that it is divided into multiple sections that can be re-organized quite easily. For instance, you can move any section up or down in order of importance, hide sections that don’t interest you, and show only those that do. Changes to the Dashboard are constant from session to session, which means that any rearranging you do or reports that you add will be available each time you log in.
Each Dashboard section can be hidden or moved. The “x” box in the top right corner of each section will hide that particular section. The up and down arrows in the top and bottom right corners will cause the section to trade places with the section above or below it.
In addition, to display or hide a section, you can click on the Dashboard menu, and then select
Hide/Show Default Sections. The Hide/Show Dashboard Sections screen opens.
Note: Additional settings concerning this feature are available in the Administration HUB. For details, see Section 5.1
Application Settings.
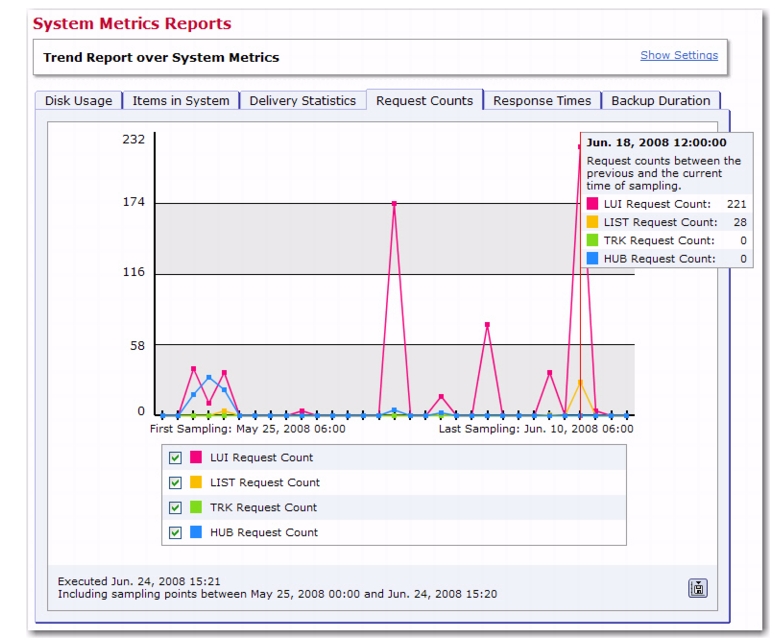
Your system metrics can also be shown in a set of reports that show trends in how your system is running. Similar to other LISTSERV Maestro reports, you can drill-down into specific events on these reports to see detailed information, and you can also run them for the immediate past or for a fixed period of time.
To run a system metrics report, click on the Reports menu and select
System Metrics. The System Metrics report opens with several tabs. Each tab contains a different report pertaining to a specific type of data.
To add a specific System Metrics report to the Dashboard, click on the Report menu and select
Add Report to Dashboard. This will only add the report that was being viewed (i.e. the report on the Request Counts tab); it does not add the entire set of reports. You can add up to 20 reports on the Dashboard; therefore, if you’d like to add other System Metric reports, simply click on their tab and then add it to the Dashboard.
If you click on the report on the Dashboard, the entire set of System Metrics reports will open. If you make any changes to the report that was on the Dashboard, then the
Apply Settings to Report on Dashboard option will be available on the
Report menu. However, if you go to the System Metrics report by selecting it from the
Report menu, and click on the tab to view that same report, then this option will not appear since this is a different version than the one on the Dashboard. If you’d like to add another version of that report to the Dashboard, then simply add it to the Dashboard using the
Add Report to Dashboard option.
Note: The
Apply Settings to Report on Dashboard option will only appear for that specific report that was on the Dashboard. For instance, if you added the Request Counts report to the Dashboard, then that is the only report/tab in the set of System Metrics reports that will have this option available.
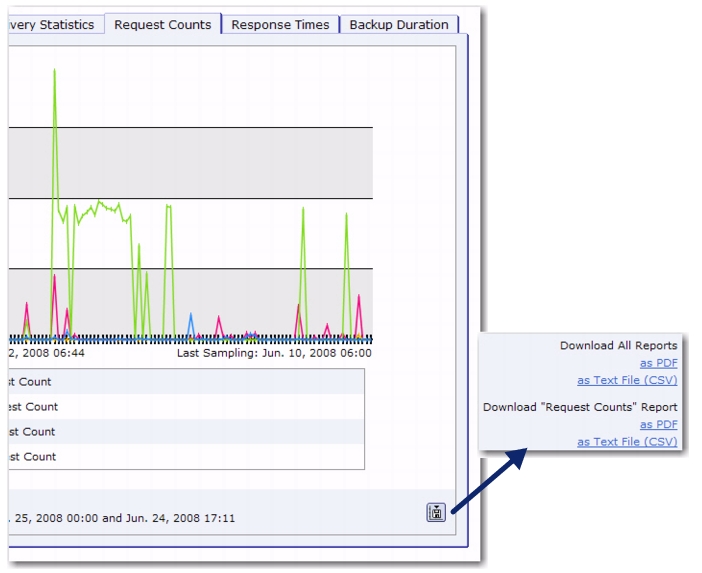
To download the entire set of reports, click on the Download icon from any tab. A pop-up menu appears with options to download all reports
as PDF or
as Text File (CSV).
To download a specific report, go to that tab, and then click on the Download icon. A pop-up menu appears with an option to download that specific report
as PDF or
as Text File (CSV).
|
•
|
Download as PDF – The report will be downloaded in the form of a PDF file for easy distribution or printing.
|
|
•
|
Download as Text File (CSV) – The report will downloaded in the form of a ZIP-file that contains the current report in the form of a text file with comma separated values (a CSV-file), plus an additional readme.txt file with details about the report. This CSV-data can be imported into 3rd party tools (such as Excel) for further analysis.
|
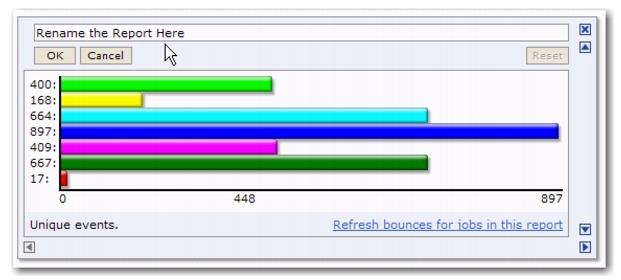
Dashboard reports are for users who want immediate access to key email reports and statistics at a single glance, helping you make better decisions for any future email communication initiatives. Once a report is placed on the Dashboard, you can drill down to problem areas, share success stories and best practices with your team, and quickly adjust your email campaigns. In addition, with one click, you have full access to the report for closer inspection.
LISTSERV Maestro gives you the ability to add up to 20 reports to the Dashboard. Each report is displayed in its own section, showing a "miniaturized" version of the report, and each report is automatically updated when new data is available.
Click [OK] to add the report. If you want to view the added report on the Dashboard, click the
Back To menu, and then select
Dashboard. The report section will be located at the bottom of the Dashboard.
To move the report, you can use the up and down arrows. If you add another report to the Dashboard and move it up to the location directly below the first report, then the two reports will be displayed side by side. Left/right arrows are displayed for each report, giving you the ability to move the reports left and right. If you move the report up or down, each report will be on a line by itself and these new arrows will no longer be available.
To view the full report with all details on its own screen, click on the report. Once you have opened the Dashboard report, you can change the view settings; however, these changes are only temporary and only apply to the current report details. To apply these changes to the report on the Dashboard as well, click on the
Report menu, and then select
Apply Settings to Report on Dashboard.
Click [OK] to confirm the deletion of the current Dashboard.
Users can define and configure several Dashboards, each with a unique collection of standard sections and reports. Once these Dashboards are created, a user can easily switch back and forth between these Dashboards.
After customizing the Dashboard, you can create a new Dashboard based on your changes. To do so, click on the
Dashboard menu and select
Copy Current Dashboard. The copied Dashboard is displayed.
To rename the Dashboard, simply use the Edit Dashboard Name option on the
Dashboard menu. For details, see Section 8.2.1.2
Editing the Dashboard’s Name.
To create a brand new Dashboard from scratch, click the Dashboard menu and select
Create New Dashboard. The new Dashboard is displayed with the default sections.
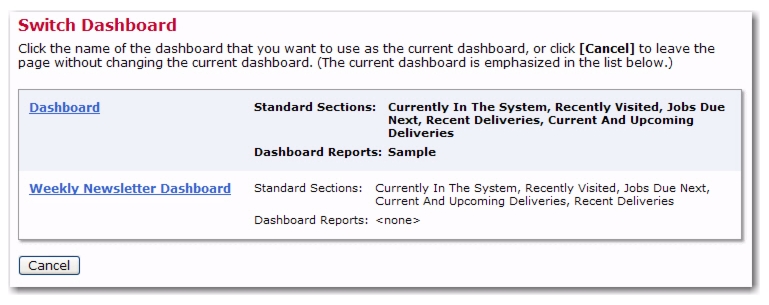
If you have more than one Dashboard and would like to display a different Dashboard other than the one currently displayed, then you can simply click on the
Dashboard menu and select
Switch Dashboards. The Switch Dashboard screen opens.
From this screen, select the Dashboard you want to use in your current LISTSERV Maestro session. The currently selected Dashboard is emphasized in the list of available Dashboards. To select a different Dashboard, simply click on the name of the Dashboard.
Note: The choice you make here will only apply to the current session. This means that any parallel sessions that you may have open in other LISTSERV Maestro windows can have their own current Dashboard displayed.
The job list on the Open Jobs, Ongoing Jobs, or Completed Jobs screens are displayed slightly different for the administrator. At the top of the screen, are two drop-down menus that let you view the list with jobs owned by a specific user and/or with jobs belonging to a specific category. The administrator can also choose to view all jobs/categories or jobs with no owner/category. The job list is refreshed according to the choices made in the drop-down menus. Each job is listed with its Job ID, Job Title, Category, Owner, Mail Type (plain or HTML), and "Authorization Due By" date.
Also, for the administrator the Multiple Job Actions feature is always enabled and can not be disabled.
Below the category selection box appears the Advanced Filter Settings link, which will take you to the Advanced Filter Settings screen that allows you to further define filters that are applied for the job list below (in addition to the filtering over the selected category).
If advanced filtering is enabled, then the control says "Filters are active: See detailed settings below". In this case, the currently defined filter will be applied and the job list below will show only jobs that fulfill the filtering condition (and are in the correct selected category).
In addition, the job list will display an additional filter row (with light-yellow background, just below the table header) that displays each filter in short form, as a reminder. For each column in the table, if a filter has been defined for that column, then the filter is displayed in the filter field below that column's header. If no filter is defined for a column, then the filter field of that column will be empty.
To save server space and shorten jobs listings within the Maestro User interface, administrators can archive delivered jobs and jobs that have been closed after a failed delivery. Archiving a delivered or failed job removes the job from the system and saves it in a single ZIP archive file stored in a special archive folder on the system. Archived jobs cannot be viewed because all their tracking events are deleted and they are removed from any report data sources. As a result, any existing reports referencing them in their data sources will not display correctly.
The default archive folder of a LISTERV Maestro installation on Windows is located along a path similar to:
\Program Files\L-Soft\Application Server\lui\archive. On UNIX/Linux, the default archive folder is
~/lui/archive. Although archived jobs are saved as ZIP files, little space will be saved because the archive folder exists on the same server or disk as the application. To save disk space, they can be moved from the server or disk where LISTSERV Maestro is installed. This can be done two different ways.
The first way is to change the default archive folder in the Administration Hub to point to a folder that is located on a different disk. The disk could be another disk on the same server, a mapped network drive (Windows), or a mounted NFS drive (UNIX/Linux) available on another server. By setting a different default folder for saving archived jobs within the Administration Hub, the list of archived jobs displayed on the Archived Jobs screen remains intact. All archived jobs in the folder will display in this list and can be imported back into LISTSERV Maestro if necessary. To change the default archive folder, see Section 5
Settings for the Maestro User Interface.
The second way to move archived jobs from the disk or server where LISTSERV Maestro is located is to do so manually. Open the default archive folder. All archive files are ZIP files and have the job ID in the file name. Select the files and move them to a secondary storage medium such as different disk, a tape, a CD-ROM or similar. Once the file has been removed from the default archive folder it will not appear in the list of archived files. Files removed from the archive folder can be moved back in it at any time, and then will appear in the list of archived files. Once listed, the files will be available to import back into LISTSERV Maestro.
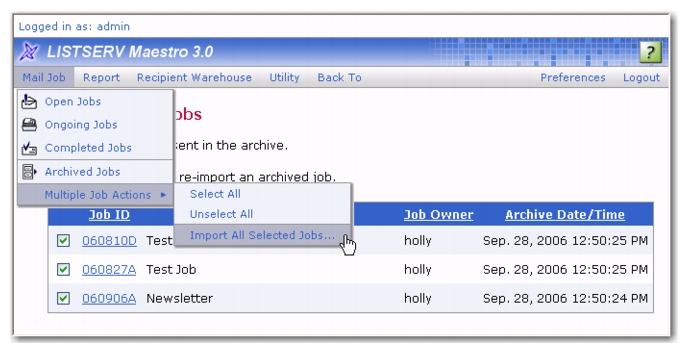
There are two ways to archive a delivered or failed job. Click on Mail Job >
Completed Jobs from the Toolbar for administrative user account. The Completed Jobs screen opens listing all the previously delivered jobs. Then, either:
|
•
|
Check the box next to each job ID that you want to archive, and then click Mail Job > Multiple Job Actions > Move All Selected Jobs to Archive. The Move Selected Jobs to Archive screen opens. Click the [Move to Archive] button. Click the [Cancel] button to cancel the operation and return to the Completed Jobs screen. By using this method of archiving, you can archive more than one job at a time.
|
LISTSERV Maestro now gives you the ability to automatically archive completed jobs that are older than a certain age. To define the default settings for auto-archiving, click on the
Global Component Settings icon, then
Maestro User Interface, and finally
Default Auto-Archive Settings. The Auto-Archive Settings screen opens.
From this screen, define whether or not jobs will be automatically archived when the completed job reaches the “auto-archive age”. In the
Auto-Archive Age field, enter the number of days old the completed job must be before it is automatically archived. If the age is set to 0, then the auto-archive setting is off. The age defined here will be the default for all accounts and groups. To define these settings for a specific user, see Section 7.3
Managing User Rights or Section 7.4.2
Editing Component Specific Settings for Single and Group Users.
Imported archived jobs are in a “frozen” state. The status and the contents of the job will not change from the moment it was placed in the archive. Any tracking events that arrive after the moment the job is archived will be discarded, even if the job is later imported.
To restore an archived job to the system, click Mail Jobs>
Archived Jobs. The Archived Jobs screen opens with a listing of all the jobs currently present in the archive. From this screen, you can:
|
•
|
Click on the Job ID link to select the job to be imported. Click [OK] to import the selected archived job. The Job Administration screen opens. Use the drop-down menu to select an owner for the imported archived job, and then click [OK]. Once restored, an imported job will be listed again in the Completed Jobs screen with its original Date and Time of Delivery (not the archived date). The job owner (and other group members, if applicable) can use imported archived jobs in tracking reports.
|
|
•
|
Check the box next to all the jobs you want to import, and then click Mail Job > Multiple Job Actions > Import All Selected Jobs. Click [OK] to import the selected archived jobs. By using this method of importing, you can import more than one job at a time. Imported jobs will have to be assigned a new Job Owner. From the Completed Jobs screen, display jobs with <No Owner>. Check the box next to the job(s) you want to assign a new owner to, and then click Mail Job > Multiple Job Actions > Change Owner of All Selected Jobs. From the Job Administration screen, use the drop-down menu to select an owner, and then click [OK]. Once restored, an imported job will be listed again in Completed Jobs screen with its original Date and Time of Delivery (not the archived date). The job owner (and other group members if applicable) can use imported archived jobs in tracking reports.
|
The user that initially creates a new job or report is the owner of that job or report. The owner is the only user with privileges (rights) to execute the following job or report related actions:
No other user can be granted owner rights within the same email job. Therefore, it is important that there is an owner for each job and each report because only the owner can execute these actions.
Under normal conditions, there will always be an owner because the initial creator will automatically become the owner. However, under certain circumstances, a job may lose its owner:
To reassign a job, go to the appropriate screen that would list that job. Click Mail Job >
Open Jobs to open the Open Jobs screen for a listing of all the current jobs that have not been authorized for delivery yet; click
Mail Job >
Ongoing Jobs to open the Ongoing Jobs screen for a listing all the jobs that have been authorized for delivery; click
Mail Job >
Completed Jobs to open the Completed Jobs screen for a listing all the jobs that have already been delivered.
To reassign a report, click Report >
Reports to open the Tracking Reports screen for a listing of all the currently defined reports.
If you want to view a job owned by a specific user, click the Display the jobs owned by drop-down menu and select that particular owner. Then, you can:
|
•
|
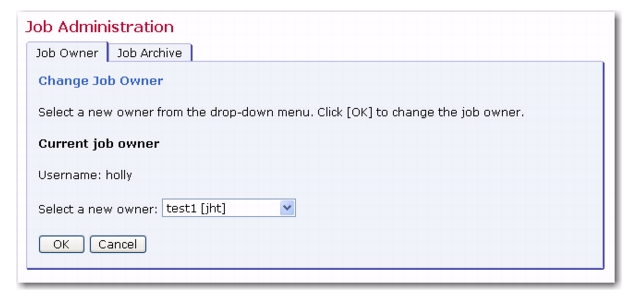
Click on the Job ID link to select the job. The Job Administration screen opens. Click on the Job Owner tab (if necessary). Select a new owner for the job from the drop-down menu. Click [OK] to save the change, or [Cancel] to discard the change and return to the previous screen.
|
If you’ve clicked Report >
Reports, then the Tracking Reports screen opens with a listing of all the currently defined reports. If you want to view a report owned by a specific user, click the drop-down menu and select that particular owner. Then, you can:
|
•
|
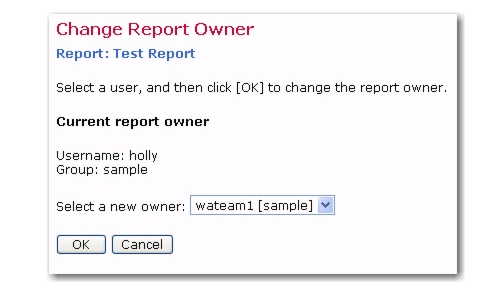
Check the box next to all of the reports you want to reassign, and then click the Actions link. Select Change owner of all selected reports, and then use the drop-down menu to select an owner for the report(s). Click [OK] to save the change, or [Cancel] to discard the change and return to the previous screen. To delete more than one report or job at a time, simply check the box next to all of the reports/jobs that you want to delete, and then click the Actions link. Select Delete all selected reports/jobs, and then click [OK]. Click [Cancel] to discard the deletion and return to the previous screen.
|
|
•
|
Account name is changed; account not in a group – The account retains ownership of all jobs and reports. The account remains the owner of all previous jobs and reports. Since the account is not a member of a group, neither before nor after the change, team collaboration rights on the jobs and reports are not affected.
|
|
•
|
Account name is changed; account member of a group – The account retains ownership of all jobs and reports and the jobs and reports remain in the same group. The account retains ownership of all previous jobs and reports. The team collaboration rights on the jobs and reports are not affected. All members in the same group that had any job or report privileges before the change have the same privileges after the change.
|
|
•
|
Group is added to a non-group account – The account retains ownership of all jobs and reports and transfers them to the new group. The account remains owner of all previous jobs and reports. Since the account was not a member of a group before the change, no team collaboration rights on the jobs and reports are affected. However, after the change, since the account is now a member of a group, the owner of the account can assign team collaboration rights on any of the jobs or reports to any of the other members in the group.
|
|
•
|
Group is removed from a group account – The account loses ownership of all jobs and reports. Jobs and reports remain in the old group. All previous account privileges for any jobs or reports are removed. This means that the account loses all team collaboration rights on all jobs and reports that are owned by other members of the account’s old group. The account also loses ownership of all jobs and reports that the user of the account created while the account was still a member of the old group. The team collaboration rights of other members of the old group are unaffected. However, these jobs no longer have an owner, since the old owner left the group. The administrator should set a new owner at this point.
|
|
•
|
Group account becomes member of different group – The account loses ownership of all jobs and reports. Jobs and reports remain in the old group. All previous account privileges for any jobs or reports are removed. This means that the account loses all team collaboration rights on all jobs and reports that are owned by other members of the account’s old group. The account also loses ownership of all jobs and reports that the user of the account created while the account was still a member of the old group. As a result, the account joins the new group as a “fresh” member, without any team collaboration or job or report ownership rights. The jobs and reports that were created by the user of the account while still in the old group remain in the old group. The team collaboration rights that other members of the old group may have on those jobs and reports are unaffected. However, these jobs no longer have an owner, since the old owner left the group. The administrator needs to set a new owner at this point.
|
If the item is created by a user that is a member of a group, then this item is owned by the group, i.e. all accounts in the group can use this item, and all accounts with the necessary right to create items of that type can also modify or delete it.
|
•
|
If an item is owned by a group and the group is deleted with the Keep data owned by the group and its accounts option selected, or the last account of that group is deleted with the Keep data owned by the account or group option selected, or the last account of that group is moved out of the group (into another group or made into an account without a group).
|
The ownership of any item, whether it already has an owner or not, can be changed by the administrator using the special Administrator User Account. The administrator can also delete any item.
To change ownership for or delete a drop-in, select Utility >
Drop-Ins. The Manage Drop-In Content Elements screen opens.
To change ownership for or delete a content template, select Utility >
Content Templates. The Manage Content Templates screen opens.
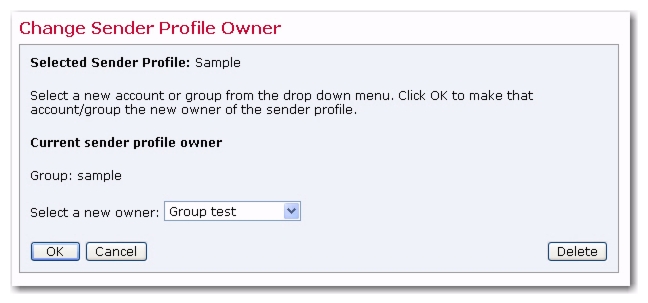
To change ownership for or delete a sender profile, select Utility >
Sender Profiles. The Manage Sender Profiles screen opens.
At the top of the screen, there is a drop-down menu with all available owners, e.g. all available non-group accounts and all available groups, as well as a special “<No Owner>” entry. From this drop-down menu, select the owner you’d like to view.
Click on an item to change the ownership or delete. The Change Owner screen opens. Select a new owner from the drop-down menu. Click
[OK] to save the change, or
[Cancel] to discard the change and return to the previous screen. To delete, click the
[Delete] button.
If an item is moved to a new owner, and the new owner already has an item with the same name, then the moved item is automatically renamed to give it a unique name. For example, if an item named “sample” is moved to an owner who already has an item with that name, the moved item is renamed “sample1”. If “sample1” is also in use, the moved item will be renamed “sample2”, and so on until a unique name is created.
|
•
|
Group is added to a non-group account
Ownership of all items previously owned by the account is transferred to the group that the account joins. All members in that group will then share ownership of these items. The account also gains ownership of all items that previously existed in the group it joins.
|
|
•
|
Group is removed from a group account
Since the group owns the items, the account loses access to them. They stay in the old group. The account that no longer belongs to a group does not have ownership of any items until new ones are created with this account.
|
|
•
|
Recipient warehouse owned by a group: Each group owns its group’s recipient warehouse with all its datasets, hosted lists and lookup tables. All member in the group (provided they own the necessary user right) may use the objects in this recipient warehouse. Any dataset, hosted list or lookup table which is created by any user in the group will be part of this one group-owned recipient warehouse.
|
The ownership of a recipient warehouse, no matter if it still has an owner or not, can be manipulated by the administrator. This means that the administrator can assign a recipient warehouse to a new owner (even if the recipient warehouse still has an owner). However, the administrator can only assign the whole recipient warehouse to a new owner, not the individual datasets, target groups, hosted lists, or lookup tables in it. In reality, the recipient warehouse is not truly assigned to a new owner, but simply the objects in it are moved from the recipient warehouse of the old owner to the recipient warehouse of the new owner. This means that the old owner (if still existing) remains the owner of their own recipient warehouse (only it is now empty), and the moved objects are simply added to the already existing recipient warehouse of the new owner.
|
•
|
Delete the whole recipient warehouse: Actually, this does not really delete the recipient warehouse, but it simply deletes all datasets, target groups, hosted lists, and lookup tables in it, i.e. the recipient warehouse remains, but is now empty.
|
|
•
|
Delete a lookup table: This deletes only the selected lookup table. However, a lookup table can only be deleted in this fashion if it is not currently used by any dataset or hosted list.
|
If the objects in a recipient warehouse are moved to a new owner, and the recipient warehouse of the new owner already contains objects, and an object with the same name as one of the moved objects already exists in the recipient warehouse of the new owner, then the moved object is renamed to give it a unique name. For example, an object called “sample” is renamed to “sample1”, unless this name is also already in use, in which case it is renamed to “sample2”, etc.
|
•
|
Group is added to a non-group account
All objects in the recipient warehouse previously owned by the account are transferred to the recipient warehouse of the group that the account joins. Thus, all members in that group will then share ownership of these new objects in their recipient warehouse. The account also gains access to the group recipient warehouse and all objects in it (i.e. both the ones that were already there and the ones that moved with him). The previous (now empty) recipient warehouse of the account is discarded as it is no longer needed.
|
|
•
|
Group is removed from a group account
Since the recipient warehouse is owned by the group, the account loses access to it. Instead, the account gets his own new recipient warehouse only that it is initially empty. Thus, the account which now no longer belongs to the group does not have ownership of any objects, until new ones are created with this account.
|
As with sender profiles, content templates, and drop-ins, target groups may have either single user or group ownership. Single user target groups are owned by an individual user, and may not be used by anyone else. If a group member creates items, they may be used and modified by other users within the group who have the necessary rights.
|
•
|
If an item is owned by a group and the group is deleted with the Keep data owned by the group and its accounts option selected, or the last account of that group is deleted with the Keep data owned by the account or group option selected, or the last account of that group is moved out of the group (into another group or made into an account without a group).
|
The ownership of any item, whether it already has an owner or not, can be changed by the administrator using the special Administrator User Account. The administrator can also delete any item.
Click [OK] to save the change, or
[Cancel] to discard the change and return to the previous screen.
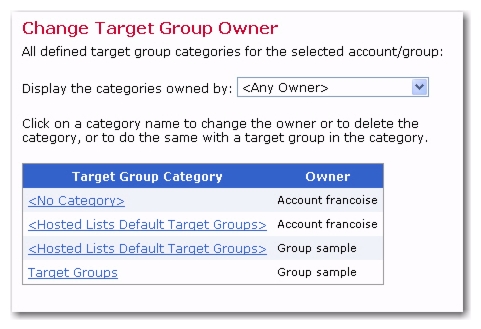
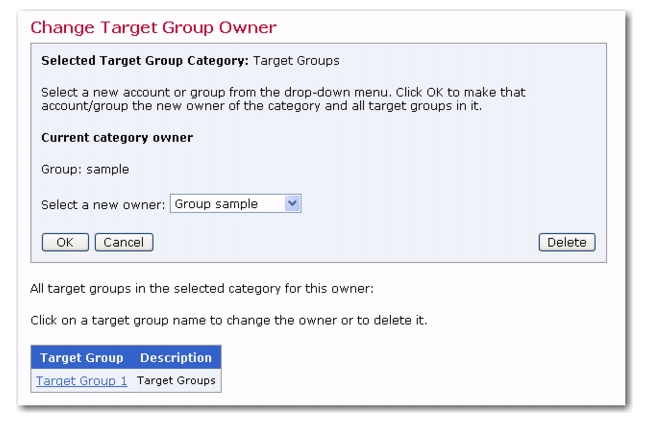
Notes: To delete a target group category, click the
[Delete] button. If you delete the category, then all target groups within that category will also be deleted. If you change the owner of a category, then all target groups within that category will automatically change to the new owner as well. The <No Category> target group category cannot be deleted or moved to a different owner because it exists in the scope of all owners.
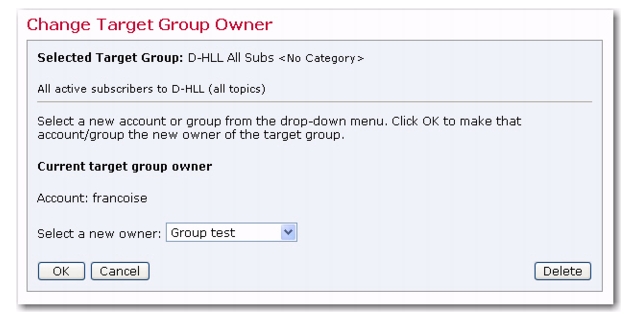
To change the ownership of an individual target group, click the target group name in the list at the bottom of the Change Target Group Owner screen. The next Change Target Group Owner screen opens. From this screen, select the new owner from the drop-down menu. Click
[OK] to save the change, or
[Cancel] to discard the change and return to the previous screen.
The target group will be moved to the new owner. If the target group was within a category, and a category with the same name already exists in the scope of the new owner, then the target group will appear in it. If the new owner does not have a category with the same name, then one will be automatically created so that the target group can be moved into it. If the new owner already has a target group with the same name within the category, the new target group will automatically be renamed. The following renaming scheme will be used: If the original name was "sample", and a target group with this name already exists, then the new name will be "sample1". If this name also is in use, "sample2" will be used, and so on.
Note: To delete an individual target group, click the
[Delete] button.
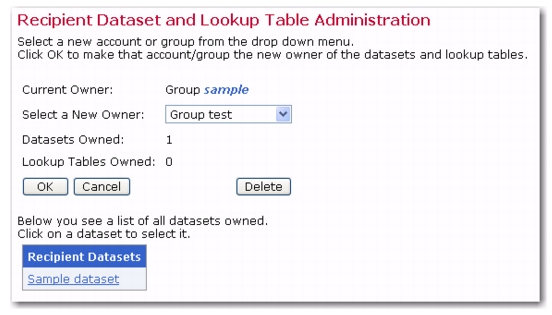
To change the ownership of a Recipient Dataset, click Recipient Warehouse >
Datasets & Lookup Tables. The Recipient Datasets and Lookup Table Administration screen opens.
Select a new owner from the drop-down menu. Click [OK] to save the change, or
[Cancel] to discard the change and return to the previous screen.
Note: To delete a Recipient Dataset, click the
[Delete] button.
Lookup tables are listed with their name and a short list of references (how many fields of how many datasets or mailing lists use the lookup table). For lookup tables without any references, the name is clickable. Click to open the Lookup Table Administration screen for that lookup table (for lookup tables that have at least one reference, no further administration is possible; therefore, their names are not clickable). From the administration screen, view the name of the Lookup Table, a description of the table, and the current owner of the table. From here, it is also possible to
[Delete] the Lookup Table. Click
[Cancel] to return to the previous screen.
Note: It is
not possible to re-assign individual datasets or lookup tables. When you choose to re-assign a specific owner’s datasets and lookup tables, then you are re-assigning that owner’s entire Recipient Warehouse.
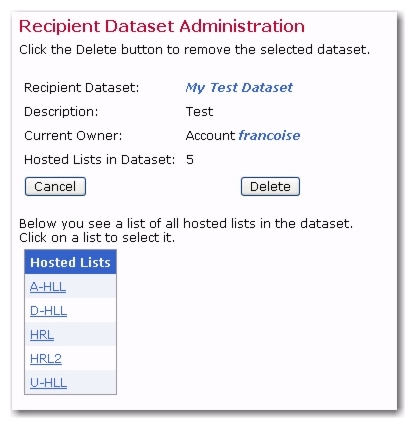
From the Recipient Dataset Administration screen, it is possible to [Delete] the Lookup Table. Click
[Cancel] to return to the previous screen.
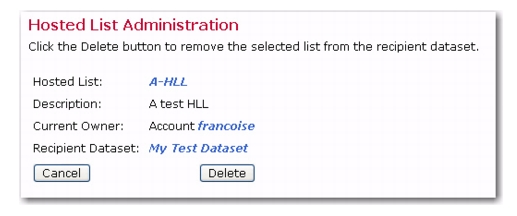
If the dataset contains Hosted Lists, click on the individual list names to open the Hosted Lists Administration screen. From that screen, view the name of the Hosted List, a description of the list, the current list owner, and the Recipient Dataset to which the Hosted List belongs. From here, it is possible to
[Delete] the Hosted List from the dataset or
[Cancel] to return to the previous screen.