Designed specifically to work with LISTSERV
® 15.5, LISTSERV Maestro 4.0 allows users to easily create and send personalized email messages using a web interface. Incorporated into this powerful tool is a tracking component that can collect data every time a recipient opens an email message or clicks on a URL contained within the message.
|
•
|
The Administration Hub – Controls all user and program settings. It is the central component that stores registry and account information. It is accessed both by the Maestro User Interface and by Maestro Tracker to validate login information. It has its own administrator user interface.
|
|
•
|
The Maestro User Interface – The actual user interface. Individuals and groups use it to create and distribute customized email messages. It is also used to access, view, and download the collected tracking data, and to maintain the recipient repository (datasets and lists).
|
In addition to LISTSERV Maestro’s three components, LISTSERV
Maestro 4.0 also relies on the existence of an installation of
LISTSERV 15.6. LISTSERV receives email jobs from LISTSERV Maestro and prepares them for delivery. It is also used to process bounced mail. In certain cases, LISTSERV may also act as an interface between LISTSERV Maestro and an external DBMS. In addition, if both applications are configured correctly, you can switch between the two with a single sign-on, meaning you won’t have to logout of one and then login to the other.
By default, LISTSERV Maestro 4.0 comes installed with MySQL® 4.1.7 as the internal system database. Use of this internal system database is optional. It is possible to decide during installation not to install the internal MySQL database, in which case some external database must be installed instead. It is also possible to install the internal database during the initial setup, and then switch to some external database later.
Please see http://www.mysql.com for details about MySQL 4.1.7 and its features to determine if it meets your organization’s requirements and expectations for a production database. Reviewing the features will help to decide if the internal database should be used or if a different external system database should be installed.
LISTSERV Maestro can use the external database to store its own system data as well as to select recipient lists from database tables and drop-in content elements. LISTSERV
Maestro can connect to several databases in this way. Supported databases are:
|
•
|
Oracle® 8i, Oracle ® 9i, Oracle ® 10g, and compatible versions
|
|
•
|
DB2® V7.2, V8.2, and compatible versions
|
|
•
|
MySQL® 4.x and compatible versions, as well as 3.23.42 and later 3.23x builds
|
LISTSERV and LISTSERV Maestro also require access to one or more SMTP servers to perform the actual delivery of email jobs for LISTSERV Maestro and LISTSERV. Any standards-compliant SMTP server will work.
The three LISTSERV Maestro components, LISTSERV, the SMTP server(s), and the optional external database may be installed on any combination of hosts, from one single host shared by all components to six or more dedicated hosts, one for each component (it is possible to have multiple LISTSERV servers and multiple SMTP servers). If different components are installed on separate servers, it is not necessary that all of the servers have the same operating system. It is possible to install the Maestro User Interface and Administration Hub components on a Windows server and at the same time the Maestro Tracker component on a Linux server (or other combinations). For more information on host restrictions, installing LISTSERV Maestro, and starting and stopping the LISTSERV
Maestro service, see the LISTSERV Maestro Installation Manual.
It is important to understand the different roles involved in administering and using the various components of a LISTSERV Maestro system. In a small organization, the same person may play many of these roles. In larger organizations, the following duties will likely be distributed among several different people:
|
•
|
System Administrator – Responsible for the installation and initial configuration of the LISTSERV Maestro applications. The system administrator must have Administrator or root access to the computer(s) on which LISTSERV Maestro applications will reside.
|
|
•
|
LISTSERV Maestro Administrator – Responsible for administration of LISTSERV Maestro through the HUB component and the “admin” account in the Maestro User Interface. The LISTSERV Maestro Administrator acts as the “master account” for all LISTSERV Maestro users.
|
|
•
|
Data Warehouse Administrator – Responsible for administering recipient data within LISTSERV Maestro. See the “LISTSERV Maestro Data Administrator’s Manual” for details.
|
|
•
|
LISTSERV Site Administrator – Responsible for the configuration and administration of LISTSERV (including configuring LISTSERV for database access, adding LISTSERV “postmaster” accounts, and so on). See the “LISTSERV Site Manager’s Manual” for details.
|
|
•
|
Database Administrator – Responsible for the initial installation of the external database(s). Also responsible for monitoring available space in the database(s), database performance tuning, routine database backups, and other routine database maintenance tasks.
|
|
•
|
Maestro User – Responsible for creating, sending and tracking email jobs through LISTSERV Maestro. There are many different user responsibilities, which may fall to different users. See the “LISTSERV Maestro User Guide” for details.
|
For many organizations, it may be desirable to have some overlap among the various roles. For instance, the Data Warehouse Administrator may also be a regular Maestro User, or the System Administrator and LISTSERV Administrator may be the same person. In other cases, there may be clear distinctions between some of the responsibilities (e.g., it may not be desirable for a Maestro User to also have System Administrator access to the computer running LISTSERV Maestro).
Tip: It is usually a good idea to understand and assign the various user roles to groups and individuals within your organization before even installing LISTSERV Maestro. This may save considerable time and confusion.
The three main LISTSERV Maestro components all write their own log files. These files are in the “logs” subfolder of each component’s home folder inside the installation folder. However, in some situations the administrator does not have access to these folders, but still wants to access the log files. To solve this, LISTSERV Maestro offers remote log file access. The remote access allows an administrator to download the log files from the server, directly in the web-browser.
Before you can access the log files of a component, you first have to configure the component for remote log access. To do so, edit the INI-file of the component and add the following entry:
RemoteAdminPassword=PASSWORD
where you replace “PASSWORD” with a password only known to authorized administrators (although, for security reasons, you should not use your normal admin password from the Administration Hub).
Note: Since the password will later be used as a parameter in a URL, you should only use URL-safe characters in the password (e.g. you are on the safe side if you only use alphanumeric characters).
Remember that you have to add this entry to each component’s INI file, e.g. to lui.ini, hub.ini, and tracker.ini. If you do not add the entry to one of the INI files, then you will not be able to access the log files of that component (but you will still be able to access logs of the other components where you have added the entry).
Once you have configured the component(s) for remote log access, you can access their log files from any web-browser on any computer that has HTTP access to the component in question. You only need to know the “
PASSWORD” you configured in the INI file(s) and the day of the log file you want to access (for normal log files) or the backup-ID (for backup log files):
“HOST” with the host name of the server running the component you want to access.
“PORT” with the HTTP-port on that server (“
PORT” can be left out if the HTTP-port is “
80”),
If you enter only the password, then the displayed log file will be the one of the current day. If you want to see a log file of a different day, enter the date of the day you want to view into the first
Date field (leave the second
Date field empty). If you want to see the log files of a range of days all at once, enter the date of the first day in the first
Date field and the date of the last day in the second
Date field. (For all date input, use the format “YYYYMMDD”, where “YYYY” is the year with 4 digits, “MM” is the month with 2 digits and “DD” is the day of the month with 2 digits.) Each time you change a date setting, click
[Apply] to make it effective.
You can also enter a text into the Search String field (and click
[Apply]). This will have the effect, that all occurrences of this string in the log file will be highlighted and all log entries which do not contain the search string will be initially hidden so that you can concentrate on the log entries that contain the search string. The hidden areas are marked with a little “+” symbol at the left margin. Click the “+” to unfold a hidden part and make it visible again. The left margin will then show a ruler with “-“ symbols at the top and the bottom of the unfolded area. Click on the ruler or the “-“ symbols to hide the area again.
Note: If you need to provide the log file to a 3rd party (for example, to L-Soft support), then you can use the
Save as plain text link at the bottom right of the page to download and save the backup file in its plain text format. Please supply this plain text log file to L-Soft support if necessary (i.e. please do not simply do a copy & paste from the browser and do also not a “Save As…” of the log-viewing page, as this would also mean that all the additional HTML data used for formatting the log-view would be included).
If you access the log file of the Administration Hub component, then the page also has an additional
Backup ID field. You can use this field to access one of the backup logs of the HUB: Enter the backup-ID of the backup for which you want to view the log and make sure that the two
Date fields are empty (as long as the
Date fields contain a value, the
Backup ID is ignored and the standard log is retrieved). Then click
[Apply].
Initially, the page displays the backup log with all the backup details hidden and only the general information visible. As explained above, the hidden parts are marked with a little “+” symbol at the left margin and can be unfolded for viewing. Once unfolded, they can also be hidden again.
The backup-ID is a sequence of digits and letters and is unique for each backup. You can find the information about which ID a given backup has by looking at the normal HUB log file: At the backup start-time you will find an entry like “BackupMaster starts backup (Backup ID: xxxxxx)” where “xxxxxx” is the backup-ID that you need to enter in the above
Backup ID field.
The current version and build number of all components can be queried remotely. This is done with a simple HTTP-request - a URL typed into the address field of any browser. The result of the query will be displayed in the browser. This query can also be used to verify that a fresh installation is operational.
|
•
|
To query LUI’s list context: http://LUISERVER/list/build
|
|
•
|
Client with Windows – Microsoft® Internet Explorer 5.5 or later, Mozilla® 1.0.0 or later, other browsers based on a compatible Mozilla version (e.g., Firefox 1.0 or later, Netscape® 7.0 or later).
|
|
•
|
Client with Linux – Mozilla® 1.0.0 or later, other browsers based on a compatible Mozilla version (e.g., Firefox 1.0 or later, Netscape® 7.0 or later).
|
To access the Maestro User Interface or the Administration Hub, we strongly recommend that only Windows, Linux, or Mac OS X is used with the browsers and browser versions listed. Other operating systems, browsers, or browser versions are
not supported.
The client does not necessarily have to have the same operating system as the LISTSERV Maestro server. A Linux client can be used to access LISTSERV Maestro on a Windows server and vice versa. Similarly, the different components of LISTSERV Maestro may run on different operating systems, if they are installed on separate servers. For example, the Maestro User Interface and Administration Hub components may be installed on a Windows server, while the Maestro Tracker is installed on a Linux server.
Important: Recipients of email being tracked by LISTSERV
Maestro may use whatever browser they wish to access the URLs contained in the messages sent by LISTSERV Maestro. Tracking occurs no matter which browser is used by email recipients.
With the new Single Sign-On feature, the LISTSERV Maestro Administrator can now switch back and forth between the Administration HUB and User Interface with one click. No more hassle, no more logging in and out, just one simple click is all it takes.
In the URL above, you need to replace “<YOUR_USER_INTERFACE_HOST>” with the hostname of the server running the Maestro User Interface component (LUI). In addition, if the server uses a different HTTP-port than the standard port “
80”, then you need to include this different port with the host name, separated with a colon “
:”, like this: “
http://HOSTNAME:PORT/lui”.
Tip: In a Windows installation, a shortcut for this address will appear in the Windows Start Menu under
Programs >
L-Soft Application Server.
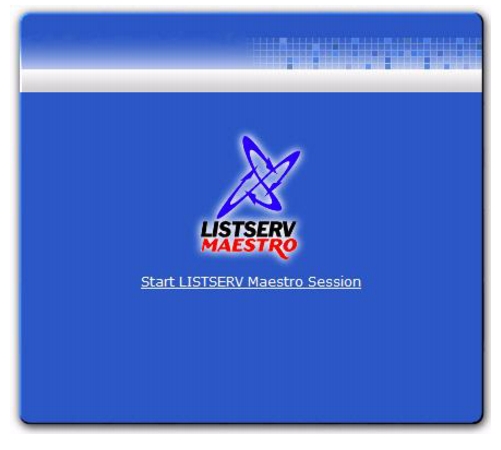
This URL provides access both to the Maestro User Interface (for normal users and the administrator) and to the Administration Interface (for the administrator only); in addition, the URL redirects you to the new login area.
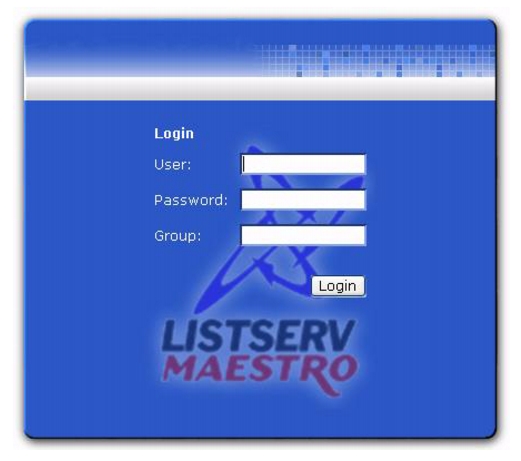
From here, click on the Start LISTSERV Maestro Session link to open the Login Screen.
Enter the Administrator’s user name and password (the user name is admin and the password is established during installation). Click the
[Login] button to enter the Administration HUB.
Note: The Administrator’s account does not belong to a group; therefore, the
Group field should be left empty.
With the new “single sign-on” feature, the LISTSERV Maestro Administrator can now switch back and forth between the Administration HUB and User Interface with one-click. No more hassle, no more logging in and out, just one simple click is all it takes.
Note: If you switch to the User Interface and then logout from there, the next time you (as the administrator) login, you will taken directly to the User Interface. Similarly, if you logout of the HUB, the next time you login, you will be taken directly to the HUB.
Administering LISTSERV Maestro involves many different tasks and interaction with more than just the Administration Hub (HUB). Administrators will have to understand how LISTSERV Maestro is situated within the institution’s infrastructure. This understanding is critical for making decisions about settings for all the application’s components to ensure consistency and compatibility with new or existing systems. Consequently, this manual is organized around those different tasks an administrator needs to perform in order to set up, monitor, backup, and change an installation of LISTSERV Maestro. It also serves as a reference for advanced systems configuration, touching on the HUB Interface screens as they fit in to each task.
The Accounts and Identities screen is the opening screen of LISTSERV Maestro’s Administrator Interface. This screen is gives you quick and immediate access to one of the most important administrative duties – managing user accounts.
The Toolbar contains menus and icons that give you quick access to the different functions in LISTSERV Maestro, letting you easily navigate from one area to another. It appears on each LISTSERV Maestro page and displays the currently available options.
Note: There are quite a few different sub-menus and options that may appear in the various parts of the main menu. However, not all of these options and sub-menus are always visible. The main menu and its sub-menus only show those options and menus that are currently available according to the context of the page you are on.
The Accounts and Identities menu contains options for the creation and administration of user accounts and identities. The possible options are:
The User Account menu is only available when a user is selected. It contains options to administer the currently selected user account. The possible options are:
|
•
|
Edit – Edit the account name, group, identity, and/or password, and define if the account is allowed to change its password or not.
|
|
•
|
Delete – Delete the user account.
|
|
•
|
User Right Settings – Define the user rights for the selected account.
|
|
•
|
LISTSERV Connection – Define the LISTSERV connection settings for the selected account.
|
|
•
|
URL Settings – Define the settings for various URLs used by LUI for the selected account.
|
|
•
|
Size Limits – Define the message size limit for the selected account.
|
|
•
|
Job ID Prefix – Define the job-ID prefix for the selected account.
|
|
•
|
Lite Mode Restrictions – Define the lite mode restrictions for the selected account.
|
|
•
|
Content Restrictions – Define the content restrictions for the selected account.
|
|
•
|
Recipients Restrictions – Define the recipients restrictions for the selected account.
|
|
•
|
Tracking Restrictions – Define the tracking restrictions for the selected account.
|
|
•
|
Hosted Data Settings – Define the hosted data settings for the selected account.
|
|
•
|
DomainKeys Settings – Define the DomainKeys settings for the selected account.
|
The Group menu is only available when a group is selected. It contains options to administer the currently selected group. The possible options are:
|
•
|
Delete – Delete the selected group and all accounts in it.
|
|
•
|
LISTSERV Connection – Define the LISTSERV connection settings for the selected group.
|
|
•
|
URL Settings – Define the settings for various URLs used by LUI for the selected group.
|
|
•
|
Size Limits – Define the message size limit for the selected group.
|
|
•
|
Job ID Prefix – Define the job-ID prefix for the selected group.
|
|
•
|
Lite Mode Restrictions – Define the lite mode restrictions for the selected group.
|
|
•
|
Recipients Restrictions – Define the recipients restrictions for the selected group.
|
|
•
|
Tracking Restrictions – Define the tracking restrictions for the selected group.
|
|
•
|
Hosted Data Settings – Define the hosted data settings for the selected group.
|
|
•
|
DomainKeys Settings – Define the DomainKeys settings for the selected group.
|
The Global Settings menu contains options to administer the global configuration settings. The possible options are:
|
•
|
Administration Hub – Define the global configuration settings for the Administration Hub component. The sub-menu may contain the following options:
|
|
•
|
Maestro User Interface – Define the global configuration settings for the Maestro User Interface component. The sub-menu may contain the following options:
|
|
•
|
User Rights – Configure the Maestro User Interface specific user rights of all user accounts.
|
|
•
|
LISTSERV Web Interface Access – Define the configuration for direct access to the LISTSERV Web Interface (WA) from the LISTSERV Maestro Interface (and vice versa). The sub-menu may contain the following options:
|
|
•
|
LISTSERV Web Interface Links – Configure links between the LISTSERV Maestro User Interface and one or several LISTSERV Web Interfaces (WAs).
|
|
•
|
LISTSERV Web Interface Account Mappings – Configure mappings between LISTSERV Maestro accounts and LISTSERV Web Interface (WA) accounts, to allow a user to move between the two interfaces without having to login again.
|
|
•
|
Maestro Tracker –Sub-menu for global configuration settings for the Maestro Tracker component. The sub-menu may contain the following options:
|
|
•
|
General Administration – Configure general Maestro Tracker related settings.
|
The Utility menu contains general administer options. The possible options are:
|
•
|
Change Password – Change the password of the administrator account.
|
|
•
|
Print Page – Print the current page/screen.
|
The Logout option allows you to log out from LISTSERV Maestro (after first confirming that you really want to log out).
The Help icon is used to access the help associated with the current screen.