Defining the sender of an email job can take place at any point in the process of creating or editing a job. It is necessary, however, to have sender information added to a job before delivery testing so that authorization to deliver the message can take place.
Enter sender information from the Job Details screen by clicking on the Define Sender icon in the Workflow diagram or the Edit link in the Sender section of the Summary diagram. Enter the sender information by loading a saved sender profile or typing in new information.
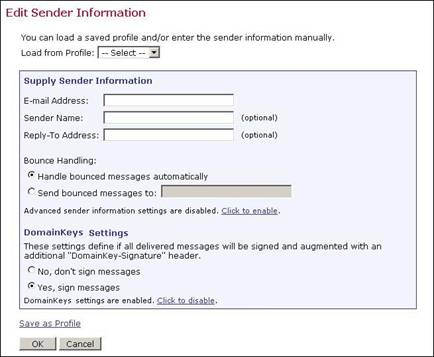
Figure 62 Edit Sender Information Screen
It is possible to use merge fields when entering sender information in the Email Address, Sender Name, and Reply-To Address text boxes, allowing you to create personalized values for each recipient. Merge field values are limited to those provided in the recipients’ definition and must follow the standard format (i.e. the field name proceeded by an ampersand “&” and followed by a semi-colon “;”).
See Section 5.6 Merging Fields and Conditional Blocks for more information on using merged fields. See the online help for examples of using this feature to personalize sender information.
Bounced email (email that is not accepted by the receiving mail server) can be handled automatically by LISTSERV or sent to another address supplied by the sender. If LISTSERV handles bounces, bounce details can be downloaded on the Job Summary screen. Bounces can also be retrieved from a file called NOLIST-jobname.changelog, located in LISTSERV’s main directory.
If bounced mail is being sent to another address and not processed by LISTSERV, make sure that the address is a valid email address. Be aware that bounced mail not handled by LISTERV will not be available for reporting purposes or for easy download. It will have to be collected from the other mailbox and processed accordingly.
Select either Handle bounced messages automatically or Send bounced messages to. If Send bounced messages is selected, then enter the address where you want the bounced messages to be sent.
LISTSERV Maestro allows you to use DomainKeys signatures to authenticate that the messages (sent for a specific email job) do indeed originate from the domain in the “From:” address. Major ISPs already check every incoming mail to see if it is signed with a valid DomainKeys signature. Once DomainKeys has become an accepted standard for message origin verification, the current policy of only informing the recipient about the DomainKeys verification result in an additional header entry may change, and an ISP may opt to not even deliver the message to the recipient or to mark it as coming from an unsure origin. Therefore, in order to achieve good deliverability, signing messages with a valid DomainKeys signature will become more important in the future.
If the administrator has enabled users or groups to have the ability to change the default DomainKeys signature settings, then the settings in the DomainKeys Settings section will be active and you will be able to set the DomainKeys signature setting for each individual job.
If you want the email messages for this particular job to contain a DomainKey signature, then select the Yes, sign messages option. If you do not want the email messages for this particular job to contain a DomainKey signature, then select the No, don’t sign messages option.
Note: LISTSERV Maestro interacts with LISTSERV to determine if the supplied sender address is supported by one of the DomainKeys that were deployed to the LISTSERV host when DomainKeys were configured by the administrator. This check is performed at several stages during the life cycle of an email job, one of which is while defining a sender. The sender definition settings of an email job are only accepted as valid if either DomainKeys signatures are switched off (by selecting the No, don’t sign messages option or clicking on the Click to disable link) or if the check succeeds at the LISTSERV host that is configured for the account. If the email address is not accepted as valid, then an error message appears. If this happens, contact your administrator for assistance.
Advanced Sender Information Settings are disabled by default. Click the corresponding link to enable the advanced settings. Once enabled, the advanced settings can be disabled by clicking the disable link. Advanced Sender Information Settings allows user defined mail headers to be added to the end of the header part of the mail. These headers follow the X-Header convention as described in RFC822. The X-Headers will appear just before the actual mail content, and will appear in the order that they are entered on the screen.
To add an X-Header to a mail job, enter the name of the header, which must include the leading “X-” in to the X-Header-Name column. Enter the text for the header in the X-Header-Text column. Rows where both the name and text are empty are ignored. To remove a header, click the corresponding Clear Row link. Click Add Row to add additional headers.
If the system administrator has granted permission, it is possible to save any new sender information as a profile for future use. All saved sender profiles are available to all members of a group. The only required field is the sender’s email address, but including the sender name makes the message more personalized. Include a reply-to address if replies are an option for recipients and if the reply-to address is different from the sender’s email address. Click the Save as Profile link once all the information is entered. The Save Sender as New Profile screen opens. Enter a title for the profile and click [OK]. This saved profile will then be available in the Load from Profile drop-down menu.
Figure 63 Sender Information

It is critically important to test an email job thoroughly before sending it, especially if it is a large job being distributed to many recipients or a message containing a large amount of data. Large jobs take up a lot of server time and space and affect many email hosts and individual recipients. Sending out a less than perfect message can create a very negative reaction among recipients and damage an institution’s credibility and reputation. As a safeguard, LISTSERV Maestro will not allow an email job to be authorized before a test of the job has been sent out and approved. Any changes to contents, recipients, or sender require a new test to make sure that the changes were effective.
To test an email job, click on the Delivery Test icon on the Workflow diagram or the Test link in the Test Status section of the Summary diagram.
LISTSERV Maestro allows the user to use a previously entered group of test recipients, upload and download test recipient lists, or type in test recipient names and addresses. The test interface displays a table for entering test data. Each row represents a test recipient. The columns displayed depend on the columns defined in the recipient definition stage of the job.
Valid Internet email addresses are necessary for all the fields in the column that is specified as the email column. The test messages will be sent to these addresses. The same address may be used in more than one row.
The subject line for a test message can be changed. Changing the test subject line will not affect the subject line of the final message. The optional test line allows the user to enter a line of text that will appear above the body of the message when it is delivered. Use this to recognize test messages and different versions of test messages. If nothing is entered into the optional test line box, then no text is added to the test messages. A test line will never be added to a final email job.
Figure 64 Delivery Test
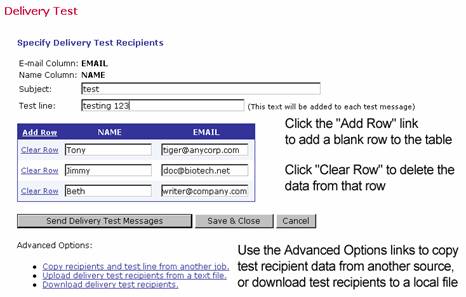
Click [Send Delivery Test Messages] to continue. Click [Save & Close] to save the test recipient data but not send the test message. Once the messages have been sent, review the results. It is usually a good idea to include the job owner and any team members in the test recipient list so test results can be viewed firsthand.
If the test results were not acceptable, select the No option and then click [OK]. This will prevent the job from being approved for delivery and allow any necessary changes to be made by bringing up the Job Details screen.
If the test results were acceptable, select the Yes option and then click [OK]. This will allow the job to be authorized for delivery.
Figure 65 Delivery Test Results

If you want to view and verify the delivery test results later, select the Verify Later option and click [OK]. If this option is selected, the job can not yet be approved for delivery. The next time the Delivery Test icon or link is clicked from the Job Details screen, the user will be returned to the Delivery Test screen. To approve the pending test, click the Go directly to the validation page, without another delivery test link under the Advanced Options section to return to the Validation screen of the test that was saved for later verification. Click the Yes option and then click [OK] to proceed.
Tips: It is useful to have
a good understanding of the actual recipient data when putting together
a test. If the message contains merged fields, then study those fields
in the actual data: what are the shortest and longest instances of those
fields? Are those fields ever empty? Next, make sure to send tests that
have values of the shortest and longest lengths, and empty fields if appropriate,
to make sure that the message layout looks correct in all cases. It is
sometimes necessary to change the layout or use conditional blocks to
accommodate special cases. If using conditional blocks, make sure that
the test cases exercise every possible condition, being especially cautious
about the formatting when working with HTML messages.
Send test messages to email accounts running different email clients. A
message that looks fine in one client may look messy or unreadable in
another.
The recommended method for testing mailings that have the recipients defined
from a LISTSERV list and are being sent a standard list message is to
create a clone of that list within LISTSERV (such as TEST-listname). Make
sure that the entire list configuration is exactly duplicated, including
customized templates (especially the top and bottom banners, if these
are defined). Subscribe only the test recipients to the test list. On
the Delivery Test screen, enter the full address of the test list as the
sole test address.
It is important to test every facet of an email job including bounce settings.
To test bounce settings, send a test message to an undefined address.
Look at the bounce report if LISTSERV is handling bounces and download
the address to make sure it corresponds to the one used in testing. If
bounces are being sent to another address, go to that address and examine
the bounced message.
Remember to also test both the From:
address and the Reply-To:
address (if the latter is specified). To test the From:
address and the Reply-To:
addresses try replying to both from the test message and examine the results.
Once a test message containing tracked data has been delivered and the test recipients have opened the message and clicked on tracked links, then the Test Reports tab, available from the Job Details screen, becomes active. Click on the tab to open up a definition page to generate a “quick report” on the test message data. Quick Reports are predefined report types that create a temporary report based on the selected report settings and the active email job.
Figure 66 Test Reports
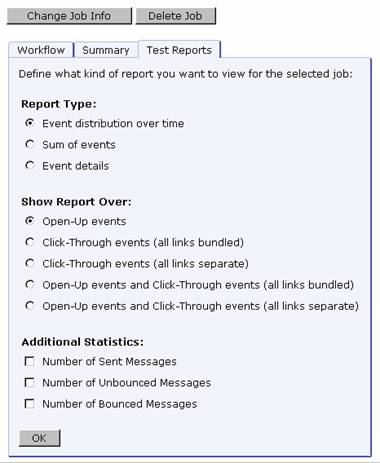
First, select the report type by clicking the corresponding option button. Three different report types are available depending on the type of tracking you selected:
· Event distribution over time – Produces a simple line graph showing the number of responses over time. Time is plotted on the x-axis of the chart and events are charted on the y-axis.
· Sum of events – Produces a bar graph showing the number of recipients who clicked on each URL and/or opened up the message. The length of each bar shows the number of events.
Two types can be chosen for the report – Sum of unique events or Sum of all events. Sum of unique events records only a single event of each type for each recipient. This chart will register “0” (zero) events if blind tracking has been selected for the tracking type during the tracking definition because blind tracking cannot count any event as unique. Sum of all events counts all events triggered for each recipient.
· Event details – Displays a table that lists the report type, lists the time period of the report, allows for the selection of encoding for downloading the data, and allows for the selection of the time zone to reference the downloaded data. Click the download link to download the raw data to a local drive. Raw data can be used in Microsoft® Excel or third party statistical analysis software to create detailed reports. Event detail reports are available for personal, anonymous, unique, and blind tracking jobs.
Next, select the source data for the report type. Each data source will create a line or bar on the chart. There are up to five choices depending on the type of message (Plain Text or HTML), as well as the tracking events defined in the message:
· Open-Up events – This option charts all the open-up events for a job. It is only available for HTML messages.
· Click-Through events (all links bundled) – This option bundles all click-through events together into one variable charted on the report. For example, if three links were being tracked in a message, they would appear as one line or bar on the chart.
· Click-Through events (all links separate) – This option creates separate variables for each click-through event that is tracked. For example, if three links were being tracked in a message, each of the three links would appear as a separate line or bar on the chart.
· Open-Up and Click-Through events (all links bundled) – This option puts all the open-up events into one variable and all the click-through events into a second variable charted on the report. It is only available for HTML messages.
· Open-Up and Click-Through events (all links separate) – This option creates separate variables for the open-up and each of the click-through events. It is only available for HTML messages.
Other data sources can be added to the chart by selecting any or all of the Additional Statistics option buttons. These additional data sources can provide comparison data in the chart so that it is possible to see the total number of messages sent in relation to the number of open-up events that occurred, for example. Three Additional Statistics options are available:
· Number of Sent Messages – Adds the number of messages that were sent to LISTSERV as a constant reference value in the report.
· Number of Unbounced Messages – Adds the number of unbounced messages as a constant reference in the report. This value shows the number of messages that were sent and not detected as bounces by LISTSERV. This option is only available if LISTSERV handles bounces automatically (selected during the sender definition).
· Number of Bounced Messages – Adds the number of bounced messages as a constant value in the report. This value shows the number of messages that were sent but were detected as bounces by LISTSERV. This value can go up over time as new bounces are received by LISTSERV. This option is only available if LISTSERV handles bounces automatically (selected during the sender definition).
Make your selections, and then click [OK] to continue. A temporary report with the settings selected will be generated and displayed on the screen. This report will not be saved (it can always be run again from the Test Reports tab).
Located at the bottom right side of the test report are four icons. Each icon opens a page with different functions and options. The currently selected icon will be highlighted with a blue border. Unavailable icons will appear grayed out. These icons appear on all test reports, quick reports, and regular report pages.
Table 4 Test Report Icons
|
|
View Report – Displays the currently selected report with the latest report options. |
|
|
Download Report – Opens the Download Report Result screen. From here it is possible to download report data in a zipped text file. |
|
|
Change Results Settings – Opens the Change View Settings for Report screen. From here it is possible to change how the results are displayed and downloaded. |
|
|
Edit Report / Create Report – For delivered jobs, opens the Define Report screen. For delivery tests, it is not possible to save a quick report; therefore, this icon is disabled (grayed out). |
For more information on Quick Reports, see Section 9.3 Delivered Jobs Reports. For more information on creating and editing reports, see Section 10 Tracking Statistics and Reports.
LISTSERV Maestro allows the user to send out an approved email job immediately on approval or schedule a job for future sending. Jobs can be scheduled to be delivered once or to repeat automatically over programmed intervals. Scheduling the delivery of a message can take place at any time during the creation of the email job; however, final delivery is still subject to delivery testing and delivery authorization.
To schedule the delivery of an email job, click on the Delivery Settings icon on the Workflow diagram or the Edit link in the Delivery section of the Summary diagram.
The Delivery Settings screen opens with selections to schedule the delivery of a normal job that will be delivered once and not repeat. This is the default delivery scheduling format for LISTSERV Maestro.
Select the Deliver immediately when authorized or Deliver at the following time option. If the job is scheduled for a future delivery date and time, enter the date and time in the edit boxes using the format displayed adjacent to each box. The date and time entered are dependent on the time zone selected from the drop-down selection box at the bottom of the screen. Local time is relative to the workstation accessing the job, and not the server running LISTSERV Maestro.
Figure 67 Delivery Settings
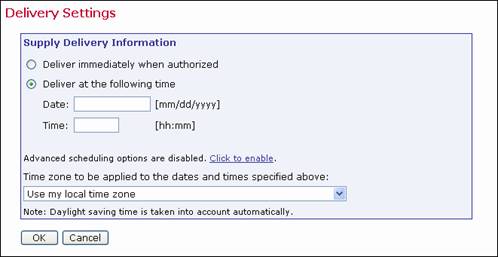
Note: Time entered in the Time field uses the “24 hour” format. For example, 08:00 would be 8 am and 20:00 would be 8 pm. See Appendix A for a table on converting from AM and PM times to their 24 hour equivalents.
Click [OK] to continue. Jobs scheduled for future sending will be available in the Outbox. It is possible to revoke the send authorization of a job up until the delivery time. This moves the job back into the Resume Jobs list, for further editing. If a job is changed, test messages must be resent, and final approval will have to occur again before the job can be re-authorized.
In addition to the basic scheduling options described in Section 7.4.1, there are also advanced options available for defining the delivery schedule. The advanced options are disabled by default. The Click to enable link expands the Delivery Settings screen. If you want to disable the advanced options later, use the Click to disable link that appears when the advanced options screen is exposed. The advanced options are enabled or disabled on a per job basis.
Figure 68 Advanced Scheduling Options
The advanced options available are:
· Deliver only once. Do not auto-repeat – With this option, the job will be delivered only once, at the delivery time specified in the basic options at the top of the screen. This is the default setting for delivery. It is also used when the advanced delivery options are disabled.
· Auto-repeat delivery of this job – With this option, the job will start an auto-repeat sequence upon delivery. The job will be delivered for the first time at the time specified in the basic options. Once the job has been delivered, an exact copy of it will automatically be created and authorized for delivery, with a delivery time that is scheduled at a given interval after the first delivery.
Once this copy of the job has been delivered, another copy will be created and authorized, again with a scheduled delivery time that is offset from the previous delivery by the same interval, and so on, until the defined auto-repeat end-condition is met.
If this option is chosen, a delay interval must be supplied between each repeated delivery of a copy of the original job by entering a positive value into the Delay interval between repeated deliveries field and choosing an appropriate time unit from the selection list. Choose between Hours, Days, Weeks, and Months. An end condition must be entered to stop the auto-repeat sequence. Select one of these options:
° Repeat until stopped manually – After each delivery, a new auto-repeat copy will always be created and authorized. This can only be stopped manually by selecting the latest copy, located in the Outbox awaiting delivery, and revoking its delivery authorization.
° Repeat until the following threshold time – With this option, specify the threshold date and time to stop the auto-repeat sequence. After each delivery, a new auto-repeat copy is created and authorized only if its designated delivery time (the time of the previous delivery plus the specified interval) is not later than the date and time specified here.
Auto-repeat jobs are made up of a sequence of identical jobs based on the first job created in the series and scheduled to be delivered at regular programmable intervals. Various settings control the auto-repeat sequence, and these sequences can be used in many ways.
The delivery time of auto-repeat jobs is defined using the following rules:
· The first job in the auto-repeat sequence will be delivered at the date and time specified in the basic options of the Schedule Delivery screen (see Section 7.4.1 Scheduling Information for Normal Jobs).
· Each subsequent copy of the original job will then be delivered a certain amount of time after the previous delivery, which is defined in the Delay interval between repeated deliveries advanced option.
Here are some examples:
· If Deliver immediately when authorized is specified and a repeat interval of 12 hours is used for the first job, and that job is authorized at 9:15h, then the initial job would be delivered at 9:15h, the first copy would be delivered at 21:15h, the second copy at 9:15h of the next day, and so on.
· If Deliver at 12:00h is specified and a repeat interval of 24 hours is used (or for the same effect 1 day), then one delivery each day, at 12:00h, would occur.
· If Deliver at 10:20h on 11/24/2004 is specified (which happens to be a Wednesday) and a repeat interval of 2 weeks is used, then this would cause a copy of the job to be delivered at 10:20h of the Wednesday of every second week after the initial delivery.
· If Deliver at 12:00h on 1/1/2005 is specified and a repeat interval of 3 months is used, a delivery on the first of each of the months of January, April, July and October would occur, resulting in one mailing at the beginning of each quarter.
Auto-Repeat delivery is particularly useful together with dynamic recipient lists and/or dynamic content. Dynamic recipient lists are the “just-in-time” variants of recipients defined by a target group, text upload, a select from a database, as well as standard LISTSERV lists or recipients selected from a database by LISTSERV. What all these recipient types have in common is that the actual list of recipients a job will be mailed to is determined "just-in-time" at the moment prior to delivery. If such a job auto-repeats itself, each repeated copy may be mailed to a different list of recipients.
Dynamic content is content that uses drop-ins to pull content into the message "just-in-time" before delivery. Different content can be used with auto-repeat jobs to mail constantly changing content to a list of recipients without editing the other parts of a job. Examples of these types of jobs are provided below:
A bank or credit union could employ dynamic recipient lists for sending a generic "Your account balance is negative" warning message on the first of each month to only those recipients who have a negative account balance on that day.
To set up such an auto-repeat job, create a job with static content telling the recipients that their account balance is negative (possibly using the balance value as a merge field pulled from the customer database). Use a recipient definition that is "just-in-time" and that selects exactly those recipients from the database where the account balance is negative. Next, schedule this job to be delivered at a certain hour of the first day of the next month, with a repeat interval of one month. After the initial authorization of that first job, the mail would automatically go out at the set hour of the first of each month, to only the recipients with a negative account balance.
A weather report service could employ dynamic content to automatically mail the daily weather forecast to all subscribers on their list. To set up this type of auto-repeat job, create a job with content that uses a drop-in that pulls the text of the daily forecast from a suitable source (for example from a web server). Next, schedule this job to be delivered at a certain hour of the next day, with a repeat interval of one day. Before setting the hour of delivery, check to make sure that the source of the weather forecast drop-in is updated before the hour of the delivery time. After the initial authorization of that first job, the mail would automatically go out at the scheduled hour each day, with a different forecast (as pulled from the web server source by the drop-in) each day.
If delivery of an auto-repeat job fails for any reason, the failure is handled differently than with normal jobs. A failed auto-repeat job is marked failed as usual, only it is automatically closed and transferred into the list of delivered jobs, just as if it had been manually closed as a failed normal job. If the end-condition for the auto-repeat has not yet been met, a new copy is created and authorized for delivery after the corresponding delay interval, just as if the delivery of the previous job had not failed. See Section 8 for more information on delivery failures.
Important: "No recipients found" is a valid reason for a delivery failure. However, in the context of auto-repeat jobs, this may actually be an acceptable state if there are no recipients that fit the conditions of the job. In the dynamic recipients example, a message was supposed to be delivered to all recipients with a negative account balance on the first of each month. If in a given month there are no recipients with a negative account balance, no mail would be sent out for that month, and the job instance for that month would fail with "No recipients found" as the reason for failure. In this case, the failure should be interpreted as a valid state because there simply were no recipients to deliver mail to on that day. The auto-repeat sequence would continue with another copy for the next month, so if any recipients have a negative balance on the first of the next month, they would then get the reminder mail.
Auto-repeat jobs are treated differently than normal jobs during a system shutdown. For a normal job, if the system is down at the scheduled delivery time, the job will be delivered immediately when the system is started the next time. The system will recognize that the delivery time of the job has passed while the system was down and will immediately start the delivery to "make up" for the lost time.
If the system is down at the scheduled delivery time of an auto-repeat job, the system will recognize that the delivery time of the job has passed while the system was down. Instead of starting delivery immediately, the job will be re-scheduled to the next available "delivery slot" of the auto-repeat sequence it belongs to. The job will remain in the Outbox as "authorized for delivery", but now with a new delivery time that occurs after the system startup. If there is no such delivery slot available because the end-condition for the auto-repeat has already been met, (the threshold time has passed) the job will be marked as failed with a corresponding error message and will immediately be transferred to the list of delivered jobs (as explained in Section 8.1 Auto-Repeat Jobs and Delivery Failures).
For example:
If a job is scheduled to be delivered at 8:00, with an auto-repeat delay interval of 12 hours (the job is supposed to repeat itself at 8:00 and 20:00 of each day), but the system is down at that time, then during the next system startup, the job will be re-scheduled from 8:00 to 20:00. Or if the next system startup occurs after 20:00 of that day, the job will be re-scheduled to 8:00 of the next day, or even 20:00 of the next day, if necessary, and so on until a delivery time is found that occurs after the system startup. During the whole process, the job will not fail and no new job copies are created. The system simply takes the job that should have been delivered earlier and re-schedules it for the next available delivery time. If the job was supposed to stop auto-repeating at a time that has passed before the system startup, then the system will not find a "next available delivery time" for re-scheduling. In that case, the job will fail with a message to that effect.
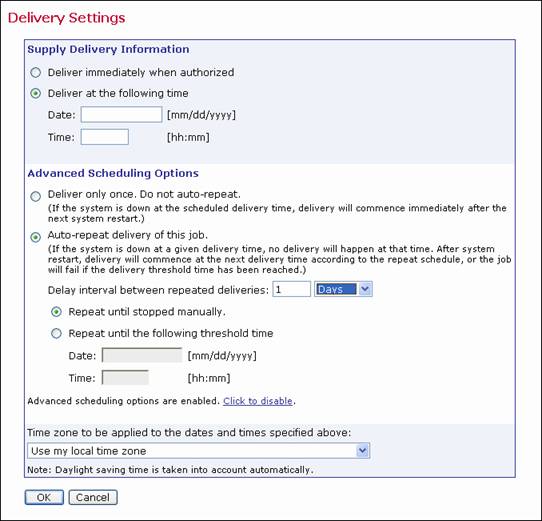
In order for an email job to be delivered, final authorization is required. After all previous requirements have been met – define recipients, define message, define tracking, define sender, delivery test, and delivery settings – a job may be authorized for delivery. The job owner always has permission to authorize a job, as do any other team members that have been granted permission.
To authorize an email job delivery, click on the Authorize Delivery icon on the Workflow diagram or click the [Authorize Delivery] button at the top of the Summary diagram. The Authorize Delivery screen opens.
Figure 69 Authorizing Delivery
The Job Summary section lists all the selections that make up the email job. Above the [Authorize Delivery Now] and [Cancel] buttons is a message that summarizes the selections made for the delivery. If this is an auto-repeat job, the auto-repeat sequence time delay will be listed as well as other notes on the screen. Normal jobs will have a shorter message summarizing the delivery schedule.
The Details link in the Content section will display a copy of the message, alternative text, attachments, and tracking information. The message can be downloaded to a local file as well. The Details link in the Recipients section displays information regarding the recipients for the email job.
The Sender section lists all the selection you made while defining the sender’s information. If DomainKey signing is enabled, then LISTSERV Maestro interacts with LISTSERV to determine if the supplied sender address is supported by one of the DomainKeys that were deployed to the LISTSERV host when DomainKeys was configured. If the email job is configured for future delivery, then there is a considerable time window during which the administrator may opt to change the DomainKeys settings at the LISTSERV host. Therefore, if DomainKeys have been disabled during this time window, then the email job delivery will fail with an appropriate error message.
Clicking [Authorize Delivery Now] will do exactly that, and the job will be sent immediately or at the scheduled day and time. Clicking [Cancel] will go back to the Job Details screen so that any part of the job may be edited, or the job can be deleted.
If a job is authorized for delivery at a future date and time, delivery authorization may be revoked by going to the Outbox and selecting the job. For more information, see Section 8.
The scheduled delivery time shown on this screen is always displayed relative to the local time of the user. If a job is scheduled for a time zone different from the user’s local time, then the time displayed in the Job Summary may appear incorrect. For example, if the user enters the time 10:00 with time zone GMT as the scheduled delivery time, but the user’s location is not in the GMT time zone, the delivery time displayed on the Authorize Delivery screen will be different from the 10:00 time selected. This is because the user’s local time is in a different time zone than the scheduled delivery time. When converted to absolute time, the delivery time will be correct. Time zone differences between the local time and the delivery time may even show an “incorrect” day. If the user sets the scheduled delivery time to 0:30 at GMT on the first of January, the time will appear as 23:30 on the 31st of December on this screen if the local time zone is one hour behind GMT.
Any auto-repeat job currently in the Outbox awaiting its scheduled delivery time can have its delivery authorization revoked just like a normal job. If authorization is revoked, the job will be put back into the Resume Jobs list, where it can be edited again.
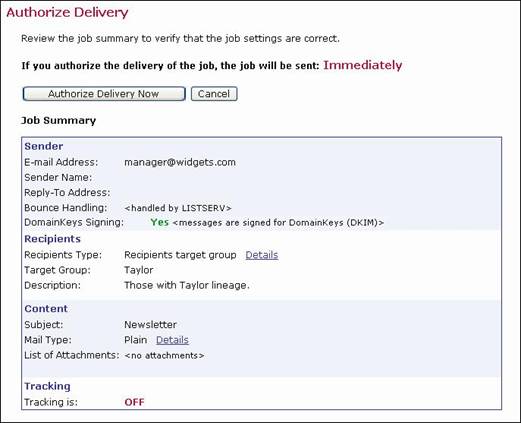
If a job is re-authorized for future delivery, the job may have its standing changed in respect to the auto-repeat sequence it was part of before the authorization was revoked. Here are the possible standings:
· The job is the first job of an auto-repeat sequence – This means that no delivery has taken place for this job because it was the first job of the sequence and was already revoked before its scheduled delivery time. When re-authorized, the job will simply continue to be the first (and still only) job of the same auto-repeat sequence it belonged to before.
· The job is not the first job of the auto-repeat sequence but has not been changed since the delivery authorization was revoked – This means that this job is already an automatically created copy that is part of an auto-repeat sequence. The delivery authorization of this job was revoked, but the job has not changed since then. When re-authorized, the job can continue as part of the same auto-repeat sequence, or it can start a new auto-repeat sequence. This choice will have to be made on the Authorize Delivery screen.
Figure 70 Auto-Repeat Re-Authorization
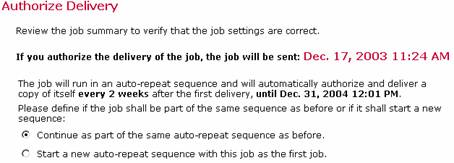
· The job is not the first job of the auto-repeat sequence and has been changed since the delivery authorization was revoked – This means that this job is already an automatically created copy that is part of an auto-repeat sequence. The delivery authorization of this job was revoked and then it was changed in some way. When re-authorized, the job will create a new auto-repeat sequence and it will no longer be part of the sequence it belonged to before the delivery authorization was revoked. This happens because the job is no longer an exact copy of the previous jobs in its original sequence. Instead, it will be the first (and still only) job of a new auto-repeat sequence.
Figure 71 Auto-Repeat Authorization for a New Sequence
Note: A job is defined as changed since authorization was revoked if the recipients definition, content definition, tracking definition, or sender definition of the job has changed since the delivery authorization was revoked. If these four parts remained unchanged, the job is interpreted as unchanged. Changes on the Delivery Test or Delivery Settings screens are not interpreted as changes to the job.


