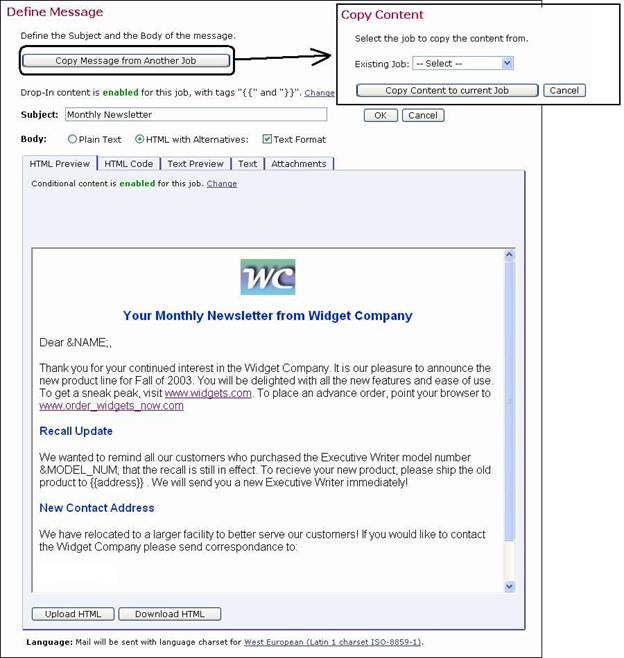
The next phase of creating a new email job is defining the message of the email to be sent to the recipient list. LISTSERV Maestro will copy content from a previously defined email job, or original content can be uploaded or entered as plain text, as HTML or a combination. Special “Drop-In Content” elements in the form of text, links, files, or a database can be added to the message. It is possible to include attachments to messages as well as select the language character set used to encode the message.
Figure 43 Define Message Screen
Drop-in content is similar to merging fields, except that the same content is merged into the email message for all recipients. For more information on merging fields, see Section 5.6 Merging Fields and Conditional Blocks. Drop-ins can be used to create pre-defined content parts that can then be inserted into any message. For example, a drop-in content element could be created with a company header and added to all the outgoing email messages simply by including the name of the drop-in element in the content. For more information about creating drop-in content elements, see Section 11.2 Creating and Managing Drop-In Content Elements.
Drop-in content must first be enabled before it can be used in a message. The Define Message screen will display a green enabled if drop-in content can be used. A red disabled will appear if drop-in content is not available. Click on the Change link to toggle between enabled and disabled.
LISTSERV Maestro recognizes drop-in elements if they appear in the message enclosed by specially defined tags. The tags surround the name of the drop-in content element, creating a “drop-in placeholder.” This placeholder will be replaced by actual content at the time the message is sent. It is possible to see what the drop-in will look like within the context of the message by clicking any of the preview tabs, Text Preview, HTML Preview, or AOL Preview (see Figure 43).
Figure 44 Drop-In Content Settings
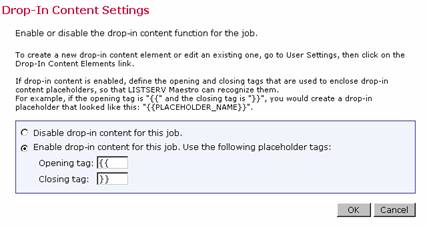
The default setting for drop-in content tags are double open and closed curly brackets “{{“ and “}}”. An example of a drop-in content placeholder using the default settings would be {{company_address}}. It is possible to change the open and closed tags to other characters, but the characters must not appear in the actual name of the drop-in content element itself or anywhere else in the text. For instance, if the name of the drop-in were "dec_header", then in the default mode the drop-in would appear as {{dec_header}}. It would not be possible to change the open or closed tag to an underscore “_” because it appears in the name of the drop-in element. Conversely, if the actual message contains the text “{{“ or “}}”, then it will be necessary to select different tags to use for placeholders.
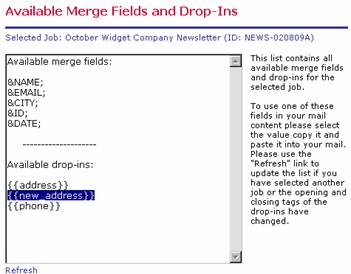
To include a drop-in content element in a message, simply type the drop-in element's name (with the exact spelling and case) and surround it with the opening and the closing tags that have been defined. For a list of available drop-ins, click the Show Merge Fields and Drop-Ins link at the bottom of the text box on the HTML Code, AOL Code, or Text screen. Copy and paste the name of the drop-in into the message to ensure the correct name and tags. To define a new drop-in content element, click on the User Settings icon and then select the Drop-In Content Elements link.
Figure 45 Available Merge Fields and Drop-Ins
To create a plain text message with LISTSERV Maestro, select the Plain Text option. Then, type in the Plain Text text box, or click [Upload Plain Text] to upload a text file. If drop-in content has been enabled, the Plain Text Preview tab will appear. Click on this tab to see what the drop-in content elements look like within the body of the message.
Tip: Uploading a file composed in a word processing program can be beneficial because it is possible to use spelling and grammar checkers. Just be sure to save the file as text, not in the word processor format. Click [OK] when finished composing or uploading the message.
Important: In order to track links inside of text messages, it is necessary to enclose the URL within quotation marks (“http://www.lsoft.com”). These quotation marks will be removed from the recipients’ copy of the message, and serve only to let the system know that there is a trackable link in the message.
There are several ways to compose HTML messages in LISTSERV Maestro:
· Upload an HTML file from a local drive.
· Copy and paste HTML source code from another application.
· Type in HTML source code.
HTML messages can be created locally in any HTML editing program and uploaded to LISTSERV Maestro.
In order for any links to be tracked in an HTML message, they must be enclosed within quotation marks. Most HTML editors will do this automatically, but it is possible to create a link without quotation marks that will be read in Internet Explorer (this browser is very forgiving of HTML coding errors). If in doubt, or if there is trouble selecting a tracking definition for a seemingly good link, double check the HTML coding of the links. An example of correct coding appears below:
<a href=”http://www.lsoft.com”>Link text goes here</a>
Omitting the quotation marks would result in incompatible coding for LISTSERV Maestro tracking.
Important: In order to upload HTML files into LISTSERV Maestro, it is necessary to have the Microsoft® Java Virtual Machine (MS JVM) or Sun Microsystem’s The Java Virtual Machine (JVMTM) installed. This ensures that any accompanying image files for backgrounds, banners, icons, diagrams, and pictures will be automatically uploaded with the source code. Most Windows systems manufactured before 2003 already have MS JVM installed. If a system does not, download The Java Virtual Machine from http://java.sun.com/getjava/index.html.
1. Click [Upload HTML] from the Define Message screen.
2. The first time a file is uploaded after the Java Virtual Machine is installed, a Security Warning screen will appear, asking for permission to use the L-Soft applet to upload HTML. If Always trust content from L-Soft Germany GmbH is checked, then the Security Warning screen will not re-appear for future uploads. If this option is not checked, then it will be necessary to grant permission to use the applet every time HTML files are uploaded in a new browser session.
Grant permission to install and run HTML Upload Applet (for the first time only). Check Always trust content from L-Soft Germany GmbH to prevent the dialog box from re-appearing. Click [Yes] to continue.
3. Browse a local drive for the file, select the file to upload, and then click [OK]. If there are any image files that are linked remotely or embedded from local files, then a screen will appear listing each and asking whether to proceed with the upload. Click [Yes]. The HTML message will then appear in the HTML box.
4. Review the Load Properties, and then click [Yes] to continue.
5. Review the Load Results, and then click [Yes] to continue.
The LISTSERV Maestro applet will also check to ensure internal and external references to linked or embedded image files are valid. Linked files are not sent with the message; embedded files (inline) are sent with the message. One advantage of using linked files is that the message will be smaller. However, a live Internet connection is necessary to view linked files. If the image server is down, they will not be visible. In addition, some firewalls strip HTML messages that contain links to outside sources thus rendering the image invisible.
Embedded files, on the other hand, will be visible without a live Internet connection and if the image server is down. They will make the message larger, but they will not, in most cases, be stripped from the message by a firewall. Consider the use of images, linked or embedded, carefully to avoid complications for the recipients.
Any invalid links will be counted as errors and will be reported in the Load Results dialog box. If [Yes] is clicked, then LISTSERV Maestro will continue uploading the HTML file even if it contains link errors. The error report is only a warning to remind the user that there are currently problems, but the upload is not suspended. The reason that uploads are not halted when the HTML contains errors is that the linked files simply may not be available yet. Sometimes, referenced web sites are under development or are being updated as the email message is being created. Once the linked site is complete, the message will be valid and can be sent out.
Tip: Make clicking each link for linked files a part of the testing procedure and don’t approve the test until all of the links are working correctly. For more information on testing an email job, see Section 7.2 Delivery Testing for a Job.
Table 2 Advantages and Disadvantages of Linked and Embedded Files
|
|
Advantages |
Disadvantages |
|
Linked Files |
Smaller message size. Mail servers will most likely not refuse a small message. Drop-in content can be used. |
Recipients must have a live Internet connection. Some firewalls strip HTML content linking to outside sources. Some email clients refuse to show linked files. Image server must be available. |
|
Embedded Files |
No image server needed. Firewall will not strip content. Visible without a live Internet connection. Drop-in content can be used. |
Large message size. Some mail servers may refuse or delete large messages.
|
To add a plain text alternative to an HTML message, follow these steps:
1. Select the HTML with Alternatives option on the Define Messagescreen.
2. Check Text Format. This activates the Text Preview and Text tabs.
3. Click on the Text tab to add the alternative text message. The message can be uploaded, pasted, or typed directly into the box.
4. Click the Text Preview tab to see what the message looks like to recipients. Any drop-in content elements will be automatically added into the body of the text message.
Notes: Any trackable links in the alternative text
message must be enclosed within quotation marks the same way as the trackable
plain text message links are enclosed. Merge fields and drop-in content
can be used in this format as described in Sections 5.1 Drop-in
Content and 5.6 Merging Fields and
Conditional Blocks.
A second check box for an AOL alternative may appear on the same line as
the text alternative check box. In most instances, this is an obsolete
setting, but more information on formatting LISTSERV Maestro content for
older versions of AOL mail clients can be found in Appendix
H.
In the event that recipient data is available that somehow determines the format each recipient prefers to receive, then that data can be used to send the preferred format to each recipient, all within the same job. This determination is based upon a conditional statement run against the recipient data. The advantage of using conditional content is that it’s possible to prepare a single job for recipients who prefer HTML and those who prefer plain text, respecting each recipient’s choices as well as saving time and reducing the chance for errors while sending multiple jobs.
In order to use the Conditional Content feature, it must first be enabled. To enable Conditional Content, click on the Change link that appears directly under the tabs of the text box on the Define Message screen when HTML with alternatives is selected (see Figure 43). The Conditional Content Settings screen opens. Select the Enable conditional content option.
Once enabled, it is necessary to type in the condition that determines which recipients receive which type of mail. LISTSERV Maestro uses the standard LISTSERV syntax to create the condition. See Appendix E: Using Conditional Blocks for more information on constructing conditions. The condition needs to include at least one merge field from the recipient data so that the condition acts like a variable whose true/false result is different for those recipients receiving each of the different message formats.
Figure 46 Conditional Content Settings
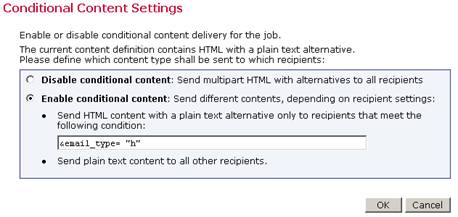
· HTML content with plain text alternative – one condition needs to be specified for the HTML content.
° If a recipient fulfills the condition, the full HTML email including the plain text alternative is delivered to that recipient.
° If the recipient does not fulfill the condition, a simple plain text email is delivered instead, containing only the plain text alternative.
If attachments are present, then LISTSERV Maestro adds the attachments to each of the messages, without applying conditions.
Any type of file can be included as an attachment to an email message. There is no limit to the number of files that can be attached to a message, but there may be a limit to the size of each attachment set by the system administrator. Large attachments or numerous attachments can slow down the delivery of the message and use up bandwidth. Recipients with slower connections may have a negative reaction to the message if they have to download large or numerous attachments. Consider using a link to the information instead of an attachment. That way, processing time is faster, less bandwidth is used, and the link can be tracked.
To attach a file to a message, click the Attachments tab on the Define Message screen. Click [Add Attachment] to browse for a file from a local drive. When content from one job is copied to another job, attachments are copied as part of the message content
Figure 47 Define Message Attachments
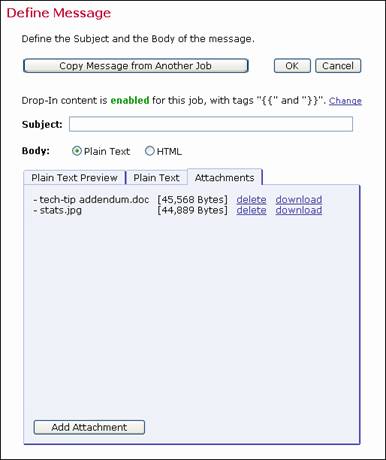
To delete an attachment, click the delete link next that particular attachment. To download an attachment to a local drive, click the download link next to that particular attachment.
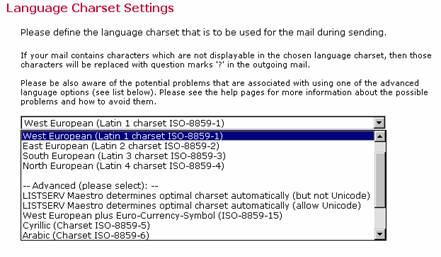
A character set (also called charset, character encoding, code page, or character page) is a table that matches numbers (the digital information sent by computers over the Internet) to letters, or more precisely, characters. Due to the nature of digital information and email (all data is reduced to numeric code) there is a finite number of “positions” in this table to correspond to letters and other symbols of a language. Therefore, different charsets have been developed to correspond to the different letters and symbols for different languages.
A charset will not translate one language to another; it only encodes data to match positions in the table to specific characters. For example, in the charset ISO-8859-1 (matching an alphabet suitable for West-European languages), the position number 196 represents the umlaut Ä. The same position, 196, using the charset ISO-8859-7 (the Greek alphabet), matches the Greek letter Δ. As a result, the same position number in the table will result in different characters being displayed, depending on the charset used for the encoding. For more information on this subject, see Appendix B.
LISTSERV Maestro defaults to the ISO-8859-1
(Latin 1) character set for encoding
email messages unless a different default setting has been preset by the
system administrator. LISTSERV Maestro supports other charsets, and if
users are given the right to use other character sets, an active link
will appear at the end of the Language: Mail will be sent with language charset for… sentence
at the bottom of the Define Message screen. The link will be different
depending on whether a different selection has previously been made. The
default link is West European (Latin 1 charset ISO-8859-1).
To choose a different charset, click the active link. The Language Charset Settings screen will open. Select a charset from the drop-down menu and click [OK].
Figure 48 Language Charset Settings
Tip: If LISTSERV Maestro
is being used to send mail to recipients in a single language environment,
either with plain English or with one of the common West European languages,
the safest choice for a character set (charset)
is always ISO-8859-1 (Latin 1) charset. It contains all 26 common alphabetic
characters (both in upper and lower-case), all the common punctuation
characters and the more common special characters like '@', '+', '*',
and others. In addition, it contains the characters with diacritics required
for many West European languages, such as 'ö', 'å', 'ç' and others.
It is not always necessary or possible to change the charset for email
messages. Using other charsets can become quite complex, especially when
merged data is involved. Each charset has advantages and disadvantages
that are described in more detail in the online help and in Appendix
B.
LISTSERV provides the ability to customize mail messages for each recipient by merging in values uploaded with the recipient data or conditionally including blocks of text based on the preferences indicated in the recipient data. These values and preferences are taken from columns that are present in the recipient data.
To merge a field into the message, simply enter the field name (or header name) used in the recipient definition and precede it with an ampersand ("&") and follow it with a semi-colon (";").
If the recipients data is derived from a traditional LISTSERV list not connected to a database, then the only merge substitution fields available are &*TO; for the email address and &*NAME; for the name.
For a list of available merge fields, click the Show Merge Fields and Drop-Ins link at the bottom of the text box on the HTML Code, the AOL Code, or the Text tab of the Define Message screen. Copy and paste the name of the merged field into the message to ensure the correct name and formatting.
Figure 49 Available Merge Fields and Drop-Ins

The following example demonstrates how overdue book notices can be customized using specific recipient data in the form of the fields EMAIL, NAME, IDNUM, BRANCH, BOOK1, BOOK2, BOOK3. A text message merging the fields might look like this:
Figure 50 Merge Fields Example
|
Dear &NAME;, The following book(s), borrowed using library ID card #&IDNUM;, are overdue: &BOOK1; &BOOK2; &BOOK3; Please return them to the library at &BRANCH; as soon as possible. Sincerely, Your Librarian **************************************************************** Note: This email was sent to &EMAIL; --if you wish to change the email settings for library ID &IDNUM;, please visit “http://library.example.com/mylibrary” **************************************************************** |
In an HTML message, the HTML Code would be altered to include the merge fields, being careful to respect the resulting HTML source code. In an HTML message with alternative text or alternative AOL, remember to put the merge fields in both the HTML Code and the alternative messages.
Conditional blocks act much the same way that merge fields do in that their use is dependent upon the recipient data available in the mail job. Well thought-out use of conditional blocks can also save time and resources by allowing one job to contain different content for different recipients that would otherwise have to be sent in multiple jobs.
Conditional blocks are sections of text that are inserted into a message based on a conditional statement. If the condition is “true”, a particular section of text will be inserted into the message. If the condition is “false”, the text will not be inserted. An “ELSE” clause can be included as part of the conditional statement so a different section of text will be inserted into the message when the condition is “false”. For more information on coding conditional blocks, see Appendix E.
Figure 51 Conditional Block Example
.* If BOOK2 is blank, then use the singular phrasing
.BB &BOOK2 = ""
The following book, borrowed using library ID card #&IDNUM;,
is overdue:
.ELSE
The following books, borrowed using library ID card #&IDNUM;,
are overdue:
.EB
&BOOK1;
.* To avoid extra blank lines, we only include the lines for
.* other books if they are not blank.
.BB &BOOK2 ^= ""
&BOOK2;
.EB
.BB &BOOK3 ^=""
&BOOK3;
.EB
If conditional blocks are used in an HTML message, first create the basic HTML message, then go into the HTML Code and correctly insert the conditional statements, making sure to maintain proper HTML syntax once the directives are followed. The HTML Preview page will now look incorrect because the directives are interpreted as part of the HTML source code.
Important: Test all possible conditional values in the testing stage (see Section 7.2 Delivery Testing for a Job) to make sure that the HTML code works correctly in all cases.
Mail-merge substitutions and conditional blocks are explained in more detail in the LISTSERV Developer's Guide.
URL parameters are specially constructed parts of a web address (URL) that allow a single URL to initiate various specific operations by passing particular instructions and data to the web server. Parameters are text based instructions and data that are passed to a web server, which passes them on to a script (for example, a Java, Perl, C/C++, or a UNIX shell script). The script then executes the corresponding parameter as instructed by the URL, and passes the results back to the web server. The web server then returns the results to the client. In essence, parameters can be used to select a certain page or part of a page to display, or tell the server which page to display to a specific user or type of user.
A URL-parameter is a pair such as ”name=value” that appears after the path-part of the URL, separated from the path by a question mark “?”, similar to the example below:
http://host.domain/path?param=value
If there are several parameters in one URL, then the individual parameters are separated by ampersand characters “&”:
http://host.domain/path?param1=value1¶m2=value2
URL-parameters have many uses and, when it comes to mailings, they come in two general types:
· Constant URL-parameters – Parameters that are the same for all URL visitors. A typical use of a constant parameter is to select a certain page, or part of a page. The following imaginary URL would tell the server to show the “electronics” page and the 15th item on that page:
http://host.domain/path?page=electronics&item=15
· Individual URL-parameters – Parameters that are different for each individual visitor. A typical use of an individual parameter is to tell the server about the identity of the visitor. The following imaginary URL would tell the server that the user with the ID “usr15” is visiting the page. The URL also contains a constant parameter that tells the server that it is supposed to show the “home” page:
http://host.domain/path?visitorID=usr15&page=home
Different visitors would have different values of the “visitorID” parameter. For example, the following URL would tell the server that this time the visitor has the ID “usr217”:
http://host.domain/path?visitorID=usr217&page=home
LISTSERV Maestro allows the user to track URLs with or without parameters as well as URLs with constant or individual parameters. Since URLs with individual parameters need to have a different value for the parameter for each recipient, writing the text of the message could pose a significant challenge.
This challenge is overcome by using field merging, where it is possible, to create unique URL parameters based on the fields of a database. For example, assume there is a merge field named “ID” for each recipient that contains the visitor ID of that recipient. The sample URL would be written as:
http://host.domain/path?visitorID=&ID;&page=home
Let us dissect the different parts of this example:
The URL begins as usual with the protocol header, the host name and the URL-path:
http://host.domain/path?visitorID=&ID;&page=home
The question mark follows next, signaling the end of the path-part and the beginning of the parameter-part:
http://host.domain/path?visitorID=&ID;&page=home
The first parameter is the parameter “visitorID” with the value “&ID;”:
http://host.domain/path?visitorID=&ID;&page=home
Between the first and the second parameter is the ampersand as a separator:
http://host.domain/path?visitorID=&ID;&page=home
The second parameter is the parameter “page” with the value “home”:
http://host.domain/path?visitorID=&ID;&page=home
The second part of the first parameter “visitorID=&ID;” uses the LISTSERV Maestro convention of denoting mail merge fields. Its value is not an actual user ID, but instead is the name of the merge field “ID”, with the preceding ampersand and the trailing semicolon (the format always used in LISTSERV Maestro to mark mail merge fields).
Although the ampersand usually has the reserved function of separating two parameters (like the second ampersand right before the “page” parameter), when it appears to denote the merge field “&ID;” it is acting as a token that will be replaced by the corresponding value of the recipient before the mail is sent out. Therefore, this string will not be present in the final email that appears to the recipient. Instead, it will have been replaced by the merge value for that recipient.
If the URL from above were sent to two recipients, where one recipient has an ID merge value of “usr15” and the other has a value of “usr317”, each would receive an email message with different URLs, like this:
http://host.domain/path?visitorID=usr15&page=home
−OR−
http://host.domain/path?visitorID=usr317&page=home
By employing LISTSERV Maestro’s mail merging features, it is possible to insert URLs that contain constant and individual parameters for each recipient into email messages. If these URLs are marked for tracking, then LISTSERV Maestro is able to track all of them. As a result, if a URL that contains a merged parameter is selected for tracking, LISTSERV Maestro will count all clicks of all recipients on this URL, and each recipient will be directed to the actual URL using his or her own individual parameter.
For example, the imaginary URL below is selected for tracking:
http://host.domain/path?visitorID=&ID;&page=home
In the email messages that are sent out, the URL is replaced by a special tracking URL that points to the server running the Maestro Tracker component. This allows LISTSERV Maestro to count each click on the URL and then redirect to the actual target URL. The user with the ID “usr15” would have the URL in the mail that looks something like this:
http://maestro.domain/trk/click?ref=z4bx39x&visitorID=usr15&page=home
Each user that clicks on this tracking URL will be counted and will be redirected to the actual target URL, using the URL-parameters for that user. For example, the server at “host.domain” will receive the correct “visitorID=usr15” and “page=home” parameters (for other recipients, the “visitorID” would have different values).
URL-parameters may only contain characters that are safe to use in a URL. Some characters are not safe to use, other characters have a reserved meaning (for example, the ampersand “&”, which has the special meaning of separating two parameters). Therefore, all characters that are not valid for use in a URL parameter value must be “URL-encoded”. URL encoding is a standard that encodes unsafe characters into safe characters.
When using field merging in URL parameters, there are two options to ensure that all parameters are URL-safe:
· Make sure that the values of all merge fields that are used (of all recipients) are actually URL-safe. For example, if all recipient IDs only contain alphanumeric characters, then the ID values are already URL-safe because alphanumeric characters are, by definition, URL-safe. It is important to know how recipient IDs are generated by a registration script, for example, in order to know if they are indeed URL-safe.
· If the possibility exists that not all merge values are URL safe, then use the special LISTSERV function “&*URLENCODE()” to make them so. Simply enclose the merge field in the URL within the parenthesis of this function. For example, if there were any doubt that the ID merge field’s values were URL safe, then the sample URL could be written like this:
http://host.domain/path?visitorID=&*URLENCODE(&ID;)&page=home
The function “&*URLENCODE(&ID;)” tells LISTSERV to retrieve the value of the “&ID;” merge field, apply the “&*URLENCODE()” function to it, and then merge in the result in place of the whole “&*URLENCODE(&ID;)” string.
Important: The parameter name “ref” is a reserved name that is used by LISTSERV Maestro to transfer the tracking information to the Maestro Tracker component (seen in the example above). Therefore, “ref” cannot be used in any parameters if there are also merge fields in the same URL. If a URL appeared as:
http://host.domain/path?ref=&ID;
The tracking URL generated from it (for the user with ID “usr15”) would look something like this:
http://maestro.domain/trk/click?ref=z4bx39x&ref=usr15
This URL contains two parameters with the name “ref”. One comes from the original URL, while LISTSERV Maestro added the other. These two parameters with the same name would confuse the Maestro Tracker component. Therefore, a parameter called “ref” must never be used if there are merge fields used in the URL.
If merge fields are not being used in the parameter list of the URL, then LISTSERV Maestro replaces the whole URL with the tracking URL, including the parameters. For example, the following URL with three constant parameters (no merge fields used):
http://host.domain/path?param1=value1¶m2=value2¶m3=value3
will be fully replaced by LISTSERV Maestro with a tracking URL similar to this:
http://maestro.domain/trk/click?ref=z4bx39x&
Since the parameters are also replaced by the tracking URL, it does not matter if the parameter list contains a parameter called “ref” or not. However, this is only true if no merge field is used in the parameter list, meaning that there are only constant parameters.