
The Recipient Warehouse is LISTSERV Maestro’s name for the method of creating, storing, and retrieving data within the system. Every group or single user account has its own recipient warehouse that is the repository for recipient datasets, lookup tables, and recipient target groups. Click on the Recipient Warehouse icon on the home page to open the warehouse. From there, select Recipient Datasets or Recipient Target Groups to begin working with recipient data. Creating and administering recipient target groups is covered beginning in Section 12 Introduction to Recipient Target Groups.
Figure 2 Recipient Warehouse
A recipient dataset is a collection of data organized into fields and pertaining to recipients. The fields making up a dataset can have different types of properties that determine the kind of data within them, such as text, numbers, menu selections, dates and so on. The data administrator designs the datasets within a recipient warehouse, defining each field and the type of data it holds. The recipient dataset also contains mailing lists created by the data administrator that use the recipient data for job definition. The data is shared across all mailing lists that are created within the dataset. Individual lists within the dataset are allowed to have additional fields of data that pertain just to those lists.
As the dataset is being created, a web form is also being created that reflects the exact design of the dataset, including the order of the fields, the descriptions of each field, and the types of data to be collected. Each organization has to decide what kinds of data to collect, including the acceptable format of that data, and how the data is entered into the web form by anyone wishing to join a mailing list. Careful consideration of the dataset design will produce user-friendly web forms, and will collect the types of recipient data that can be used to send personalized and targeted messages to subscribers.
A link to the dataset web form can be placed on a web site where anyone can fill it out, entering the requested data, and then joining any available mailing lists. Data collected from the web form is automatically placed in the matching dataset, where it becomes available for use when sending email jobs to subscribers. Subscribers and their data can also be added to the dataset directly by the data administrator. Managing subscribers and subscriber data is covered in Section 9.1 Managing Members of a Dataset and List Subscribers.
The Recipient Dataset screen has three basic functions that are accessed by clicking either the Recipient Datasets tab, the Lookup Tables tab, or the Bounce Processing Settings tab.
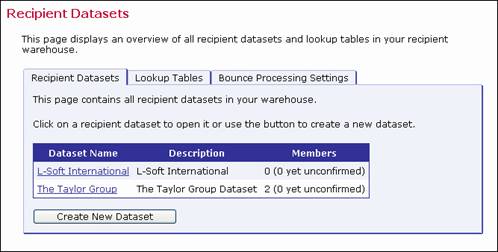
The Recipient Datasets tab contains a listing of the names of any existing datasets, their descriptions, and the number of members in each. Each dataset name is a link that opens the dataset for editing, member management, and customization of the web form.
Figure 3 Recipient Datasets
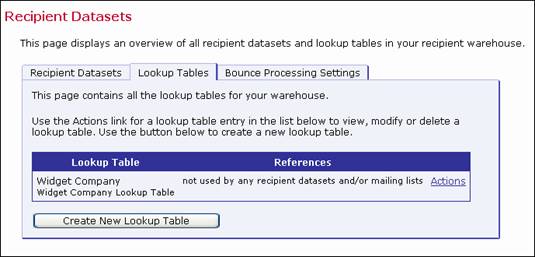
The Lookup Tables tab contains a listing of the names of any existing lookup tables, the datasets and mailing lists that reference them and a link for editing and downloading.
Figure 4 Lookup Tables
Part of the dataset design process is deciding the format of the data collected and how it is presented on the web form. One type of data that needs special mention is the selection list. A selection list is presented as a drop-down menu where one (single select) or more (multi select) items can be chosen. LISTSERV Maestro handles the creation of selection lists under the function of “Lookup Tables”. A lookup table is a collection of entries for a selection list. Lookup tables can be used by any dataset in the warehouse. When designed well, they can serve multiple functions across a warehouse. For example, a listing of university departments in one dataset can be used as a list of college majors in another. A listing of years can be used for graduation year in one dataset and anniversary year in another. Creating Lookup tables is covered in depth in Section 4.1.3 Creating a Lookup Table.
Tip: If your dataset is going to use selection menus, to save time, create the lookup tables first and the then create the dataset.
The Bounce Processing Settings tab displays the bounce removal settings for all of the datasets in your Recipient Warehouse. These settings include:
· The number of bounces with a minimum time between the first and last bounce that it would take before an email address is removed from the Recipient Warehouse.
· The age a bounced email message has to be before it no longer counts against the number of bounces.
Figure 5 Bounce Processing Settings Tab

To change these settings, click the Edit Settings link. The Edit Bounce Processing Settings screen opens. Make your changes and then click [OK] to save. Click [Cancel] to ignore your changes and to return to the Bounce Processing Setting tab.
The Recipient Dataset Definition wizard guides you through all the steps of designing a dataset with its accompanying web form. From the Recipient Dataset screen, click the Recipient Datasets tab, if necessary. Click on the [Create New Dataset] button to start the wizard. Use the [Next ->] and [<- Back] buttons navigate page by page through the wizard. Use the links at the top of the screen to open a particular page of the wizard. The [Save & Exit] button will save the current dataset settings of the open dataset even though the wizard may not be completed. The [Cancel] button will void any current selections and return to the Recipient Dataset Details screen.
The Recipient Dataset Definition wizard is comprised of four main screens – General, Profile Fields, Profile Fields Details, and Summary.
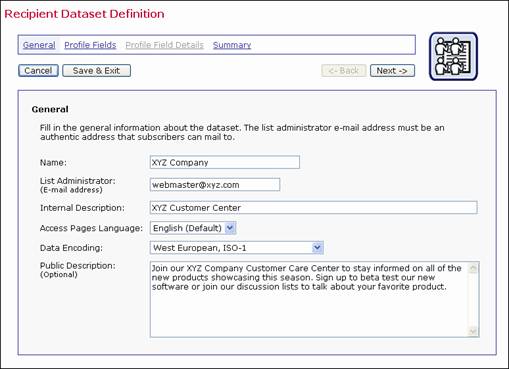
The General screen defines the general information pertaining to the dataset.
· Name – The name of the dataset will appear on all the “public” subscriber pages. It is important to select a name that is reflective of the organization sponsoring the web pages and descriptive of the types of mailing lists available for members.
· List Administrator (email address) – The list administrator email address is the address that confirmation email messages come from. Confirmation email is sent to all subscribers who join a member area and/or subscribe to a mailing list in the dataset. Confirmation email is also sent to members to when they change their passwords. It is important that this address be an authentic email address that can receive mail from subscribers.
· Internal Description – This description information is used internally on the Recipient Datasets tab for identification purposes.
· Access Pages Language – Select the language to use on the subscriber access pages of the dataset (and lists within the dataset). The drop-down list contains the languages that are currently available on your system. Choose English (Default) to use the system default language text. If available, choose English (Customized) to use your own customized English text. Other languages may also be available (depending on the foreign language translations you’ve created using the Resource Translation Tool; for more information on the Translation Tool, see the Interface Customization Manual for LISTSERV Maestro 2.1).
· Data Encoding – Select the type of encoding for the data entered in the dataset from the drop-down menu. This encoding will also be inherited by all mailing lists in the dataset, meaning that it also determines the encoding used to store the profile values of all list subscribers in all lists of the dataset.
· Public Description – This optional information appears on the web form and will assist anyone wanting to join a member area and subscribe to a mailing list to understand what the benefits of membership are. Any additional information about the organization can be placed here.
Figure 6 The Recipient Dataset Definition Wizard – General Screen
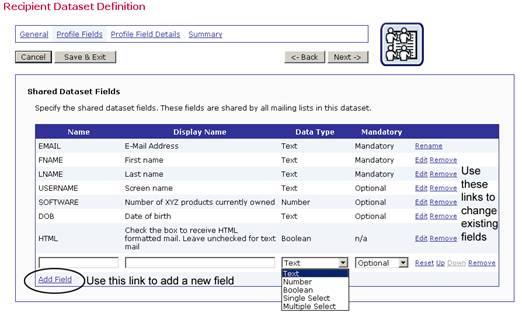
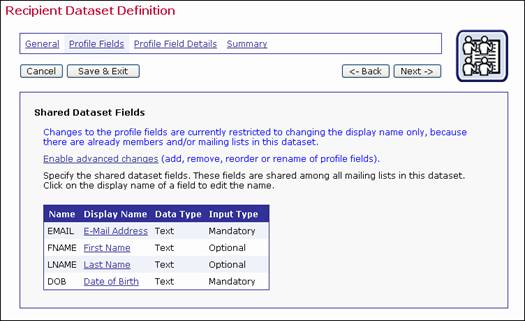
The Profile Fields screen displays a list of shared dataset fields. Every new dataset begins with one mandatory field, called EMAIL. With just this one field, it is possible to create an entire dataset. The email address of each member will be shared among all the lists created in this dataset. Other fields can be added to the dataset, and they too will be shared among all of the lists in the dataset. To add a new field, click the Add Field link. After fields are created, they can be edited, removed, moved up, or moved down by using the corresponding links on the right side of the table.
For each new field, enter the following information:
· Name – The name of the field as it will be used internally by the system for mail merging and querying. Field names can only use upper and lower case letters A-Z and a-z, the numbers 0 – 9 and the underscore “_”. Spaces and other special characters are not allowed.
· Display Name – The label that identifies the field on the web form. The display name will be seen by anyone accessing the public web pages to the membership area. It is also used in the data entry forms used in the Recipient Warehouse for entering and changing subscriber data. All alphanumeric characters are permitted, as well as spaces and special characters allowed by the encoding scheme selected in the General Settings for the dataset.
· Data Type – Choose the type of data to be entered in the field from the drop-down menu. Five different classifications of data are available:
o Text – Text fields can accept any type of text, including dates in specific formats such as dd/mm/yyy or mm.dd.yyyy.
o Number – Number fields accept any whole integers.
o Boolean – Boolean fields are based on two states – true or false.
o Single Select (lookup table) – A single selection field consists of a drop-down menu from which one item may be chosen. It may optionally be represented as a set of radio buttons.
o Multiple Select (lookup table) – A multiple selection field consists of a drop-down menu where one or more items may be chosen. It may also be represented as a set of checkboxes.
· Input Type – Decide whether the data is mandatory for subscribers to enter into the web form or optional. Optional fields can be designated as hidden or read-only if the subscribers are not allowed to enter or change the data in those fields. Boolean fields cannot be optional due to the nature of the data type. Boolean fields may be visible or hidden.
Figure 7 The Recipient Dataset Definition Wizard – Profile Fields Screen
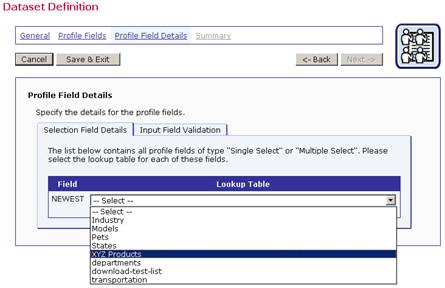
The Profile Field Details screen appears differently depending on the data types in the dataset. Datasets containing selection fields need the relevant Lookup Table assigned to the field.
Figure 8 The Recipient Dataset Definition Wizard – Profile Field Details Screen for Selection Feld Details
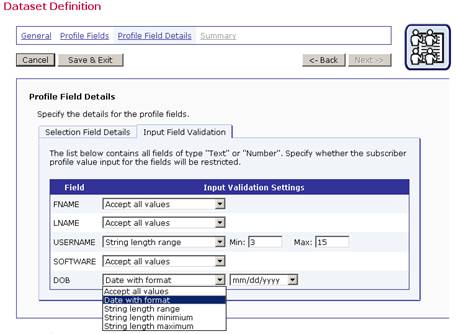
The Text and Number field types can have set validation criteria specified so that when the fields are filled in by members, only certain types of input will be accepted. For example, in the DOB column, (see Figure 8) a date of birth is requested. By setting a validation setting of a date with format, only dates entered using the specified format will be accepted.
Figure 9 The Recipient Dataset Definition Wizard – Profile Field Details Screen for Input Filed Validation
The Summary screen is the final step in the Recipient Dataset wizard. This screen summarizes the settings of the dataset. If necessary, click the [<- Back] button to makes changes to the dataset settings.
Once the dataset is acceptable, set the access level using the drop-down menu. Datasets can have one of three levels of member area access:
· Open to everyone – Anyone can click on the membership area URL and have access to the membership area in order to join the area and subscribe to mailing lists.
· Access for members only – Only those who are current members can login and access the membership area.
· No public access – The membership area is not open for access to anyone.
Figure 10 The Recipient Dataset Definition Wizard – Summary Screen
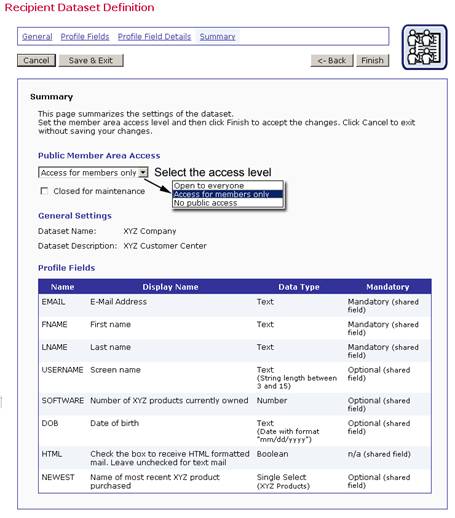
The membership area can be temporarily closed for maintenance such as updating the membership list or other tasks by checking Closed for maintenance. Closing the member area for maintenance will prevent anyone from joining or existing members from changing their settings while the system is temporarily closed. Click the [Finish] button to save all the settings of the dataset. The Recipient Dataset Details screen opens.
For more information on membership areas, see Section 10 Allowing Members to Join a Dataset. For information on customizing the membership area, see Section 11 Giving Subscribers Access to URLs.
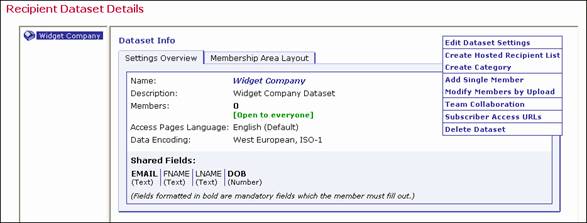
Once you have existing datasets in a warehouse, their settings can be fully edited until there are lists or members added to them. After lists or members become part of a dataset, only limited editing capabilities are available. To edit the settings of an existing dataset, click on the dataset name. A split screen will appear showing the dataset and any lists in the left frame and the dataset information in the right frame. Click on the Actions link in the right corner to open a menu of actions that can be performed on the dataset. The top menu item, Edit Dataset Settings, will open the Recipient Dataset Definition wizard so its settings can be changed.
Figure 11 Editing an Existing Dataset from the Recipient Dataset Details Screen
If there are no members, mailing lists, or layout customizations in the dataset, all of the dataset settings may be changed without any repercussions.
If there are members or mailing lists in the dataset, the following settings can be changed without significant impact on the dataset: the name of the dataset, the list administrator email address, the public description, field display names, the access level of the membership area, and the closed for maintenance check box.
If there are members or mailing lists in the dataset, it is possible to add new fields, remove existing fields, reorder fields, or rename fields. However, as this requires a change in the structure of the underlying database tables, the dataset may be unavailable for a significant time while the entire dataset is rebuilt with the new structure. In order to prevent unanticipated disruptions to the dataset, these types of changes are disabled by default. In order to make such changes, it is necessary to first click on the Enable advances changes link on the Profile Fields screen of the Recipient Dataset wizard.
Figure 12 Enable Advanced Changes on Profile Fields Screen of the Recipient Dataset Definition Wizard
If there are Membership Area Layout customizations of templates that include data fields, then adding, removing, reordering, or renaming fields will break these customized templates and the customizations must be reapplied.
Lookup tables are fields of data that are shared across datasets in a warehouse. When used wisely, they can save time and resources by reusing a single set of data for many datasets and lists. For example, a list of countries of the world can be used to create a lookup table. If this information is collected by several lists or datasets in a warehouse, making a lookup table containing a list of countries once will make this available to all datasets and lists.
To create a new lookup table, click on the Lookup Tables tab from the Recipient Warehouse screen (see Figure 4). Next, click the [Create New Lookup Table] button. The Lookup Table screen opens. Enter a name for the lookup table, select the encoding for the data in the table, and then type in a description of the contents of the table. Click [OK] to continue.
Each lookup table requires an entry that becomes the default value for “no choice”, meaning the value assigned to a field when members do not select from any of the items presented on the selection list. This entry can also be the first selection on the list, or the most popular or common selection on the list. LISTSERV Maestro defaults to an entry that says “<none>”, but this can be changed by clicking the Edit link and adding different text.
To change the default value for “no choice”, click the Edit link. The Edit Lookup Table Entry screen opens. The default, <none>, is used if a subscriber does not select a choice from the lookup table. To use a value other than the default, enter a new value in the Entry Text field. This value may be up to 100 characters. The Entry Text field can not be empty.
Figure 13 Enter Lookup Table Entries
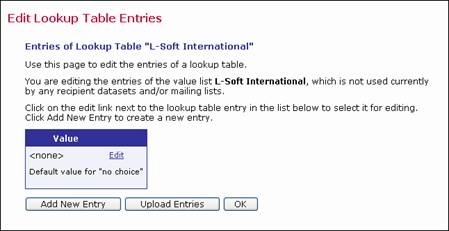
Lookup table entries can be added manually one by one, or they can be uploaded from a text file that contains one entry per line. The number of entries for any single lookup table is limited to 1000 items. To add single entries, click the [Add New Entry] button. Type one item in the text box, and then click [OK]. Click the [Add New Entry] again to add the next item. To upload a text file, click the [Upload Entries] button. Browse for the file on a local drive, select it, and then click [OK].
Figure 14 Edit Lookup Table Entries

Once there are items listed in the lookup table, they can be edited, deleted, moved up, or moved down in the list. Use the adjacent links – Edit, Delete, Move Up, Move Down – to change the item in the table.
Click [OK] to accept the entries in the lookup table and return to the Lookup Tables tab.
Once you have an existing lookup table in a warehouse, then its settings can be edited. To edit the settings for a specific table, click on the Actions link to open a menu of actions that can be performed. You can edit the name or description, edit the values, download values, or delete the table. This menu may vary depending on the settings previously defined for the lookup table, and whether or not the table is being used by any recipient datasets and/or mailing lists. A lookup table cannot be deleted if it is being used by a recipient dataset or mailing list.
Figure 15 Editing an Existing Lookup Table from the Lookup Table Tab
