Dataset members and list subscribers can be added to a dataset and to lists by the data administrator or designated team members. Alternatively, they can add themselves if the dataset (membership area) or any lists in the dataset are visible to the public on the Web. Anyone joining a membership area using the web form has the option of subscribing to any available lists there. Subscribing directly to a list using the list’s web form will automatically add the subscriber to the list’s dataset. More information on self-subscribing to membership areas and lists is covered in Section 10 Allowing Members to Join a Dataset.
Once members belong to a dataset, their data can be managed within the dataset by the data administrator. Management can take place at the dataset level and at the list level. The data administrator can search for members, delete members, change a member’s data, add a single member, download all members, and modify multiple members by uploading a file. Members of a dataset are managed by selecting the dataset. Subscribers to a list are managed by selecting the list.
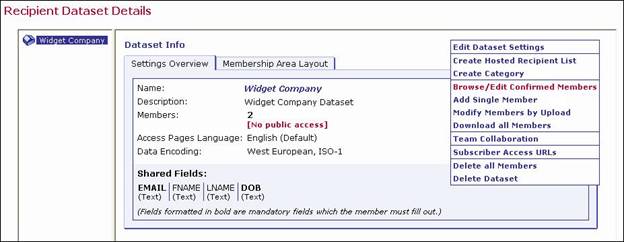
To perform an action on members in a dataset or subscribers on a list in the dataset, select the dataset or list from the Recipient Datasets screen. The Recipient Dataset Details screen opens. Click the Actions link in the right corner to open the actions menu.
Figure 62 Managing Members of a Dataset
Dataset members’ and list subscribers’ data can be reviewed, changed, or deleted by clicking the Actions link, and then Browse / Edit Confirmed Members. If subscribers of a list are deleted from the list, they are not automatically deleted from the dataset. However, if members are deleted from a dataset, they will be deleted from all lists in that dataset. The functions and rules for managing dataset members and list subscribers are almost identical and will both be covered in this section. Pertinent differences will be pointed out in the text and screen shots.
The Manage Members of Recipient Dataset screen displays a listing of all the confirmed members of a dataset. Confirmed members are those members who have been added to the dataset by the data administrator or have added themselves from the web form and then confirmed their membership using a special email message sent to them by LISTSERV Maestro. Unconfirmed members are not displayed here. Unconfirmed members are those who have joined the membership area or subscribed to a list themselves, but have not yet replied to the confirmation email message sent to them by the system.
The members of a dataset or list are displayed 15 at a time per page. A navigation system for paging through members appears when more than 15 members are in a dataset or list. Each page number is a clickable link and contains the next 15 members or subscribers. A maximum of ten page links will appear on the screen at a time. Datasets and lists with more than ten pages will use << to denote the set of 10 pages before the open page, and >> to denote the set of 10 pages after of the current page links.
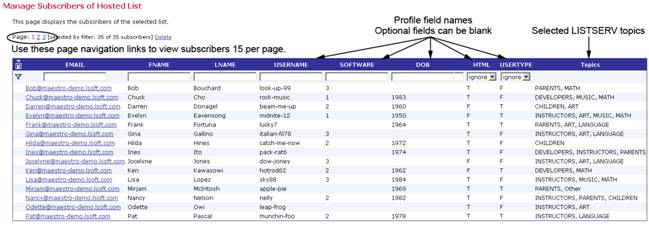
Members and subscribers are sorted alphabetically by email address. Members have their entire dataset profile displayed on the screen. Subscribers have their dataset profile along with any list specific fields displayed on the screen. The table header lists the profile field names in the dataset and list. Each column in the table represents one profile field on the web form. Each field is filled out with the corresponding value for that profile field and member. Mandatory fields have all values filled in for members, while optional fields can be blank. Boolean fields will have a “T” for true and an “F” for false. Datasets with selection menus that allow for multiple selections will display all selected values separated by commas. LISTSERV lists that have topics have all the selected topics displayed.
Figure 63 Managing Members of a Dataset
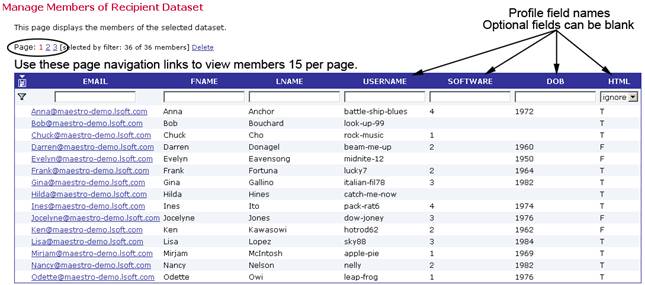
Figure 64 Managing List Subscribers
Each email address is a link that opens the profile page for that member. Click on the email address of the member to be edited. Enter the new data in the profile fields, and then click [OK] to save the new data and return to the previous screen. Click [Cancel] to return to the previous screen without saving the new data. Click [Delete] to delete the member from the dataset.
Figure 65 Edit Dataset Member
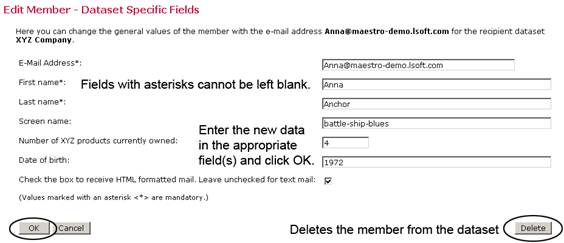
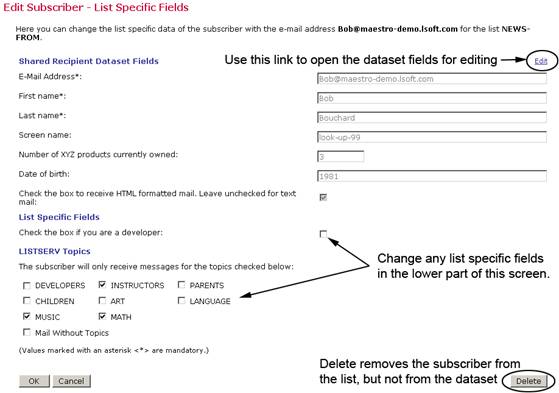
Member profiles will contain only those fields that belong to the dataset. Subscriber profiles will contain the member profile in the top part of the screen with the values grayed out and the list specific fields below. It is possible to edit the member profile from the list profile screen by clicking the Edit link located on the upper right.
Figure 66 Edit List Subscriber
Locating members within a large dataset
can be easily accomplished by using the filtering system available on
the Manage Members of a Recipient Dataset screen. Locating members within
a large list can be accomplished using the filtering system on the Manage
Members of Host List screen. Filtering works the same way for members
and subscribers. A funnel icon located in the upper left
of the recipient data table precedes a row of blank edit boxes at the
top of each column. Use the boxes to enter filtering conditions to narrow
the search for specific members or subscribers. After adding the filtering
conditions in the text boxes, click the funnel icon to filter the members.
A new set of members will be displayed on the screen. This set can be
filtered again by adding additional conditions in the text boxes and clicking
the funnel again. After filtering, the full set of matching members can
be downloaded by clicking the download icon located in the blue header
row of the table. The file that is downloaded is in zipped format.
located in the upper left
of the recipient data table precedes a row of blank edit boxes at the
top of each column. Use the boxes to enter filtering conditions to narrow
the search for specific members or subscribers. After adding the filtering
conditions in the text boxes, click the funnel icon to filter the members.
A new set of members will be displayed on the screen. This set can be
filtered again by adding additional conditions in the text boxes and clicking
the funnel again. After filtering, the full set of matching members can
be downloaded by clicking the download icon located in the blue header
row of the table. The file that is downloaded is in zipped format.
Figure 67 Edit List Subscriber

There are many ways to enter conditions to filter members of a dataset or list subscribers. The type of profile field determines what types of filtering can take place. Wildcards and operators can assist with filtering.
· Text Field Filtering – Fields based on text can be filtered using the following operators and wildcards:
|
Text Box Content |
Filtering Result |
|
empty |
No filtering, all members displayed. |
|
GINA |
All members with a field value of “GINA”. |
|
=GINA |
All members with a field value of “GINA”. |
|
<GINA> |
All members with a field value not equal to “GINA”. |
|
<GINA |
All members with a field value less than “GINA” (less than in terms of alphabetical order). |
|
<=GINA |
All members with a field value less than or equal to “GINA” (less than in terms of alphabetical order). |
|
>GINA |
All members with a field value greater than “GINA” (greater than in terms of alphabetical order). |
|
>=GINA |
All members with a field value greater than or equal to “GINA” (greater than in terms of alphabetical order). |
|
GINA* |
All members with a field value that starts with “GINA”. |
|
*GINA |
All members with a field value that ends with “GINA”. |
|
*GINA* |
All members with a field value with “GINA” in it somewhere. |
The text “GINA” was used as an example in this table. Any text string can be filtered using these rules.
· Number Field Filtering – Fields that are based on numbers can be filtered using the following operators and wildcards:
|
Text Box Content |
Filtering Result |
|
empty |
No filtering, all members displayed. |
|
23 |
All members with a field value of “23”. |
|
=23 |
All members with a field value of “23”. |
|
<23> |
All members with a field value not equal to “23”. |
|
<23 |
All members with a field value less than “23”. |
|
<=23 |
All members with a field value less than or equal to “23”. |
|
>23 |
All members with a field value greater than “23”. |
|
>=23 |
All members with a field value greater than or equal to “23”. |
|
23* |
All members with a field value that starts with “23”. |
|
*23 |
All members with a field value that ends with “23”. |
|
*23* |
All members with a field value with “23” in it somewhere. |
The number “23” was used as an example in this table. Any number can be filtered using these rules.
· Boolean Fields – Fields that are based on Boolean logic display a drop-down menu with the choice of three filters:
|
Filter Choice |
Filtering Result |
|
ignore |
No filtering, all members displayed. |
|
True |
All members with a field value of “T” for true. |
|
False |
All members with a field value of “F” for false. |
· Single Select Fields – Fields that are based on single selection menus can be filtered using the same rules for filtering text (see above).
· Multiple Select Field Filtering – Fields based on multiple selection menus cannot be filtered.
· Topics Field Filtering – LISTSERV lists that contain topics cannot be filtered using the special topics field that is displayed when browsing the list members.
The data administrator can add members to a dataset or subscribers to a list one at a time. It is important to have the necessary data for each addition. To add a single member to a dataset:
1. Select the dataset.
2. Click the Actions link, and then select Add Single Member.
3. Fill in all the fields marked with an asterisk “*”.
4. Optionally, fill in any other fields.
5. Click [OK].
The member will be added to the dataset. Members added to a dataset are not automatically added to any lists in that dataset set. To add or change information at the dataset level, click the Actions link, and then select Browse / Edit Confirmed Members.
To add a single subscriber to a list:
1. Select the list.
2. Click the Actions link, and then select Add Single Subscriber.
3. Enter the email address of the new subscriber in the edit box.
4. Click [OK].
5. If the address is not already a member of the dataset, fill in all the mandatory fields for the dataset and the mandatory fields for the list. If the email address already is a member of the dataset, the dataset fields will already be filled in and their values will appear in gray. Fill in the list specific fields.
6. Optionally, fill in any other list fields.
7. Click [OK].
New list subscribers that are not dataset members are automatically added to the dataset when they are subscribed to any list in that dataset. To add or change information at the dataset level, click the Actions link, and then select Browse / Edit Confirmed Members. To add or change information on the list level, click the Actions link, and then select Browse / Edit Confirmed Subscribers.
Any existing dataset or list can have its current membership modified by the data administrator uploading a file in to the system. This is the easiest way to add many members to a dataset or subscribers to a list as well as update data for numerous members and subscribers. As with other management tasks, the steps for uploading a file to change data for a dataset and to change data for a list follow very similar procedures.
LISTSERV Maestro uses the Upload wizard to assist the data administrator with modifying the data in an existing dataset or list. The wizard is comprised of seven pages that go through the process of modifying the data of an existing dataset or list step by step. Depending on the choices made on some wizard pages, other pages may become disabled or appear in different versions. If a wizard page is disabled, it is not necessary with the current selections and can safely be ignored.
Files uploaded to the system must be in .TXT or .CSV format, one record per line. The columns of data in the file do not have to be in the same order as they appear in the dataset or list. A header row is not required, but if the file has a header row, the header names do not have to be the same as the field names in the dataset or list. The Upload wizard will assist with parsing the data and matching header and field names. For more information on text formatted files, see Appendix B: About Comma Separated Files.
To modify the current members of a dataset, select the dataset, click the Actions link, and then select Modify Members by Upload.
To modify subscribers of a list, select the list, click the Actions link, and then select Modify Members by Upload.
The first screen of the Upload wizard is Type. The existing data can be modified five different ways. Available types for datasets are:
· Add to Dataset – Adds new members to the dataset. All existing members are left unchanged. If records for existing members or subscribers are present in the file, then these will be ignored.
· Update in Dataset – Updates the existing members with the values fond in the file. Does not add any new members to the dataset.
· Synchronize with Dataset – This is a combination of the "add" and "update" functions. Adds any new members found in the file and updates values for existing members found in the file.
· Full Synchronize with Dataset – The data in the file will become the exact data in the dataset. Adds any new members found in the file and updates values for existing members found in the file. Any existing members not included in the file will be deleted from the dataset and from any lists they are subscribed to.
· Remove from dataset – Removes members listed in the file from the dataset and from any lists they are subscribed to. Only the email addresses of those members to be deleted are required to be in the uploaded file; all other columns in the file are ignored.
When modifying subscribers for a list, the values for the dataset are included. The available modifications for lists are:
· Add to List – Adds new subscribers to the list. All existing subscribers are left unchanged.
· Update in List – Updates the existing subscribers with the values found in the file. Does not add any new subscribers to the list.
· Synchronize with List – This is a combination of the "add" and "update" functions. Adds any new subscribers found in the file and updates values for existing subscribers found in the file.
· Full Synchronize with List – The list data in the file will become the exact data in the list. Adds any new subscribers found in the file and updates values for existing subscribers found in the file. Any existing subscribers not included in the file will be deleted from the lists. Subscribers removed from the list will not be removed from the dataset.
· Remove from List – Removes subscribers listed in the file from the list. Only the email addresses of those members to be deleted are required to be in the uploaded file; all other columns in the file are ignored.
Figure 68 The Upload Wizard –Type Screen

Once you’ve selected the modification type, click [Next ->] to continue.
The Type Details screen defines the details for the selected modification type. This screen may not be available for all modification types. For modifying datasets the following details are available:
Table 3 Modifying Datasets Details
|
Modification Type |
Type Details Available |
|
Add to Dataset |
No Details Available. |
|
Update in Dataset |
Overwrite Manual Changes: If members have changed their settings since the last upload modification, will their changes be overwritten? Yes, overwrite manual changes with uploaded values. No, keep values of manually changed members. |
|
Synchronize with Dataset (select the desired option button) |
Overwrite Manual Changes: If members have changed their settings since the last upload modification, will their changes be overwritten? Yes, overwrite manual changes with uploaded values. No, keep values of manually changed members. |
|
Full Synchronize with Dataset (select the desired option button) |
Overwrite Manual Changes: If members have changed their settings since the last upload modification, will their changes be overwritten? Yes, overwrite manual changes with uploaded values. No, keep values of manually changed members. |
|
Remove from Dataset |
No Details Available. |
For modifying lists the following details are available:
|
Modification Type |
Type Details Available |
|
Add to List (select the desired option button) |
If the new subscriber is not yet part of the dataset: Add as new dataset member – Adds the subscriber to the dataset and the list. Ignore subscriber row – Skips the row in the data file and does not add the subscriber to the dataset or the list. |
|
Update in List (select the desired option button for each of the two sets of alternatives) |
The Update may be applied to: List and dataset values – All changes to both the dataset and the list will be accepted. List values only – Changes in the list will be accepted and any changes to the dataset will be ignored. Overwrite Manual Changes: If subscribers have changed their settings since the last upload modification, will their changes be overwritten? Yes, overwrite manual changes with uploaded values. No, keep values of manually changed subscribers. |
|
Synchronize with List (select the desired option button for each of the three sets of alternatives) |
If the new subscriber is not yet part of the dataset: Add as new dataset member – Adds the subscriber to the dataset and the list. Ignore subscriber row – Skips the row in the data file and does not add the subscriber to the dataset or the list. The Update may be applied to: List and dataset values – All changes to both the dataset and the list will be accepted. List values only – Changes in the list will be accepted and any changes to the dataset will be ignored. Overwrite Manual Changes: If subscribers have changed their settings since the last upload modification, will their changes be overwritten? Yes, overwrite manual changes with uploaded values. No, keep values of manually changed subscribers. |
|
Full Synchronize with List (select the desired option button for each of the three sets of alternatives) |
If the new subscriber is not yet part of the dataset: Add as new dataset member – Adds the subscriber to the dataset and the list. Ignore subscriber row – Skips the row in the data file and does not add the subscriber to the dataset or the list. The Update may be applied to: List and dataset values – All changes to both the dataset and the list will be accepted. List values only – Changes in the list will be accepted and any changes to the dataset will be ignored. Overwrite Manual Changes: If subscribers have changed their settings since the last upload modification, will their changes be overwritten? Yes, overwrite manual changes with uploaded values. No, keep values of manually changed subscribers. |
|
Remove from List |
No Details Available. |
Once you’ve selected the type details, click [Next ->] to continue.
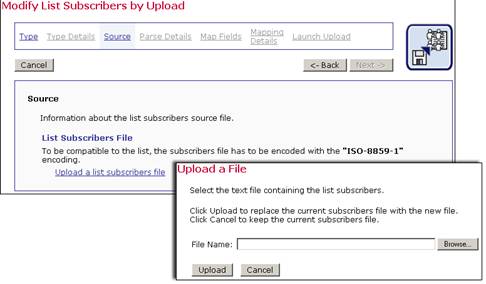
The Source screen is used to determine where the uploaded text file originates. The file uploaded to the system must be encoded with the same character set (charset) that has been defined for the dataset being modified. For more information about character sets, see Appendix C: Email and International Character Sets.
Browse for the file on a local drive, and then click [Upload]. If a file has already been uploaded to the system, a link to upload a different file appears.
Figure 69 The Upload Wizard - Source for Datasets Screen
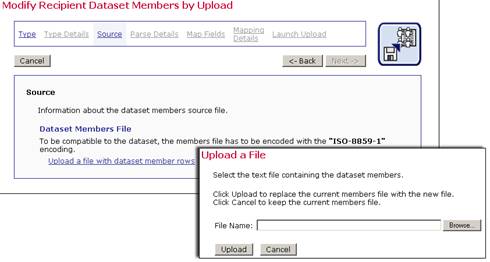
Figure 70 The Upload Wizard - Source for Lists Screen
Once the files has been uploaded, click [Next ->] to continue.
The Parse Details screen lets you determine whether or not the data was uploaded and parsed correctly. When a text file is uploaded, LISTSERV Maestro will try to determine how the columns of data are separated, and how each column or field of data is labeled (header). In order to modify a dataset or list, LISTSERV Maestro must correctly interpret which column contains the email address of the recipient. Other fields may be included and will appear in the Preview table located on the lower half of the screen.
Figure 71 The Upload Wizard - Parse Details for Dataset Screen
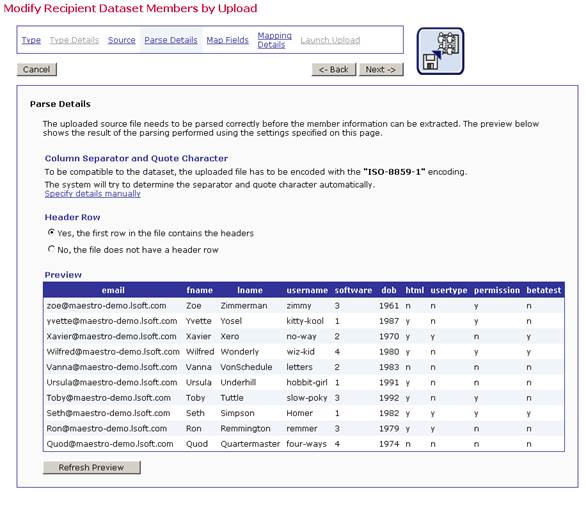
Click the [Next ->] button to continue if the parsing is accurate and each column of data is separated correctly and labeled with a header row.
If LISTSERV Maestro has not interpreted the data correctly, or an unconventional delimiter and/or quote character has been used, click on the Specify details manually link to configure the parsing manually. For example, if the USERNAME field contained Tom “the cool cat” Jones as an entry, and double quotes happened to be the quote character for the file, then the details would have to be specified manually. The same would be true if a field named LOCATION contained the entry Atlanta, GA where the comma was the separator character.
Figure 72 The Upload Wizard - Parse Manually
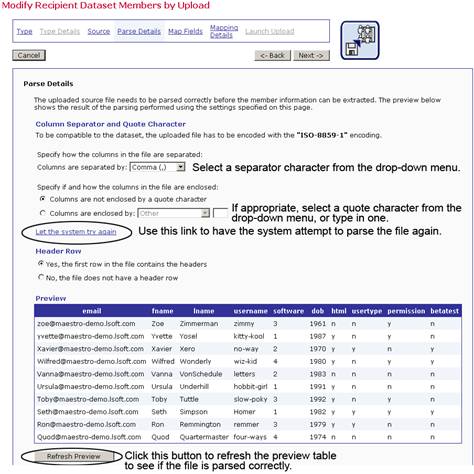
LISTSERV Maestro has four selections for choosing separator characters:
· Tab (\t)
· Comma (,)
· Semicolon (;)
· Other – if this is chosen, type the character into the adjacent box.
Columns can be defined as not enclosed by a quote character or select the quote character from three choices:
· Double Quotes (“)
· Apostrophe (‘)
· Other – if this is chosen, type the character into the adjacent box.
After separator and quote characters have been entered, and any encoding change made, click [Refresh Preview] to have LISTSERV Maestro attempt to parse the file again with the new settings. The new columns will then be displayed. If the columns are now separated correctly, proceed. If the columns are not correct, repeat the process and click [Refresh Preview] to see the new changes. Click the [Next ->] button to continue if the parsing is accurate and each column of data is separated correctly and labeled with a header row.
Headers are specially defined rows used to label the columns of data so that the system and the user can correctly identify the columns. An uploaded text file may contain headers or not. If the file does not contain headers, select the No, the file does not contain a header row option and the system will automatically add a header row. Each column of data in the header row will have a generic name using the pattern COL1, COL2, COL3, and so on. If the uploaded file does have a header row, select the Yes, the first row in the file containers headers option and the headers within the file will be used. Click the [Next ->] button to continue if the parsing is accurate and each column of data is separated correctly and labeled with a header row.
The Map Fields screen lets you map the columns of your uploaded file to the fields in the dataset. For example, if the header names for the columns of data do not match the names of the fields in the dataset or list, then they can be “mapped” to the correct fields. Boolean fields in this context are considered mandatory. Optional fields can be mapped, but it is not necessary for a successful upload. Any “extra” fields that may be contained in the file (fields that are not listed in the dataset or list) will be ignored by the system. This way, data to be used to modify datasets and lists does not need to match the format of the dataset or list exactly, but can contain other fields and different header names.
If the uploaded file contains headers, LISTSERV Maestro will attempt to map the fields to the column names. Fields that are mapped successfully appear with a green checkmark icon next to them. Fields that cannot be mapped automatically appear with a yellow arrows icon; these may be mapped to a column from the file, or a default value may be assigned in a later step. Fields that are mapped to more than one column have a red null icon; these must be fixed before proceeding.
To map a column from a file to a list or dataset field, use the drop-down menu under the header to locate the correct field and select it. If the file contains columns that do not map to any field, select <ignore> for these columns.
Figure 73 The Upload Wizard - Map Fields Screen
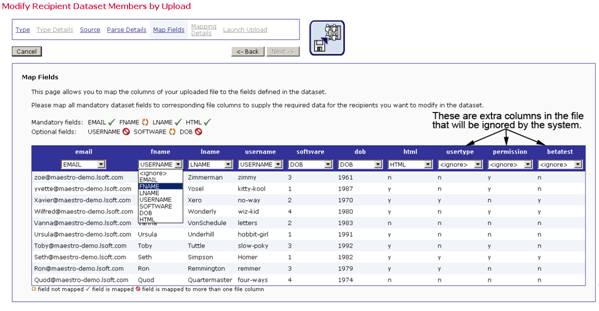
Once all the fields are correctly mapped, click the [Next ->] button.
The Mapping Details screen is used for further defining fields so LISTSERV Maestro can correctly interpret the uploaded values. This screen is also used to provide default values, when necessary.
The following fields may be available for definition:
· Default Values – If values are missing in the uploaded data, then define the default values to be used for each field.
· Boolean Value Mapping – If Boolean fields are among those mapped on the Map Fields screen, then the Boolean value for these fields needs to be defined.
· Multiple Value Parsing – If Multiple Selection fields are among those mapped on the Map Fields screen, then the data in the uploaded file needs to be defined as to how it will be parsed to correctly extract multiple values from it.
The Mapping Details screen differs depending on the type(s) of fields mapped on the Map Fields screen. If only one of the above fields need further definition, then the Mapping Details screen displays only that value. If there is more than one field that needs defined, then the screen will display a tab for each type of field. For example, if both Boolean fields and multiple selection fields need further definition, then the Mapping Details screen will appear with two tabs, one representing each type of field, allowing you to define each value. When each tab is completed, a green checkmark will appear on that tab. The [Next->] button will not be available until all required mapping details are completed.
Default Values
Default values are applied when field values from the uploaded data are missing. This tab displays a list of all the fields with the currently defined defaults. Click on a field to edit its default value. The Define Default Value screen opens.
Figure 74 The Upload Wizard - Mapping Details for Default Values
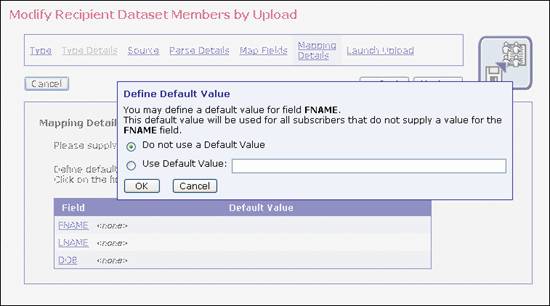
Default values are used in two cases:
· If the field is not mapped to a file column at all, then the provided default will be used for all uploaded rows to provide the field with a value.
· If the field is mapped to a file column, then the provided default will only be used for those uploaded rows where the value of the mapped column is empty. In this case, the field will not be assigned the empty value from the column, but the default defined here.
For fields that are optional (including the hidden and read-only types, which are variations of the optional type), then it is not necessary to define a default. If, for such a field, no default is defined, then the empty default is assumed. Therefore, for fields of this type, you can define a default (to get the defaulting behavior as described above), but it is not mandatory.
For fields that are mandatory (including the visible type, which is a variation of the mandatory type), then, in some situations, a default is required, and in some, it is not:
· Mandatory fields that are not mapped to a file column: For fields of this type, it is required to define a default; otherwise, the field would be empty for every uploaded row, and since a mandatory field is not allowed to be empty, then that would mean every uploaded row would be rejected as invalid.
· Mandatory fields that are mapped to a file column: For fields of this type it is not required to define a default; however, in many cases it may be advisable. If no default is defined, then any uploaded row where the value of the mapped file column is empty will be rejected as invalid (because the mandatory field may not be assigned an empty value). Therefore, if you want to avoid rows being rejected, define a default for use whenever the mapped column is empty.
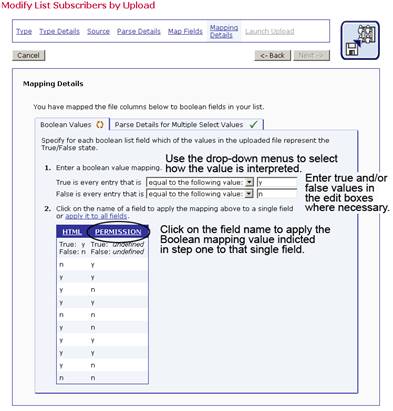
Boolean Fields
When Boolean fields are present in a dataset or list, LISTSERV Maestro needs to know what value equates to “true” and what value equates to “false” for each field. These values do not have to be the same for all fields in the dataset or list. Each Boolean field can have its own true and false values. For example, one field might have the digit “1” represent true and the digit “0” represent false, and another field might have the letter “Y” represent true and the letter “N” represent false. Once the true and false values have been defined, they can be used to tell the system how to use the values to register a true or false in the dataset.
A “true” value can be registered by selecting one of the options:
· True is every value that is equal to the value entered in the True field.
· True is every value not equal to the value in the False field.
A “false” value can be registered by selecting one of the options:
· False is every value that is equal to the value entered in the False field.
· False is every value not equal to the value in the True field.
Three valid combinations of these options are possible:
· A value representing “true” is specified and a value representing “false” is specified. This combination will assign the corresponding Boolean values to all rows that have the specific true and false values. Any rows that do not have the specified true and false values will be skipped as invalid and can be downloaded from the Results Statistics screen after the upload is completed.
· A value representing “true” is specified and the “false” is every value that is not equal to the true value. This combination will assign the true value to those rows that have the specified value, and assign false to all other rows. No rows will be skipped due to an invalid value in that field.
· A value representing “false” is specified and “true” is every value that is not equal to the false value. This combination will assign the false value to all those rows that have the specified value, and true to all other rows. No rows will be skipped due to an invalid value in that field.
In the second step of Boolean field mapping, select which field to apply the values to by clicking the name of the field. If all of the Boolean fields use the same definition, click the apply to all fields link.
Figure 75 The Upload Wizard - Mapping Details for Boolean Fields Screen
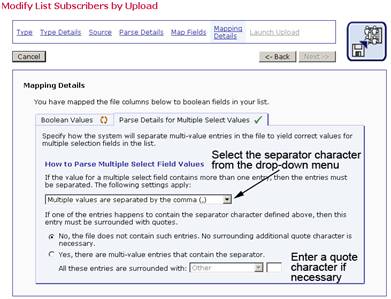
Multiple Select Values
If there are multiple selection fields, LISTSERV Maestro needs to know how multiple entries are separated. If the separator character is used in one or more of the entries, those entries need to be surrounded by a quote character that LISTSERV Maestro needs to be aware of as well (see Section 9.3.1.4 Parse Details).
Figure 76 The Upload Wizard - Mapping Details for Multiple Selection Lists Screen
Click [Next ->] to continue if there are no other tabs to set mapping details for, or if each tab has a green checkmark.
The Launch Upload screen summarizes the options for the upload. Use the [<- Back] button to return to the previous screen, or any of the links in the navigation bar to return to a previous screen to change selections. Click the [Launch] button to upload the file and modify the dataset or list. An Operation in Progress bar will display until the upload and modification are completed. Results of the modification will be displayed. Download any unprocessed rows by using the download links.
Figure 77 The Upload Wizard - Upload Results Statistics
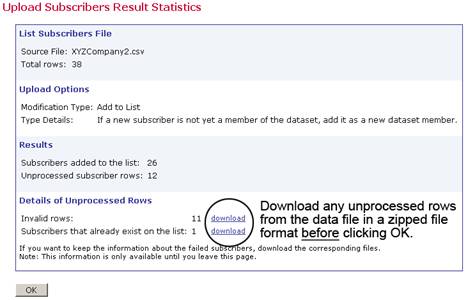
Click [OK] to accept all modifications and return to the Recipient Dataset Details screen.
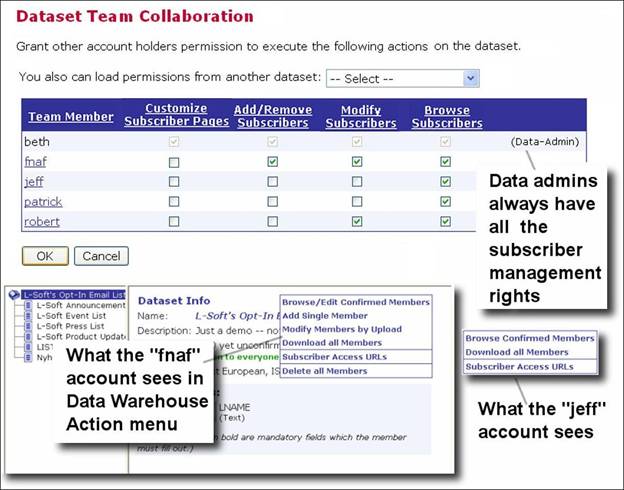
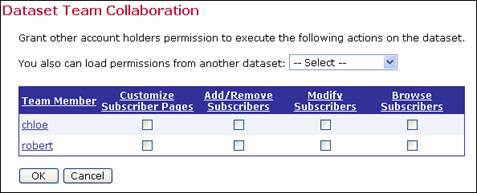
Team Collaboration is now available for datasets, allowing the data administrator to designate certain rights to other team members. These rights include the ability to add, remove, or modify subscribers, plus the ability to browse through subscriber data for purposes of downloading data for reports. Also available is the right to customize the subscriber access web pages.
To set up team collaboration for a dataset, click the Actions link, and then select Team Collaboration. The Team Collaboration screen opens. All of the team members in the same group as your own account are listed in the table on this screen.
Note: Only data administrators have the right to grant team collaboration permissions to other team members; therefore, if you cannot access the Team Collaboration screen, then you are not a data administrator.
To grant permissions to other team members, simply check the box that corresponds to that particular permission. To revoke permissions, simply uncheck the box for that particular permission. To grant or revoke all of the permissions for a team member, click on the team member’s name. All of the boxes will either be checked or unchecked simultaneously.
To copy existing permissions from another dataset, select the dataset from the drop-down menu. The permissions will be automatically copied.
Figure 78 Team Collaboration Screen
The following permissions can be granted to a team member:
·
Customize Subscriber Pages
If this box is checked, then the team member has permission to customize
the subscriber pages associated with the dataset and its hosted lists.
·
Add/Remove Subscribers
If this box is checked, then the team member has permission to add new
members to the dataset and new subscribers to the hosted lists in the
dataset. They can also remove members or subscribers from the dataset
or its lists.
If this permission is granted, then the Modify Subscribers and Browse Subscribers permissions are also automatically granted.
·
Modify Subscribers
If this box is checked, then the team member has permission to modify existing
members of the dataset or modify existing subscribers of the hosted lists
in the dataset.
If this permission is granted, then the
Browse Subscribers permission is granted.
If this permission is revoked, and the Add/Remove Subscribers permission
was already granted, then both permissions are revoked.
·
Browse Subscribers
If this box is checked, then the team member has permission to browse and
view the list of current members of the dataset or subscribers of the
hosted lists in the dataset.
If this permission is revoked, and the Add/Remove Subscribers and/or the Modify Subscribers permissions were already granted, then all three permissions will be revoked.
Note: Some team members in the list may be displayed as “read only”, with all permissions granted and the Data-Admin label. This means that this particular team member is a data administrator. A data administrator always possesses all possible permissions, which can not be revoked from them on this screen. A user is considered a data administrator if the Administer Hosted Recipient Datasets option is granted in the Administration HUB (set by the administrator).
Figure 79 Data Team Collaboration Example