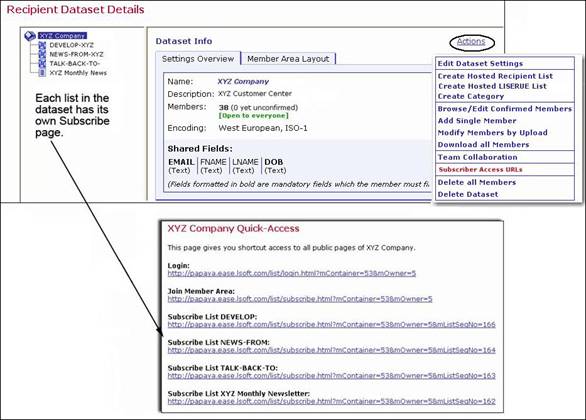
One of the final steps in the process of setting up a Recipient Warehouse – to collect, organize, and manage recipient data and email lists – is to provide people with access to the membership and list subscription areas. LISTSERV Maestro automatically generates URLs to all of the public pages of a dataset as each dataset and the lists within it are created. These URLs can then be used in links on the organization’s main web site or sent in an email message in order to invite members and subscribers to join. Subscriber access URLs can be found on the Recipient Dataset Details screen by clicking the Actions menu, and then selecting Subscriber Access URLs. Each dataset may have the following URLs defined:
· Login – Takes existing members to their membership page when they enter their email address and password. Members that have been added by the data administrator but do not have a password can enter their email address and request a password. Members that have forgotten their password can request a new one. There is also a link that brings people who are not members to the join membership area page.
· Join Membership Area – Takes a prospective member to the sign up page for the membership area (dataset). This URL is only available for datasets that are defined as “Open to everyone”.
· Subscribe List [list name] – Takes a prospective subscriber to the list’s subscription page. Each list defined as “Open to everyone” in a dataset that is “Open to everyone” will have its own subscription URL.
Figure 85 Subscriber Access URLs
Click on each of the subscriber access URLs to view what the public pages look like. After seeing what the public sees, it may be necessary to go back and edit the dataset fields or list fields. If the automatically generated web pages are inadequate for your site, they may be customized.
The Customization wizard for the Subscriber Interface makes it possible for the data administrator to customize every page and email that a subscriber will see. This will make it easier for you to focus on your subscriber’s “touch points” and convey your organization’s message. This same customization can be applied to all of the pages related to a single dataset or you can customize each individual page. For example, text for some lists can be in English, and text for others can be in French, or the entire look and feel of the signup page for an individual list can be different from all other lists in the dataset.
Context-sensitive instructions guide you through the Customization wizard, describing each template, listing the placeholders used in each template, and showing you how each template relates to the others.
The Customization wizard maintains two versions of every template – a draft version and a production version. You are also able to test the draft version of the template, using varying conditions, before releasing it into production.
To access the Customization wizard, click on the Recipient Warehouse icon, and then select Recipient Datasets. Click on the name of the dataset that you want to customize. The Recipient Dataset Details screen opens; click on the Membership Area Layout tab. If you have not customized your subscriber pages, then a general overview and introduction into the topic of membership area customization is displayed.
Note: If the subscriber pages are not customized, then LISTSERV Maestro will use the default setting for the visual layout and text.
Figure 86 Membership Area Layout Customization
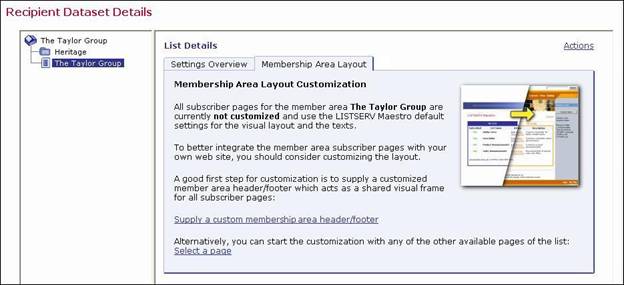
To start customization, click on either the name of the dataset or the name of the list you want to customize, and then click either of these links:
· Supply a custom membership area header/footer – The header/footer is a common template which is (by default) shared by all pages that constitute the membership area; therefore, any changes to the header/footer will automatically affect all pages. Because of this, the header/footer is the ideal place to start the customization, providing a common layout for all pages.
· Select a page – In addition to the header/footer template, there are a number of other layout elements which can be customized. This link takes you to a list of all available layout elements.
Note: The sections below only summarize the customization process. For more information, see the Interface Customization Manual or the online help.
The Supply a custom membership area header/footer link opens the Customize Page Layout screen. This screen allows you to preview the draft and production version for each layout element you want to customize for the dataset.
To customize the membership area layout for the dataset, click the Currently Customizing drop-down menu and select Membership Area Layout. This layout is shown by default. To customize the list(s) in the dataset, click the drop-down menu and select list you want to customize (i.e. if you have a list named XYZ, then select Layout of List XYZ).
The Customize Page Layout screen for the Membership Area Layout is divided into two panes. The left pane is where you select the page or template that you want to customize. The default is the Membership Area Header/Footer page. To change, simply click the drop-down menu and select a different page/template to work with. From this menu, you can also select to customize notifications, messages, or error text. Once you make a selection, the area below the drop-down menu displays the following:
· If you selected a template page, normal page, or a notification email, then a short description of the selected layout element is displayed.
· If you selected a message text for a message group, then a list of available message for that group is displayed. Click on one of the messages to select it as the layout element you want to customize (or view). When you initially select a message group from the drop-down menu, the first message in the group is selected, by default.
· If you selected an input validation error for an error group, then a list of available errors for that group is displayed. Click on one of the errors to select it as the layout element you want to customize (or view). For each error group, there is an Error Group Header/Footer option that defines a common opening and closing text that is shared by all of the errors in this group. This header/footer appears first in the list of errors for the group and is select, by default, when you initially select an error group from the drop-down menu.
The right pane contains two tabs – the Draft Version tab and the Production Version tab. The production version is the version that subscribers, who access the membership area pages, actually see. The draft version, on the other hand, is not visible to the subscribers. This means that you can safely make any changes to the draft version without them becoming immediately visible. For example, you may want to customize one page after the other by editing their draft versions; but, you want to make the customized versions available all at once, after you have finished with all pages. Or, you may want to experiment a bit with the layout, without disturbing the actual production versions that subscribers see. Only when you finally deploy the draft version as the new production version will your changes become visible to subscribers.
Various action icons may be displayed, letting you execute certain action on the current draft version of the selected layout element. Not all actions are always available.
 Edit Source – Click to edit the current
draft version.
Edit Source – Click to edit the current
draft version.
 Deploy as Production Version –
Click to deploy the current draft version as the new production
version. This will make a copy of the current draft version of the selected
layout element and write it into the element's production version, making
this the version of the selected element which subscribers actually see.
The draft version remains unchanged.
Deploy as Production Version –
Click to deploy the current draft version as the new production
version. This will make a copy of the current draft version of the selected
layout element and write it into the element's production version, making
this the version of the selected element which subscribers actually see.
The draft version remains unchanged.
 Copy from Production Version –
Click to make a copy of the current production version and use
it as the new draft version. This will overwrite all current changes to
the draft version. The production version remains unchanged.
Copy from Production Version –
Click to make a copy of the current production version and use
it as the new draft version. This will overwrite all current changes to
the draft version. The production version remains unchanged.
 Reset to System Default –
Click to reset the current draft version to the LISTSERV Maestro
system default. This will overwrite all manual changes to the draft version
and will reset it to its default. The production version remains unchanged.
Reset to System Default –
Click to reset the current draft version to the LISTSERV Maestro
system default. This will overwrite all manual changes to the draft version
and will reset it to its default. The production version remains unchanged.
Various comments may also be displayed, depending on the type of layout element you selected to customize.
· Header/Footer Template – The comment displays how many pages (in the dataset and its lists) that are currently using the header/footer template (i.e. pages that do not have a header/footer defined of their own but are inheriting the template). Click the Details link to view a detailed list of pages using this template.
· Any of the List Page Templates – The first comment displays if the template page inherits the header/footer template (see above) or if the header/footer is defined locally on the list page template. The second comment (below the first one) displays how many list pages are currently using the corresponding template (i.e. pages that do only define the layout of the actual list profile fields locally, but inherit the rest of the page layout from this template).
· Any of the Normal Pages – The comment displays if the page inherits the header/footer template (see above) or if the header/footer is defined locally on the page.
· Any of the Message Page Texts – The comment describes the currently selected message and the circumstances under which it is displayed to the subscriber.
· Any of the Input Validation Errors – The comment describes the currently selected error message and the circumstances under which it may occur. Also, unless the current message is already the error-header/footer of the error group, then it provides a link to select the error-header/footer for the current error group. By editing the error-header/footer, you can provide all errors in one error group with the same opening and closing texts.
Additional controls may also appear, allowing you to simulate certain system states so you can verify their impact on the actual preview. These controls vary depending on the layout element selected, and only a few elements offer them. For information on these controls, please see the online help.
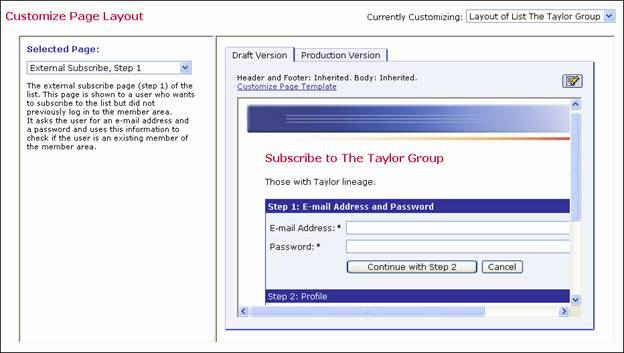
Figure 87 Customizing the Membership Area Layout

The Customize Page Layout screen for the selected list is divided into two panes. The left pane is where you select the list page that you want to customize. The default is the External Subscribe, Step 1 page of the list. To change, simply click the drop-down menu and select a different list page to work with. Once you’ve made a selection, a short description of the current list page is displayed below the drop-down menu.
Various action icons may be displayed, letting you execute certain action on the current draft version of the selected layout element. Not all actions are always available.
Edit Source –
Click to edit the current draft version.
Deploy as Production Version –
Click to deploy the current draft version as the new production
version. This will make a copy of the current draft version of the selected
layout element and write it into the element's production version, making
this the version of the selected element which subscribers actually see.
The draft version remains unchanged.
Copy from Production Version –
Click to make a copy of the current production version and use
it as the new draft version. This will overwrite all current changes to
the draft version. The production version remains unchanged.
Reset to System Default –
Click to reset the current draft version to the LISTSERV Maestro
system default. This will overwrite all manual changes to the draft version
and will reset it to its default. The production version remains unchanged.
Various comments may also be displayed, giving further details about the current list page. All list pages consist of three parts – the outer header/footer, the page body, and the inner list fields. It is possible to customize each page on three levels.
· Inherit the header/footer and the page body from the list template and customize only the inner list fields.
· Inherit the header/footer from the list page and customize the body, including the inner list fields.
· Customize the whole page, including header/footer, body, and inner list fields.
Additional controls may also appear, allowing you to simulate certain system states so you can verify their impact on the actual preview. These controls vary depending on the layout element selected, and only a few elements offer them. For information on these controls, please see the online help.
Figure 88 Customizing the Layout of a List
To start customizing a subscriber page, click on either the dataset name or the list name (in the right pane of the Recipient Dataset Details screen), and then click the Select a page link.
Once you’ve selected to customize a subscriber page for a dataset, then the Membership Area Layout tab refreshes and displays a list of all customizable layout elements. The layout elements are divided into three tables – Templates, Pages, and Subscriber Notification Mails. Each table lists the available elements and displays their current customization status:
 The draft
version of the layout element is not customized.
The draft
version of the layout element is not customized.
 The draft version
of the layout element is customized.
The draft version
of the layout element is customized.
 The production
version of the layout element is not customized.
The production
version of the layout element is not customized.
 The production
version of the layout element is customized.
The production
version of the layout element is customized.
Figure 89 Selecting a Subscriber Page for a Dataset
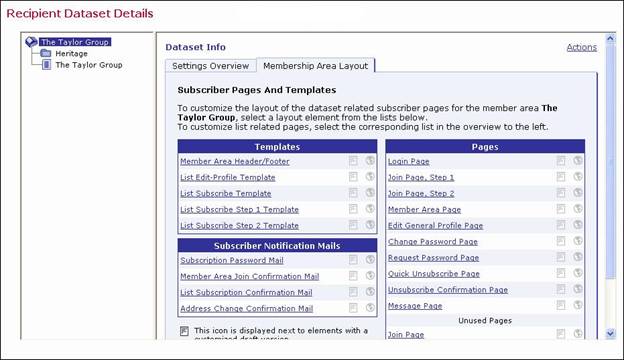
To start customizing a layout element, simply click on it.
If at least the draft or production
version of a layout element is customized (or both), then either a " " or a "
  " sign is displayed between
the two icons. This lets you know whether or not the current draft version
is equal to the current production version. If both versions are not customized,
then the equals-sign is not displayed because the two versions are the
same.
" sign is displayed between
the two icons. This lets you know whether or not the current draft version
is equal to the current production version. If both versions are not customized,
then the equals-sign is not displayed because the two versions are the
same.
 If you have at least one
layout element in the dataset where the draft version is different than
the current production version, then the Deploy icon allows you
to deploy all these draft versions at once (either the ones in the dataset
itself or all draft versions in the dataset and all its lists).
If you have at least one
layout element in the dataset where the draft version is different than
the current production version, then the Deploy icon allows you
to deploy all these draft versions at once (either the ones in the dataset
itself or all draft versions in the dataset and all its lists).
For some customization placeholders
(that you can use on customized pages), it is possible to provide certain
attributes that determine how each placeholder will be rendered on the
final HTML page. For these placeholders, it is also possible to define
which attributes shall be used by default (i.e. on all pages that do not
define individual attributes for their placeholders).
Click the Profile-Placeholder Default Attributes link at
the bottom of the Pages table to define these defaults. For more information,
please see the online help.
If the customized versions of some pages are no longer compatible to the dataset, then the following additional icons may be displayed instead of the icons explained above:
 The draft version of the page is customized, but the
customized version is no longer compatible with the dataset. Therefore,
before you can view (or deploy) the current customized draft version,
you will have to make it compatible to the dataset again.
The draft version of the page is customized, but the
customized version is no longer compatible with the dataset. Therefore,
before you can view (or deploy) the current customized draft version,
you will have to make it compatible to the dataset again.
 The production version of the page is customized, but
the customized version is no longer compatible with the dataset. Therefore,
the system has automatically modified the customized production version
to make it compatible again (and has saved a backup copy of the original
customized production version).
The production version of the page is customized, but
the customized version is no longer compatible with the dataset. Therefore,
the system has automatically modified the customized production version
to make it compatible again (and has saved a backup copy of the original
customized production version).
If the customization of any page is currently incompatible to the matching dataset, then the tab also displays an additional notification message about this fact and contains a link to a page where you can view (and access) all incompatible pages.
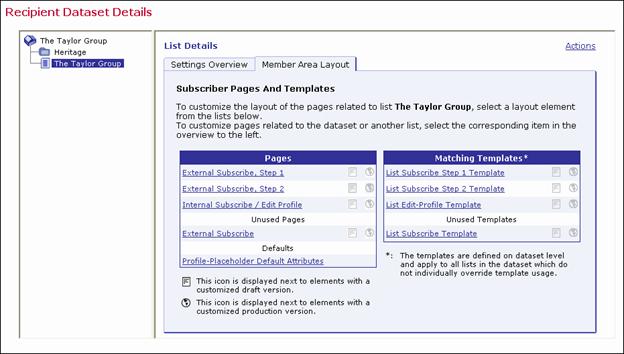
Once you’ve selected to customize a subscriber page for a list, then the Membership Area Layout tab refreshes and displays a list of all customizable layout elements. The layout elements are divided into two tables – Pages and Matching Templates.
Note: The Pages table contains the actual layout elements that can be customized for the selected list, while the Matching Templates table contains the layout elements of the dataset that the list belongs to. However, since the list pages by default make use of these templates, the templates have been included for convenience.
Each table lists the available elements and displays their current customization status:
The draft version
of the layout element is not customized.
The draft version
of the layout element is customized.
The production
version of the layout element is not customized.
The production
version of the layout element is customized.
Figure 90 Selecting a Subscriber Page for a List
To start customizing a layout element, simply click on it.
If at least the draft or production
version of a layout element is customized (or both), then either a "" or a " " sign is displayed between
the two icons. This lets you know whether or not the current draft version
is equal to the current production version. If both versions are not customized,
then the equals-sign is not displayed because the two versions are the
same.
If you have at least one
layout element in the list where the draft version is different than the
current production version, then the Deploy icon allows you to
deploy all these draft versions at once (either the ones in the dataset
itself or all draft versions in the dataset and all its lists).
For some customization placeholders
(that you can use on customized pages), it is possible to provide certain
attributes that determine how each placeholder will be rendered on the
final HTML page. For these placeholders, it is also possible to define
which attributes shall be used by default (i.e. on all pages that do not
define individual attributes for their placeholders).
Click the Profile-Placeholder Default Attributes link at
the bottom of the Pages table to define these defaults. For more information,
please see the online help.
If the customized versions of some pages are no longer compatible to the list, then the following additional icons may be displayed instead of the icons explained above:
The draft version of the page is customized, but the
customized version is no longer compatible with the list. Therefore, before
you can view (or deploy) the current customized draft version, you will
have to make it compatible to the list again.
The production version of the page is customized, but
the customized version is no longer compatible with the list. Therefore,
the system has automatically modified the customized production version
to make it compatible again (and has saved a backup copy of the original
customized production version).
If the customization of any page is currently incompatible to the matching list, then the tab also displays an additional notification message about this fact and contains a link to a page where you can view (and access) all incompatible pages.