The data administrator account can simplify and streamline the use of data sources, including databases, uploaded text files, and email lists, to select recipients and recipient data to the point where end users do not need to know anything about how and where data is stored. To do this, the data administrator creates predefined recipients lists, complete with a name and description, called Recipient Target Groups.
Users can choose among these target groups to select the recipients for their jobs. The data administrator builds the recipient target groups by writing SQL statements to retrieve data from a database, a data source such as a spreadsheet, or in the case of hosted recipient data, building a query using the LISTSERV Maestro interface. The data administrator also designs the methods end users employ to select the data (in a series of check boxes, drop-down menus, and/or text boxes).
There are many advantages to using recipient target groups.
· Using recipient data stored in a database can save time and system resources.
· The database can be continually updated until the time the job is sent, ensuring that the most current data is used for the job.
· Recipient target groups are shared among group members and can be reused for multiple jobs.
· Parameters can be inserted into recipient target groups so that end users have some control over what recipients are retrieved for each job. Using parameters reduces the number of individual queries that need to be written for jobs.
· The data administrator does not need to be involved with any other parts of email jobs.
· Specific recipient target groups can be removed from use without deleting them. They can be reinstated whenever desired.
· Recipient target groups can be organized into categories for easy recognition.
To create recipient target groups, the data administrator must first log into his/her account. Recipient target groups are created and saved under the Recipient Warehouse icon in the Maestro User Interface. Click on the Recipient Warehouse icon, and click Recipient Target Groups to open the Recipient Target Groups screen. This screen lists all defined target groups (if any) and provides a wizard to create new target groups.
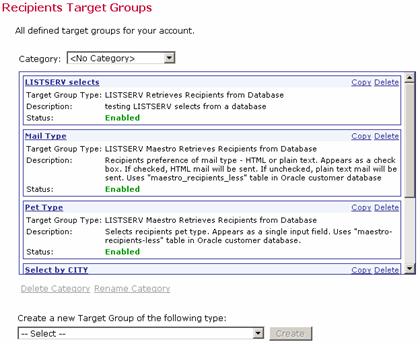
The Recipient Target Groups screen shows the list of target groups in the selected category. Choose the category to view from the Category drop-down menu. The table below will then be refreshed to show all target groups in that category.
Target groups not assigned to a specific category will be displayed under <No Category> in the drop-down menu. Target groups automatically created by the system for hosted lists will be displayed under <Hosted Lists Default Target Groups>.
Figure 91 Recipient Target Groups
Each target group is displayed with the following information:
· Name – The name of the target group. The name is a clickable link used to open the target group for editing in the Target Group Definition wizard for all target groups except those listed under <Hosted Lists Default Target Groups>. In order to edit target groups for hosted lists, they first must be copied (see below).
· Copy – Click to create a new target group as a copy of the selected one. The name of a copied target group will be listed alphabetically as "Copy of 'original name'". This name can be changed when editing the target group. When a hosted list default target group is copied, the copy is placed in the <No Category> category. The category may be changed by engaging the Target Group Definition wizard.
· Delete – Click to delete the selected target group.
· Target Group Type – Displays the type of the data the target group is based on. Currently five types are supported:
o Hosted Recipient List
o Classic LISTSERV List
o Uploaded Text File
o Database accessed by LISTSERV Maestro
o Database accessed by LISTSERV (see Section 12.2 Selecting the Type of Target Group for more details).
· Description – The description of the target group. It is important to create an accurate description of the type of data being retrieved so that end users will be able to select an appropriate target group for their email jobs.
· Status – The current status of the target group:
o Incomplete – This target group has not yet been completed. It may be partially defined and remain in this state while the target group administrator edits it.
o Complete – This target group has been completed, but the target group has not been enabled for use. A target group in this state has been completed by the data administrator, or automatically created by the system for hosted lists, but is not open for users to select it for recipient definition.
o Enabled – This target group has been completed and has been enabled for use in the Define Recipients wizard. A target group in this state is complete and has been enabled for use as a recipient definition.
Below the list that displays the target groups in the selected category are links to manipulate the category itself:
· Delete Category – Allows the currently selected category to be deleted. Only available if the current category is empty. Not available for <No Category> or <Hosted Lists Default Target Groups>.
· Rename Category – Allows the name of the currently selected category to be changed. Not available for <No Category> or <Hosted Lists Default Target Groups>.
To create a new target group, scroll to the bottom of the screen, and then click the Create a new target group with recipients based on drop-down menu. Select one of the five ways to create a new target group, and then click the [Create] button. The Target Group Definition wizard will initiate the process of creating the new target group. Wizard pages will be different for the different types of target groups. Each target group type is described below:
· Hosted Recipient List – This target group is based on a hosted recipient list. The target group wizard will display all the datasets and their respective hosted recipient lists. Once a list is selected, the wizard will allow for conditions and parameters to be set in order to segment the list.
· Classic LISTSERV List – This target group is based on the Send to an Existing LISTSERV List recipient type in the Define Recipients wizard. (For more information, see Section 4.2 Send to an Existing LISTSERV List in the LISTSERV Maestro User's Manual.) When this target group is selected, the Target Group Definition wizard will display all available LISTSERV lists on the server assigned to the account group. Select a list from the drop-down menu, and then select the type of LISTSERV message to send – standard or mail merge.
· Uploaded Text File – This target group is based on the Upload a Recipients Text File recipient type in the Define Recipients wizard. (For more information, see Section 4.5.Upload a Recipient’s Text File in the LISTSERV Maestro User's Manual.) The Data Administrator can upload the file into the system while defining the target group, storing the recipients at that time, or set up a server file to be uploaded just before the job is delivered.
· Database accessed by LISTSERV Maestro – This target group type is based on the Select Recipients from a Database recipient type in the Define Recipients wizard. (For more information, see Section 4.6 Selecting Recipients From a Database in the LISTSERV Maestro User's Manual.) When this target group type is selected, the Target Group Definition wizard will require that a database connection, a SQL statement, merge column headers, and duplicate elimination be entered, the same way as when using the underlying recipient type in the Define Recipients wizard. Optionally, the SQL statement may be parameterized. Using parameters in the SQL statement allows the user to fill in values to be used for segmenting the recipients when this target group is used for a recipient definition. For more information on using parameters, see Section 18 Defining Parameters.
· Database accessed by LISTSERV – This target group type is based on the Let LISTSERV Select Recipients From a Database recipient type in the Define Recipients wizard. For more information on this part of the Define Recipients wizard, see Section 4.7 Letting LISTSERV Select Recipients From a Database in the LISTSERV Maestro User's Manual.
When this target group type is selected, the target group wizard will require that a database name, a SQL statement, and merge column headers be entered, the same way as when using the underlying recipients type in the recipients wizard. Optionally, the SQL statement may be parameterized. Using parameters in the SQL statement allows the user to fill in values to be used for segmenting the recipients when this target group is used for a recipient definition. For more information on using parameters, see Section 18 Defining Parameters.
The Target Group Definition wizard takes the data administrator through all of the steps necessary to define the settings of the target group. The top row of the wizard displays links to each of the steps necessary to complete the wizard. The current step is marked with a highlighted background. Depending on the choices made on some of the wizard screens, other screens may become disabled or be displayed differently. If a wizard step is disabled, it means that the step is not necessary with the current selections and can be safely ignored.
When the wizard is entered for the first time for a newly created target group, it is necessary to click [Finish] or [Save & Exit] in the wizard to create the target group. A new target group will not be created if the wizard is terminated by clicking [Cancel], clicking any of the navigational icons, or by closing the browser.
For an existing target group, if the wizard is exited by clicking [Cancel], clicking navigational icons, or closing the browser, then the target group will still exist, but all changes made since the last save will not be applied.
The [Finish] button is only available on the Summary screen of the wizard. The Summary screen only becomes available if the entire wizard is completed. If the wizard is closed by clicking [Finish], then the target group will exist in the Complete or in the Enabled state, depending on whether the Yes, allow the definition of recipients based on this target group checkbox on the Summary screen was selected or not.
The [Save & Exit] button is available on every screen. Clicking this button saves the current state of the wizard, allowing the data administrator to re-enter the wizard and complete the definition. This will put the target group in any of the three states – Incomplete, Complete, or Enabled, depending on whether all screens in the wizard were completed, and if the Yes allow the definition of recipients based on this target group checkbox on the Summary screen was selected or not.
A completed target group may be enabled at any time by entering the Target Group Definition wizard, and going directly to the Summary screen (click on the Summary link at the top of the page). On the Summary screen, check Yes, allow the definition of recipients based on this target group.