This target group type is based on the Send to an Existing LISTSERV List recipient type in the Define Recipients wizard. Multiple screens guide the data administrator through defining a recipient target group using LISTSERV Maestro to select recipients from a LISTSERV List.
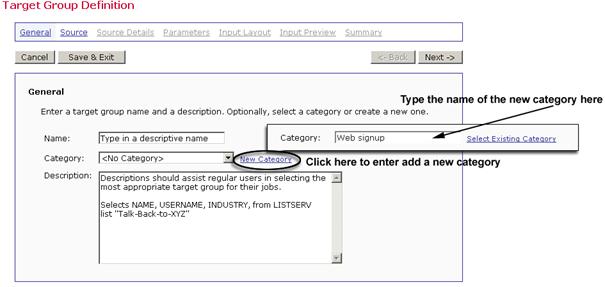
The General screen in the wizard defines the name, category, and description of the target group. Both name and description are mandatory. Enter a meaningful name and a good description so the users who are selecting target groups in the Define Recipients wizard will have all the information they need to decide which target group to use.
Target groups can be clustered in categories, making it easier for users to select a target group. A category is meant to contain target groups that are related to each other. The intent of categories is to minimize the time needed to locate a specific target group. By selecting a category first, users do not need to browse through all the available target groups, but only those in the relevant category.
To add a target group to a category, select the category for the target group from the drop-down menu. To create a new category, click the New Category link and define a new category. Target group categories are optional. If no category is selected or created, target groups are placed into the <No Category> category by default.
Figure 99 The Target Group Definition Wizard – General Screen for Classic LISTSERV Lists
Once you’re finished entering the information, click [Next ->] to continue.
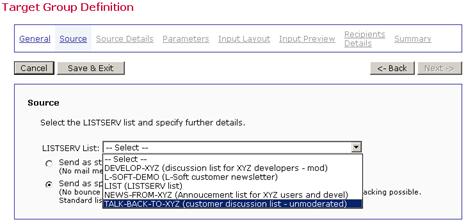
The Source screen lets you select the LISTSERV list and specify any additional information. Select the LISTSERV list for the drop-down menu. Next, select the type of message by selecting Send job as standard list message to list members or Send as special list message. Standard list messages are sent to the list subscribers just as a normal list posting would be from a list subscriber or editor. The message will be archived if there are list archives, and the message will be available for list digests.
Special list messages are what LISTSERV calls a “distribute job”. Mail merging is possible by using special substitution placeholders created by surrounding the names of the data fields (column headers) associated with the list with an ampersand “&” at the beginning and a semi-colon “;” at the end, for example &INDUSTRY;. Special list messages do not go into the archives or digests.
Figure 100 The Target Group Definition Wizard – Source Screen for Classic LISTSERV Lists
Click [Next ->] to continue. If the job is sent as a standard list message to a list with no topics defined, the wizard will skip to the Summary screen. If the job is sent to a list with topics or as a special list message, the wizard will continue with additional pages.
The Source Details screen will appear differently depending on the type of message being sent. Standard list messages for lists that have topics will need to select the topic or topics. Special list messages will need to select options and decide whether to set conditions that can segment the list based on the existing subscriber data.
Active LISTSERV lists often use "sub-groups" within the list to give subscribers the opportunity to receive only the posts they are most interested in and not receive all the list mail. Sub-groups are created in LISTSERV by defining the keyword Topics in the list header. If the LISTSERV list was created in LISTSERV Maestro, topics are defined within the List Definition wizard.
Lists can have up to 23 topics. List subscribers can elect to receive only those messages that fit into the topic(s) they are interested in reading. Similarly, list members can post their messages to only those topics their messages are relevant to, if subscribers are allowed to post to the list. For example, a list could have the general subject of Software Development. Topics could be defined by operating system, type of software, or type of development. For more information on Topics, see the LISTSERV List Owner's Manual.
Select the way that topics will be used in the target group definition from these options:
· Send only to subscribers with the following topics – The message will be sent only to those list subscribers that selected any of the checked list topics.
· Expose the topics as parameters so that end users can select which topic or topics to use in their job definitions.
· Use topics as selected above.
· All subscribers, ignore topics – The message will be sent to all list subscribers regardless of their topic selections.
· Send to subscribers with no topics or with the OTHER topic – The message will be sent to list subscribers who have no topics selected or with the “OTHER” topic.
Figure 101 The Target Group Definition Wizard - Source Details Screen for Standard List Message
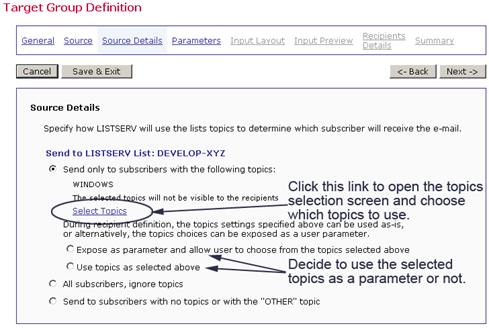
Click the Select Topics link to open the Topics Selection screen. From here, you can choose which topics to use. Also, you can hide or expose the selected topics in the subject line of the message by selecting the corresponding option. If the list subscribers are aware of the topics and are accustomed to using them (for example, if they set up filters in their email clients to move list messages to different folders depending on the topic), then consider exposing the topics in the subject line. However, if there are many topics selected for the message, a rather lengthy subject line will result. In this case, consider hiding the topics from the recipients. Hiding topics can also be useful if the topics are only used to sub-divide the list and are not used by the recipients. Topics will be defined in an email “X-header” so they will be revealed to recipients who choose to view the (usually hidden) email headers in their email clients.
Figure 102 Selecting Topics for a Standard List Message
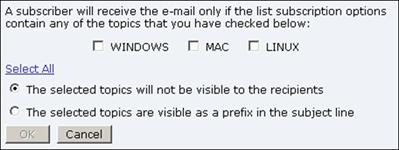
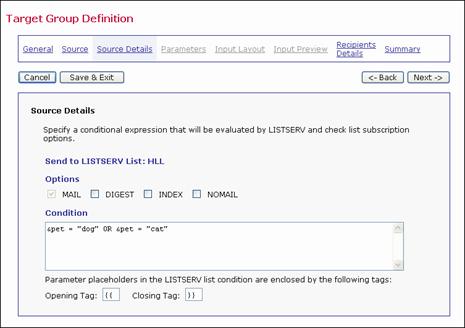
There are four options for a LISTSERV list that can be set by checking the adjacent boxes. The options are standard LISTSERV settings that subscribers may have set for their subscriptions.
· MAIL – Will deliver the message to all normally subscribed users.
· DIGEST – Will deliver the message to users that receive only a digest.
· INDEX – Will deliver the message to users that receive only a topics index.
· NOMAIL – Will deliver the message to users that currently receive no mail.
Setting a condition is a means of creating a subset of recipients from the selected LISTSERV list based on the email address, or, in the case of DBMS backed or LISTSERV hosted lists, other information in the list’s database table. Conditions begin with an ampersand “&” followed by the name of the data column (header) and contain an operator such as equal to “=” or less than “<” and finally the value to be assessed. For example, a LISTSERV list could set the condition of sending mail to all those subscribers who own a dog or cat. This condition would look similar to this:
&pet = “dog” OR &pet = “cat”
Conditions may use parameters that are then filled out by users when they define the recipients of email jobs. The condition in the example above containing parameters could look like this:
&pet = “{{pet_type}}” OR &pet = “{{pet_type}}”
The brackets denote a parameter name to the system. The text inside the brackets is the name of the placeholder that will be replaced by the selection made by the user when defining the recipients for a mail job. Setting parameters for a LISTSERV condition uses the same process as setting a parameter for an SQL query. See Section 18 Defining Parameters for further details. For information on setting conditions for a LISTSERV list, see the LISTSERV Developer’s Guide, available online at http://www.lsoft.com/resources/manuals.asp
Figure 103 The Target Group Definition Wizard - Source Details Screen for a Special List Message
Once you’re finished setting up any conditions for the list, click [Next ->] to continue.
The Parameters screen will only open if the target group is set up to send mail as a standard list message with the topics that are exposed as a parameter, or the target group is set up to send mail as a special list message containing a condition with parameters.
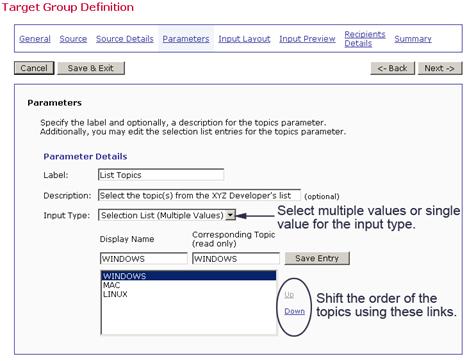
A target group definition that uses the topics of a LISTSERV list as a parameter allows the users to select which topic(s) to use in the recipient definition of their email jobs. Fill out the parameter details by giving the parameter a label and a description. These will help users understand what they are selecting for their recipient definition. Select the input type, either a single select list or a multiple select list. Single select allows one topic choice from the drop-down menu; multiple select allows for more than one topic choice from the drop-down menu. Use the Up and Down links to shift the order of the topics in the drop-down menu.
Figure 104 LISTSERV Topics as Parameters
Once you’re satisfied with the parameter details, click [Next ->] to continue.
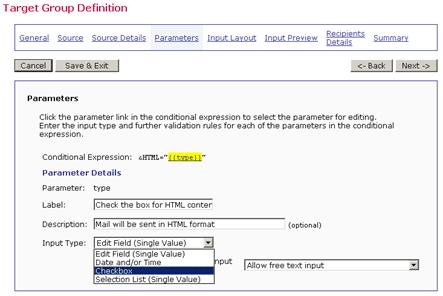
Conditional expressions may have one or more parameters. Parameters that are highlighted in yellow are undefined; parameters appearing as normal links have already been defined. To select a parameter, simply click on it. Fill out the parameter’s initial definition, or edit an existing definition in the lower part of the screen. The definition of the parameters made here will affect the choices that the end user will have when using this target group in the Define Recipients wizard. For more information on creating parameters, and the different parameter types, see Section 18 Defining Parameters.
Figure 105 Parameters in Conditional Expressions
Once you’re satisfied with the parameter details, click [Next ->] to continue.
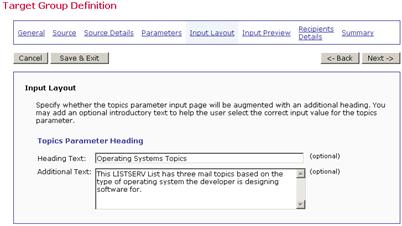
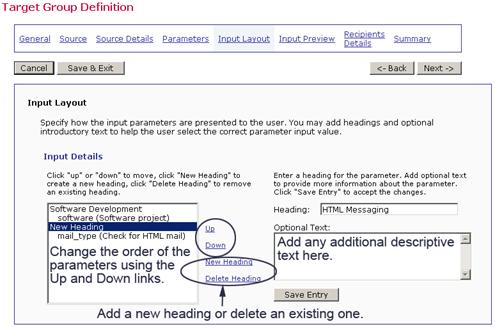
The Input Layout screen allows the data administrator to design how the recipient target group appears to end users. Headings and additional screen text can be added to further describe the choices users have among the different selections available in the target group. If there are multiple parameters, then they can be grouped under headings and their order can be arranged. The more description users have, the easier it will be for them to decide how to use the target groups to select the recipients they want for their email jobs.
Target groups sending standard list messages to lists with topics expressed as a parameter will only have the single parameter to describe to end users.
Figure 106 Input Layout for LISTSERV Lists with Topics as a Parameter
Once you’re finished, click [Next ->] to continue.
Target groups sending special list messages to lists with conditions that have parameters may have one or more parameters to arrange and describe. Concise descriptions and intuitive layouts make using target groups easier for end users.
Figure 107 Input Layout for LISTSERV Lists with Parameters in Conditions
Once you’re finished, click [Next ->] to continue.
The Input Preview screen reveals how the target group will appear to users when defining recipients. Use this screen to check the appearance of the target group and make selections that are run against the data.
Figure 108 Input Preview for LISTSERV Lists with Topics
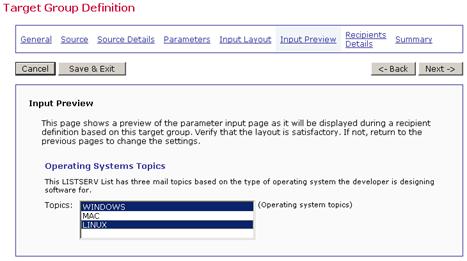
Figure 109 Input Preview for LISTSERV List with Conditions
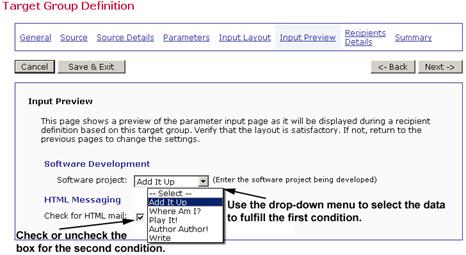
Click the [<- Back] button to return to the Input Layout screen to make changes, or click the [Next ->] button to continue.
The Recipients Details screen displays a view of details about the recipients and, in some cases, allows additional details to be supplied. In the case of hosted LISTSERV lists, no further data needs to be supplied and this screen is for informational purposes only.
Figure 110 Recipient Details for Hosted LISTSERV Lists
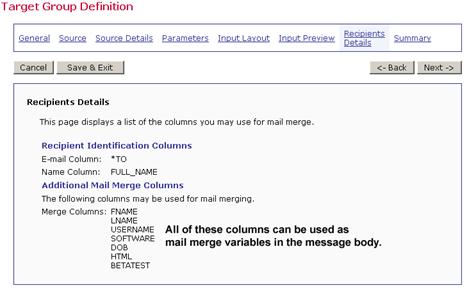
For LISTSERV lists not hosted by LISTSERV Maestro, where mail merging is set in the list header and the list is DBMS backed, additional recipient fields can be added in the edit box, one column name per line. These column names can be used for mail merge placeholders in the body of the email message.
Once you’re finished, click [Next ->] to continue.
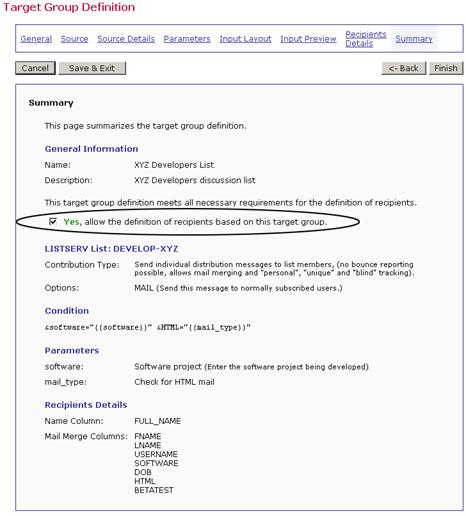
The Summary screen displays all the selections for the target group definition, listing conditions and parameters. In order for users to access the target group to define recipients for a mailing, it must be enabled. Check Yes, allow the definition of recipients based on this target group to enable it. If left unchecked, the target group will not appear in the list of available target groups in the Define Recipients wizard.
Figure 111 The Target Group Definition Wizard – Summary Screen for Classic LISTSERV Lists
Click the [Finish] button to complete the target group definition and return to the Recipient Target Groups screen.