This target group type is based on the Select Recipients from a Database recipient type in the Define Recipients wizard. Multiple screens take the data administrator through the process of defining a recipient target group using LISTSERV Maestro to select recipients from a database.
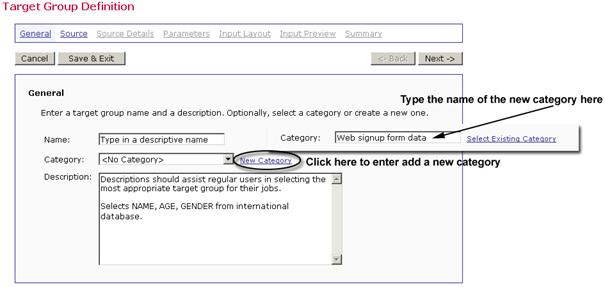
The General screen in the Target Group Definition wizard defines the name, category, and description of the target group. Both name and description are mandatory. Enter a meaningful name and a good description so the users who are selecting target groups in the Define Recipients wizard will have all the information they need to decide which target group to use.
Target groups can be clustered in categories, making it easier for end users to select a target group. A category is meant to contain target groups that are related to each other. The intent of categories is to minimize the time needed to locate a specific target group. By selecting a category first, users do not need to browse through all of the available target groups, only those in the relevant category.
To add a target group to a category, select the category for the target group from the drop-down menu. To create a new category, click the New Category link and define a new category. Target group categories are optional. If no category is selected or created, target groups are placed into the <No Category> category by default.
Figure 120 The Target Group Definition Wizard – General Screen
Once you’re finished enter a name and description, click [Next ->] to continue.
On the Source screen of a target group, where LISTSERV Maestro retrieves the recipients, select the database plugin that matches the database to be accessed. Plugins are available for MySQL, Oracle, SQL Server, DB2, and ODBC. If the desired plugin is not listed on the drop-down menu, then that means it has not been registered in the Administrative HUB – contact the LISTSERV Maestro administrator to request plugin registration.
Once a selection has been made, the screen will automatically refresh with input boxes for connection parameters. The Source screen is slightly different for each database types.
Next, enter the connection values required by that plugin, such as host name, database name, password, and/or TCP/IP port. These values depend on the database being accessed.
Enter the SQL statement that will be executed to retrieve the recipients. This statement is executed using the connection data specified above. The statement may be a fixed statement or it may contain parameters that are later filled out when this target group is used for defining recipients. See Section 18 Defining Parameters for more information on how to parameterize the SQL statement and for details on the Opening Tag and Closing Tag fields.
Figure 121 The Target Group Definition Wizard – Source Screen
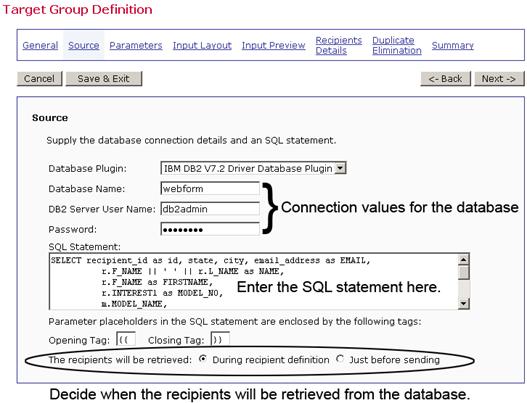
Select an option to define when the SQL statement will be executed:
· During recipient definition – The SQL statement will be executed when this target group is used in the Define Recipients wizard, and when the Summary screen of that wizard is entered. This means that if the user chooses this target group in the Define Recipients wizard, then the list of the actual recipients is defined at the moment the user completes the Define Recipients wizard. If the database content changes between that moment and the actual sending of the job, then those changes will not be reflected in the recipient list. In order to update the data, the end user would have to go back into the Define Recipients wizard and specifically request a reload.
· Just before sending – The SQL statement will be executed when this target group is used in the Define Recipients wizard at the moment before the job is actually sent. This means that if the end user chooses this target group in the Define Recipients wizard, then the list of the actual recipients is defined at the moment the job is actually sent, which may be some time after the Define Recipients wizard is completed. If the database content changes between the completion of the Define Recipients wizard and the actual sending of the job, then those changes will be reflected in the recipient list.
Important: If Just before sending is selected and the database is not available during the sending of the job, the job will fail. Be sure to coordinate the sending and database maintenance times to avoid conflicts.
Once you’re finished entering the database connections details, click [Next ->] to continue.
If parameters are part of the SQL statement on the Source screen, then they will need to be further defined on the Parameters screen. All parameters appear as links. Parameters highlighted in yellow are undefined; parameters appearing as normal links have already been defined. Click on a parameter, highlighted or not, to select it. Fill out the parameter’s initial definition, or edit an existing definition in the lower part of the screen. The definition of the parameters made here will affect the choices that the end user will have when using this target group in the Define Recipients wizard. For more information on creating parameters, and the different parameter types, see Section 18 Defining Parameters.
Figure 122 The Target Group Definition Wizard – Parameters for a Database Accessed by LISTSERV Maestro
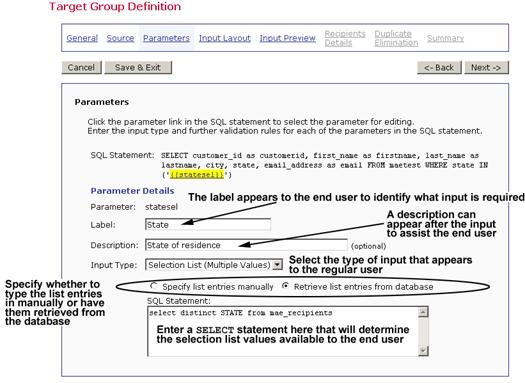
Once a label and an optional description have been entered, select the input type of the parameter. There are four different types of input for parameters – check box, edit field, selection list, and date/time. Click [Next->] to continue.
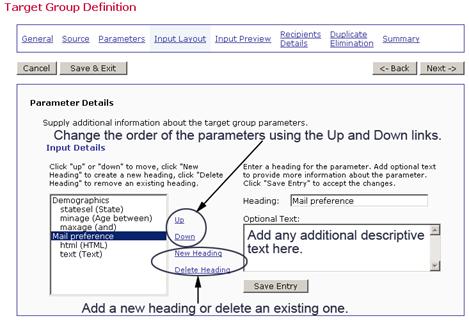
The Input Layout screen allows the data administrator to design how the recipient target group appears to end users. Heading and additional screen text can be added to further describe the choices users have among the different selections available in the target group. If there are multiple parameters, then they can be grouped under headings and their order can be arranged. The more description users have, the easier it will be for them to decide how to use the target groups to select the recipients they want for their email jobs.
If one or more parameters are of the Restrict values(s) to floating point numbers type, then the decimal separator that the database uses needs to be defined. This will be either a dot (period) “.” or a comma”,”. The selection of dot or comma here only defines how the floating point number will be formatted for replacement in the SQL statement. In the Define Recipients wizard, the end user will always use a dot as the decimal separator when entering a floating point number.
Figure 123 The Target Group Definition Wizard - Input Layout for a Database Accessed by LISTSERV Maestro
Once you’re finished enter information about the parameters, click [Next ->] to continue.
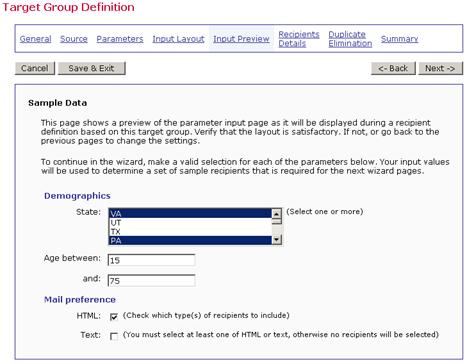
The Input Preview appears as it would to users who are selecting recipients using this target group in the Define Recipients wizard. Use this screen to verify order, labels, descriptions, parameter types, and values. If the order of the parameters needs to be changed, click the [<‑Back] button. If labels or descriptions need to be changed, click the Parameters link to re-enter the Parameters screen.
When the Input Preview screen is displayed, any SQL statements that are required to determine the values of single selection or multiple selection lists are executed. By executing the SQL statements, the drop-down lists or multi-line lists are filled in with values that can be selected.
Using the selections lists, checkboxes, input fields, and/or date fields, make selections for each parameter type.
The values entered in the Input Preview screen are used to fill out the actual target group SQL statement the same way as it will later happen in the Define Recipients wizard. The SQL statement will be executed and retrieve up to ten sample recipients that will be displayed on the next screen, Recipients Details. The “filled out” statement will be displayed on the Summary screen of the wizard as further verification that the statement and the parameters are correct. Click [Next->] to continue.
Note: If the Target Group Definition wizard is engaged to create a new target group definition, be sure and click [Save & Exit] to save all previous work on the target group if it is necessary to close the wizard before the Summary screen is reached.
Figure 124 The Target Group Definition Wizard – Input Preview for a Database Accessed by LISTSERV Maestro
The Recipients Details screen specifies how the headers from the recipient data will be used. It is necessary to decide whether additional data will be used for mail merging and tracking, define which column contains the email address, and to edit the column headers, if necessary. The Recipients Details screen is split into three sections to accommodate the data administrator.
LISTSERV Maestro needs to know if additional recipient data will be used for mail merging and tracking, or whether this information is to be ignored and the job sent as bulk email. If the Use additional recipient data for mail merging and tracking option is selected, columns from the text file or database can be used in the email message to create personalized messages. These columns can then also be used to identify recipients for more detailed tracking reports. For more information on using mail merging, see the LISTSERV Maestro User’s Manual, Section 5.6 Merge Fields and Conditional Blocks.
If the Ignore additional recipient data and send job as bulk email option is selected, any additional columns that were uploaded with the file or that appear in the database will be ignored by the system. It will not be possible to use mail merging. Tracking for the message will be limited to blind tracking, meaning that the tracking data available from the job will not be associated with identifiable individuals or other demographic information. It is possible to enter an address and optional name for the “TO:” field in the message header (see Figure 126).
In order to process an email job, LISTSERV Maestro needs to know which column represents the recipients’ email addresses. Use the drop-down menu to select the Email Column. When additional recipient data is being used for mail merging, it is possible to select the Name Column as well (see Figure 125). This option is not available for bulk email (see Figure 126).
Headers are specially defined rows used to label the columns of data so that the system and the user can correctly identify the columns. LISTSERV Maestro will use the field names returned by the SQL query as headers. By default, these are the field names used in the database tables, but they can be changed by the SQL query through the use of an “AS” clause. It is possible to edit the headers returned by the SQL query in order to make them easier to use in mail merging. Changing the headers in LISTSERV Maestro will not change the field names in the original database.
Header labels are limited to upper and lower case letters, the numbers 0-9, and the underscore “_”. Any illegal characters in the headers will have to be changed before proceeding. Before continuing to the next screen, specify the Email Column and the Name Column using the drop-down menus.
Figure 125 The Target Group Definition Wizard - Recipients Details Use Additional Recipients Data
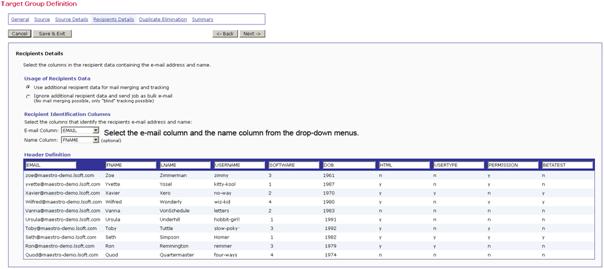
Figure 126 The Target Group Wizard - Recipient Details Send Job as Bulk Mail

Once you’re finished defining the recipients and the headers, click [Next ->] to continue.
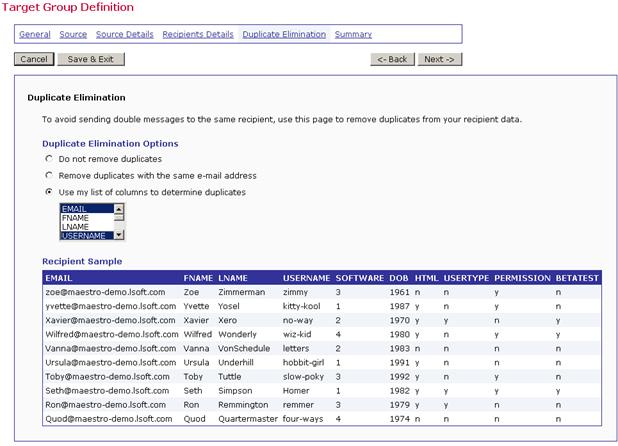
On the Duplicate Elimination screen define how duplicate recipients, which may exist in the database, will be handled. Choose between the following options:
· Do not remove duplicates – All recipients retrieved by the SQL query will be used for delivery, even if some of them are duplicates.
· Remove duplicates with the same email addresses – If the list of recipients retrieved by the SQL query contains entries with the same email address, then only the first of these entries will be used for delivery, the others will be ignored.
· Use my list of columns to determine duplicates – If the list of recipients retrieved by the SQL query contains entries with the same values in all of the columns selected in the column list below this option, then they will be considered duplicates. Only the first instance of each will be used for delivery; the others will be ignored. Select the columns that will be considered for this comparison from the list. Use SHIFT and CTRL to select multiple entries.
The Recipient Sample section is displayed to make it easier to understand the contents of each column. This will assist with deciding which columns to be considered for comparison, and which not to be considered.
Figure 127 The Target Group Definition Wizard - Duplicate Elimination
Once you’re finished defining how duplicate recipients are to be removed, click [Next ->] to continue.
Tip: Removing duplicates from recipient data can be a useful way to ensure that multiple messages are not sent to the same recipient. It is common practice for one person to have more than one email address (i.e. a work email address and a personal email address). By creatively selecting one or more criteria to remove duplicates, it is possible to avoid sending multiple messages to the same person with different email addresses. In contrast, several recipients may use the same email address (i.e. family members sharing an ISP may also share an email address). In this case, it might be desirable to send multiple messages to the same address shared by multiple recipients, but addressed to each individual using the email account.
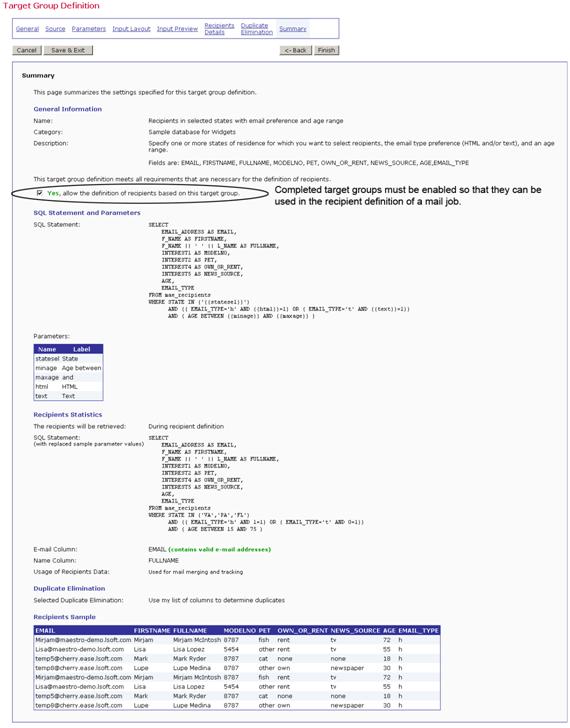
The Summary screen displays all the important details about the target group for verification. The screen is split into categories listing the relevant details for each part of the target group. A target group that has been created by the data administrator is not automatically enabled for use in the Define Recipients wizard. The data administrator must explicitly enable the use of each target group. Target groups need to be enabled individually, giving the target group administrator control over the use of each target group. This way, groups can be created in advance, and only enabled when needed. Similarly, target groups can be disabled, preventing users from accessing them, without permanently deleting them.
To enable a target group, check Yes, allow the definition of recipients based on this target group. Target groups that are enabled meet all the requirements for the definition of recipients, and they are available for use in the Define Recipients wizard. To disable a target group, uncheck the option. This will put the target group into a state called Complete, where all the requirements for the definition of recipients are met, but the target group is not released for use.
Figure 128 The Target Group Definition Wizard – Summary for a Database Accessed by LISTSERV Maestro
Click [Finish] to complete the target group and return to the Recipient Target Groups screen.