This target group type is based on the Upload a Recipients Text File recipient type in the Define Recipients wizard. Multiple screens take the data administrator through the process of defining a recipient target group using LISTSERV Maestro to select recipients from an uploaded text file.
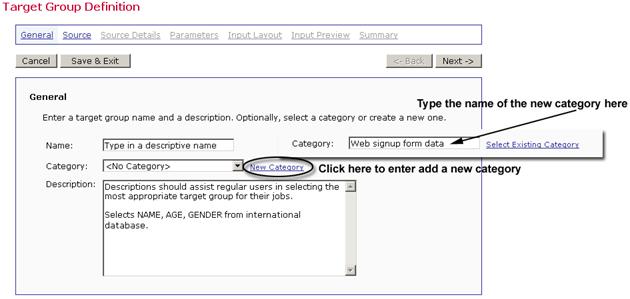
The general characteristics of the target group consist of a name, a category and a description. This information will be used by users to locate and identify the target groups they want to use for jobs. Both name and description are mandatory. Enter a meaningful name and a good description so the users who are selecting target groups in the Define Recipients wizard will have all the information they need to decide which target group to use.
Target groups can be clustered in categories, making it easier for users to select a target group. A category is meant to contain target groups that are related to each other. The intent of categories is to minimize the time needed to locate a specific target group. By selecting a category first, users do not need to browse through all the available target groups, but only those in the relevant category.
To add a target group to a category, select the category for the target group from the drop-down menu. To create a new category, click the New Category link and define a new category. Target group categories are optional. If no category is selected or created, target groups are placed into the <No Category> category by default.
Figure 112 The Target Group Definition Wizard – General Screen for Uploaded Text File
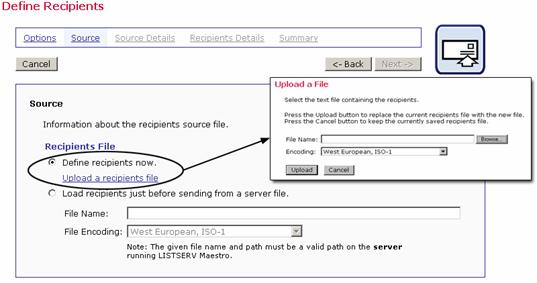
The Source screen for a target group based on an uploaded text file contains two options concerning when the recipients file will be uploaded to the system.
· Select Define recipients now to immediately upload a file from a local drive that will be the source of the recipients for the target group. Once the file is uploaded, the recipient definition is static, meaning it will not change between the upload time and the job delivery time. Every job that uses this target group will send to the exact same list of recipients. In order to update the list of recipients, the data administrator will have to update the definition of the target group and reload an updated file.
− OR −
· Select Load recipients just before sending from a server file to link to a file on the server running LISTSERV Maestro to become the source of the recipients for the target group just before the job is sent for delivery. This recipient definition is dynamic, meaning that the file containing the recipients can change between the time the target group is defined and the time the mail job is delivered. Each job using this target group may end up sending to different recipients if the file is updated on the server between jobs.
If you selected the Define recipients now option, then the Upload a recipients file link is enabled. Click the link to upload a text file from a local drive. Browse for the file on a local drive and select the encoding for the file if necessary. For more information on encoding, see Appendix C: Email and International Character Sets.
Figure 113 Define Recipients from an Uploaded File
Once a file had been uploaded, information about that file will appear on the screen. The link to upload a file will change to Upload a different file after one file has been successfully uploaded to the system.
If you selected the Load recipients just before sending from a server file option, then enter the path and name of the file the recipients will be imported from at the moment just before the message is sent. The file must be on a valid path on the server running LISTSERV Maestro. The file must also be included in a list of files that can be accessed by LISTSERV Maestro. This list of permissible files is controlled by the system administrator and is necessary to maintain server security. See the LISTSERV Maestro Administrator’s Manual for more information on granting access to server files. If the file is not available at the moment of sending, the job will fail.
In order to proceed with the next steps, it is necessary to have a file of the right name on the server. It does not have to be the final recipient file – it could contain just test recipients – but it needs to use the same formatting as the final file so that LISTSERV Maestro can determine how to import it correctly.
Click [Next ->] to continue or [<- Back] to return to the previous page.
The Source Details screen parses the text file containing recipients for the target group. When a text file is uploaded, LISTSERV Maestro will try to determine how the columns of data are separated, and how each column or field of data is labeled (header). In order to create a target group, LISTSERV Maestro must correctly interpret which column contains the names of the recipients and which column contains the email addresses of the recipients. Other fields may be included and will appear in the results table located on the lower half of the screen.
Figure 114 The Target Group Definition Wizard - Parse Recipients Screen for an Uploaded Text File
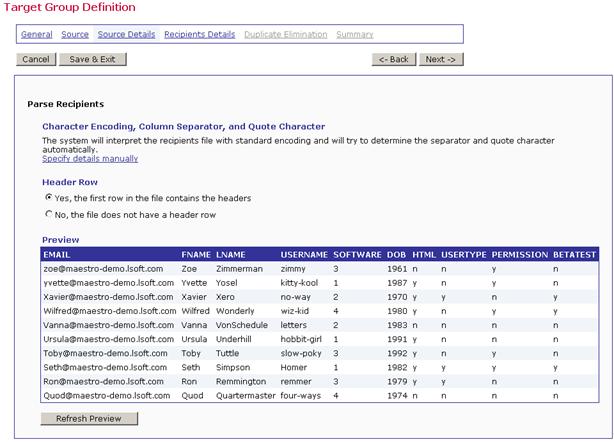
If the parsing is accurate with each column of data separated correctly and labeled with a header row, then click the [Next ->] button to continue.
If LISTSERV Maestro has not interpreted the data correctly, or an unconventional delimiter and/or quote character has been used, click on the Specify details manually link to configure the data manually.
Use the Specify details manually link when the delimiter (separator character) or the quote character is used in some of the data fields. For example, if the USERNAME field contained Tom “the cool cat” Jones as an entry, and double quotes happened to be the quote character for the file, the details would have to be specified manually. The same would be true if a field named LOCATION contained the entry Atlanta, GA where the comma was the separator character.
Figure 115 Manually Parse an Uploaded File
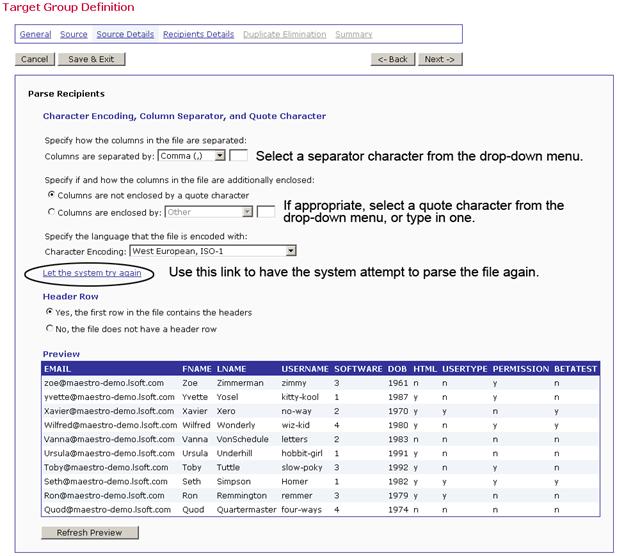
LISTSERV Maestro has four selections for choosing separator characters:
· Tab (\t)
· Comma (,)
· Semicolon (;)
· Other – if this is chosen, type the character into the adjacent box.
Columns can be defined as not enclosed by a quote character or select the quote character from three choices:
· Double Quotes (“)
· Apostrophe (‘)
· Other – if this is chosen, type the character into the adjacent box.
After separator and quote characters have been entered, and any encoding change made, click [Refresh Preview] to have LISTSERV Maestro attempt to parse the file again with the new settings. The new columns will then be displayed. If the columns are now separated correctly, proceed. If the columns are not correct, repeat the process and click [Refresh Preview] to see the new changes.
Headers are specially defined rows used to label the columns of data so that the system and the user can correctly identify the columns. An uploaded text file may contain headers or not. If the file does not contain headers, select the No, the file does not contain a header row option and the system will automatically add a header row. Each column of data in the header row will have a generic name using the pattern COL1, COL2, COL3, and so on. If the uploaded file does have a header row, select the Yes, the first row in the file containers headers option and the headers within the file will be used.
If the parsing is accurate with each column of data is separated correctly and labeled with a header row, then click the [Next ->] button to continue.
Once LISTSERV Maestro can successfully separate the recipient data into columns or otherwise quantify the data, the next steps are to define the column that identifies the email address, decide whether to use additional recipient data for mail merging and tracking, and to edit the column headers, if necessary. The Recipients Details screen is split into three sections to accommodate these steps.
LISTSERV Maestro needs to know if additional recipient data will be used for mail merging and tracking, or whether this information is to be ignored and the job sent as bulk email. If the Use additional recipient data for mail merging and tracking option is selected, columns from the text file or database can be used in the email message to create personalized messages. These columns can then also be used to identify recipients for more detailed tracking reports. For more information on using mail merging, see the LISTSERV Maestro User’s Manual, Section 5.6 Merge Fields and Conditional Blocks.
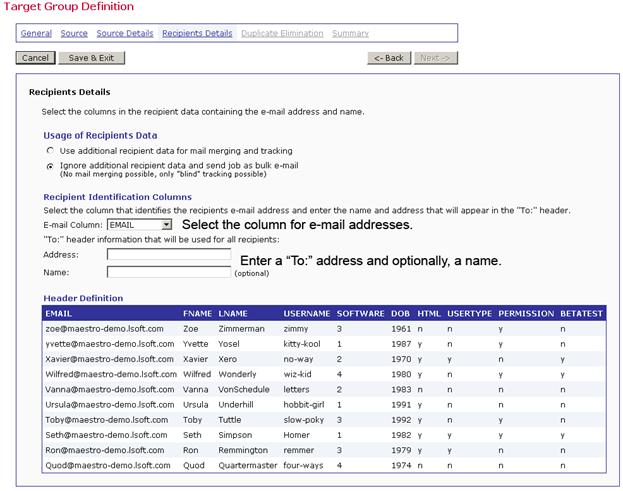
If the Ignore additional recipient data and send job as bulk email option is selected, any additional columns that were uploaded with the file or that appear in the database will be ignored by the system. It will not be possible to use mail merging. Tracking for the message will be limited to blind tracking, meaning that the tracking data available from the job will not be associated with identifiable individuals or other demographic information. It is possible to enter an address and optional name for the “TO:” field in the message header (see Figure 117).
In order to process an email job, LISTSERV Maestro
needs to know which column represents the recipients’ email addresses.
Use the drop-down menus to select the Email Column. When additional
recipient data is being used for mail merging, it is possible to select
the Name Column as well (see Figure 116).
This drop-down menu will not appear when sending bulk
email (see Figure
117).
Headers are specially defined rows used to label the columns of data so that the system and the user can correctly identify the columns. Recipient data files containing a header will be sorted or parsed by LISTSERV Maestro based on that header row, and the table reflected on the screen will have the columns labeled. It is possible to edit the existing headers for an uploaded text file in order to make them easier to use in mail merging. Changing the headers in LISTSERV Maestro will not change the headers in the original text file.
If the recipient data file does not contain a header, it is possible to define a header within LISTSERV Maestro.
Header labels are limited to upper and lower case letters, the numbers 0-9, and the underscore “_”. Any illegal characters in the headers will have to be changed before proceeding. Before continuing to the next screen, specify the Email Column and the Name Column using the drop-down menus.
Figure 116 Recipient Details Using Additional Recipient Data
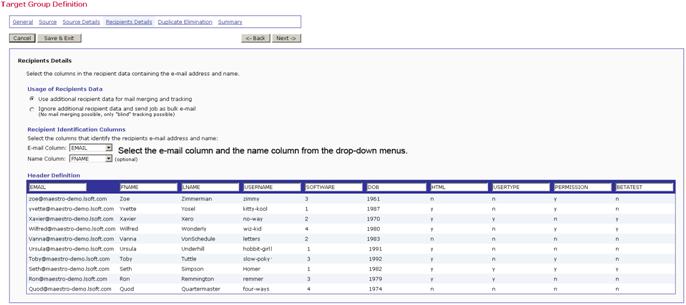
Figure 117 Recipient Details Ignoring Additional Recipient Data
Once you’re finished selecting the columns and defining the headers, click [Next ->] to continue.
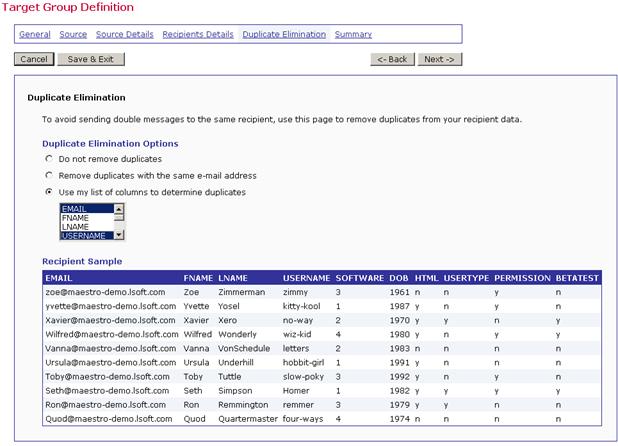
On the Duplicate Elimination screen, define how duplicate recipients that may exist in the text file will be handled. Choose between the following options:
· Do not remove duplicates – All recipients in the text file will be used for delivery, even if some of them are duplicates.
· Remove duplicates with the same email addresses – If the text file contains entries with the same email address, then only the first of these entries will be used for delivery, the others will be ignored.
· Use my list of columns to determine duplicates – If the text file contains entries with the same values in all of the columns selected in the column list below this option, they will be considered duplicates. Only the first instance of each will be used for delivery; the others will be ignored. Select the columns that will be considered for this comparison from the list. Use SHIFT and CTRL to select multiple entries.
The recipient sample at the bottom of the screen is displayed to make it easier to understand the contents of each column. This will assist with deciding which columns are to be considered for comparison and which are not to be considered.
Tip: Removing duplicates from
recipient data can be a useful way to ensure that multiple messages are
not sent to the same recipient. It is common practice for one person to
have more than one email address, for example, a work email address and
a personal email address. By creatively selecting one or more criteria
to remove duplicates, it is possible to avoid sending multiple messages
to the same person with different email addresses. In contrast, several
recipients may use the same email address, for example, family members
sharing an ISP may also share an email address. In this case, it might
be desirable to send multiple messages to the same address shared by multiple
recipients, but addressed to each individual using the
email account.
Figure 118 The Target Group Definition Wizard - Duplicate Elimination Screen for an Uploaded Text File
Once you’re finished setting up the removal of duplicates, click [Next ->] to continue.
The Summary screen displays all the selections for the target group definition. In order for end users to access the target group, it must be enabled. Check Yes, allow the definition of recipients based on this target group to enable it. If left unchecked, the target group will not appear in the list of available target groups to end users.
Figure 119 The Target Group Definition Wizard - Summary Screen for an Uploaded Text File

Click [Finish] to complete the target group and return to the Recipient Target Groups screen.