LISTSERV Maestro uses an instance of LISTSERV to send email jobs that are prepared in the Maestro User Interface. Any instance of LISTSERV, or multiple instances of LISTSERV, can be used to send jobs as long as each instance has a LISTSERV Maestro license, is reachable over the network, has been configured to accept jobs from LISTSERV Maestro, and LISTSERV Maestro has been configured to connect to it. A hierarchy of LISTSERV Connection settings can be used to configure a global application default connection, a default connection for each group, a separate sender address for group users, and a default connection for each single user not in a group. For more information on configuring individual and group user settings, see Section 7.4.2
Editing Component Specific Settings for Single and Group Users.
The system works by having the Maestro User Interface send a “distribute job” to LISTSERV.
A DISTRIBUTE job is a series of commands to LISTSERV that essentially says, “Take this message and send it to these recipients.” In order to successfully process a DISTRIBUTE job, LISTSERV needs to have a list of recipients (email addresses), and the message itself. A complete DISTRIBUTE job must include one or more command lines giving instructions to LISTSERV and an authenticating password. LISTSERV Maestro handles these and many other steps automatically.
Normally, LISTSERV does not accept "distribute" commands from everyone. LISTSERV accepts this command only if the “distribute job” is sent from an account (email address) that is configured in LISTSERV to have the right to DISTRIBUTE jobs. The reason for this is to avoid allowing LISTSERV to be hijacked for spamming and other unethical purposes.
LISTSERV Maestro may also access an instance of LISTSERV to create and manage Hosted LISTSERV lists. This feature utilizes nearly all of the features of traditional LISTSERV lists in combination with the LISTSERV Maestro user interface. It also requires additional configuration within LISTSERV to allow LISTSERV to connect to the user database and to allow LISTSERV Maestro to create new LISTSERV lists.
Several steps are required in order to prepare LISTSERV for communication with LISTSERV Maestro. These include preparing LISTSERV to accept DISTRIBUTE jobs from Maestro, preparing LISTSERV to allow LISTSERV Maestro to create new LISTSERV lists, preparing the LISTSERV list archive folder, and preparing LISTSERV for database access. These steps require access to the LISTSERV Site Configuration file on the LISTSERV server, and need to be carried out by the LISTSERV Site Administrator. For more information on LISTSERV’s Site Configuration file, see the LISTSERV Site Manager’s Manual at
http://www.lsoft.com/resources/manuals.asp.
In order to process email jobs from LISTSERV Maestro, LISTSERV needs to be prepared in certain ways. Authentication between LISTSERV and LISTSERV Maestro happens by way of an email address and password combination. This means that LISTSERV needs to have an email address and password stored for LISTSERV Maestro in order to give LISTSERV Maestro the right to send DISTRIBUTE jobs. (This email address and password combination will later be entered in to the Administration Hub; see Section 5
Settings for the Maestro User Interface.)
For Windows, if the Express Setup option was used to install the full LISTSERV Maestro Suite, then this step is handled automatically for the default LISTSERV connection. You can skip this step unless you want to add more distribute accounts (i.e. so that each group uses a different account, which is recommended if you do not want separate groups sharing data).
DIST_ALLOWED_USERS: This parameter confers only the right to send DISTRIBUTE jobs and is the recommended one to use. An example from a Windows
SITE.CFG file might look as follows:
|
•
|
The first way is to send an email message to LISTSERV@EXAMPLE.ORG (substituting the domain name of the LISTSERV server in place of EXAMPLE.ORG) from the newly registered email address with the following command in the message body:
PW REP newpassword
where newpassword represents the desired password. LISTSERV will send a confirmation message back by email. You must reply to that confirmation message with another message saying OK. If the LISTSERV Web Interface is running on the LISTSERV server, then the request can be confirmed by visiting the URL provided in the confirmation message.
|
|
•
|
The second way to do this is to send an email message to LISTSERV@EXAMPLE.ORG (substituting the domain name of the LISTSERV server in place of EXAMPLE.ORG) from the LISTSERV site administrator’s address (an address defined as a POSTMASTER in the LISTSERV Site Configuration file) with the following command in the message body:
PWC ADD email newpassword PW=createpw
where email is the email address being used for the LISTSERV Maestro jobs, newpassword is the password being assigned to that email address, and createpw is the password defined in the Site Configuration file as the CREATEPW or the personal password registered for the postmaster address.
|
By configuring LISTSERV with these steps, an email address and password combination now exists that has the right to send DISTRIBUTE jobs. This address and associated password are necessary for LISTSERV to accept a DISTRIBUTE job from LISTSERV Maestro. The configured address, referred to as the "sender" address, is the
sender of the DISTRIBUTE job. It is
not the same email address that is used in the Maestro User Interface for the sender definition step of creating a job.
It is possible to have more than one address and password configured within the LISTSERV instance and granted the DISTRIBUTE right. Follow the steps above to add additional addresses if desired. Multiple addresses with the DISTRIBUTE right will allow for individual accounts within a group to have individual sender addresses or for distinct groups to use the same LISTSERV instance without sharing other privileges (for example, sharing the rights to send to the same LISTSERV lists).
Tip: Each account group should have a separate distribute account defined in order to prevent inadvertent sharing of LISTSERV List data. For even stricter separation, each group can connect to a different LISTSERV server.
On some platforms, it is possible for LISTSERV Maestro to create traditional LISTSERV lists and store the subscription data for these lists such that they are accessible from the LISTSERV Maestro subscription pages. These types of lists are referred to as Hosted LISTSERV Lists or HLLs because their data is “hosted” within LISTSERV Maestro’s system database.
First determine whether HLLs are supported on your LISTSERV platform. As far as LISTSERV is concerned, HLLs are simply DBMS-backed lists. DBMS-backed lists are not supported on every LISTSERV platform using every DBMS package.
LISTSERV running on Windows supports any ODBC-compliant database so HLLs are always possible if LISTSERV is running on Windows, even if LISTSERV Maestro is using the internal system database.
If LISTSERV is running on Linux or Solaris, HLLs are possible only if the LISTSERV Maestro system database is defined as an external database using Oracle or DB2. If LISTSERV is running on Mac OS X, HLLs are possible only if the LISTSERV Maestro system database is defined as an external system database using Oracle. If LISTSERV is running on a different operating system (remember that LISTSERV may run on a different platform than the other LISTSERV Maestro components), support for HLLs depends on LISTSERV support for DBMS-backed lists on that platform. The table below summarizes the restrictions for HLL support.
Assuming the platform supports Hosted LISTSERV Lists, the following steps are necessary to prepare LISTSERV to support Hosted LISTSERV Lists in LISTSERV Maestro.
Note: On Windows, if the
Express Setup option was used to install the full LISTSERV Maestro Suite (including LISTSERV), a postmaster address and password have already been defined for Maestro, and you can skip directly to step 2.
In order to allow LISTSERV Maestro to create Hosted LISTSERV Lists, the LISTSERV Site Administrator needs to register an email address for LISTSERV Maestro under the
POSTMASTER setting of the LISTSERV Site Configuration file. This should be a separate address from those registered as
DIST_ALLOWED_USERS, as the
POSTMASTER address will additionally have the rights to create new lists on the LISTSERV server and to access any LISTSERV list on that server. It is recommended that the
QUIET and
HIDE parameters are used for the address, so that it does not receive routine administrative messages from the LISTSERV server. An example from a Windows
SITE.CFG file might look as follows (while the line may be wrapped in this document, it should not be in the actual configuration file):
Hosted LISTSERV lists store their subscriber information in a DBMS-back-end, rather than “traditional” LISTSERV list files. In order to use DBMS-driven Hosted LISTSERV Lists, the LISTSERV Site Administrator must configure LISTSERV to access the LISTSERV Maestro system database. First, a compatible database client must be installed and configured on the LISTSERV host. Next, LISTSERV must be enabled to use that client. Finally, LISTSERV must be configured to access the LISTSERV Maestro system database. See the next section for detailed instructions.
Installing and Configuring a Database Client – The
System Administrator of the LISTSERV host will need to install and configure a database client on the LISTSERV system. For LISTSERV on Windows, ODBC is the only supported database client (as of the time this document was written). For LISTSERV on Solaris, Linux, AIX, Oracle’s OCI client, and IBM’s DB2 CLI client are the supported clients. For LISTSERV on Mac OS X, Tru64 Unix, and OpenVMS, only Oracle’s OCI client is supported (please consult the LISTSERV documentation for current specific version support). Please consult the vendor documentation for details on installing the appropriate ODBC, OCI or CLI client files for the LISTSERV platform.
Once the database client is installed, a client connection to the LISTSERV Maestro system database needs to be configured. This usually means supplying the client with a host name and port number for your database server, a database name, and a unique service name.
For sites using an external database as the LISTSERV Maestro system database, configure the database client on the LISTSERV server with connection settings for that particular environment. Usually this requires at least a host name for the database server, port number, database name, and unique service name. Consult the vendor documentation for information on configuring these settings.
Details for LISTSERV on Windows Connecting to the Internal System Database for HLL Support – For LISTSERV Maestro installations on Windows using the default internal system database and running LISTSERV on the same host as Maestro, an ODBC driver for MySQL will need to be installed on that host. (At the time this document was written, MySQL provides such a driver on their web site at
http://dev.mysql.com/downloads/connector/odbc/). Open the ODBC Data Sources control panel, and create a new system DSN using the MySQL driver. The host name configured in the DSN should be
localhost, the port should be
3306, and the database name should be
LUI. Give the DSN a unique name; this name will be assigned to the ODBC_DSN parameter in the LISTSERV site configuration file (see below).
For sites using the default internal system database, but with LISTSERV for Windows installed on a different host than LISTSERV Maestro, an ODBC driver for MySQL will again need to be installed on the LISTSERV host. While configuring the ODBC DSN, substitute the actual hostname of the LISTSERV Maestro server for
localhost (the port number and database name will be the same as above). On the LISTSERV Maestro server, give LISTSERV permission to access the internal system database. Start the MySQL client program
\Program Files\L-Soft\Application Server\lui\database\bin\mysql.exe, login as root, and then enter the following command:
Replace USERNAME with the ODBC_UID that you will be assigning to LISTSERV (see below),
LISTSERVHOST with the name of the host on which LISTSERV is running, and
PASSWORD with the ODBC_AUTH that you will be assigning to LISTSERV (see below).
Enabling LISTSERV To Use a Database Client Driver –
On Windows, LISTSERV comes already linked to the Microsoft ODBC system. No additional steps are needed in order to enable DBMS support in LISTSERV (although it is still necessary to configure the ODBC connection and enter specific database information in LISTSERV’s Site Configuration file, see below).
On other platforms, if LISTSERV is not already compiled with database support (which is the case by default), then you’ll have to re-link the LISTSERV executable to include database support for Oracle or DB2. Make sure to use the current LISTSERV installation kit from
ftp://ftp.lsoft.com/LISTSERV/UNIX, and follow the instructions in the LISTSERV installation memo for adding DBMS support to the LISTSERV executable.
Configuring LISTSERV to Access the LISTSERV Maestro System Database –
For Hosted LISTSERV lists, LISTSERV stores its subscriber data in tables in the LISTSERV Maestro system database. Once there is a database-enabled LISTSERV installation, the LISTSERV Site Administrator next needs to configure LISTSERV to access the LISTSERV Maestro system database. This is done by adding configuration information to LISTSERV’s Site Configuration file (
SITE.CFG or
go.user. See the LISTSERV Site Manager’s Manual at
http://www.lsoft.com/resources/manuals.asp for detailed information on editing LISTSERV’s Site Configuration File). Typically, three parameters are needed: a database identifier, a user name, and a password.
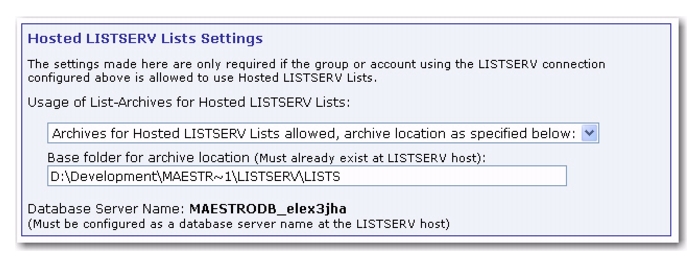
Before adding any of the following parameters to the LISTSERV Site Configuration file, take note of the database server name of the LISTSERV Maestro system database. LISTSERV Maestro automatically generates this server name upon installation. To view the database server name through the Maestro Administration Hub click on the
Global Settings menu, select
Maestro User Interface, and then select the
Default LISTSERV Connection option. Under the
Hosted LISTSERV Lists Settings section, look for the
Database Server Name field. The name in this field should begin with MAESTRODB_, followed by a string of characters.
In the example in Figure 4-1, the Database Server Name is MAESTRODB_elex3jha. This server name uniquely identifies the Maestro system database to LISTSERV. Enter that database server name into the LISTSERV Site Configuration file (SITE.CFG or go.user) exactly as it appears in the Administration Hub – including upper and lower case letters. Utilize the following parameters to configure LISTSERV for access to the Maestro system database (depending on the DBMS product in which the Maestro system database is housed). Replace SERVERNAME with the Database Server Name displayed in the Maestro Administration Hub:
|
•
|
ODBC_DSN_SERVERNAME – The ODBC_DSN parameter should be the Database Service Name (DSN) that was already configured in the Windows ODBC control panel (see above for DSN configuration information).
|
|
•
|
ODBC_UID_SERVERNAME – The ODBC_UID parameter should contain the user name under which LISTSERV should connect to the DSN configured above. This user name (and corresponding password) should already be registered in the DBMS. If the internal system database installed with LISTSERV Maestro is being used, and LISTSERV is running on the same host, the user name for the LUI database is luiuser.
|
|
•
|
ODBC_AUTH_SERVERNAME – The ODBC_AUTH parameter should contain the password that corresponds to the ODBC_UID configured above. If the internal system database installed with LISTSERV Maestro is being used and LISTSERV is running on the same host, the password for the luiuser user is lui.
|
|
•
|
OCI_CONNECT_SERVERNAME – The OCI_CONNECT parameter should contain an OCI connect string (typically configured in a TNSNAMES.ORA file. Consult the Oracle documentation for connect string configuration.)
|
|
•
|
OCI_UID_SERVERNAME – The OCI_UID parameter specifies the user name under which LISTSERV will connect to the database specified by the connect string. This user name (and corresponding password) should already be registered in the DBMS. (If a user name and password have already been specified as part of the OCI_CONNECT parameter, then the OCI_UID and OCI_PWD parameters may not be necessary.)
|
|
•
|
OCI_PWD_SERVERNAME – The OCI_PWD parameter specifies the password to be used for the OCI_UID configured above.
|
|
•
|
CLI_DSN_SERVERNAME – As with the ODBC_DSN, the CLI_DSN specifies some Database Service Name (DSN) already configured in the CLI configuration.
|
|
•
|
CLI_UID_SERVERNAME – The CLI_UID parameter specifies the user name under which LISTSERV should connect to the CLI_DSN configured above. This user name (and corresponding password) should already be registered in the DBMS.
|
|
•
|
CLI_AUTH_SERVERNAME – The CLI_AUTH parameter supplies the password for the CLI_UID configured above.
|
In addition to the ODBC, OCI, and CLI parameters listed above, LISTSERV must also be supplied with a default database connection (without the additional
SERVERNAME parameter). This default connection may contain invalid “dummy” settings, but it must be present in order for LISTSERV to enable its database functions. LISTSERV looks in its site configuration file for a parameter called
ODBC_DSN,
OCI_CONNECT or
CLI_DSN (without the additional
SERVERNAME) in order to determine whether the database extensions should be initialized. Enter “dummy” information in addition to the actual Maestro system database information, as in the example below. The following example is for OCI; substitute ODBC or CLI parameter names as appropriate:
In the example above, the OCI_CONNECT,
OCI_UID and
OCI_PWD parameters define the “dummy” database connection, and the
OCI_CONNECT_MAESTRODB_dtn7nzn3,
OCI_UID_MAESTRODB_dtn7nzn3 and
OCI_PWD_MAESTRODB_dtn7nzn3 parameters define the actual connection settings for the Maestro system database.
Important: If there is not a default DBMS connection defined, (ODBC_DSN, OCI_CONNECT, or CLI_DSN) then LISTSERV’s DBMS features will be disabled and Hosted LISTSERV lists will not work properly, even if there is an ODBC_DSN_SERVERNAME, OCI_CONNECT_SERVERNAME, or CLI_DSN_SERVERNAME parameter defined. It is permissible to use a “dummy” setting (one which contains invalid “placeholder” settings) for the default DBMS connection, but a default connection must be configured in order for LISTSERV’s DBMS support to be enabled.
After LISTSERV has been configured for use with LISTSERV Maestro, the LISTSERV configuration information must be entered into LISTSERV Maestro's Administration Hub. The LISTSERV connection can be configured at several levels. The widest level of setting is the Global Component Setting, which defines the global default LISTSERV connection on the application level (see Section 5
Settings for the Maestro User Interface). These settings will be used as defaults for all accounts that do not have individual settings for group or user level.
The next level is the default setting for a group. The group default LISTSERV connection may connect to a different instance of LISTSERV, or may use different settings than the global default. To set the LISTSERV settings for an entire group in the user list, click on the group name (appears only if the account belongs to a group). If defined on the group level, the group settings will override the global default settings for that group. The settings will apply to all accounts in the group, except for the
Client Address for Mail Delivery settings (
Address and
Password). These two settings may be configured individually for each account in the group, provided LISTSERV is configured with additional addresses with the DISTRIBUTE right. Accounts in the group for which they are not configured will use the group's settings as the default.
Individual accounts are the last level of settings for the LISTSERV Connection. Individual accounts can belong to a group (group user) or not belong to a group (single user). Settings for individual accounts will override default group and global settings. To configure the LISTSERV connection for an individual account, click on the user name from the user list. The screen that opens is different depending on whether the account is a group user or a single user.
Single user accounts can use a separate LISTSERV instance and would therefore need to have all LISTSERV connection settings defined. Or, single user accounts may use a different client address and password than the global default. Group user accounts can only define the
Client Address for Mail Delivery settings. These individual group settings result in a different LISTSERV email address for each user so that jobs can be identified by owner in the LISTSERV logs.
Properly specifying the LISTSERV host name settings, found on the LISTSERV Connection screens, is another important aspect to preparing LISTSERV Maestro to process DISTRIBUTE jobs from LISTSERV. This is important for three reasons:
|
•
|
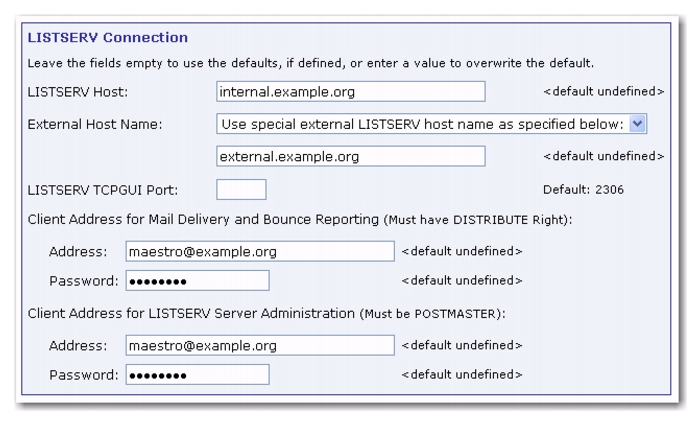
LISTSERV Maestro to LISTSERV system communication – LISTSERV Maestro communicates with LISTSERV using the TCPGUI port. For this reason, LISTSERV Maestro needs to know the name of the server where LISTSERV is running. Enter this server name in the LISTSERV Host field.
|
|
•
|
Host Name For Return Path – When email is sent out over the Internet, the return path, which allows undeliverable messages to be returned to the sender (also know as the RFC 821 address), must include a known external name, otherwise the bounced mail cannot be returned and LISTSERV Maestro cannot automatically process and report on bounces. Use the External Host Name drop-down menu to help identify this external name.
|
|
•
|
Host Name For List Addresses – When doing mailings that are based on a normal LISTSERV list, the address of the list in use must include a known external name of the server hosting the LISTSERV instance for list communication to function correctly (something like listname@hostname). Use the External Host Name drop-down menu to help identify this external name.
|
Usually, a server is only given a single host name by which it can be reached from other computers, including both internal intranet computers and external computers on the Internet. In this case, enter that name into the
LISTSERV Host field of the LISTSERV Connection screen. Click the
External Host Name drop-down menu and select
Use LISTSERV host name as given above.
When the LISTSERV server is given several different names (or appears to have several names) a different setup is required. These situations often stem from optimizing a high performance installation of LISTSERV Maestro. In this case, follow the instructions in Section 4.2.1
Specifying the LISTSERV Host with Different Internal and External Names.
A common optimizing set up is to have LISTSERV on one server inside a firewall with only an internal name, and the SMTP service on another server outside the firewall with an external name. With this set up, LISTSERV, installed on the server with the internally known name, is visible by this name to inside users. For all outside purposes, such as the return path and list email addresses, LISTSERV “appears” to actually be running on the SMTP server with the external name. This is because the SMTP service is connected to the actual LISTSERV instance on the internal server. When viewed remotely, LISTSERV appears to have two host names: one internally known and one externally known.
To enter a separate external host name, select Use special external LISTSERV host name specified below from the drop-down menu. An edit box will appear. Enter the host name in the edit box.
|
•
|
For the internal communication, (the LISTSERV Host field) always specify a host name that points to the server where LISTSERV is actually running, not to the instance where LISTSERV only “appears” to be running, when in reality it is SMTP running on that server. Also, the LISTSERV Maestro server must be able to resolve that host name to the actual IP address of that server.
|
|
•
|
For the External Host Name field, always specify the host name of LISTSERV as seen by outside clients (the Internet), even if that name is actually only an alias for the host or if it points to a server where only the SMTP instance is running.
|
For very large volume installations of LISTSERV Maestro, a separate instance of LISTSERV can be used just to process bounces. From the LISTSERV Connection screen, select the
Use dedicated server option if you want more settings for this LISTSERV instance to appear.
If the dedicated bounce processing host has only a single name, enter that name into the
LISTSERV Host field of the LISTSERV Connection screen. Select
Use LISTSERV host name as given above from the
External Host Name drop-down menu.
Fill in the other appropriate information, the TCPGUI port, the client address and password following the same rules outlined in Section 4.2 Preparing LISTSERV Maestro to Send DISTRIBUTE Jobs to LISTSERV.
If the dedicated bounce-processing host has more than one name (or appears to), then select Use special external LISTSERV host name specified below from the drop-down menu. An edit box will appear. Enter the host name in the edit box.
LISTSERV Maestro can provide access to existing LISTSERV lists, presenting a drop-down menu of available lists on the Source page of the Recipient Definition wizard when
Send to an Existing LISTSERV List is selected on the Options page. In order to do this, follow these instructions:
For each existing LISTSERV list to be added to the drop-down menu, insert a line in the list header containing the keyword “
Owner=”. Add the email address that was configured with the DISTRIBUTE right (LISTSERV client address) to the right side of the "
=" sign. This can be accomplished using email for all LISTSERV servers. If LISTSERV’s Web Interface is installed and configured, it can be used to edit the list header. See the LISTSERV List Owner’s Manual for detailed information on editing LISTSERV list headers.
For example, in the sample list header below, the lines highlighted in gray have been added. The address to the right of the "
=" sign is the address that has the DISTRIBUTE right in the LISTSERV instance where this list is located. The line before that sets this owner to "quiet" meaning that no mail will ever be sent to that address. This is useful in case that address does not resolve into a real mailbox, but only exists to allow DISTRIBUTE jobs through LISTSERV Maestro. The example below shows how the list header might look when edited through the LISTSERV web interface; if edited through email, each header line would be preceded by an asterisk (*):
Notify= Yes
Editor= user@example.org
Owner=someone@example.org
Owner=quiet:
Owner= maestro@companyserver.example.org
Moderator= All
Sizelim= 1M
Subscription= By Owner
Subscription= Confirm
Ack= Yes
Confidential= Yes
Validate= No
Reply-to= Sender,Respect
Send= Private
Errors-To= Owner
Notebook= Yes,E:\LISTS\WOMENS_CLUB,Weekly,Private
For institutions that have many lists, it is likely that different people will need to have access to different lists. If this is the case, people that work on the same list or set of lists will have to be placed in the same group. The group can have its own default LISTSERV connection and/or LISTSERV client address and password. If different addresses are assigned to individuals in a group (multiple LISTSERV client addresses), then all those addresses must appear in the list headers as
Owner=.