The next step in creating an email job is to define or select the recipients of the message. Generating a recipient definition is a multi-step process. The steps are contained in the Recipients Definition wizard, which guides the account holder through the process. The wizard is comprised of the following steps:
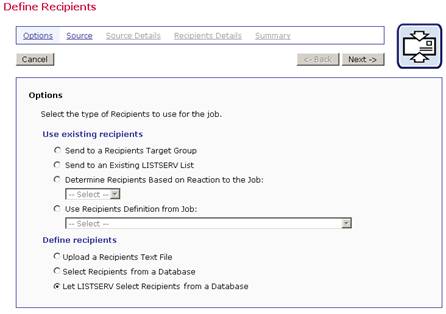
– Deciding where the recipient data will come from. There are seven different options split into two categories that can be selected to define the source for a recipient list
° Send to a Recipient target group – Allows account holders to select pre-defined groups of recipients from a database.
° Send to an Existing LISTSERV List – Recipients are defined by a LISTSERV list.
° Determine Recipients Based on Reaction to the Job – Recipients are selected based upon a defined action they performed in a previous job.
° Use Recipients Definition from Job – Recipients are copied from a previous job.
° Upload a Recipients Text File – A text file uploaded into the system defines recipients.
° Select Recipients from a Database – Recipients are defined by a LISTSERV Maestro defined database.
° Let LISTSERV Select Recipients from a Database – Recipients are defined by a database that has been configured so that LISTSERV has direct access to it.
Options are made available by the LISTSERV Maestro administrator. Every option is not always available for every account.
Depending on the selection of options for each step, subsequent steps and options will become available or will not be necessary to complete.
The [<-Back] and [Next ->] buttons navigate to the previous and following pages, automatically saving any changes on the current page. Click on any active link to go immediately to that screen, saving any changes on the current page.
Click [Cancel] to close the wizard without saving changes and return to the Workflow or Summary diagram. Exiting the wizard by closing the browser or clicking on a navigational or functional icon before successfully completing it acts the same as clicking [Cancel].
Send to a Recipient Target Group allows account holders to select pre-defined groups of recipients from a data source. All accounts in the group where the recipient target groups are saved may use them to build a recipient list for an email job. The data administrator will set up target groups based on available data, and will decide what the target group functionality will look like – check boxes, drop-down menus, or a combination. For information on how to create target groups, see the Data Administrator’s Manual.
There are many advantages to using recipient target groups:
· They can be fixed – pulling recipients in a predefined fashion such as “all males” or “all cat owners above age 40.”
· They can include parameters – giving the account holder the freedom to select a sub-set of data such as “all customers in a certain country” where country is a list of countries that the user can select from.
· The account holder does not have to know how to query the data – the data administrator programs the query that retrieves data from the database, freeing the user from this task.
· They are reusable – target groups can be reused on different jobs.
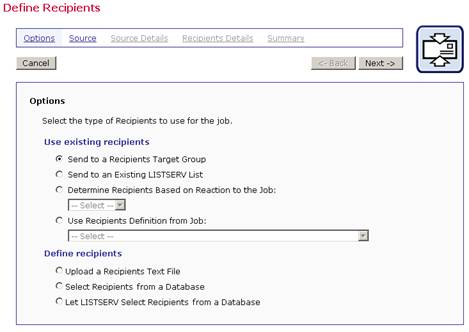
The first screen that opens in the Define Recipients wizard is the Options screen. Select the Send to a Recipient Target Group option, and then click [Next ->].
Figure 8 Define Recipients Options Screens for Target Groups
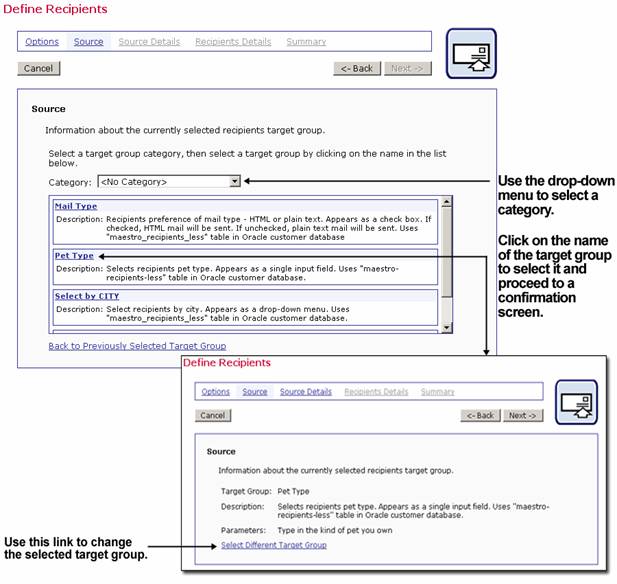
The Source screen for the Send to a Recipient Target Group option contains a list of the available target groups. Target groups may be placed within categories by the data administrator for organizational purposes. Click the Category drop-down menu to select a category associated with the target group (if appropriate). Once the category is selected, the target groups listed in the table will only be those in that category.
To select a target group to use for the recipients list, click on the name of the target group. The Source screen will confirm the selection. If the selection is correct, click the [Next ->] button. To change the target group, click the Select Different Target Group link, which will re-open the first source screen.
Figure 9 Source Screen for Recipient Target Groups
The Source Details screen is only displayed for target groups that have parameters defined. This screen allows the account holder to choose the specific recipients from the target group based on the parameters set up by the data administrator. Each parameter is designed by the data administrator to appear as a drop-down menu, a check box, or a text input box. The Source Details screen requires that those parameters be filled in by selecting what data will be extracted from the data source.
For example, to select recipients from certain cities as recipients, the recipient target group may appear as a drop-down menu listing all the cities in the database. Simply select the city or cities from the drop-down menu and all recipients associated with those cities in the data source will be used in the recipient definition.
For menus that allow multiple selections, click on the first selection, and then press CTRL while clicking additional items (or press SHIFT while clicking additional items to select a range of items).
Figure 10 Drop-Down Menu Recipient Target Group
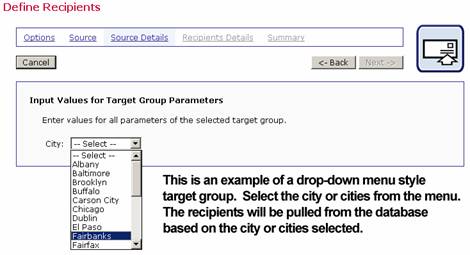
Figure 11 Multiple Parameters Recipient Target Group
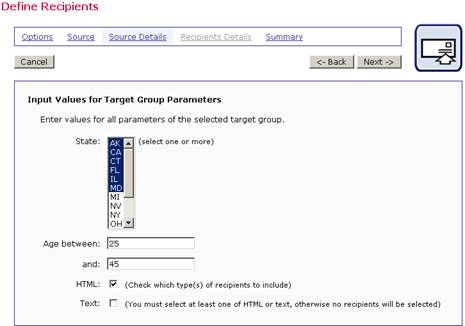
There can be more than one parameter on the Source Details screen; therefore, scroll down to make sure values have been selected for all parameters. After selections have been made, click [Next ->] to continue and to query against the data source.
There are no Recipient Details for recipient target groups.
If the target group is defined to retrieve recipients, then the Summary screen will appear listing the count and a sample of the recipients who matched the criteria and make up the recipients list. Valid recipients and recipients with errors in their addresses may be downloaded. Duplicate elimination is usually determined by the data administrator when the target group is first created. If the target group is defined to retrieve recipients just before sending, then the Summary screen simply summarizes the choices that were made throughout the Define Recipients wizard.
Sending to an existing LISTSERV list uses the identified list’s subscriber names and addresses to create the recipient list for the email job. Contained in a drop-down menu are all the LISTSERV lists available to the LISTSERV Maestro instance.
The first screen that opens in the Define Recipients wizard is the Options screen. Select the Send to an Existing LISTSERV List option, and then click [Next ->].
Figure 12 Options for an Existing LISTSERV List

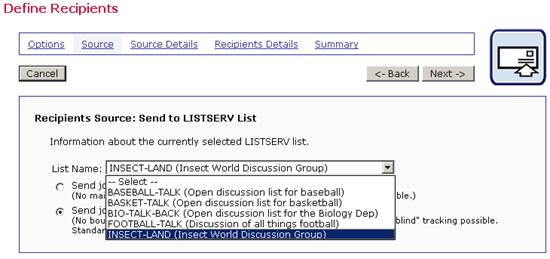
Select the LISTSERV list for the job from the drop-down menu. Next, select one of the two options for the type of list message to be sent. The Send job as standard list message to list members option limits the tracking options, but allows for the use of topics (see Section 4.2.3.1 LISTSERV Topics). The Send job as special list message option is used to send the message as a special list message (see Section 4.2.3.2 Special List Messages), which allows for mail merging and more tracking options.
Figure 13 Define Recipients from a LISTSERV List
Important: The type of message selected has an impact on how the sender of the message is defined. The sender of a message is defined using the Define Sender icon (located on the Work Flow diagram). If the message is sent as a standard list message, the “From:” address field in Define Sender must be an authorized sender for that list. For more information on defining the sender of a job, see Section 7.1 Define Sender.
The Source Details screen will become active if the selected LISTSERV list has topics defined and the Send job as standard list message to list members option is selected. It will also become active if the Send job as special list message option is selected as the message type for the job. No Source Details screen will open if the selected list has no topics and the message is sent as a standard list message to list members.
LISTSERV lists often use sub-groups within the list to give subscribers the opportunity to receive only the posts to the list that pertain to the topics they are most interested in reading about. Sub-groups are created in LISTSERV by defining the keyword topics in the list header. Lists can have up to 23 topics defined.
List subscribers can select the topic(s) they are interested in receiving, including the “Other” topic, which includes all messages that are not specifically assigned to a topic.
Someone sending a message to the list can designate which topic or topics that message covers. Alternatively, they can request that their message be sent to all subscribers, regardless of the subscribers’ topic selections. If no topic designation is made when sending a message to the list, that message falls in the “Other” topic, and is sent only to those subscribers who have selected the “Other” topic.
For example, a large list could have the general subject of Insects of North America. Topics could be defined by type of insect, by geographical region, or by areas of research. For more information on Topics, see the LISTSERV List Owner's Manual.
When topics are defined for the list selected in the Recipients wizard, there are three ways to send the message:
· Send only to subscribers with the following topics – The message will be sent to only those list subscribers that selected any of the checked list topics.
· All subscribers, ignore topics – The message will be sent to all list subscribers, regardless of their topic selections. This is the same as selecting all topics and “Other”.
· Send to subscribers with no topics or with “OTHER” topic – The message will be sent to all list subscribers that have selected the OTHER topic.
Figure 14 Source Details for LISTSERV List Topics
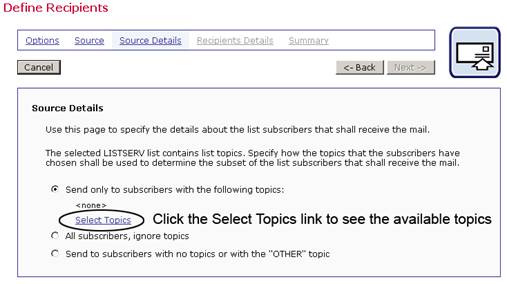
Click the Select Topic link to view the available topics for the list. Use the check boxes to select which topics to include as message recipients. Click the Select All link to select all topics. Next, decide whether to hide or expose the selected topics in the subject line of the message by selecting the corresponding option button.
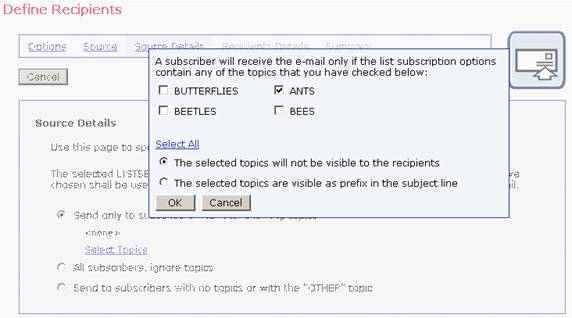
If the list subscribers are aware of the topics and are accustomed to using them (for example, to automatically move list messages to folders in their email programs), then consider exposing the topics in the subject line. However, if there are many topics selected for the message, a rather lengthy subject line will result. In this case, consider hiding the topics from the recipients. Hiding topics can also be useful if the topics are only used to sub-divide the list and have not been directly selected by the recipients. Click [OK] to save the selections and return to the Source Details screen. [Cancel] negates the action and returns you to the Source Details screen without changing any settings.
Figure 15 Source Details for a LISTSERV List with Topics
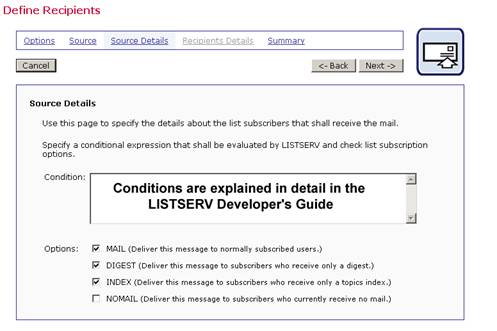
A “special” LISTSERV message is one that by-passes the normal operation of the list, and instead, treats the subscriptions in a list as a recipient database. Special messages do not get archived and do not honor subscriptions settings such as SUBJECTHDR, DIGEST, or NOMAIL. However, the subscription settings MAIL, DIGEST, INDEX, and NOMAIL can be used to subset the list. List owners generally use such special messages to send administrative messages to a certain class of subscribers (for example, all subscribers set to “NOMAIL”).
When messages are sent to a list as a special list message, the Source Details screen allows for setting a condition as well as setting other options for mail delivery.
Setting a condition is a means of creating a subset of recipients from the selected LISTSERV list based on the email address, or, in the case of DBMS-based lists, other information in the list’s database table. For information on setting conditions for a LISTSERV list, see the LISTSERV Developer’s Guide, available online at http://www.lsoft.com/resources/manuals.asp
There are four options for a LISTSERV list that can be set by checking the adjacent boxes. The options are standard LISTSERV settings that subscribers may have set for their subscriptions.
· MAIL – Will deliver the message to all normally subscribed users.
· DIGEST – Will deliver the message to users that receive only a digest.
· INDEX – Will deliver the message to users that receive only an index of subjects.
· NOMAIL – Will deliver the message to users that currently receive no mail.
Figure 16 Source Details for a Special Message for a LISTSERV List
Once you are finished making you selection, click [Next ->] to continue.
There are no Recipient Details for LISTSERV Lists.
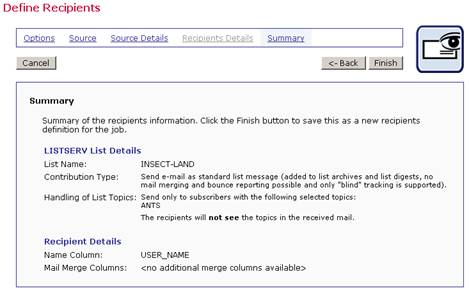
The Summary screen will display the LISTSERV List details and Recipient Details for the recipients of the job.
Figure 17 Summary for LISTSERV Lists
Under the right conditions, it is possible to send an email to recipients that reacted in a certain way to a previously delivered email job. For example, the recipients for an email job can be defined as the recipients who opened an HTML mail, or clicked on a certain link, or conversely those recipients who did not do either of these. In order for this option to be available, all of the following conditions must be met by the previous job:
· Recipients were defined from an uploaded text file or a database selection, or a target group based on one of these.
· Personal tracking was turned on.
· Tracking data has been received by the system.
All previous jobs that match these conditions will appear in the drop-down menu. If no jobs appear in the menu, this option is not available.
Note: Although this option in its present form is not available for jobs based on Hosted Recipient Lists that have personal tracking, it is possible to create a new job based on the reaction of recipients to these types of jobs by using a target group instead. Ask the LISTSERV Maestro Data Administrator for assistance with this option, or see the LISTSERV Maestro Data Administrator’s Manual for more information.
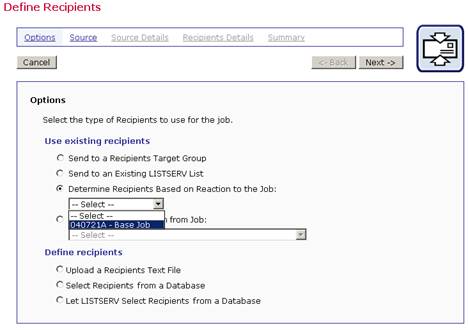
The first screen that opens in the Define Recipients wizard is the Options screen. Select the Determine Recipients Based on Reaction to the Job option, and then select a job from the drop-down menu. Click [Next ->] to proceed.
Figure 18 Options for Reaction to a Previous Job
The Source screen defines the conditions that potential recipients had to fulfill in the previous job to become eligible to receive the new message. First, decide whether to include recipients who performed an action or to exclude recipients who performed an action in the follow up message. Next, select which actions the recipients performed, opening up the message and/or clicking on specific links.
Figure 19 Determine Recipients Based on Reaction to the Job
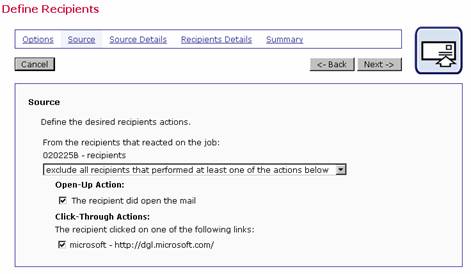
Select the include only recipients that performed at least one of the actions below option to include all those recipients who were part of the previous job and did react in the configured way – opening up the mail and/or clicking on a link contained in the message.
Select the exclude all recipients that performed at least one of the actions below option to include all those recipients who were part of the previous job and did not react in the configured way.
Next, select Open-Up Action and/or Click-Through Actions. The resulting recipients list is based upon including or excluding recipients that performed one of these specific actions in a previous job. Click [Next ->] to continue.
When a recipients list is generated by a reaction from a previous job, the Source Details screen opens so that a time frame can be set to define the reactions of the previous recipients in relation to a time period. Recipient reactions will only be considered for the new job if they fall within the time period set on this screen.
By default, LISTSERV Maestro uses the send time of the original job as the start time and the send time of the current job as the end time. By changing one or both of these default settings, it is possible to narrow the number of recipients of the current job because they will have had a limited amount of time to react.
Tip: Use the Time Period Details screen as a means of measuring the reaction to a time based offer in an email message. For example, a message could contain a link to a discount coupon with an expiration date. By setting the time period to the range of time that the coupon is valid, it would be possible to collect tracking data on those who clicked on the link within the timeframe so that a follow-up could be sent. It would also be possible to send a follow-up message to those who did not click within the time frame with another offer or extension.
Figure 20 Source Details for Reaction to a Previous Job
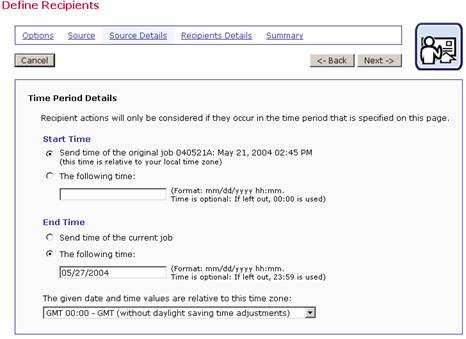
Select a Start Time option; use the original job’s send time or enter in another date and time.
Select an End Time option; use the new job’s send time or enter in another date and time.
Select the time zone that the time values are relative to from the drop-down menu. This selection is only necessary if the start and end times have been input and are not the original or current jobs times. Click [Next ->] to continue.
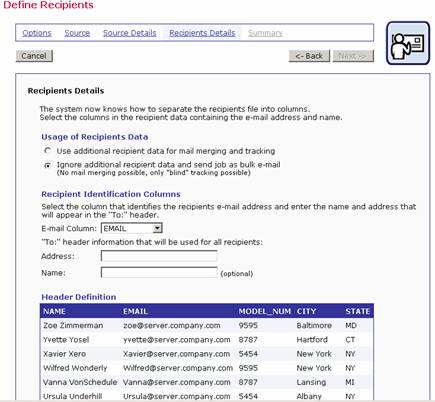
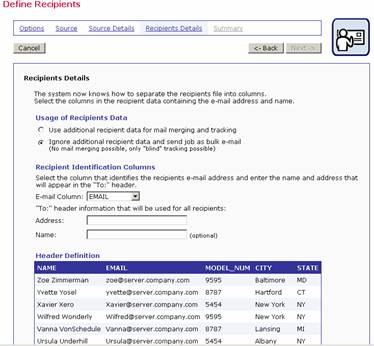
Once LISTSERV Maestro knows which recipients to select from the previous mailing, then the next steps are to define the column that identifies the email address, decide whether to use additional recipient data for mail merging and tracking, and to edit the column headers, if necessary. The Recipients Details screen is split into three sections to accommodate these steps.
LISTSERV Maestro needs to know if additional recipient data will be used for mail merging and tracking, or whether this information is to be ignored and the job sent as bulk email. If the Use additional recipient data for mail merging and tracking option is selected, columns from the text file or database can be used in the email message to create personalized messages. These columns can then also be used to identify recipients for more detailed tracking reports. For more information on using mail merging, see Section 5.6 Merge Fields and Conditional Blocks.
If the Ignore additional recipient data and send job as bulk email option is selected, any additional columns that were uploaded with the file or that appear in the database will be ignored by the system. It will not be possible to use mail merging. Tracking for the message will be limited to “blind” tracking, meaning that the tracking data available from the job will not be associated with identifiable individuals or other demographic information.
Once a selection has been made for Usage of Recipient’s Data, the selections for Recipient Identification Columns and Header Definition will change to reflect what is available for each.
Tip: It is common practice to use a generic email address with a matching generic name for the organization sending the bulk mail job in the “To:” Address and Name fields. An example of this might be “info@xyzcorp.com” as the address and “Your XYZ Team” as the name. Be sure to use an authentic email address in the “To:” Address field to avoid any bounces that could result from recipients using “Reply to all” in response to the message.
In order to process an email job, LISTSERV Maestro needs to know which column represents the recipients’ email addresses. Use the drop-down menu to select the Email Column. In the case of a mail merge job, the drop-down menu may be used to select the Name Column as well (this is optional).
If the job is sent as bulk email, with no mail merging, it is necessary to type in a “To:” address that will be used in the header of the message for all recipients. If necessary, type in a name for the “To:” address. All messages will be sent using this address and this name, no personalization is possible.
Figure 21 Recipients Details for Uploaded File without Additional Recipient Data
Headers are special rows in tables. Headers are used to label the columns of data so that the system and the user can correctly identify the columns. The header definition used from the previous job becomes the header of the current job. If a text file or a database was used to define recipients, and additional recipient data was used for mail merging and tracking, it is possible to edit the existing headers.
Editing the headers does not change the original uploaded file or the original job. However, editing does allow the user to create meaningful headers that can be used to merge recipient data into each message, making each message personalized. The name of the header becomes the name of the mail merge place holder in the message; therefore, it is important to select names that are meaningful to the users who are assembling the message content. See Section 5.6.1 Merge Fields for more information.
Figure 22 Recipients Details for Reaction to a Previous Job with Additional Recipient Data

Header labels are limited to upper and lower case letters, the numbers 0-9, and the underscore “_”. Any illegal characters in the headers will have to be changed before proceeding. Before continuing to the next screen, identify the recipients email address and name by using the drop-down menus for the Email Column and the Name Column.
The Summary screen will display the selection made for the current job, including the original job, the selected recipients, the time period, the special purpose columns, and a sample of recipients from the original job (this sample will not reflect any header changes you made).
This recipient definition transfers all the data and settings from a previous job to the new job. The recipient definition from any job that has already had the recipients defined can be used as a template for the new job; the copied job does not have to have been delivered. Using this option can save time by reusing an already created recipients list as a template for a new job. Some settings can be changed within the new job, depending on the type of job that was copied.
Note: If the original job used “just-in-time” recipient retrieval, then the copied job will too. However, if the original job retrieved recipient data at the time the recipients were defined, then the copied job will get an exact copy of the recipient list from the original job. It will not retrieve data anew, even if the source used by the original job has changed. If the data should be retrieved anew, run through the definition again and force the retrieval. For example, if the recipients of the original job were from a database retrieval, click on the Click here to refresh the data from the database link on the Recipients Details screen to renew the data retrieval.
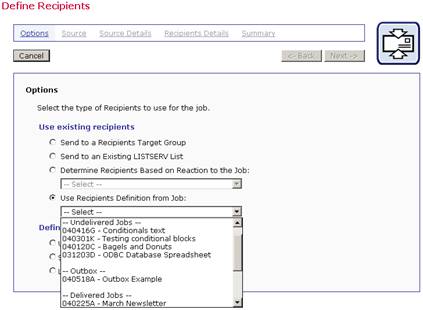
The first screen that opens in the Define Recipients wizard is the Options screen. Select the Use Recipients Definition from Job option, and then select the job from the drop-down menu. All jobs that have had a recipients definition successfully saved will appear in the selection list. This includes jobs that are undelivered, in the Outbox, or have already been delivered. Click [Next ->] to proceed.
Figure 23 Options for Recipients Defined from a Previous Job
The settings of the previous job will determine which Source screen is presented. It is possible to make changes in the selections available on the Source screen, or leave the selections the same as the previous job. Click [Next ->] to continue.
The Source Details screen will be dependent on the type of recipient definition that was copied. It is possible to make changes in the selections available on the Source Details screen, or leave the selections the same as the previous job. Click [Next ->] to continue.
The Recipients Details screen will be dependent on the type of recipient definition that was copied. Some recipient definitions do not use a Recipients Details screen. It is possible to make changes in the selections available on the Recipients Details screen, or leave the selections the same as the previous job. Click [Next ->] to continue.
The Summary screen will be dependent on the type of recipient definition that was copied.
Recipients can be added to LISTSERV Maestro by uploading a text file. Text files can be formatted as plain text with the extension .TXT or as a comma separated values file with the extension .CSV. For information on how to format text files, see Appendix C: About Comma Separated Format Recipient Files.
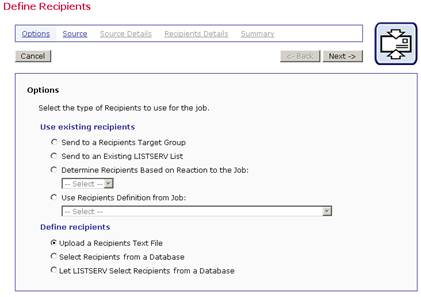
The first screen that opens in the Define Recipients wizard is the Options screen. Select the Upload a Recipients Text File option, located in the Define recipients section. The text file may contain columns of data with or without a header row. The system administrator may limit the availability of this option or the size of the uploaded file.
Figure 24 Options for Uploaded Text File
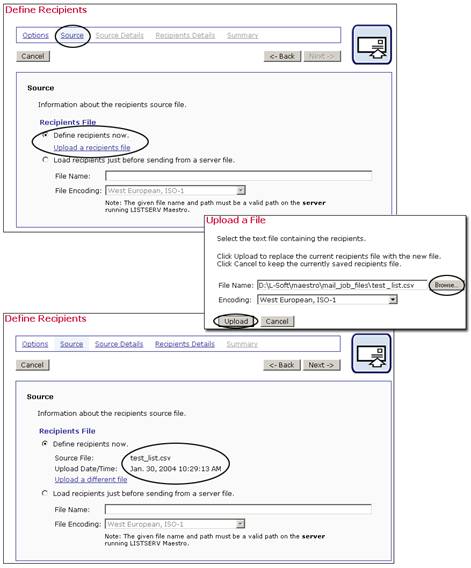
The Source screen that opens contains two options: Define recipients now and Load recipients just before sending from a server file.
Define recipients now creates a static list of recipients at the moment of definition that will not change unless re-defined. Load recipients just before sending from a server file is a “just-in-time” recipient definition, which means that the text file will be reloaded just before sending, allowing changes to be made to the file between recipients definition and sending, and those changes will be reflected in the actual list of recipients used for the mailing.
By selecting the Define recipients now option, the Upload a recipients file link is enabled. Click this link to upload a text file from a local drive. Browse for the file on a local drive and select the encoding for the file, if necessary. For more information on encoding, see Appendix B: Email and International Character Sets.
Once a file had been uploaded, information about that file will appear on the screen. The link to upload a file will change to Upload a different file after one file has been successfully uploaded to the system.
Selecting the Load recipients just before sending from a server file option requires the full path and name of the file that contains the recipients to be entered in the text box provided. The recipients from this file will be uploaded into LISTSERV Maestro just before the message is sent. The file must be on a valid path on the server running LISTSERV Maestro (specifically, the LUI component).
Any recipients file residing on
a server must be added to a list of permissible files in the HUB. This
list of permissible files is controlled by the system administrator and
is necessary to maintain server security. If the file is not on this list,
an error message will be displayed on the Source screen. If the file is
not available at the moment of sending, the job will fail. Click
[Next ->] to continue.
Tip: The Load recipients just before sending from a server file option is especially useful if the text file is created automatically by an external process, such as extracting from a different data source.
Figure 25 Define Recipients from an Uploaded File
When a text file is uploaded, LISTSERV Maestro will try to determine how the columns of data are separated, and how each column or field of data is labeled (header) on the Source Details screen. In order to send out an email job, LISTSERV Maestro must correctly interpret which column contains the name of the recipient and which column contains the email address of the recipient. Other fields may be included and will appear in the Preview section located on the lower half of the screen.
Figure 26 Define Recipients Source Details Parse Recipients
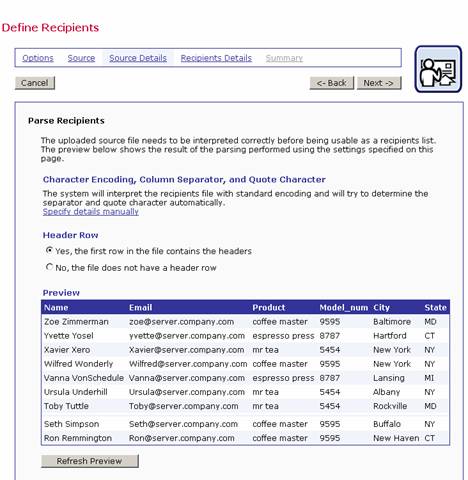
Click the [Next ->] button to continue if the parsing is accurate with each column of data separated correctly and labeled with a header row.
If LISTSERV Maestro has not interpreted the data correctly, or an unconventional delimiter and/or quote character has been used, click on the Specify details manually link to configure the data manually.
Use the Specify details manually link when the delimiter (separator character) or the quote character is used in some of the data fields. For example, if the NAME field contained Tom “the cool cat” Jones as an entry, and double quotes was the quote character for the file, the details would have to be specified manually. The same would be true if a field named LOCATION contained the entry Atlanta, GA where the comma was the separator character.
Figure 27 Define Recipients for Uploaded Text File – Specify Details Manually
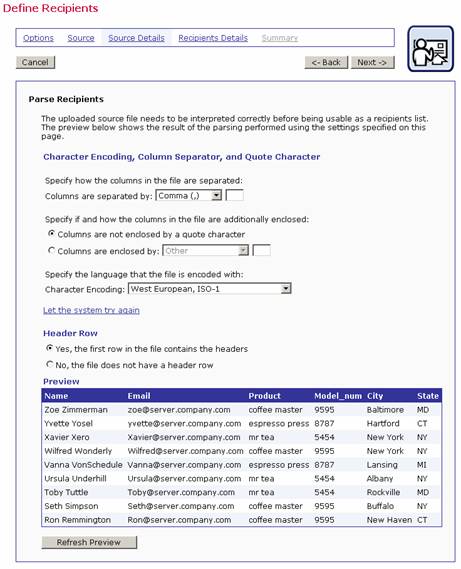
LISTSERV Maestro has four selections for choosing separator characters:
· Tab (\t)
· Comma (,)
· Semicolon (;)
· Other – if this is chosen, type the character into the adjacent box.
Columns can be defined as not enclosed by a quote character or select the quote character from three choices:
· Double Quotes (“)
· Apostrophe (‘)
· Other – if this is chosen, type the character into the adjacent box.
In addition to interpreting the separator character and the quote character, LISTSERV Maestro will select the encoding used to create the text file. If the original data file was created with a specific character set, such as Greek characters, the file encoding will have to be changed to match that character set. Use the drop-down menu to select the encoding for the file if it is different from the default. For more information on encoding, see Appendix B Email and International Character Sets.
After separator and quote characters have been entered, and any encoding change made, click [Refresh Preview] to have LISTSERV Maestro attempt to parse the file again with the new settings. The new columns will then be displayed. If the columns are now separated correctly, proceed. If the columns are not correct, repeat the process and click [Refresh Preview] to see the new changes.
Headers are special rows in tables. Headers are used to label the columns of data so that the system and the user can correctly identify the columns. An uploaded text file may contain headers or not. If the file does not contain headers, select the No, the file does not contain a header row option and the system will automatically add a header row. Each column of data in the header row will be given a generic name using the pattern COL1, COL2, COL3, and so on. If the uploaded file does have a header row, select the Yes, the first row in the file containers headers option and the headers within the file will be used.
System generated headers and headers uploaded from a file can be edited to be more meaningful if they will be used for mail merge and tracking on the Recipients Details screen. Editing headers within LISTSERV Maestro will in no way change the original file.
Click [Next] to continue.
Once LISTSERV Maestro can successfully separate the recipient data into columns or otherwise quantify the data, the next steps are to define the column that identifies the email address, decide whether to use additional recipient data for mail merging and tracking, and to edit the column headers, if desired. The Recipients Details screen is split into three sections to accommodate these steps.
LISTSERV Maestro needs to know if additional recipient data will be used for mail merging and tracking, or whether this information is to be ignored and the job sent as bulk email. If the Use additional recipient data for mail merging and tracking option is selected, columns from the text file can be used in the email message to create personalized content. These columns can then also be used to identify recipients for more detailed tracking reports. For more information on using mail merging, see Section 5.6 Merge Fields and Conditional Blocks.
If the Ignore additional recipient data and send job as bulk email option is selected, any additional columns that were uploaded with the file will be ignored by the system. It will not be possible to use mail merging. Tracking for the message will be limited to “blind” tracking, meaning that the tracking data available from the job will not be associated with identifiable individuals or other demographic information.
Once a selection has been made for Usage of Recipient’s Data, the selections for Recipient Identification Columns and Header Definition will change to reflect what is available for each choice.
In order to process an email job, LISTSERV Maestro needs to know which column represents the recipients’ email addresses. Use the drop-down menu to select the Email Column. If the job is sent as bulk email, with no mail merging, it is necessary to type in a “To:” address that will be used in the header of the message for all recipients. Optionally, type in a name for the “To:” address. All messages will be sent using this address and this name, no personalization is possible.
Figure 28 Recipients Details for Uploaded File without Additional Recipient Data
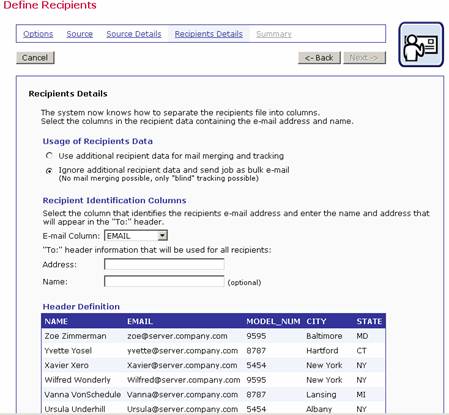
Tip: It is common practice to use a generic email address with a matching generic name for the organization sending the bulk mail job in the “To:” Address and Name fields. An example of this might be “info@xyzcorp.com” as the address and “Your XYZ Team” as the name. Be sure to use an authentic email address in the “To:” Address field to avoid any bounces that could result from recipients using “Reply to all” in response to the message.
For jobs that are sent as mail merge jobs, an additional drop-down menu is available to select the Name Column. Selecting the Name Column is optional, but it can be used to make the message more personalized.
Figure 29 Recipients Details for Uploaded text File with Additional Recipient Data

When the Use additional recipient data for mail merging and tracking option is selected, it becomes possible to edit the headers of the file. Editing the headers does not change the original uploaded file. However, editing does allow the user to create meaningful headers that can be used to merge recipient data into each message, making each message personalized. The name of the header becomes the name of the mail merge place holder in the message so it is important to select names that are meaningful to the users who are assembling the message content. See Section 5.6.1 Merge Fields for more information.
Header labels are limited to upper and lower case letters, the numbers 0-9, and the underscore “_”. Any illegal characters in the headers will have to be changed before proceeding. Before continuing to the next screen, remember to specify the Email Column and the Name Column using the drop-down menus.
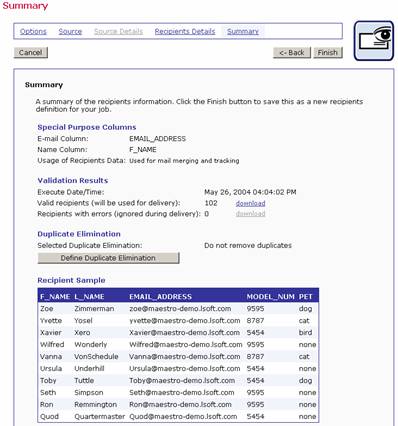
The Summary page of the Define Recipients wizard shows a summary of the recipient list selections for the job. LISTSERV Maestro will validate the recipient list data file, checking for errors in the email addresses that would prevent the email from being delivered. From this screen, it is possible to download the validated recipient list and the list containing recipients who have been rejected. If available, a sample of the recipient list will appear at the bottom of the screen.
Figure 30 Recipient Summary
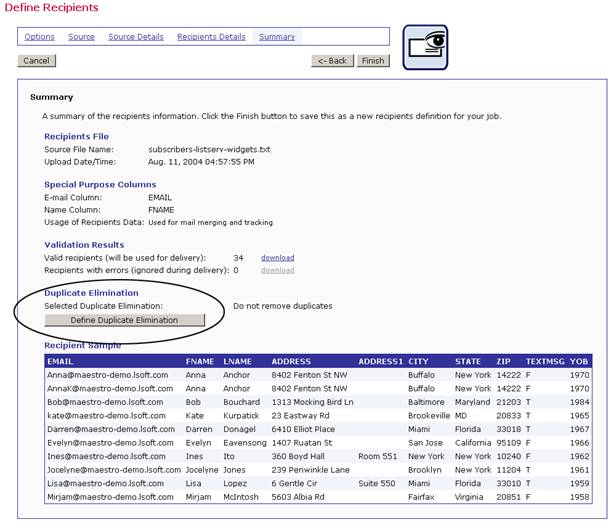
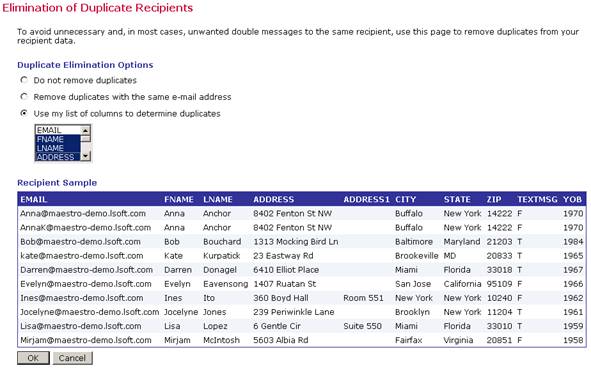
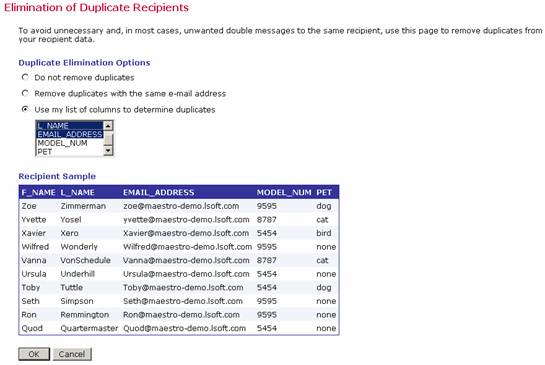
LISTSERV Maestro can eliminate duplicate recipients from the Summary screen. Click on the [Define Duplicate Elimination] button to initiate this function. Duplicates can be removed based on one or more selected criteria. To select more than one criterion for removing duplicates, hold down the SHIFT key or the CTRL key and click on the columns desired. Click [OK] to remove duplicates and return to the Summary screen.
Tip: Removing duplicates from recipient data can be a useful way to ensure that multiple messages are not sent to the same recipient. It is common practice for one person to have more than one email address (i.e. a work email address and a personal email address). By creatively selecting one or more criteria to remove duplicates (i.e. a customer ID number), it is possible to avoid sending multiple messages to the same person with different email addresses. Conversely, several recipients may use the same email address, for example, family members sharing an ISP may also share an email address. In this case, it might be desirable to send multiple messages to the same address shared by multiple recipients, but addressed to each individual using the email account.
Figure 31 Elimination of Duplicate Recipients Screen
From the Define Recipients Summary screen, click [Finish] to save all settings and return to the Job Details screen, the Summary diagram, or the Workflow diagram. The recipient definition can always be edited by selecting the Edit link from the Summary diagram or clicking on the Define Recipients icon from the Workflow diagram.
Choosing the Select Recipients from a Database option allows LISTSERV Maestro to make a direct query to a database using SQL (Structured Query Language). The system communicates with a database over a network using database drivers and plugins. The database must be accessible to LISTSERV Maestro over the network and some configuration is required by the system administrator for the connection to succeed.
The first screen that opens in the Define Recipients wizard is the Options screen. Select the Select Recipients from a Database option, located in the Define Recipients section. Click [Next ->] to continue.
Figure 32 Select Recipients from a Database Option

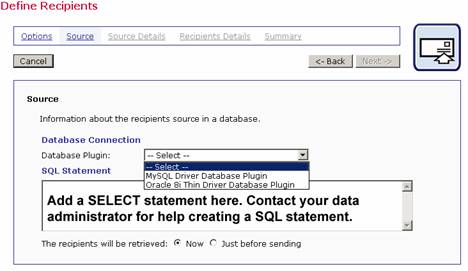
LISTSERV Maestro has the ability to communicate directly with a database over a network. This is achieved by using database “plugins”. Database plugins are available from L-Soft and should be installed by the system administrator. To make a connection to a database, select the appropriate plugin for the database from the drop-down list provided on the Source screen. If there is any uncertainty about the plugin selection, contact the system administrator, the database administrator, or see the LISTSERV Maestro Administrator’s Manual.
Figure 33 Source for Select Database Plugin
Once the database plugin has been selected, a longer Source screen opens requiring additional information. The information is required by LISTSERV Maestro in order to be able to communicate with the database. Different databases require different connection information, so the fields that appear on the Source screen will be different depending on the type of database being accessed. If there is any question about the information required, contact the data administrator or the system administrator.
This longer version of the Source screen will automatically open (skipping the shorter version) if the new job is copied from a previous job with the same settings, or if the user returns to the Source screen from another link in the Define Recipients wizard. The wizard does not have to be completed in order to keep the plugin selected.
Figure 34 Source Screen for Define Database Connection
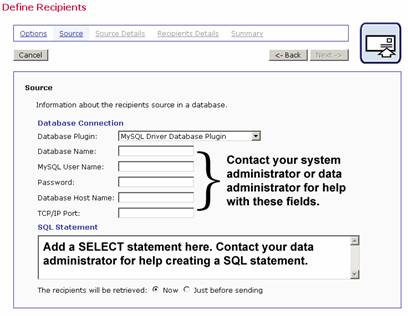
Enter the SQL statement (query) in the SQL Statement text box. Depending on the database, variations in SQL syntax may need to be considered, especially if the query returns with an error.
Below the SQL Statement text box are options that determine when to execute the query against the database. Retrieving recipients Now means building a complete recipient list by querying the database while still in the Define Recipients wizard. The recipients will be gathered from the database and saved when the wizard is completed by clicking the Summary link. Any changes in the database between the time the wizard is completed and the time the mail is sent will not be reflected.
Retrieving recipients Just before sending means that the database will be queried for the complete recipient list just before the mail is sent for delivery. Any changes in the database that occur between the time the Define Recipients wizard was completed and the time the mail is scheduled for delivery will be reflected. Click [Next ->] to continue.
There are no Source Details for recipients retrieved directly from a database by LISTSERV Maestro.
On the Recipients Details screen, the SQL statement is automatically executed to test its validity. An Operation in Process screen will appear until the operation is completed. Once completed, a preview of 10 recipients will be displayed. An error message will appear if there are any problems with the SQL statement or connection to the database. If recipients will be retrieved now, the SQL statement will be re-sent to the database when entering the Summary screen in order to build the full recipient list. If recipients will be retrieved just before sending, the SQL statement will be re-sent to the database right before the scheduled sending time.
The next steps are to define the column that identifies the email address, decide whether to use additional recipient data for mail merging and tracking, and to edit the column headers, if desired. The Recipients Details screen is split into three sections to accommodate these steps.
LISTSERV Maestro needs to know if additional recipient data will be used for mail merging and tracking, or whether this information is to be ignored and the job sent as bulk email. If the Use additional recipient data for mail merging and tracking option is selected, columns from the database can be used in the email message to create personalized messages. These columns can then also be used to identify recipients for more detailed tracking reports. For more information on using mail merging, see Section 5.6 Merge Fields and Conditional Blocks.
Figure 35 Recipients Details for LISTSERV Maestro Selects from a Database with Additional Recipient Data

If the Ignore additional recipient data and send job as bulk email option is selected, any additional columns that appear in the database will be ignored by the system. It will not be possible to use mail merging. Tracking for the message will be limited to “blind” tracking, meaning that the tracking data available from the job will not be associated with identifiable individuals or other demographic information.
Figure 36 Recipients Details for LISTSERV Maestro Selects from a Database without Additional Recipient Data
Once a selection has been made for Usage of Recipient’s Data, the selections for Recipient Identification Columns and Header Definition will change to reflect what is available for each choice.
In order to process an email job, LISTSERV Maestro needs to know which column represents the recipients’ email addresses. Use the drop-down menu to select the Email Column. In the case of a mail merge job, use the drop-down menu to select the Name Column as well (see Figure 35). Selecting the Name Column is optional, but it makes a more personalized message possible.
If the job is sent as bulk email, with no mail merging, it is necessary to type in a “To:” address that will be used in the header of the message for all recipients (see Figure 36). Optionally, type in a name for the “To:” address. All messages will be sent using this address and this name, no personalization is possible.
Tip: It is common practice to use a generic email address with a matching generic name for the organization sending the bulk mail job in the “To:” Address and Name fields. An example of this might be “info@xyzcorp.com” as the address and “Your XYZ Team” as the name. Be sure to use an authentic email address in the “To:” Address field to avoid any bounces that could result from recipients using “Reply to all” in response to the message.
Headers are specially defined rows in databases. Headers are used by database tables to label the columns of data so that the system and the user can correctly identify the columns. If additional recipient data is selected to be used for mail merging and tracking, it is possible to edit the existing headers (see Figure 35). Editing the headers does not change the original database table. It does allow the user to create meaningful headers that can be used to merge recipient data into each message, making each message personalized. The name of the header becomes the name of the mail merge place holder in the message so it is important to select names that are meaningful to the users who are assembling the message content. See Section 5.6.1 Merge Fields for more information. If the message is being sent as bulk email, it is not possible to change the headers (see Figure 36).
Tip: It is also possible
to change the header name directly in the SQL statement used to retrieve
the data by making use of the “AS” clause of the SQL SELECT statement.
For example, the following SQL statement selecting data from an Excel
spreadsheet using ODBC will result in 3 columns called CUSTID, EMAIL,
and FULLNAME, derived from 4 columns in the spreadsheet called ID, EMAIL,
FNAME, and LNAME:
select ID AS CUSTID, EMAIL, FNAME+' '+LNAME AS FULLNAME
from [Demo-recipients$]
The Summary screen lists all the selections made in the Define Recipients wizard. From here, it is possible to use the [<- Back] button to re-enter the wizard and make changes. LISTSERV Maestro will validate the recipient list selected from the database, checking for errors in the email addresses that would prevent the email from being delivered. From this screen, it is possible to download the validated recipient list and the list containing recipients who have been rejected. If available, a sample of the recipient list will appear at the bottom of the screen.
Figure 37 Define Recipient Summary
Tips: Although initially
it may take some assistance from the system administrator or data administrator,
selecting recipients from a database is a much faster method of defining
recipients for a job when compared to uploading a text file. Because recipient
data comes directly from a database, it becomes unnecessary to export
the data, upload a large text file, and parse the file, therefore saving
time and system resources.
To re-use SQL statements or build parameters into SQL statements, making
them more flexible, consider creating and using recipient target groups.
See Section 4.1 Recipient Target Groups
for more information on using recipient target groups, and see the Data
Administrator’s Manual for how to create recipient target groups.
LISTSERV Maestro can eliminate duplicate recipients from the Summary screen. Click on the [Define Duplicate Elimination] button to initiate this function. Duplicates can be removed based on one or more selected criteria. To select more than one criterion for removing duplicates, hold down the SHIFT key or the CTRL key and click on the columns desired.
Figure 38 Elimination of Duplicate Recipients Screen
Tip: Removing duplicates from recipient data can be a useful way to ensure that multiple messages are not sent to the same recipient. It is common practice for one person to have more than one email address, for example, a work email address and a personal email address. By creatively selecting one or more criteria to remove duplicates, it is possible to avoid sending multiple messages to the same person with different email addresses. Similarly, several recipients may use the same email address, for example, family members sharing an ISP may also share an email address. In this case, it might be desirable to send multiple messages to the same address shared by multiple recipients, but addressed to each individual using the email account.
From the Define Recipients Summary screen, click [Finish] to save all settings and return to the Job Details screen, the Summary diagram, or the Workflow diagram. The recipients can always be edited by selecting the Edit link from the Summary diagram or clicking on the Define Recipients icon from the Workflow diagram.
The Let LISTSERV Select Recipients from a Database option relies on a pre-existing configuration of LISTSERV connected to a database or databases, wherein LISTSERV acts as the communicator between the database(s) and LISTSERV Maestro. This option may only be used if LISTSERV has been set up to work with a database. The site administrator should consult the LISTSERV Developer’s Manual for details.
The first screen that opens in the Define Recipients wizard is the Options screen. Select the Let LISTSERV Select Recipients from a Database option, located in the Define recipients section. Click [Next ->] to continue.
Figure 39 Let LISTSERV Select Recipients from a Database Option
If LISTSERV is connected to multiple databases, enter the “server name” defined in LISTSERV’s configuration in the Database Server text box on the Source screen. Enter the SQL statement selecting the recipients in the SQL Statement text box. Click [Next ->] to continue.
Figure 40 Define Recipients from LISTSERV Connected Database

There are no Source Details for recipients selected from a database by LISTSERV.
Because LISTSERV is communicating directly with the database, LISTSERV Maestro does not have any information about what data is contained in the database or how it is arranged. As a result, there is no preview of the columns being used by the database. In order to give LISTSERV Maestro the information it needs to send the job, it is necessary to know the exact names of the columns of data in the database. This information can be obtained from the LISTSERV system administrator or from the database administrator.
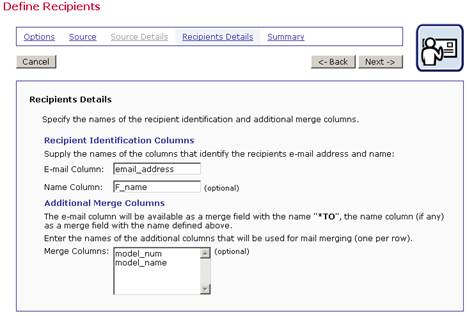
Enter the name of the email column in the Email Column text box. This is the minimum amount of information needed to send a job. Optionally, enter the name of the recipients column in the Name Column text box.
If mail merging is going to be used in the message, enter the names for the columns of data that will be used as merged fields in the Merge Columns text box, one name per row (see Figure 41). In order to function correctly, the names of the columns entered here must be the exact names used in the database.
Figure 41 Recipient Details for LISTSERV Selects Recipients from a Database
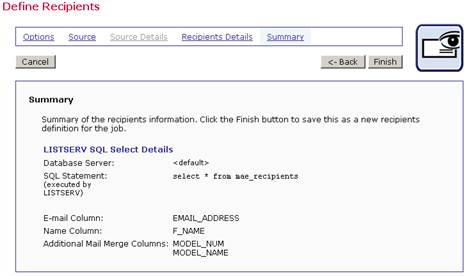
4.7.5 Summary
The Summary screen lists all the selections made in the Define Recipients wizard. The sample recipient list will not show for a LISTSERV selected database because LISTSERV Maestro has no direct connection to the database and cannot obtain that information. Any problems with the query statement or the column names will not be detectable until a delivery test is run, so be sure and test thoroughly.
From here it is possible to use the [<- Back] button to re-enter the wizard and make changes. Click [Finish] to save the recipients definition and return to the Workflow diagram.
Figure 42 Summary for LISTSERV Selects Recipients from a Database