Hosted lists contain data from the dataset. They can also have their own data fields that are not shared among lists in the dataset, but belong exclusively to the list. Lists that do have their own fields will also have their own web subscription forms generated when the list is created. All the fields that appear in the dataset and in a particular list can be used as merged fields for messages sent to that list.
To create a new hosted recipient list, first select the dataset the list will be added to from the Recipient Datasets screen. The Recipient Dataset Details screen opens.
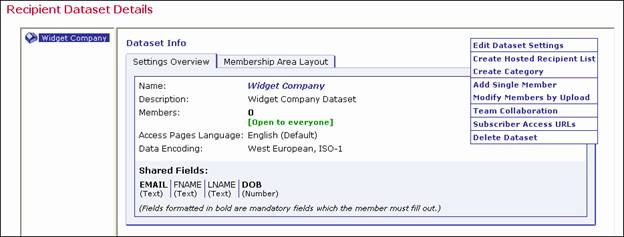
Figure 16 Recipient Dataset Details
This screen is split into two frames. The left frame will display all the lists (if any) that belong to the open dataset. Datasets with many lists can use folders called “categories” to organize lists so that they are easier to find. See Section 8 Organizing Data Sets for more information.
The right frame displays all the settings for the open dataset. Clicking the Actions link will open a menu containing links to other functions that can be performed on the dataset. Click on the Create Hosted Recipient List option to open the Hosted Recipient List Definition wizard.
Important Note: Once lists have been added to a dataset, some options for editing the dataset will be curtailed. Make sure the dataset is structured as desired before adding lists to it.
Similar to creating a dataset, creating a hosted recipient list is accomplished by using a wizard that guides you through the steps of designing the list and the accompanying web subscription form. The Hosted Recipient List Definition wizard is comprised of four main screens – General, Profile Fields, Profile Field Details, and Summary.
The General screen defines the general information pertaining to the list.
· Name – This is the name of the mailing list. Subscribers will see this name for the list on the web form when they subscribe. LISTSERV Maestro users will see the name of the list in the default hosted list target group that is automatically created when the list is populated with subscribers. See Section 13 Hosted Recipient List Target Groups for more details. Data administrators will see the list name in the dataset tree.
· Internal Description – The internal description is seen by users working within the Maestro User Interface.
· Public Description – The public description of the list appears on the subscription web form. If subscribers are permitted to select the lists they want to join and can view and change their subscription settings, having accurate descriptions will help them accomplish those tasks.
Figure 17 The Hosted Recipient List Wizard – General Screen
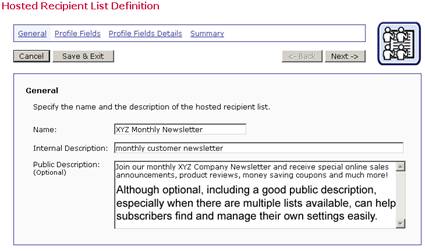
Once you’ve finished entering information, click [Next ->] to continue.
The Profile Fields screen contains a list of the fields in the dataset. New fields can be added to the list. Any added list fields will not be shared with the other lists in the dataset. To add a new field, click the Add Field link.
For each new field, enter the following information:
· Name – The name of the field as it will be used internally by the system for mail merging and querying. Field names can only use upper and lower case letters A-Z and a-z, the numbers 0 – 9 and the underscore “_”. Spaces and other special characters are not allowed.
· Display Name – The label that identifies the field on the web form. The display name will be seen by anyone accessing the list’s public subscription page on the Web. All alphanumeric characters are permitted, as well as spaces and most special characters.
· Data Type – Choose the type of data to be entered in the field from the drop-down menu. Five different classifications of data are available:
o Text – Text fields can accept any type of text, including dates in specific formats such as dd/mm/yyy or mm.dd.yyyy.
o Number – Number fields accept any whole integers.
o Boolean – Boolean fields are based on two states – true or false.
o Single Select (lookup table) – A single selection field consists of a drop-down menu where one item from it may be chosen. It may also be represented as a set of option buttons.
o Multiple Select (lookup table) – A multiple selection field consists of a drop-down menu where one or more items may be chosen. It may also be represented as a set of checkboxes.
· Input Type – Decide whether the data is mandatory for subscribers to enter into the web form or optional. Optional fields can be designated as hidden or read-only if the subscribers are not allowed to enter or change the data in those fields. Boolean fields cannot be optional due to the nature of the data type – the selection equates to either true or false. Boolean fields may be visible or hidden.
After list fields are created, they can be edited, removed, moved up, or moved down by using the corresponding links on the right side of the table. Fields that are part of the dataset cannot be moved or edited from this screen.
Figure 18 The Hosted Recipient List Wizard - Profile Fields Screen

Once you’ve finished entering information, click [Next ->] to continue.
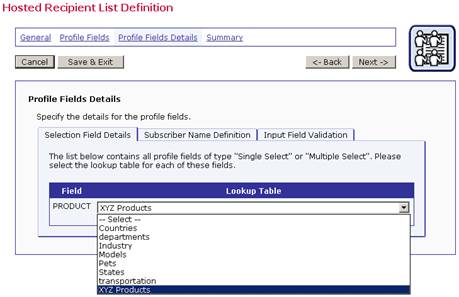
The Profile Field Details screen has multiple tabs that allow you to toggle between the different settings for list profile fields. The number and type of tabs depends on the types of data fields added to the list.
Lists containing selection fields have to assign the relevant lookup table to the field. Click on the Selection Field Details tab to access the list of available lookup tables. See Section 4.1.3 Creating a Lookup Table for more information.
Figure 19 The Hosted Recipient List Wizard - Profile Fields Details Screen for Selection Field Details
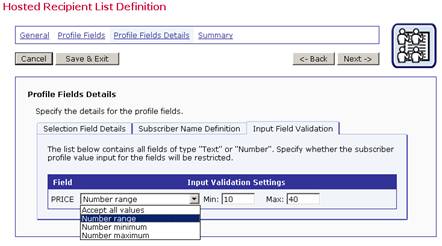
Lists with Text and Number fields can have validation criteria entered so that when the fields are filled in by subscribers, only certain types of input will be accepted. Click on the Input Field Validation tab to access the field validation settings. For example, in the PRICE column, a monetary value is requested. By setting a validation setting for a number range, only prices falling within the specified range will be accepted, and only whole numbers in the form of integers will be accepted. Floating point numbers are not accepted in the number field.
Figure 20 The Hosted Recipient List Wizard - Profile Fields Details Screen for Input Field Validation
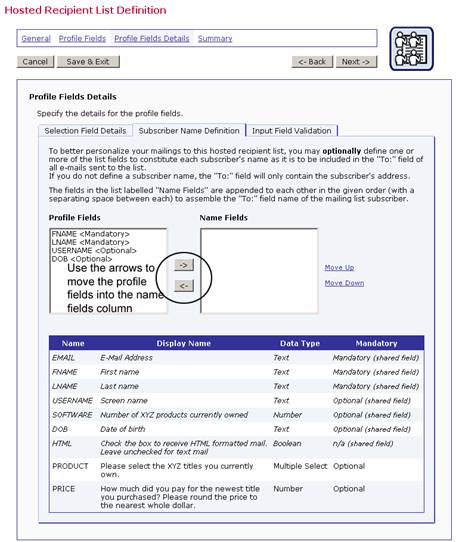
To personalize list mailings, use the Subscriber Name Definition tab to define the profile field that will be used as the name in the To: field of all messages sent to the list. This is an optional setting, and if left undefined, the To: field will contain only the subscriber’s email address. Select the field or fields that will make up the Name field. If more than one field is selected, the second one will be added after the first, leaving a space in between. This makes it easy to combine a first name field with a last name field to produce a “full name” field, for example.
Figure 21 The Hosted Recipient List Wizard - Profile Fields Details Screen for Subscriber Name Definition
Once you’ve finished entering information, click [Next ->] to continue.
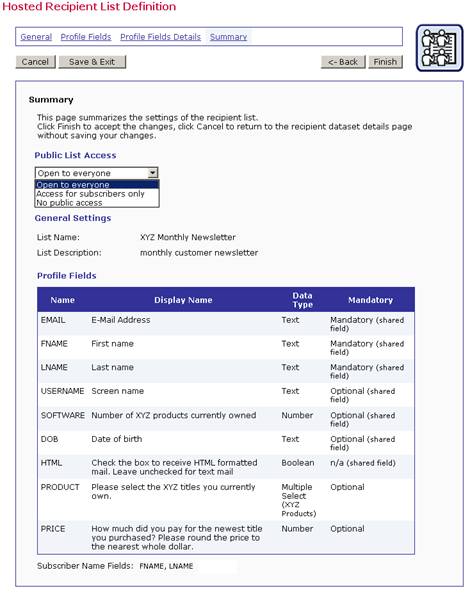
The Summary screen displays all of the settings for the list. You can set the access level for the list by selecting one of the options in the Public List Access drop-down menu. Lists that are Open to everyone can be subscribed to from the dataset web form or the list web form. Anyone with the URL to either form can access the list subscription page. Lists that have Access for subscribers only are visible to subscribers who have been added to the list by the data Administrator. The list will not be displayed on the dataset web form when accessed by a non-subscriber. Lists with No public access will not appear to non-subscribers or subscribers from the dataset web form. This setting can be used when a list is under construction to prevent anyone from signing up prematurely.
Figure 22 Hosted Recipient List Wizard – Summary
Use the [<- Back] button to return to the previous
screen. Click [Finish] to save the list and return to the Recipient
Dataset Details screen. After a hosted recipient list has been added to
the dataset, it will appear in the dataset tree in the left frame represented
by this icon  and accompanied by the list name.