Section 1
Introduction
Section 2
Configuring for First Use
Section 3
Changing Admin Password
Section 4
Creating Accounts
Section 5
Global Component Settings
Section 6
Backups
Section 7
Log Files
Section 8
User Interface Settings
Section 9
Database Connections
Section 10
Non-Standard Ports
Section 11
Firewalls
Section 12
SSL
Section 13
Tracking and Recipient Profiles
Section 14
Editing INI Files
Section 15
Distributed Components
Section 16
User Interface Branding
Section 17
International Character Sets
Appendix A
Standard Default Ports
Section 15
Distributed Components
The components of LISTSERV® Maestro can be distributed in a variety of ways. Each component can run on its own server, all components can run on the same server, or combinations of components can run on any combination of servers.
Distributing components has several advantages:
Load Distribution - Processor and disk load is shared between several servers, giving each component more "room" to operate.
Separate Maintenance - All components do not have to be shut down or re-started, whenever a maintenance task on one of them requires it. The other components may continue running (of course, when a component that other components rely on is shut down, this is no longer entirely true, since the other components can not run properly while the one component is down).
The Maestro Tracker component has very rigid uptime requirements. This component should constantly be running to be able to collect the tracking data from the messages that are sent. It can only do so while it is running and connected to the Internet. Therefore it is not a good idea to shut down the server on which the Maestro Tracker component is running - this should only be done as a last resort.
Other components however do not have these strict uptime requirements. For example, the Maestro User Interface component actually needs to be restarted if a new database is to be used or if a new JDBC database driver is installed (see Section 9 Database Connection for more information). To take advantage of this, it may be a good idea to have the Maestro User Interface and the Maestro Tracker components on separate servers.
For optimal performance for a high-end installation, a component distribution on four servers is recommended:
User-Interface and Hub Server - Contains the LISTSERV® Maestro components Maestro User Interface and Administration Hub.
Tracker Server - Contains the Maestro Tracker component.
Database Server - Contains the database used by the Maestro User Interface component.
LISTSERV/LSMTP Server - Contains the LISTSERV® and LSMTP® external components.
15.1 Fresh Installation with Distributed Components
A fresh installation with distributed components is a straightforward operation. To install any of the three LISTSERV® Maestro components, simply run the LISTSERV® Maestro setup on the server where the component(s) will be installed and then select the required components from the list, while leaving all components to be installed on other servers unchecked. The other external components, (database, LISTSERV® and LSMTP®) have separate setup instructions. Simply execute each application setup on the respective server(s).
15.2 Moving Components to Another Server
It is also possible to move an already running installation or several of its components to other servers. This also applies, (in slightly different form) if it is necessary to change the host name of the server where the components are installed.
15.2.1 Moving the Maestro User Interface Component to Another Server
Install the Maestro User Interface component on the new server. Do not start it at this stage. Shut down the LISTSERV® Maestro installation where the old Maestro User Interface is running. The next step depends on whether the Maestro User Interface's internal database is being used, or if the Maestro User Interface is connected to a different external database.
If an internal database is being used, copy the following files and folders (including all files and subfolders) to the new server:
\Program Files\L-Soft\Application Server\lui\lui.ini
\Program Files\L-Soft\Application Server\lui\my.ini
\Program Files\L-Soft\Application Server\lui\database
\Program Files\L-Soft\Application Server\lui\luidata
\Program Files\L-Soft\Application Server\lui\registry
If there is a connection to a different external database, copy only the following files and folders:
\Program Files\L-Soft\Application Server\lui\lui.ini
\Program Files\L-Soft\Application Server\lui\luidata
\Program Files\L-Soft\Application Server\lui\registry
This will overwrite some files and folders on the new server. Depending on the installation, these paths may be slightly different on one or both of the servers.
If the files for the internal database in the previous step were copied, (including the "my.ini" file), then it might be necessary to edit the file "my.ini" on the new server, in case that the installation path on the new server is different than the one on the old server.
In the "[mysqld]" section of the file, make sure that the following entries correctly point to the equivalent folders on the new server that corresponds with the ones they pointed to on the old server:
basedir=...
datadir=...
innodb_data_home_dir=...
innodb_log_group_home_dir=...
innodb_log_arch_dir=...
Remember that this step is only required if the component is being moved together with the internal database.
On the old server, use Windows' "Add/Remove Programs" panel to start the maintenance setup of LISTSERV® Maestro. In the setup, choose "Modify" and deselect the Maestro User Interface component, so that it is uninstalled. Start the LISTSERV® Maestro installation on the new server (thus starting the new Maestro User Interface component).
15.2.2 Moving the Administration Hub Component to Another Server
Install the Administration Hub component on the new server. Do not start it at this stage. Shut down the LISTSERV® Maestro installation where the old Administration Hub is running. Also shut down the LISTSERV® Maestro installation on the other servers, that the Maestro User Interface and Maestro Tracker components are running on (if they are on different servers).
Copy the following files and folders (including all files and subfolders) to the new server:
\Program Files\L-Soft\Application Server\hub\hub.ini
\Program Files\L-Soft\Application Server\hub\accountreg
\Program Files\L-Soft\Application Server\hub\hubreg
This will overwrite some files and folders on the new server. Depending on the installation, these paths may be slightly different on one or both of the servers.
Edit the following file of the Maestro User Interface component, which may be installed on an entirely different server!
\Program Files\L-Soft\Application Server\lui\lui.ini
In the file edit the "RegistryHubHost" entry so that it contains the host name of the new server where the Administration Hub will be running.
Edit the following file of the Maestro Tracker component, which may also be installed on an entirely different server!
\Program Files\L-Soft\Application Server\trk\tracker.ini
In the file edit the "RegistryHubHost" entry so that it contains the host name of the new server where the Administration Hub will be running. On the old server, use Windows' "Add/Remove Programs" panel to start the maintenance setup of LISTSERV® Maestro. In the setup, choose "Modify" and deselect the Administration Hub component, so that it is uninstalled. Start the LISTSERV® Maestro installation on the new server (thus starting the new Administration Hub component). Restart the Maestro User Interface and Maestro Tracker components on their servers (if they are on different servers).
15.2.3 Moving the Maestro Tracker Component to Another Server
It is critical to remember that moving the Maestro Tracker component to a different server must be well thought out and planned. The problem is that all messages that have been sent while the Maestro Tracker component was still installed on the old server include message tracking code with the old server name. If the Maestro Tracker component is shut down and de-installed on that old server, all tracking events from those messages will be lost.
Even worse, click-through tracking links will no longer work. If a recipient clicks on a click-through tracked link that is connected to the old Maestro Tracker component's host name, then the recipient will receive a "Host not found" or "Page not found" error -it will look like a broken link - instead of being routed to the actual link target. Therefore be very careful when moving the Maestro Tracker component to a different server.
Under normal production conditions, this should never be done. But if necessary, move the component only if the last tracked e-mail job has occurred some time in the past and there is no more concern for tracking events that get lost and broken links. Of course changing the DNS registration of the host name can also solve this problem. E.g. if the host name for the Maestro Tracker component was previously DNS-registered to point to the IP-address of the old server, than change the registration and let it point to the address of the new server instead. From the outside this will appear like there was no change at all. Keep in mind, however, that the propagation of a DNS change always takes a few days, so in the interim period, the averse effects of moving the component may still happen.
If it really becomes necessary to move the Maestro Tracker component follow these steps:
Install the Maestro Tracker component on the new server. Do not start it at this stage.
Shut down the LISTSERV® Maestro installation where the old Maestro Tracker is running. Copy the following files and folders (including all files and subfolders) to the new server:
\Program Files\L-Soft\Application Server\trk\tracker.ini
\Program Files\L-Soft\Application Server\trk\data
This will overwrite some files and folders on the new server. Depending on the installation, these paths may be slightly different on one or both of the servers. Edit the following file of the Maestro User Interface component, which may be installed on an entirely different server!
\Program Files\L-Soft\Application Server\lui\lui.ini
In the file edit the "TrackerHost" entry so that it contains the host name of the new server where Maestro Tracker will be running. If the DNS- registration of the old host name also changed to point to the new server, then this is not a necessary change, since the actual host name is not changed - it only points to a different server.
On the old server, use Windows' "Add/Remove Programs" panel to start the maintenance setup of LISTSERV® Maestro. In the setup, choose "Modify" and deselect the Maestro Tracker component, so that it is uninstalled. Start the LISTSERV® Maestro installation on the new server (thus starting the new Maestro Tracker component).
15.2.4 Moving the Database External Component to Another Server
Install the database software on the new server and start the program. Follow the instructions in Section 9 Database Connection with the exception that instead of moving from one type of database to a different one, move between two databases that are on different servers. These may actually be the same type of database (the database vendor, version, and such).
15.3 Setup with Server Name Aliases or Proxy Setup
With any given installation of LISTSERV® Maestro, the components of LISTSERV® Maestro are installed on one or more servers, where each server has its own host name. Components on separate servers use the other server or servers' name(s) to access the component(s) there. Similarly, the "outside" world (users as well as e-mail messages that are being tracked) accesses the components with their server names too.
In the simplest setup, each server hosting a LISTSERV® Maestro component will have a DNS name that can be used both for the inter-component communication as well as for "outside" world access. In this case, setup is straightforward and no extra measures have to be taken. However, there are configurations in which the host names of the LISTSERV® Maestro component servers are names known only in the local network, with no DNS names assigned. Or the hosts are, for security reasons, not accessible directly from the outside and instead there is a proxy (or other kind of "forwarder") that sits between the local network and the outside world so that the outside only ever knows the host name (and IP-address) of the proxy, but never the names and addresses of the servers behind it (which also may be addresses from a local range, like the 192.168.0.0 subnet).
The Figure 18 shows such a setup, where only the proxy has a valid non-local IP-address and a registered DNS-name (or several names, see examples below), while the LISTSERV® Maestro servers have only local names and addresses.
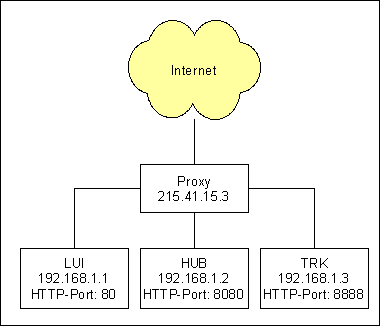
Example 1
Assume that the proxy shown in the figure has a single DNS-name
"maestro.sample.com".
It could be configured to:
Forward access on
maestro.sample.com:9001
to local host LUI (192.168.1.1), port 80
Forward access on
maestro.sample.com:9002
to local host HUB (192.168.1.2), port 8080
Forward access on
maestro.sample.com:9003
to local host TRK (192.168.1.3), port 8888
This example shows how a single DNS-name can be "splitted" to proxy for three different servers, by employing different ports (9001-9003), which are mapped to different hosts (LUI, HUB, TRK) and their corresponding ports (80, 8080, 8888). Users wanting to access the Maestro User Interface would have to use a URL like "http://maestro.sample.com:9001/lui". Users accessing the Administration Hub would use "http://maestro.sample.com:9002/hub" and the tracking URLs would contain the URL "http://maestro.sample.com:9003/trk".
Example 2
As a second example, assume that the proxy has three assigned
DNS names "lui.sample.com",
"hub.sample.com"
and "trk.sample.com",
which are used to decide which local host to access, so the
proxy could be configured to do the following:
Forward access on
lui.sample.com:80
to local host LUI (192.168.1.1), port 80
Forward access on
hub.sample.com:80
to local host HUB (192.168.1.2), port 8080
Forward access on
trk.sample.com:80
to local host TRK (192.168.1.3), port 8888
In this example the "splitting" is realized by using three different host names, all assigned to the same server, where access on the standard HTTP-port 80 is mapped to the different local hosts (LUI, HUB, TRK) and their corresponding ports (80, 8080, 8888) depending on the DNS-name used to access the proxy. Users wanting to access the Maestro User Interface would have to use a URL like "http://lui.sample.com/lui". Users accessing the Administration Hub would use "http://hub.sample.com/hub" and the tracking URLs would contain the URL "http://trk.sample.com/trk".
The example demonstrates that the host names of the servers hosting the LISTSERV® Maestro components may differ when viewed locally or from the "outside" world. Internally, the LISTSERV® Maestro components always use the local names to communicate. When setting host names in INI files (or during the setup), use the names that are locally valid (which can also be externally valid names, if only the names work for local access too). Whenever the local names are different from the external names (usually because some sort of proxying or forwarding is involved), the administrator needs to perform some additional configuration steps to make LISTSERV® Maestro aware of the differences.
The following list describes what to do if the local name or HTTP port of a host differs from the externally known name or port:
The Maestro User Interface component's server has a local host name or port that is different from the external name, edit the file:
\Program Files\L-Soft\Application Server\lui\lui.ini
Add or edit the entry "ExternalHostName" to read "ExternalHostName=HOST:PORT"
where "HOST" is replaced with the external name of the server running the Maestro User Interface component and "PORT" with its external HTTP port (if the external HTTP port is the default "80", leave out ":PORT" and only write "ExternalHostName=HOST").
The Administration Hub component's server has a local host name or port that is different from the external name, edit the file:
\Program Files\L-Soft\Application Server\lui\lui.ini
Add or edit the entry "ExternalHubHostName" to read: "ExternalHubHostName=HOST:PORT"
where "HOST" is replaced with the external host name of the server running the Administration Hub component and "PORT" with its external HTTP port (if the external HTTP port is the default "80", leave out ":PORT" and only write "ExternalHubHostName=HOST").
Important Note: This entry has to go into the "lui.ini", not into the "hub.ini".
The Maestro Tracker component's server has a local host name or port that is different from external name, set the external host name and/or port in the "Tracking URL" settings in the Administration Hub. Please see Section 10 for more details.
To actualize the examples above, the following changes to the administration settings would have to be made:
For Example 1, two lui.ini entries are required:
ExternalHostName=maestro.sample.com:9001
ExternalHubHostName=maestro.sample.com:9002
Also, the Administration Hub would be used to configure the tracking URL to use a "Tracker Host" of "maestro.sample.com" and a "HTTP Port" of "9003".
For Example 2, two lui.ini entries are required:
ExternalHostName=lui.sample.com
ExternalHubHostName=hub.sample.com
Also the Administration Hub would be used to configure the tracking URL to use a "Tracker Host" of "trk.sample.com" and a "HTTP Port" of "80". Next, it would be necessary to configure the proxy accordingly, so that it transparently forwards the requests as described above - but this depends on the proxy software used and is not part of the LISTSERV® Maestro setup.