The goal of the LISTSERV and LISTSERV Maestro integration is to make the user experience a seamless experience when working with the LISTSERV Web Interface and with LISTSERV Maestro. This seamless integration will give the user’s the perception that these two separate applications are actually working as one.
|
•
|
LISTERV Web Interface (WA) and LISTSERV Maestro Single Sign-On – This depends on the first aspect; the link between the WA and LISTSERV Maestro must be created for this aspect to work. If a link does exist, then this aspect deals with enabling the single sign-on feature, which allows users to switch between the two applications without having to log out and log back in. For more information, see Section 22.2 Enabling Single Sign-On.
|
|
•
|
Membership Area as WA Subscriber’s Corner – This depends on the first aspect; the link between the WA and LISTSERV Maestro must be created for this aspect to work. If a link does exist, then this aspect deals with replacing the Subscriber’s Corner with one or more Membership Areas. This would give the user the ability to switch from the Membership Area to the WA Archive Pages, or vice versa, with a single sign-on. For more information, see Section 22.3 Linking the Membership Area and the Subscriber’s Corner.
|
For users who regularly work with both the LISTSERV Web Interface (WA) and LISTSERV Maestro (LUI and/or HUB), it is desirable to be able to switch from one to the other via direct menu items in each of the interfaces, so that you do not have to remember the URLs of each interface (or maintain your own bookmarks).
Once a link is defined, menu items will appear both in the WA, LUI, and the HUB, allowing the user of each interface to switch to certain pages in the other interface (however, without single sign-on yet, which requires additional configuration and is dealt with in Section 22.2
Enabling Single Sign-On.).
To establish a link to the LISTERV host of the LISTSERV Web Interface, click on the Global Settings menu, select
Maestro User Interface, select
LISTSERV Web Interface Access, and then finally select
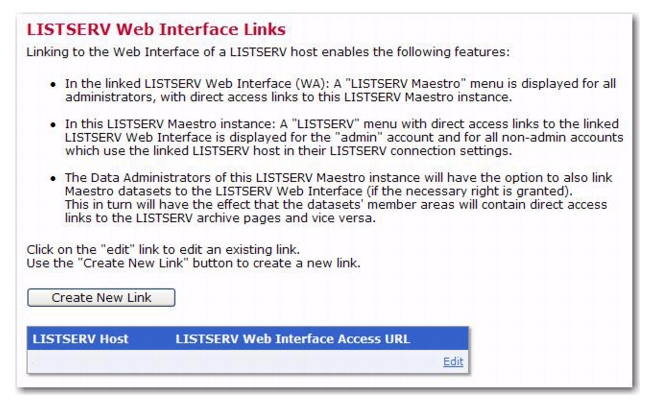
LISTSERV Web Interface Links. The LISTSERV Web Interface Links screen opens.
This screen displays a list of all interface links that are currently defined for this LISTSERV Maestro instance. Each existing interface link is displayed with the following values:
|
•
|
LISTSERV Host: The host at which the linked LISTSERV instance is running.
|
Tip: It is possible to link one and the same LISTSERV Maestro instance to the interfaces of several LISTSERV instances. This may seem strange at first glance but is logical because you can have different accounts and/or groups in LISTSERV Maestro that all may be connected to different LISTSERV instances, and of course you want to be able to create interface links to all these LISTSERV instances. In other words, you can create an interface link to any LISTSERV instance that is used by at least one of the accounts or groups in the Administration Hub (in the LISTSERV connection settings of the account or group), but each such LISTSERV instance can be linked only once.
|
•
|
For a normal account, in LUI: All accounts that use this LISTSERV instance will have a special LISTSERV menu in the main menu that allows them to directly access certain pages in the LISTSERV web interface of the linked LISTSERV instance (if the accessed LISTSERV web interface page is login protected, then the LISTSERV login information will have to be supplied after the menu item is clicked, unless single sign-on is also defined, see Section 22.2 Enabling Single Sign-On). Accounts that use a different LISTSERV instance will not see this menu, unless a link to their LISTSERV instance has also been defined.
|
|
•
|
For the admin account, in LUI and HUB: The special LISTSERV menu in the main menu will include a sub-menu for this linked LISTSERV instance that allows the administrator to directly access certain pages in this LISTSERV’s web interface (if the accessed LISTSERV web interface page is login protected, then the LISTSERV login information will have to be supplied after the menu item is clicked, unless single sign-on is also defined, see Section 22.2 Enabling Single Sign-On). Therefore, if there are several linked LISTSERV instances, this LISTSERV menu will have one entry for each of these linked instances. If, however, there are no linked LISTSERV instances at all, then the LISTSERV menu will be hidden.
|
|
•
|
In WA: All accounts will have a special Maestro menu in the main menu that allows them to directly access certain pages of the LISTSERV Maestro instance from where the interface link was defined (the LISTSERV Maestro login information will have to be supplied after the menu item is clicked before the associated LISTSERV Maestro page is displayed, unless single sign-on is also defined, see Section 22.2 Enabling Single Sign-On).
|
When defining a new interface link, select the LISTSERV host that you want to define a link for from the drop-down menu. This drop-down menu contains all of the LISTSERV hosts that are in use by any of the current user accounts or groups. Each host appears only once. Also, each host can only be linked once; therefore, the list contains only those hosts that have no link defined as of yet.
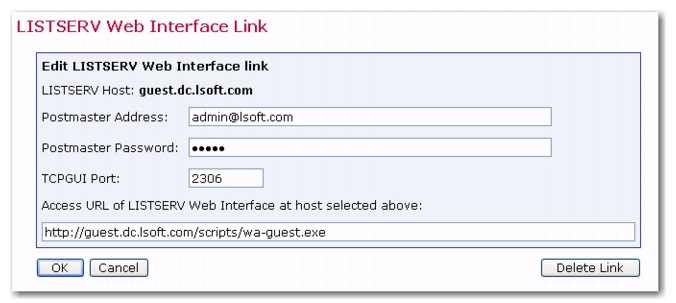
When editing an existing interface link, the LISTSERV host that this link points to is already defined and can no longer be changed (if the host is incorrect, simply delete this link and create a new one with the correct host).
For the selected host, you also need to provide the Postmaster Address and
Password and the
TCPGUI-port on which the host can be reached. When you select a host from the drop-down menu, these values will be filled out automatically, taken from the LISTSERV connection settings of the first account or group that is found using this host. If necessary, you can change these values.
Finally, fill out the Access URL to the LISTSERV web interface of the LISTSERV instance that you are linking to. This has to be the same URL as you would enter into the address field of a browser if you wanted to access this LISTSERV web interface (WA) manually. This access URL usually has the following form:
http://HOST:PORT/scripts/wa.exe
where you replace HOST with the corresponding host name and
PORT with the HTTP-port used on that server (if
PORT is the default HTTP-port "80", then you can leave out the
:PORT part so that your URL looks like this:
http://HOST/scripts/wa.exe).
Note: Usually, the value for HOST is the same host name as the LISTSERV host defined at the top of the screen, but this is not necessarily true. For example, if the server has several host names or if the HTTP access is routed via a proxy, then the host name at the top of the screen must be the name by which the server can be reached on the TCPGUI-port, while the host name for the access URL must be the name by which the server can be reached via HTTP. In addition, sometimes the LISTSERV Web Interface is installed to use a different URL than the one described above; in this case, provide this URL instead.
Optionally, you can also enter the LUI Access URL that is used for accounts
without an account mapping, when switching from WA to LUI. When a user switches over from WA to LUI, then the access URL for LUI is determined in the following way:
To submit the settings, click the [OK] button; to exit without submitting, click the
[Cancel] button.
To delete an existing interface link, click on the Edit link for that particular link, and then click the
[Delete Link] button.
Each LISTSERV instance can only be linked to one single LISTSERV Maestro instance, i.e. if you happen to have several LISTSERV Maestro instances that all use the same LISTSERV instance, and you define an interface link to this LISTERV in the Administration Hub of the first LISTSERV Maestro, and then you try to also define an interface link to the same LISTSERV in the Administration Hub of the second LISTSERV Maestro, then you will get an error message. This error message tells you that the given LISTSERV instance has already been linked by another LISTSERV Maestro instance, and includes an option for overriding this previous link with the new link. However, this override can cause some problems. If you should choose to override an existing interface link to a different LISTSERV Maestro instance, then this will have the following negative effect:
|
•
|
The first LISTSERV Maestro instance, however, will be unaware of this change, i.e. in this instance, the interface link definition will still remain in place in the Administration Hub and LISTSERV Maestro will still show the LISTSERV access menus. Also, it will still allow users to switch from LISTSERV Maestro to the web interface of LISTSERV. However, if a user does this and switches from LISTSERV Maestro (of the first LISTSERV Maestro) to WA, and then the user tries to go back to LISTSERV Maestro with the menu provided in WA, then this menu will send the user to the second LISTSERV Maestro instance, not the first instance that the user came from.
|
Therefore, if you should choose to override an existing interface link (from a different LISTSERV Maestro instance), then you should not forget to also log in into the Administration Hub of this other LISTSERV Maestro instance and delete the interface link to the same LISTSERV instance.
The previous section describes how you can create a link between a LISTSERV Web Interface and the LISTSERV Maestro so that both contain menus that allow users to switch between the two interfaces. However, when using these menus, users will still be required to log in at the other interface manually, which can be quite cumbersome.
To avoid this, the single sign-on feature can be configured. This feature allows you to define that, if a user logs in to LISTSERV Maestro with a certain LISTSERV Maestro account, and then this user switches over to the WA, then the user will automatically be logged in at the WA with a certain LISTSERV account (and vice versa). For this, the following preconditions must be fulfilled:
|
•
|
If the user logs in to LISTSERV Maestro with the LMA-account and then switches over to WA (with the LISTSERV menu), then the user will be automatically logged in at the WA with the WA-account. (Although, the user may have to re-login at a later time once the automatically created login-ticket expires. This can be avoided by allowing the WA to store the login information in a cookie so that this re-login may happen automatically.)
|
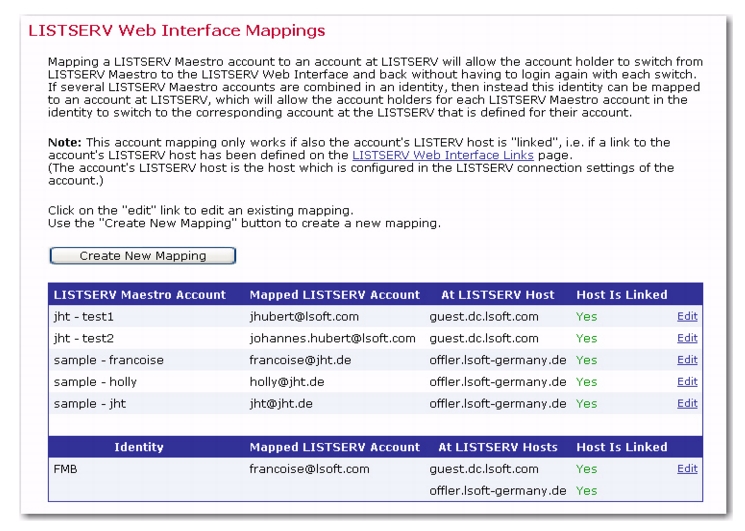
Such a single sign-on for a pair of LMA- and WA-accounts is defined by creating a mapping between these two accounts. To establish a mapping between LISTSERV Maestro and the LISTSERV Web Interface, click on the
Global Settings menu, select
Maestro User Interface, select
LISTSERV Web Interface Access, and then finally select
LISTERV Web Interface Account Mappings. The LISTSERV Web Interface Mappings screen opens.
|
•
|
Mapped LISTSERV Account: The LISTSERV account (the “WA-account”) that is part of the mapping (see above), in form of an e-mail address.
|
|
•
|
At LISTSERV Host: The LISTSERV host that is being used by the given LMA-account. For the single sign-on to work, the given WA-account must be a valid account at this LISTSERV instance, i.e. there must be a password registered for the email address that constitutes this WA-account.
|
|
•
|
Host Is Linked: Contains either the value “Yes” or “No”, depending on if an interface link has been defined for the given LISTSERV host or not. For the single sign-on to work, this value must appear as “Yes” (because otherwise there will not even be any access menu items either in LUI or the WA, which would leave the account mapping a moot point).
|
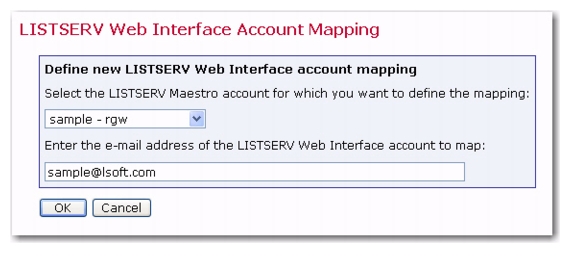
To create a new mapping, click the [Create New Mapping] button. The Define New LISTSERV Web Interface Account Mapping screen opens.
On this screen, select the LISTSERV Maestro user account (the “LMA-account”) from the drop-down list at the top. The list contains all unmapped standard accounts, as well as entries for all unmapped admin accounts (although there is only a single admin account, it can be mapped individually for each available LISTERV instance so the list contains one admin account entry for each LISTSERV instance).
Note: Each LMA-account can only be mapped once. In addition, you can only create one mapping for each WA-account (email address) on one and the same LISTSERV instance. In other words: If you have two LMA-accounts which use the same LISTSERV instance, then those two LMA-accounts must be mapped to two different WA-accounts (email addresses), since both WA-accounts are then interpreted as belonging to the same LISTSERV instance. If however you have two LMA-accounts which use different LISTSERV instances, then you can map those two LMA-accounts to one and the same WA-account (email address), since this one address is actually interpreted as two different accounts at two different LISTSERV instances, which only happen to use the same email address.
To edit or delete an existing account mapping, click on the Edit link in the matching table row. The editing of an existing account mapping is similar to what you do when creating a new account mapping (see above), except for that the selected LUI-account is now fixed.
Also when you edit an account mapping there is a [Delete] button that you can use to delete this account mapping.
To submit the settings, click the [OK] button; to exit the screen without submitting, click the
[Cancel] button.
|
•
|
If the user logs in to the LISTSERV Maestro with any of the LMA-accounts from the identity and then switches over to LISTERV Web Interface (using the LISTSERV menu), then the user will be automatically logged in at the LISTERV Web Interface with the LISTERV Web Interface account mapped to the identity. (Although, the user may have to re-login at a later time if the automatically created login-ticket expires. This can be avoided by allowing the interface to store the login information in a cookie so that this re-login may happen automatically.)
|
|
•
|
If the user logs in at the LISTSERV Web Interface (WA) with the WA-account and then switches over to LISTSERV Maestro (using the Maestro menu), then the user will be presented with a selection page that shows all LMA-accounts in the mapped identity. Once one of the LMA-accounts has been selected from this list, then the user will automatically be logged in to LISTSERV Maestro with this LMA-account.
|
|
•
|
If a user logs in to LISTSERV Maestro with a LMA-account from the identity that uses a LISTSERV instance for which an interface link has actually been defined, but at this LISTSERV there exists no account that matches the mapped LISTSERV Maestro Web Interface account (i.e. there is no password registered for this email address), then this user will see the special LISTSERV access menu. But, if the user clicks on any of its options, then they’ll have to provide the login information at the LISTSERV Web Interface manually (if the user tries to access a protected page).
|
|
•
|
If a user logs in to LISTSERV Maestro with a LMA-account from the identity that uses a LISTSERV instance for which an interface link as actually been defined, and at this LISTSERV there actually exists an account that matches the mapped LISTSERV Web Interface account (i.e. there is a password registered for this email address), then this user will see the special LISTSERV access menu. And, if the user clicks on any of its options, then they’ll automatically be logged in at the LISTSERV Web Interface with the mapped LISTSERV Web Interface account. (Although, the user may have to re-login at a later time if the automatically created login-ticket expires. This can be avoided by allowing the interface to store the login information in a cookie so that this re-login may happen automatically.)
|
In addition to the link between the LISTSERV and LISTSERV Maestro interfaces (as described above), it is also possible to link a dataset (or several datasets) with the LISTSERV Web Interface (WA) so that the membership areas of the linked datasets act as a replacement for the WA’s normal subscriber’s corner and that subscribers who login to a member area can access the archive pages of WA.
Such a link between a dataset and the WA is defined on dataset level, i.e. by the data administrator who has administrative access to the dataset in question. However, before the data administrator can define such a link for a given dataset, the following preconditions must be met:
|
•
|
The data administrator must have been granted the additional user right to create links between datasets and the WA. To do this, go to the Accounts and Identities screen and click on the data administrator’s account name. The User Account Overview screen opens. Click on the User Account menu, and then select User Right Settings. On the User Right Settings screen, check The user may link Recipient Datasets to the LISTSERV Web Interface.
|
Once these preconditions are fulfilled, the data administrator can define a link between a given dataset and the WA at any time using the dataset’s definition wizard (see the
LISTSERV Maestro Data Administrator’s Manual for these instructions).
Note: Linking a dataset in this fashion has the additional effect that the
Member Password option of the dataset is automatically set to
The member will get a system defined password, and this password can not be changed until the link to the WA is removed.
|
•
|
These links and menu-entries between the membership areas and the WA archive-pages can be used by subscribers with “single sign-on” automatically enabled, i.e. a subscriber who logs into the membership area can switch to the WA archive-pages without having to login again. (Although, the subscriber may have to re-login at a later time, once the automatically created login-ticket expires. This can be avoided by allowing the WA to store the login information in a cookie so that this re-login may happen automatically.)
|
As described above, it is possible to create a link between a dataset and the WA for several datasets at once. In this case, the WA will contain a menu that lists the Membership Areas of all linked datasets (by name), and the user can select the Membership Area to be directed to by selecting it from the menu. This means that, in the WA, the user will see the names of all linked datasets and will be able to switch to all of them, as long as the user is actually a member of the selected dataset.
Because of this, the LISTSERV Maestro administrator has created separate LISTSERV Maestro groups, one for each fan club. In these groups, the administrator has created various accounts, one of which has the data administrator rights for that group, so that a member of each fan club can administrator the datasets and lists of that club. Therefore, there is a data administrator in each group, one for each fan club.
If all groups are connected to the same LISTSERV instance (via their LISTSERV connection settings in the Administration Hub), and the LISTSERV Maestro administrator grants the
The user may link Recipient Datasets to the LISTSERV Web Interface user right to the data administrators of all groups, then it could happen that each data administrator decides independently to link his dataset to the WA. This would again have the effect that the links to various membership areas (of the various fan clubs) all appear in the same menu in the WA, which is definitely not a good idea.