|
Q: How do I set up an auto-responder email marketing campaign?
By Robert Graf-Waczenski
Senior Applications Programmer, L-Soft
An auto-responder is a message that is triggered by a certain action executed by the user. A typical trigger could be, for example, that the user opened a certain message or clicked on a certain link in a message. The simplest form of auto-responder is a welcome message that is automatically sent to new subscribers. If you stopped at that one message, you would be missing a huge chance. By having subscribed recently, a user has shown active and current interest in the messages that you are sending to your list. Following up on the welcome message is, therefore, very important. This tip is about doing this with a carefully planned and tailor-made sequence of messages that is sent automatically.
In this tip, we'll set up the initial auto-responder message to welcome new subscribers and combine it with two variant follow-up messages targeted at subscribers who received the message prior in the chain. All messages in the chain are configured with auto-extended delivery to make sure that the sequence continues to deliver messages to new subscribers who have been added after the initial delivery.
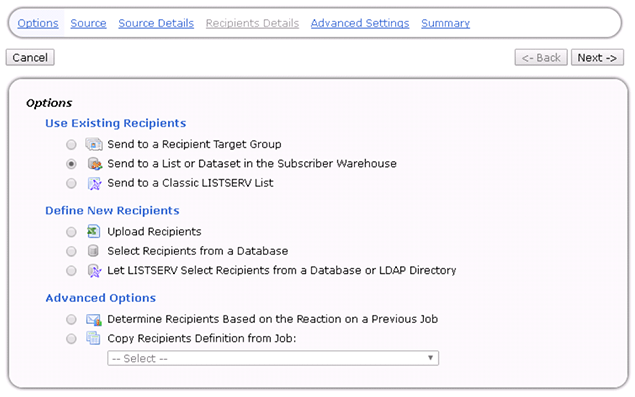
The welcome message is triggered upon the subscriber being added to the list, so we define a LISTSERV Maestro Mail Job with recipients as follows:
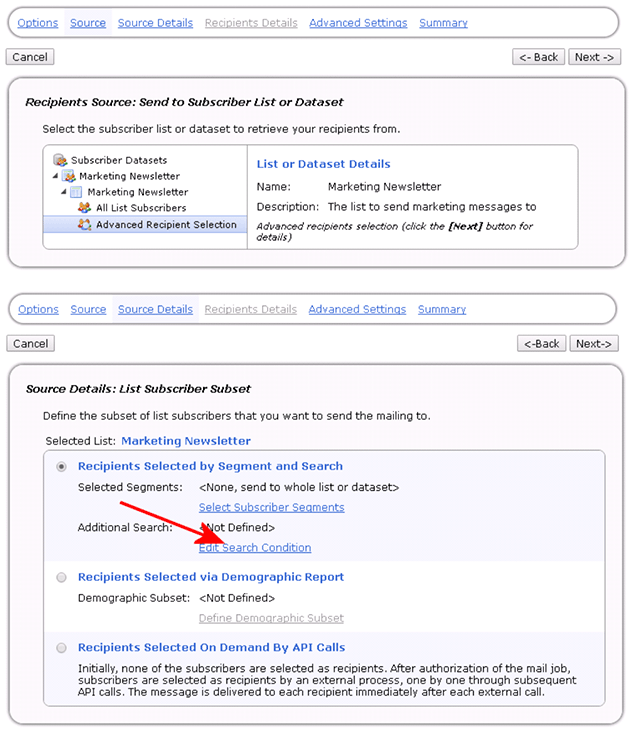
Choose the "Send to a List or Dataset in the Subscriber Warehouse", then proceed to the "Source" screen, select the desired list ("Marketing Newsletter" in the dataset of the same name, in this example). Select "Advanced Recipient Selection" and proceed to the "Source Details" screen.
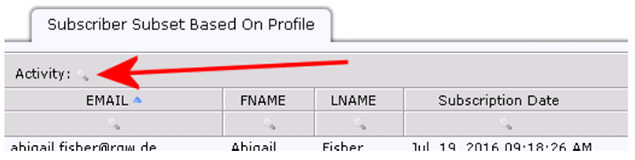
Click on "Edit Search Condition". Then, on the following screen, click the filter icon under "Subscription Date".
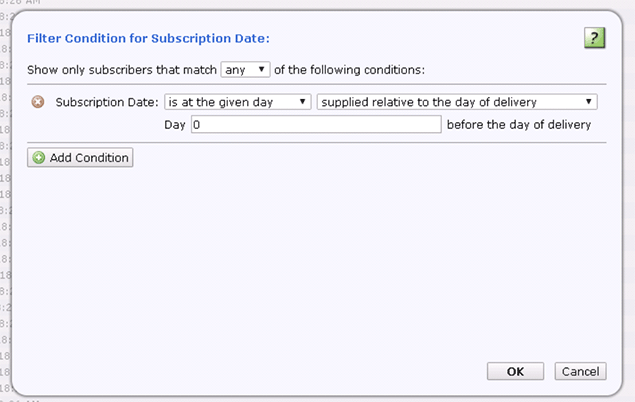
This condition will target subscribers who have been added on the day of delivery (thus ignoring subscribers who already existed). Now save the recipients definition and complete the mail job's content with a message that is suitable for welcoming new subscribers to the list. Make sure that the tracking definition is set to "Personal Tracking". We will be using the fact that a subscriber has opened the message in the follow-up messages in the sequence.
Of special note is the "Delivery Settings" setup for the jobs in this campaign:
The choice "Open-ended extended delivery", together with the condition "Day 0 before the day of delivery" of the recipients definition, has the following effect: Each day, at the same time, LISTSERV Maestro checks for subscribers who have been added (or self-subscribed) on this day and will send the message to these subscribers. By choosing the open-ended delivery, we are defining a mail job that runs indefinitely. For the example of a welcome message, this is the desired behavior. In other cases, you may want to stop this job's delivery on a given date.
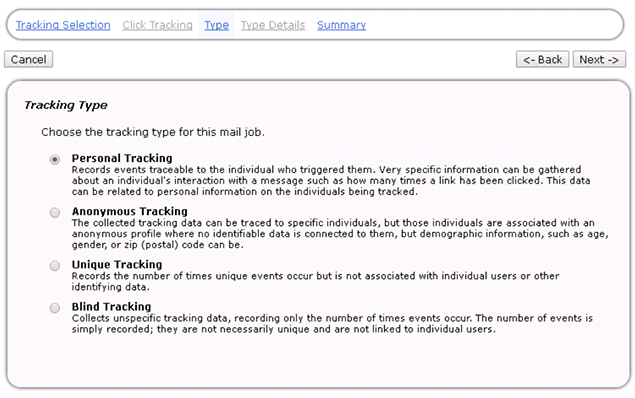
We will now define two follow-up jobs based on this welcome message, and we will be using recorded personal tracking events in the definition of the two follow-ups. Therefore, we need to set this job's tracking type to personal:
With the tracking type set to "personal", we can now start defining the two follow-up jobs. The first follow-up message targets subscribers who have subscribed three days ago and have opened the welcome message. Targeting the subscribers who have opened allows you to tailor the follow-up message and, for example, leave out yet another long welcoming section in your message.
The first follow-up job's recipients definition is similar to the job for the welcome message. Choose the same recipient type and the same subscriber list and also choose "Advanced Recipient Selection", and on the "Source Details" screen of the recipients wizard, you also click "Edit Search Condition".
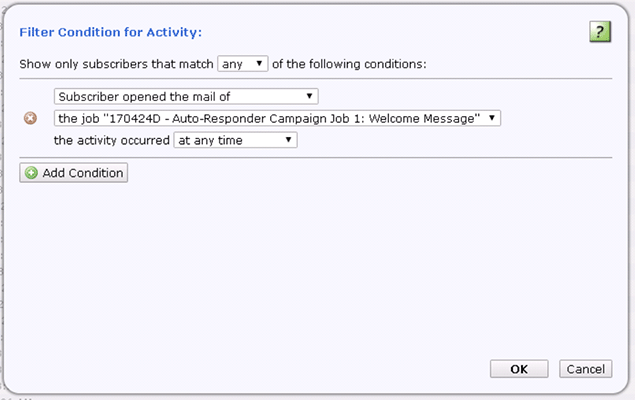
The first part of the subscriber subset condition is activity-based and is defined like this:
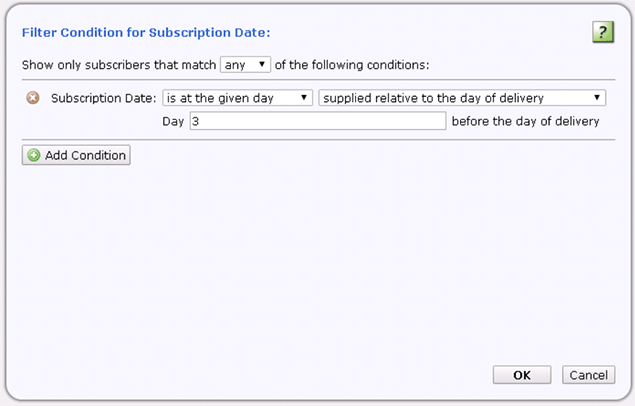
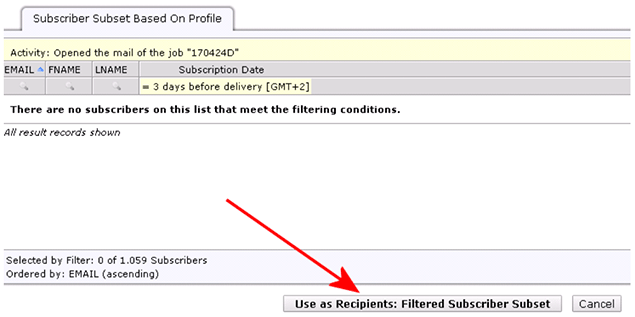
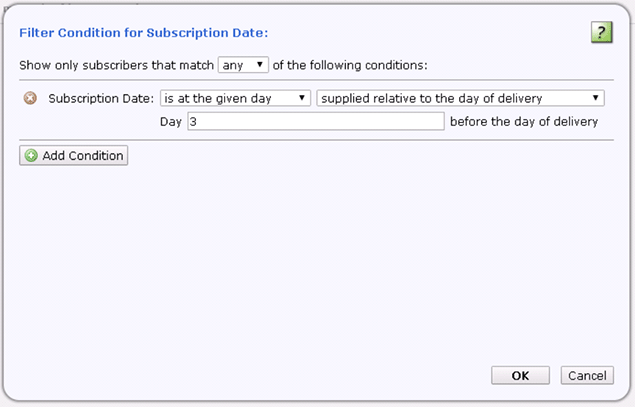
The first part of the condition targets subscribers who have opened the welcome message. To make sure that we address only those that have subscribed three days ago, we need a second part based on the internal "Subscription Date" field:
The second part of the condition is defined as follows:
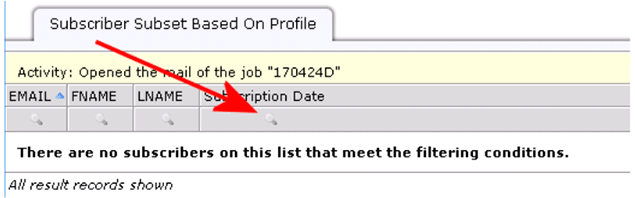
With both parts defined, click the button on the bottom to return to the recipients wizard:
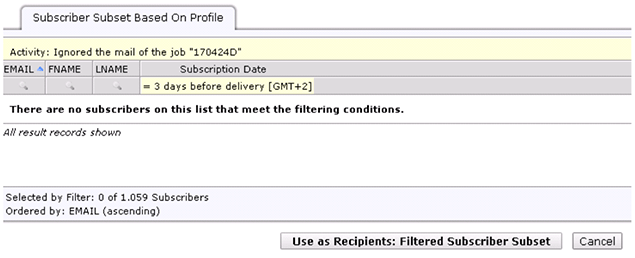
Note: The message "There are no subscribers..." on the screen shown above is normal for a condition like the one that we are defining now, in preparation for jobs that have not yet been delivered. Even at the time of delivery there may, in fact, be no subscribers matching the condition, also a completely normal and desired behavior.
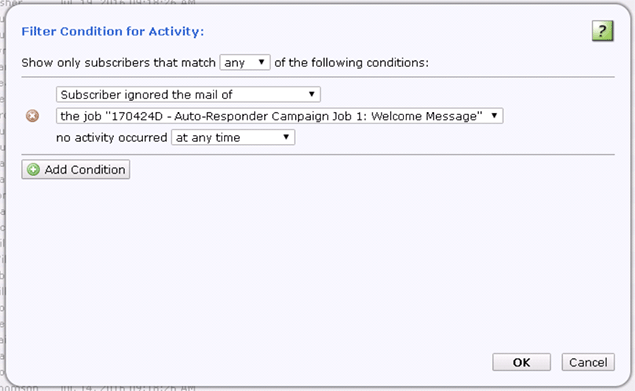
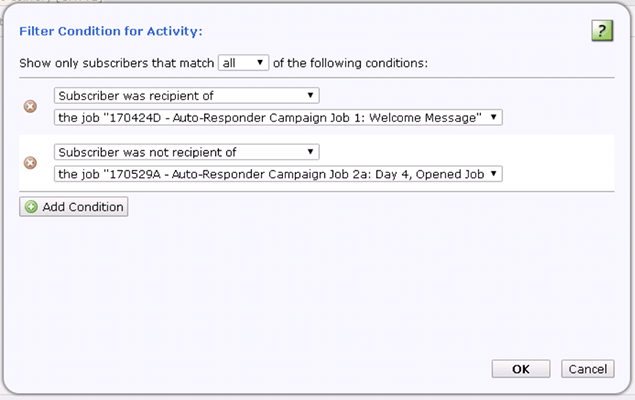
This completes the recipient definition of the first follow-up job. As mentioned above, since only subscribers who opened the welcome message are targeted with this job, you can (and should) tailor this mail job's content to this and spend less detail on the welcoming section. To also address the subscribers who did not open the welcome message, we define a second follow-up job and make use of the "ignored the mail of" condition:
This condition means two things combined: 1) The subscriber was a recipient of the given mail job; and 2) The subscriber did not trigger any event for this job. Again, we combine this with a condition on the "Subscription Date" field:
Together, this yields the following condition:
On first glance, this may be the correct condition. But what about subscribers who opened the message in the short time between the delivery of the two mail jobs? If we schedule the second job to be sent after the first one, then we would not send a message to them because the condition for the first job will not match because the subscriber did not yet trigger an event, and the condition for the second job will not match because the subscriber did in fact trigger an event later. If we schedule the second job to be sent first, then we take the even higher risk of sending both messages to a subscriber because both conditions would match. What we need is a form of custom A/B-split condition to send one message to those who opened and a second one to "all others", regardless of whether the subscriber's event happens to fall into the short time between the delivery of the two jobs. So the correct activity condition is this:
 Note that we changed the drop-down choice on the top of the dialog from the default "any" to "all". Combined with the filter on the "Subscribe Date", this condition does what we need: It targets exactly those subscribers who were left out of the first follow-up because they did not trigger an event. Some of them may in fact have triggered an open-up during the time shortly before delivery, but this condition still matches them because they were not matched by the first condition.
With this condition, you are now ready to tailor the message to the "all others" group, i.e. those who did not open the welcome message. You may want to combine a medium-length version of your welcoming section with remaining content aiming at subscribers who are on the list for a short while.
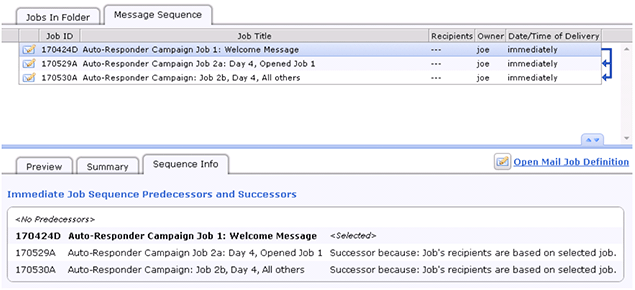
Here is an overview of the campaign as it is defined now:
The "Message Sequence" tab shows more details about the jobs related to this campaign:
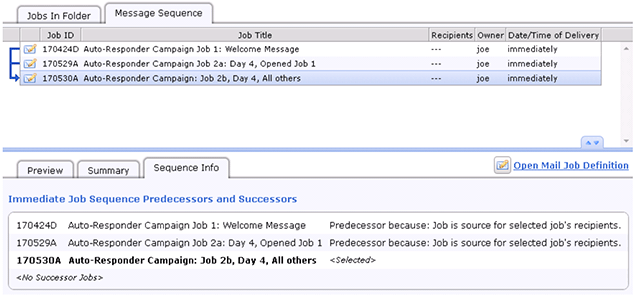
Clicking on the "... All others" job reveals that this job has in fact two predecessors:
Keeping this visualization in mind, we can now revisit the delivery settings of the three mail jobs. We need all of them to use the "extended delivery" option, but their scheduling definitions are slightly different because we need the "Day 4, All others" job to be sent at a suitable time after the delivery of the "Day 4, Opened Job 1" message. The exact amount of time that is required for this depends on internal factors related to available system resources, but a delay of 1 hour should be more than sufficient even for large subscriber lists, so assuming we have scheduled the welcome message job for delivery on May 30th, 2017, at 2 p.m., then we can schedule the first follow-up job to be delivered on June 3rd, 2017, at 2 p.m. and the second follow-up job to be delivered on June 3rd, 2017, at 3 p.m.
 With this auto-responder campaign defined, each new subscriber will receive two messages: One is sent on the same day or the day immediately after subscription (depending on whether the subscription occurred before or after the time shown under "Date/Time of Delivery" of the welcome message job). The second message comes in two flavors, depending on the subscriber's tracking activity: If the welcome message was opened before the moment when the "Day 4, Opened Job 1" message is sent, then this message is sent to the subscriber and will leave out most of the welcoming details. If the welcoming message was not opened, then the second message looks different and will still contain some welcoming text, but will also contain a body section with content aimed at existing subscribers.
This tip has shown how to define an auto-responder sequence of messages by combining three important features of LISTSERV Maestro:
- Filtering dynamically on the "Subscribe Date" field to yield a rolling time window that matches a different set of subscribers each time the condition is applied.
- Auto-extended delivery as an easy-to-use mechanism to let a mail job delivery run indefinitely and pick up new subscribers automatically.
- Activity-based filtering based on previously delivered mail jobs.
When combined, these (and other features) allow you to define sophisticated auto-responder message sequences for all kinds of purposes, such as:
- A multi-part series of recipes featuring one of your main products as the main ingredient
- A series of advertisements, starting with your main product and followed by subsequent advertisements of related products
- A 10-day email course about a certain topic that your subscribers opted in to receive
Subscribe to LISTSERV at Work.
|