Version 4.0 of LISTSERV Maestro has several new features in the Administration Interface that benefit the system administrator. This section gives you detailed information about the following new features:
With the new Single Sign-On feature, the LISTSERV Maestro Administrator can now switch back and forth between the Administration HUB and User Interface with one click. No more hassle, no more logging in and out, just one simple click is all it takes.
In the URL above, you need to replace “<YOUR_USER_INTERFACE_HOST>” with the hostname of the server running the Maestro User Interface component (LUI). In addition, if the server uses a different HTTP-port than the standard port “
80”, then you need to include this different port with the host name, separated with a colon “
:”, like this: “
http://HOSTNAME:PORT/lui”.
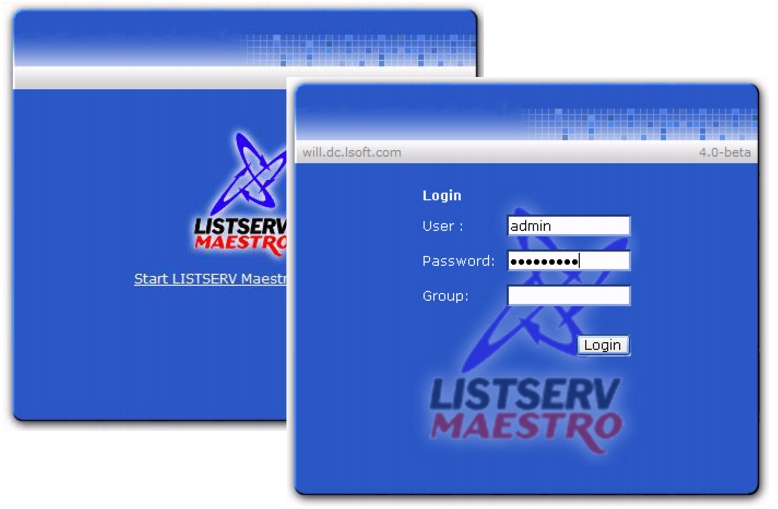
This URL provides access both to the Maestro User Interface (for normal users and the administrator) and to the Administration Interface (for the administrator only); in addition, the URL redirects you to the new login area.
From here, click on the Start LISTSERV Maestro Session link to open the Login Screen.
Enter the Administrator’s user name and password (the user name is admin and the password is established during installation). Click the
[Login] button to enter the Administration HUB.
To switch to the LISTSERV Maestro User Interface, simply click the Switch to LUI link at the top of the HUB screen. To switch back to the HUB, click
Switch to HUB.
Note: If you switch to the User Interface and then logout from there, the next time you (as the administrator) login, you will taken directly to the User Interface. Similarly, if you logout of the HUB, the next time you login, you will be taken directly to the HUB.
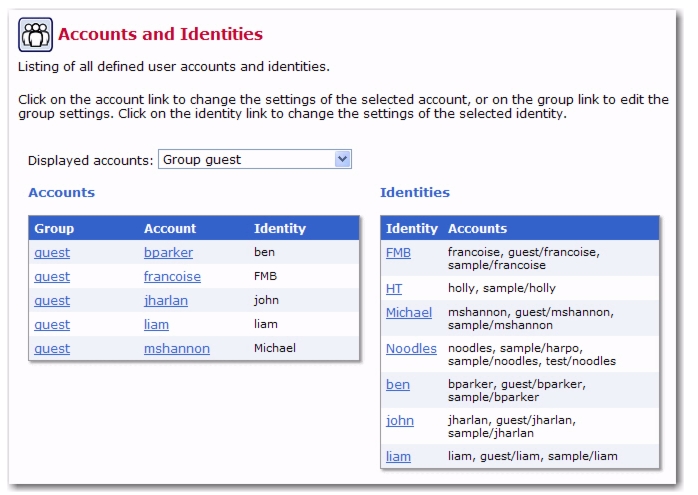
The Accounts and Identities screen is now the opening screen of the LISTSERV Maestro Administration HUB. This screen gives you quick and immediate access to one of the most important administrative duties – managing user accounts.
The Toolbar contains menus and icons that give you quick access to the different functions in LISTSERV Maestro, letting you easily navigate from one area to another. It appears on each LISTSERV Maestro page and displays the currently available options.
Note: There are quite a few different sub-menus and options that may appear in the various parts of the main menu. However, not all of these options and sub-menus are always visible. The main menu and its sub-menus only show those options and menus that are currently available according to the context of the page you are on.
The Accounts and Identities menu contains options for the creation and administration of user accounts and identities. The possible options are:
The User Account menu is only available when a user is selected. It contains options to administer the currently selected user account. The possible options are:
|
•
|
Edit – Edit the account name, group, identity, and/or password, and define if the account is allowed to change its password or not.
|
|
•
|
Delete – Delete the user account.
|
|
•
|
User Right Settings – Define the user rights for the selected account.
|
|
•
|
LISTSERV Connection – Define the LISTSERV connection settings for the selected account.
|
|
•
|
URL Settings – Define the settings for various URLs used by LUI for the selected account.
|
|
•
|
Size Limits – Define the message size limit for the selected account.
|
|
•
|
Job ID Prefix – Define the job-ID prefix for the selected account.
|
|
•
|
Lite Mode Restrictions – Define the lite mode restrictions for the selected account.
|
|
•
|
Content Restrictions – Define the content restrictions for the selected account.
|
|
•
|
Recipients Restrictions – Define the recipients restrictions for the selected account.
|
|
•
|
Tracking Restrictions – Define the tracking restrictions for the selected account.
|
|
•
|
Hosted Data Settings – Define the hosted data settings for the selected account.
|
|
•
|
DomainKeys Settings – Define the DomainKeys settings for the selected account.
|
The Group menu is only available when a group is selected. It contains options to administer the currently selected group. The possible options are:
|
•
|
Delete – Delete the selected group and all accounts in it.
|
|
•
|
LISTSERV Connection – Define the LISTSERV connection settings for the selected group.
|
|
•
|
URL Settings – Define the settings for various URLs used by LUI for the selected group.
|
|
•
|
Size Limits – Define the message size limit for the selected group.
|
|
•
|
Job ID Prefix – Define the job-ID prefix for the selected group.
|
|
•
|
Lite Mode Restrictions – Define the lite mode restrictions for the selected group.
|
|
•
|
Recipients Restrictions – Define the recipients restrictions for the selected group.
|
|
•
|
Tracking Restrictions – Define the tracking restrictions for the selected group.
|
|
•
|
Hosted Data Settings – Define the hosted data settings for the selected group.
|
|
•
|
DomainKeys Settings – Define the DomainKeys settings for the selected group.
|
The Global Settings menu contains options to administer the global configuration settings. The possible options are:
|
•
|
Administration Hub – Define the global configuration settings for the Administration Hub component. The sub-menu may contain the following options:
|
|
•
|
Maestro User Interface – Define the global configuration settings for the Maestro User Interface component. The sub-menu may contain the following options:
|
|
•
|
User Rights – Configure the Maestro User Interface specific user rights of all user accounts.
|
|
•
|
LISTSERV Web Interface Access – Define the configuration for direct access to the LISTSERV Web Interface (WA) from the LISTSERV Maestro Interface (and vice versa). The sub-menu may contain the following options:
|
|
•
|
LISTSERV Web Interface Links – Configure links between the LISTSERV Maestro User Interface and one or several LISTSERV Web Interfaces (WAs).
|
|
•
|
LISTSERV Web Interface Account Mappings – Configure mappings between LISTSERV Maestro accounts and LISTSERV Web Interface (WA) accounts, to allow a user to move between the two interfaces without having to login again.
|
|
•
|
Maestro Tracker –Sub-menu for global configuration settings for the Maestro Tracker component. The sub-menu may contain the following options:
|
|
•
|
General Administration – Configure general Maestro Tracker related settings.
|
The Utility menu contains general administer options. The possible options are:
|
•
|
Change Password – Change the password of the administrator account.
|
|
•
|
Print Page – Print the current page/screen.
|
The Logout option allows you to log out from LISTSERV Maestro (after first confirming that you really want to log out).
The Help icon is used to access the help associated with the current screen.
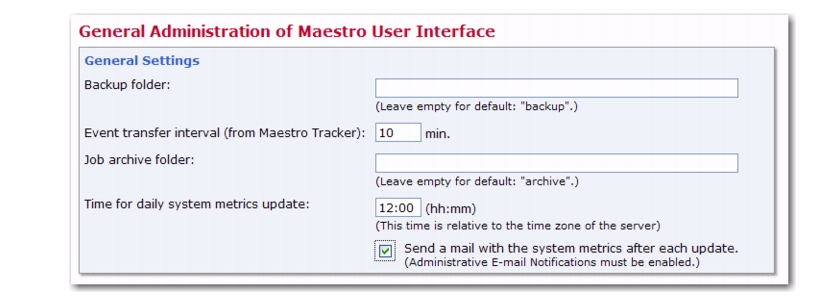
To set/change the time for your daily system metrics to update, go to the Administration HUB, click on the
Global Settings menu, select
Maestro User Interface, and then select
General Administration. At the top of the General Administration of Maestro User Interface screen, enter a time in the
Time for daily system metrics update field. The default is 12:00.
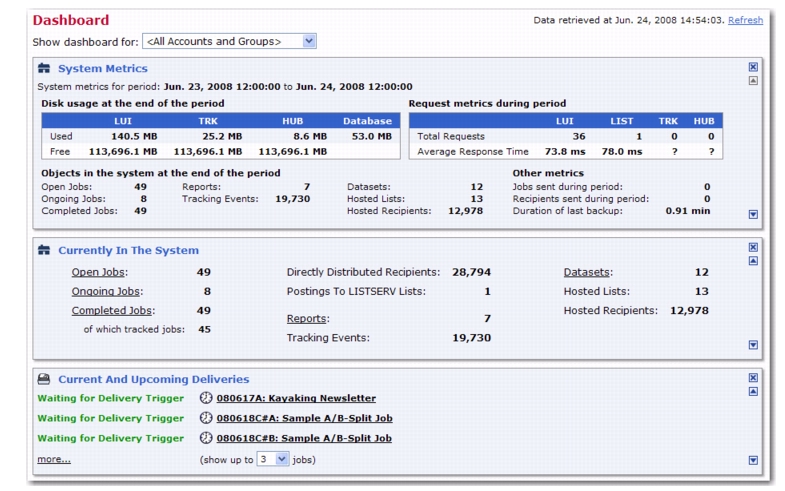
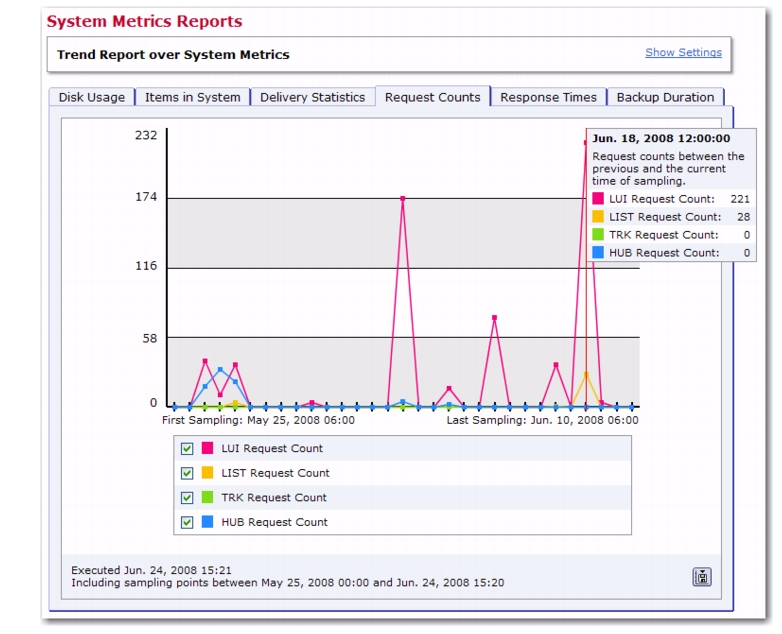
Your system metrics can also be shown in a set of reports that show trends in how your system is running. Similar to other LISTSERV Maestro reports, you can drill-down into specific events on these reports to see detailed information, and you can also run them for the immediate past or for a fixed period of time.
To run a system metrics report, click on the Reports menu and select
System Metrics. The System Metrics report opens with several tabs. Each tab contains a different report pertaining to a specific type of data.
To add a specific System Metrics report to the Dashboard, click on the Report menu and select
Add Report to Dashboard. This will only add the report that was being viewed (e.g. the report on the Request Counts tab); it does not add the entire set of reports. You can add up to 20 reports on the Dashboard; therefore, if you’d like to add other System Metric reports, simply click on their tab and then add it to the Dashboard.
If you click on the report on the Dashboard, the entire set of System Metrics reports will open. If you make any changes to the report that was on the Dashboard, then the
Apply Settings to Report on Dashboard option will be available on the
Report menu. However, if you go to the System Metrics report by selecting it from the
Report menu, and click on the tab to view that same report, then this option will not appear since this is a different version than the one on the Dashboard. If you’d like to add another version of that report to the Dashboard, then simply add it to the Dashboard using the
Add Report to Dashboard option.
Note: The
Apply Settings to Report on Dashboard option will only appear for that specific report that was on the Dashboard. For instance, if you added the Request Counts report to the Dashboard, then that is the only report/tab in the set of System Metrics reports that will have this option available.
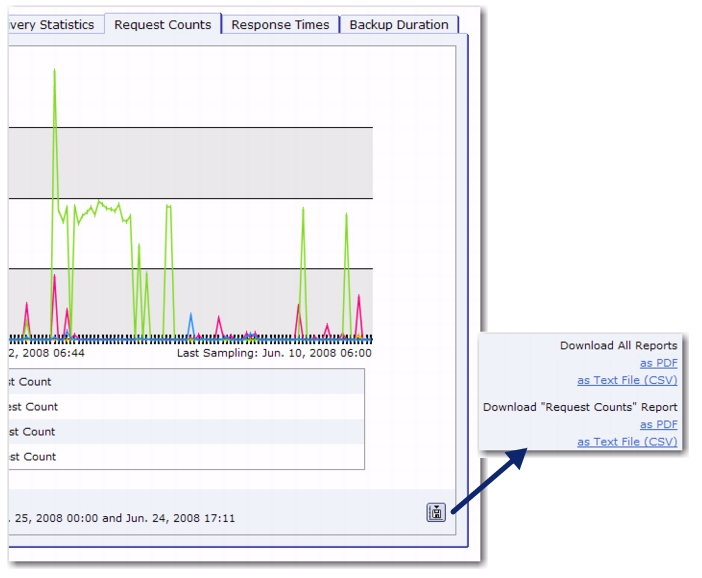
To download the entire set of reports, simply click on the Download icon from any tab. A pop-up menu appears with options to download all reports
as PDF or
as Text File (CSV).
To download a specific report, go to that tab, and then click on the Download icon. A pop-up menu appears with an option to download that specific report
as PDF or
as Text File (CSV).
|
•
|
Download as PDF – The report will be downloaded in the form of a PDF file for easy distribution or printing.
|
|
•
|
Download as Text File (CSV) – The report will downloaded in the form of a ZIP-file that contains the current report in the form of a text file with comma separated values (a CSV-file), plus an additional readme.txt file with details about the report. This CSV-data can be imported into 3rd party tools (such as Excel) for analysis.
|
Action Tracking is a cookie-based method to track actions and page visits that recipients perform after they have read your email message and followed the links to the target website. For this to be available for users in the LISTSERV Maestro User Interface, the administrator must enable it first.
To enable Action Tracking for the entire User Interface, click on the Global Settings menu, select
Maestro User Interface, and then select
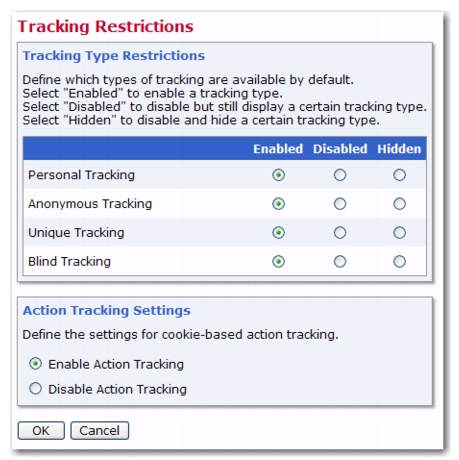
Default Tracking Restrictions. The Tracking Restrictions screen opens. From here, select
Enable Action Tracking.
To enable for a specific user that is not in a group, click on the account name on the Accounts and Identities screen. This opens the User Account Overview screen. From here, click on the
User Account menu and select
Tracking Restrictions. The Tracking Restrictions screen opens. From here, select
Enable Action Tracking.
To enable for a specific group, click on the group name on the Accounts and Identities screen. This opens the Group Overview screen. From here, select the
Group menu and select
Tracking Restrictions. The Tracking Restrictions screen opens. From here, select
Enable Action Tracking.
A Recipient Importer can either pull data from a database or read it from a file. In the latter case, the file can either be provided by the user at the moment the Recipient Importer is launched, or it can be read from a pre-defined location on the server (defined during importer definition). In addition, a Recipient Importer can be launched manually (from inside User Interface) or externally (with an external trigger, via a URL). Depending on the importer type and the method that is used for launching it, the following will happen:
|
1.
|
The Recipient Importer reads from a database and is then launched manually. As soon as the importer is launched, it reads the current data from the external database and imports it into the hosted object.
|
|
2.
|
The Recipient Importer reads from a database and is then launched with an external trigger. As soon as the importer is launched, it reads the current data from the external database and imports it into the hosted object. (The request to the trigger URL does not contain any additional data, as the data is read from the database.)
|
|
3.
|
The Recipient Importer reads from a file that is provided by the user during launch, and then the importer is launched manually. When the importer is launched, the system first asks the user to select a file to upload. This is the file that the importer is supposed to process. Once the file is uploaded (from the user's local system), the importer processes it.
|
|
4.
|
The Recipient Importer reads from a file that is provided by the user during launch, and then the importer is launched with an external trigger. The request to the external trigger URL must be a special POST-request that already contains the file data that the importer will process. (That is, the POST-request to the trigger URL is two things at once – it is the actual trigger that starts the importer, and it is also the upload that provides the data for the importer.)
|
|
5.
|
The Recipient Importer reads from a file at a pre-defined server location, and then the importer is launched manually. When the importer is launched, it reads the file from the pre-defined location at the server and processes it. The location was pre-defined when the importer was initially created (in the Member/Subscriber Importer wizard).
|
|
6.
|
The Recipient Importer reads from a file at a pre-defined server location, and then the importer is launched with an external trigger. When the importer is launched, it reads the file from the pre-defined location at the server and processes it. The location was pre-defined when the importer was initially created (in the Member/Subscriber Importer wizard). (The request to the trigger URL does not contain any additional data, as the data is read from the file on the server.)
|
For the last two cases, #5 and #6, additional settings will need to be defined. To do so for the entire User Interface, click on the
Global Settings menu, select
Maestro User Interface, and then select
Default Hosted Data Settings. The Hosted Data Settings screen opens. In the
Hosted Data Import Restrictions section, define the file import restrictions and prefix strings for the files that access is allowed for. Access to the server files is restricted and only files that start with one of the prefixes defined here are allowed.
Important: The option to import the data from a text file is only available in the Member/Subscriber Importer wizard if there is at least one such prefix defined. Similarly, the option to define an importer that reads from an external database is only available if the
Users/groups are allowed to import hosted data from an external database option is checked. These settings can also be set on a group or single user basis.
The following table lists the SSL ciphers that are supported by LISTSERV Maestro. It also shows which ciphers are enabled as allowed ciphers by default, if the SSLCiphers setting in the tomcat.ini is not defined. If you want to define a different set of allowed SSL ciphers, add the SSLCiphers setting to the tomcat.ini and specify the cipher-names in a comma separated list as the value of the setting.
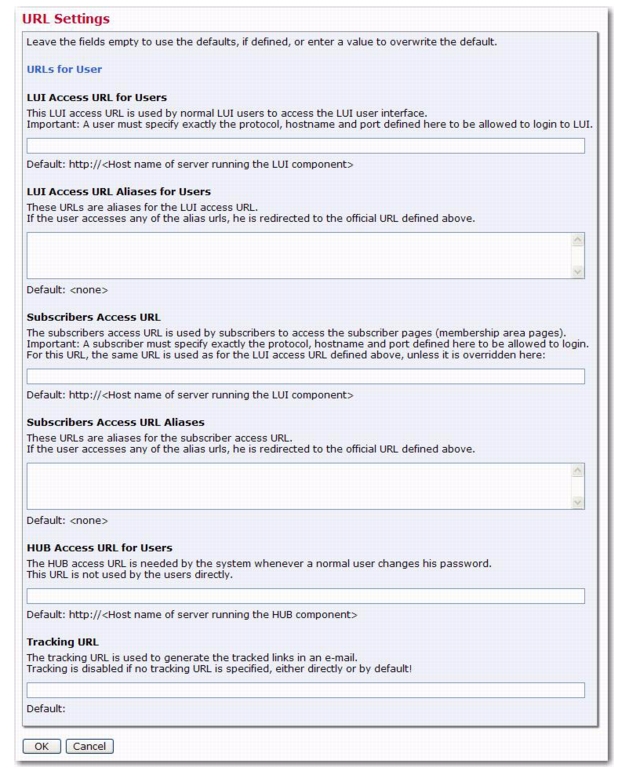
The Tracking URL screen has been replaced by the URL Settings screen, which is where you define the various URLs used by the User Interface. Because of this new screen, please note the following changes as well:
|
•
|
LUI Access URL – The LUI access URL is used by the LUI users and the admin, to access the LUI user interface. For some LUI interface pages, the system needs to include this access URL on the page itself (for example to create a link). The URL that the system uses for this is generated using the settings supplied here. If a setting is not supplied, the displayed default value will be used.
|
Specify the Host Name,
HTTP Port, and
Protocol (either HTTP or HTTPS) that is to be used to generate the LUI access URL.
Only on user/group level: If a LUI server has several host names assigned, then normally a user can use any of these host names to access LUI. If you want to restrict the user to only be able to login when he uses the host name as specified here, check the User must use this host name for login option. If checked, then a login by the user to which this setting applies will only be successful, if the user has used the same host name in his access URL as is specified here. If the user uses a different host name in his access URL, the system will behave as if the user account does not exist.
|
•
|
Hosted Subscriber Pages Access URL (only available on user/group level) – The hosted subscriber pages access URL is used by subscribers to access the subscriber pages (the pages of the membership area of a dataset). There are various situations in which LUI needs to generate this URL, for example to include an unsubscribe link, login link or forward-to-a-friend link in an e-mail message. The URL that the system uses for this is generated using the settings supplied here. By default, the system will simply use the same settings as are supplied for the LUI access URL (see above). You only need to specify separate values for the subscriber pages access URL if this URL is actually supposed to be different than the LUI access URL.
|
|
•
|
HUB Access URL – The HUB access URL is used behind the scenes to allow the system to display the password change page for normal users, and to allow the admin to switch seamlessly between the LUI and the HUB interfaces. To enable this functionality, the system needs to be able to generate a URL that correctly points to the HUB user interface. The URL that the system uses for this is generated using the settings supplied here. If a settings is not supplied, the displayed default value will be used.
|
Specify the Host Name,
HTTP Port, and
Protocol (either HTTP or HTTPS) that is to be used to generate the HUB access URL.
|
•
|
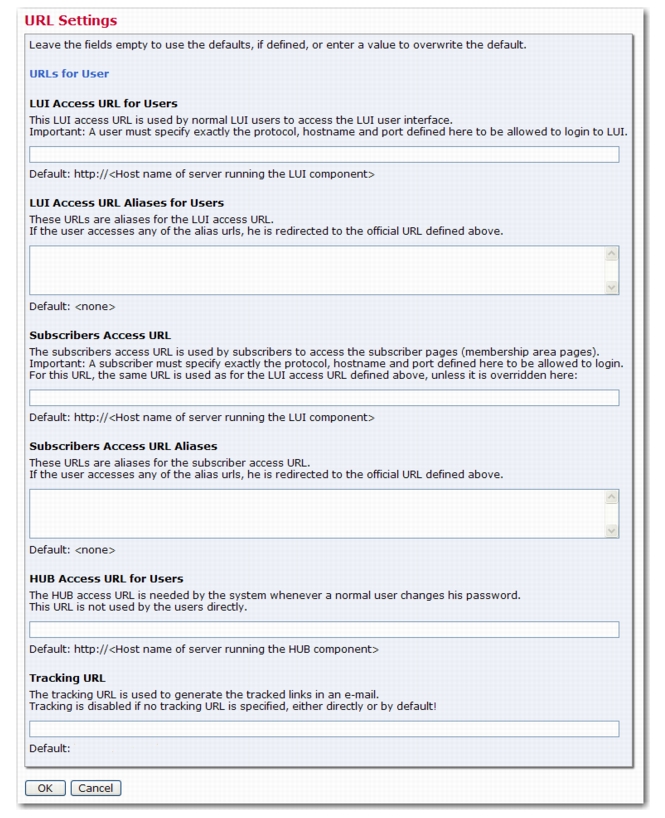
Tracking URL – The tracking URL is used to generate the tracked links in e-mail messages for which tracking has been enabled. The URL that the system uses for this is generated using the settings supplied here. If a settings is not supplied, the displayed default value will be used.
|
Specify the Host Name,
HTTP Port ,and
Protocol (either HTTP or HTTPS) that is to be used to generate the tracking URL.
Important: There is no default for the tracking URL host name. Therefore, as long as no such hostname is defined, tracking is disabled because a tracking URL can not be generated.
Click [OK] to submit and save any changes, or
[Cancel] to leave the page without saving your changes.
Login of the admin to the Administration Hub normally happens via the Maestro User Interface (LUI) login page. Under some circumstances, it may however happen that login to LUI is not possible so that the admin can not login either. This means that the admin also does not have access to the HUB. Now, if the reason for this problem is some sort of incorrect configuration in the HUB, for which the admin needs to login to the HUB to be able to fix the problem, then there is a catch-22 situation: The admin can not login to the HUB because of the problem, but to be able to fix it, he needs to login to the HUB.
For such a situation, there is an emergency login access directly to the HUB, via the HUB login page (instead of the LUI login page that is normally used). Normally, the HUB login page would not allow the admin to login but would instead redirect him to the LUI login page.
However, the HUB login page can be forced to allow a direct login, circumventing any problems with the LUI login. To force such a direct login, access the HUB login page with the following URL:
It is now possible to secure some users/groups with SSL (using https://) while other users/groups are not secured (using http://). To facilitate this new feature, several changes had to made to the previous admin settings and configurations. Because of this, please review the
LISTSERV Maestro 4.0 Administrator’s Manual in it’s entirety if you are configuring a Maestro instance.
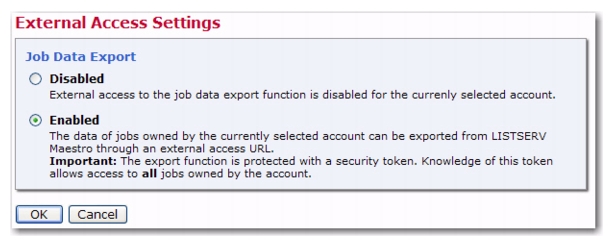
The Job Data Export feature is disabled by default. Therefore, before you can export job data, you need to enable this feature. To enable, you must enable it for the group or non-group user account that is the owner of the job(s) that you want to export.
For a group: From the Accounts and Identities screen, select the group to enable. The Group Overview screen opens. From here, select
Group > External Access from the Toolbar. The External Access Settings screen opens.
For a non-group user account: From the Accounts and Identities screen, select the user account to enable. The User Account Overview screen opens. From here, select
User Account > External Access from the Toolbar. The External Access Settings screen opens.
Select the Enabled option and click
[OK]. The Job Data Export feature is now enabled for the specific account or group you selected.
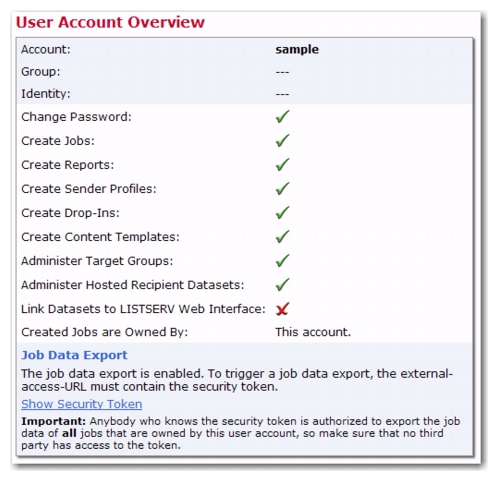
To protect against unauthorized access during the export process, the export request must include a secret security token. Every group, and every non-group account, has its own security token. The token is displayed on the Group/User Account Overview screen, once the job data export feature is enabled.
To display the security token, click on the Show Security Token link. Make note of the security token and keep it secure; you will need it for the export process.
Important: Knowledge of this security token gives access to all jobs that are owned by the account or group. This also means that any team collaboration settings in a group that define who is and who is not allowed to access a given job are ignored. Therefore, it is important to make sure that the security token does not get into the wrong hands. If there is a possibility that the token has been compromised, you should generate a new token, which automatically invalidates the old token.
Once the Job Data Export feature is enabled, then it is possible to export a specific job, or a range of jobs, depending on the access parameters. The export is triggered by making a request to an external access URL, with the corresponding parameters. The result is an export file in XML format (optionally zipped).
|
•
|
where SERVER_NAME is replaced with the name of your LISTSERV Maestro server. (If a non-standard HTTP port is used, also include the port, separated with a colon ":". If access to your LISTSERV Maestro is protected with HTTPS, you need to specify "https://" instead of "http://".)
|
|
•
|
where SECURITY_TOKEN is replaced with the security token for the job data export.
|
|
•
|
where more_parameters... is replaced with further request parameters, specifying the type of the report and other details, see below.
|
Specify the additional request parameters type=single and
jobid=JOB_ID, where you replace
JOB_ID with the ID of the job you want to export (only the bare ID, without any id-prefix). The ID that is specified must be the ID of a normal "completed" job. The referenced job must not be an "ongoing" or "open" job, and also not an A/B-split parent job. However, it can be one of the variants of an A/B-split job, if you want to export this variant specifically. See the next item for an option to export A/B-split jobs.
|
•
|
Export a Specific A/B-Split Job – This exports a specific A/B-split job, with a known job-ID. The export will contain all "completed" variants of this A/B-split job ("ongoing" or "open" variants are not included).
|
Specify the additional request parameters type=absplit and
jobid=JOB_ID, where you replace
JOB_ID with the ID of the A/B-split job you want to export (only the bare ID, without any id-prefix). The ID must be the ID of the A/B-split parent job, not of one of its variants.
Specify the additional request parameters type=chain and
jobid=JOB_ID, where you replace
JOB_ID with the ID of any of the jobs in the auto-repeat chain. The result will contain all jobs from the same auto-repeat chain that are in the "completed" state.
Specify the additional request parameter type=period and specify the period with the parameters
from=FROM_DATE_TIME and
to=TO_DATE_TIME, where you replace
FROM_DATE_TIME with the start date/time of the period, and
TO_DATE_TIME with the end date/time of the period. For both, you must use the following format:
YYYY-MM-DD-hh-mm.
Note: These date and time values are interpreted relative to the default time zone settings of the server where the LUI component of LISTSERV Maestro is running.
http://SERVER_NAME/lui/externalAction.do?token=SECURITY_TOKEN&type=period&from=2010-08-01-00-00&to=2010-08-07-23-59
Specify the additional request parameter type=period and specify the period with the parameter
recentdays=DAYS, where you replace
DAYS with the number of full days in the past that shall define the period. The period is defined as follows: It begins at 00:00h of the day that is
DAYS many days in the past, where "1" means "1 day in the past", i.e. "yesterday", so "2" means "the day before yesterday", etc. And the period always ends at 24:00h yesterday, i.e. jobs from today are never included in the export.
Note: When determining the beginning and end of the relevant days, the system uses the default time zone settings of the server where the LUI component of LISTSERV Maestro is running.
|
•
|
Combination of Auto-Repeat Chain and Specific Period – It is possible to combine the parameters to select a specific auto-repeat chain and a specific time period. As a result, the report will contain not all "completed" jobs from the selected auto-repeat chain, but only those that were delivered during the specified period.
|
http://SERVER_NAME/lui/externalAction.do?token=SECURITY_TOKEN&type=chain&jobid=100917E&from=2010-08-01-00-00&to=2010-08-07-23-59
http://SERVER_NAME/lui/externalAction.do?token=SECURITY_TOKEN&type=single&jobid=100817A&zip
This zip parameter can be combined with any of the parameters described above. If specified, then the downloaded file will be a ZIP archive file that contains one single "inner" file. The inner file is called "export.xml" and contains the same UTF-8 encoded XML data that you would also get directly if you do not specify the zip parameter.
By default, LISTSERV Maestro binds the HTTP-port on all IP-addresses of the server it is running on, and it binds the same HTTP-port on all these addresses. I.e., if the server has several addresses, then a client will be able to access the Maestro User Interface, the Administration Hub and Maestro Tracker (depending on which components are installed) on the same HTTP-port by using any of the server’s addresses.
However, if for some reasons it is required that LISTSERV Maestro binds only to some of the available IP-addresses on the server, and/or if you want LISTSERV Maestro to bind different ports on different IP-addresses, you need to edit the “BindAddress” entry in the file:
Specify one or several comma-separated IP-addresses, optionally with ports. LISTSERV Maestro will then bind only to the specified addresses, using the specified ports. If for an address no port is specified, then the default http port (as configured by the Port setting in the tomcat.ini) will be bound on that address.
Note: If you have several LISTSERV Maestro components installed on the same server, then all of them will be affected by this change. E.g., it is not possible to use different bindings for each of the components, if the components are installed on the same server. However, if the components are installed on different servers, they can use different bindings.
Important: This change will only be effective after a restart of the component in question.
If you want to install LISTSERV Maestro on a server where an IIS web server is already running, then most likely the default HTTP port 80 is already in use by this web server. Therefor, you need to configure LISTSERV Maestro to use a different HTTP port. For details on configuring LISTSERV Maestro to use a different HTTP Port, see Section 14.2.1 of the
LISTSERV Maestro 4.0 Administrator’s Manual.
The unfortunate side-effect of this is that users of LISTSERV Maestro will be unable to access Maestro with a nice "clean" URL, like http://myhost.domain.com/lui. Instead, they would have to include the non-standard HTTP port in the URL, like http://myhost.domain.com:8080/lui.
Or more precisely: IIS acts as a reverse-proxy in such a way that the requests from the clients are made to IIS (on the default port), and IIS then dispatches the requests to LISTSERV Maestro as the backend server. LISTSERV Maestro's response is then passed back to IIS, which forwards it to the client. To the client this looks, as if it is communicating directly with LISTSERV Maestro on the standard port, when, in reality, it is communicating with IIS. However, this does not process the requests itself, but passes them on to LISTSERV Maestro and then passes the responses back to the client.
Important: The web site that is to be used for the proxying must not have any root folders with the names "lui", "hub", "list" or "trk", i.e. before configuring the web site as described below, make sure that the following URLs are
not in use (and also not any sub-URLs that start with these URLs):
http://YOURSERVER/lui
http://YOURSERVER/hub
http://YOURSERVER/list
http://YOURSERVER/trk
|
1.
|
Edit the file [install_folder]/conf/tomcat.ini and add the following entry:
|
where you replace IP_ADDRESS with one of the IP-addresses of the server (usually the main address) and
PORT with a free port that is not used by any other application (for example,
8009).
where you replace HOSTNAME and
PORT according to the values that you used for the AJPConnector setting in the
tomcat.ini. The
HOSTNAME must be a host name that maps to the IP-address that you used for the AJPConnector, and the
PORT must be the same port as in the AJPConnector.
where you replace [maestro_install_folder] and
[connector_folder] (two occurrences of the latter) with the correct values for your system.
|
4.
|
Select Add a new Web service Extension from the popup menu. In the dialog that opens:
|
|
c.
|
Check the Set extension status to Allowed checkbox.
|
|
8.
|
Select New > Virtual Directory from the popup menu. In the wizard, create a new virtual directory with the following settings:
|
Alias: Must be "jakarta" (without the quotes).
Path: Select the [connector_folder]
|
10.
|
Select Properties from the popup menu. In the properties dialog:
|
|
d.
|
Click [Browse] to select the executable. Select the file [connector_folder]\isapi_redirect.dll
|
Note: At this time, we have not been able to test the following procedure ourselves, so it is described to the best of our knowledge.
|
4.
|
Select Add Application from the popup menu. In the dialog, enter the following settings:
|
Alias: Must be "jakarta" (without the quotes).
|
6.
|
Select [Add] from the popup menu. In the dialog:
|
|
8.
|
Select Add Module Mapping from the popup menu. In the dialog:
|
|
c.
|
Executable: Select the file [connector_folder]\isapi_redirect.dll
|
|
d.
|
Name: Specify a meaningful name (for example "LISTSERV Maestro").
|
|
e.
|
After you click [OK] in the dialog, you are asked if you want to allow this ISAPI extension. You must answer with Yes.
|
If everything is configured correctly, you should then be able to access LISTSREV Maestro through IIS. For example, if the web site for which you configured the proxying above is called "www.mycorp.com", then you can now access LISTSERV Maestro with the following URL:
As a last step, you should now log in to the Administration Hub and configure the access URLs to reflect that access to LISTSERV Maestro is now via the default port, i.e. the access URLs must no longer include the port element.
For example, if your LISTSERV Maestro is running on port 8080, then before you performed the above proxy configuration, your access URLs will look something like "http://SERVERNAME:8080". You now need to change these to plain URLs without a port element, like "http://SERVERNAME".
If you are configuring a fresh installation of LISTSERV Maestro, then that is all you need to do. But if you are configuring a LISTSERV Maestro instance that has already been in use for a while with the non-standard port (for example, 8080), then people might already have bookmarks to the LISTSERV Maestro access pages with this non-standard port.
After you have now changed the access URLs to no longer contain the non-standard port, users will no longer be allowed to log in to LISTSERV Maestro if they access it via these bookmarks. You should therefore set the old access URLs (the ones with the non-standard port) as access URL aliases. With such an alias, if a user accesses LISTSERV Maestro with the old URL (through an old bookmark), then they will still be allowed to login, and after login, they are automatically redirected to the new URL (with the standard port).
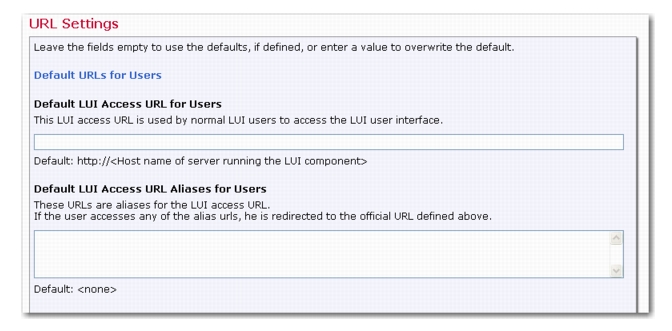
In the Default LUI Access URL Aliases for Users section, enter the URLs that will be the aliases for the LUI Access URL. If a user accesses LUI with any of the alias urls, then their login is accepted, and after login, they will be automatically redirected to the official LUI Access URL. Make sure to specify a list of alias URLs (one per row), each with the full protocol and hostname, optionally followed by the port. For example,
To access the URL Settings screen for a particular user account or group, go to the Acounts and Identities Overview screen, and then select the account/group by clicking on the account/group name. From the User Account Overview/Group Overview screen, click on
User Account > URL Settings or
Group > URL Settings.
In the LUI Access URL Aliases for Users section, enter the URLs that will be the aliases for the LUI Access URL. If a user accesses LUI with any of the alias urls, then their login is accepted, and after login, they will be automatically redirected to the official LUI Access URL. Make sure to specify a list of alias URLs (one per row), each with the full protocol and hostname, optionally followed by the port. For example,
To access the URL Settings screen for a particular user account or group, go to the Acounts and Identities Overview screen, and then select the account/group by clicking on the account/group name. From the User Account Overview/Group Overview screen, click on
User Account > URL Settings or
Group > URL Settings.
In the Subscriber Access URL Aliases section, enter the URLs that will be the aliases for the Subscriber Access URL. If the subscriber accesses any of the alias urls, then they are automatically redirected to the official Subscriber Access URL. By default, the system will simply use the same alias URLs that are supplied for the LUI access URL (see above). You only need to specify separate alias URLs for the subscriber pages if these aliases are actually supposed to be different than the LUI access aliases. Make sure to specify a list of alias URLs (one per row), each with the full protocol and hostname, optionally followed by the port. For example,