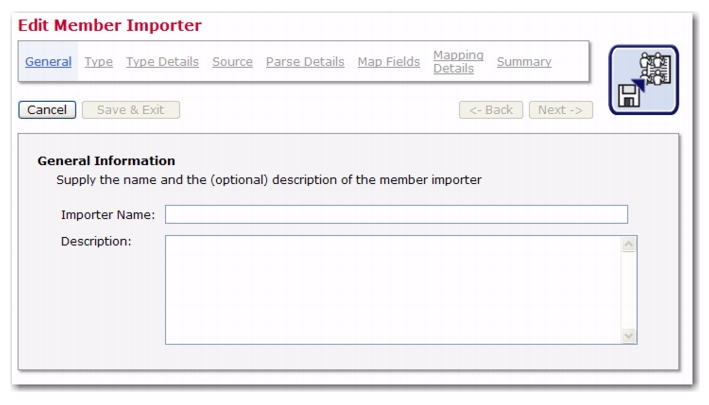
Version 4.0 of LISTSERV Maestro has many new features in the User Interface with benefits for every end user, administrator, and data administrator. This section gives you detailed information about the following features:
The behavior of the Dataset menu on the Toolbar has been updated to accommodate those who may need to access this menu while working with lists. Because of this, there are several changes to the Toolbar:
|
•
|
As soon as you select a dataset, the Dataset menu is displayed. This menu remains visible the entire time the dataset is selected. Therefore, if you select one of the Hosted Recipient List (HRL), Hosted LISTSERV List (HLL), or Linked LISTSERV List (LLL) nodes in the dataset tree, then the Dataset menu is still displayed.
|
|
•
|
If you select a category node (folder) in the dataset tree, then, as before, only the Dataset menu is visible. However, previously, this Dataset menu only showed the category/folder related menu items. This behavior has been changed. If a category is selected, then the Dataset menu now continues to show the full set of dataset related menu items, and the category specific items are shown in addition to the other menu items.
|
|
•
|
In the Hosted List menu, the following menu items have been removed, as they were duplicates of menu items that already exist in the Dataset menu (they are no longer required in the Hosted List menu because the Dataset menu is now always visible):
|
|
•
|
Similarly, in the Linked LISTSERV List menu, the following duplicate menu items have been removed:
|
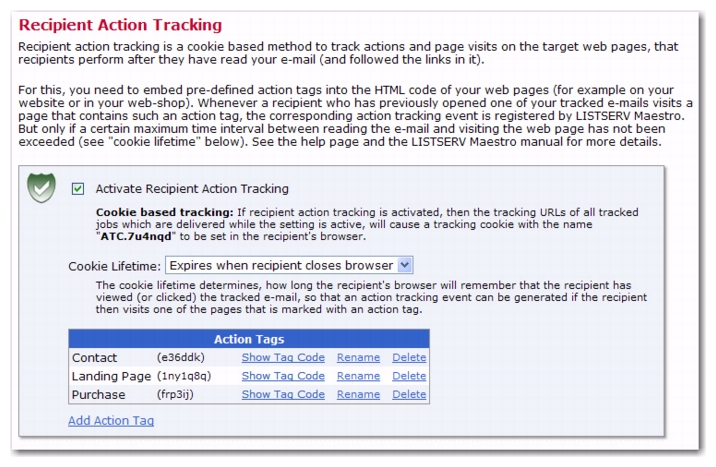
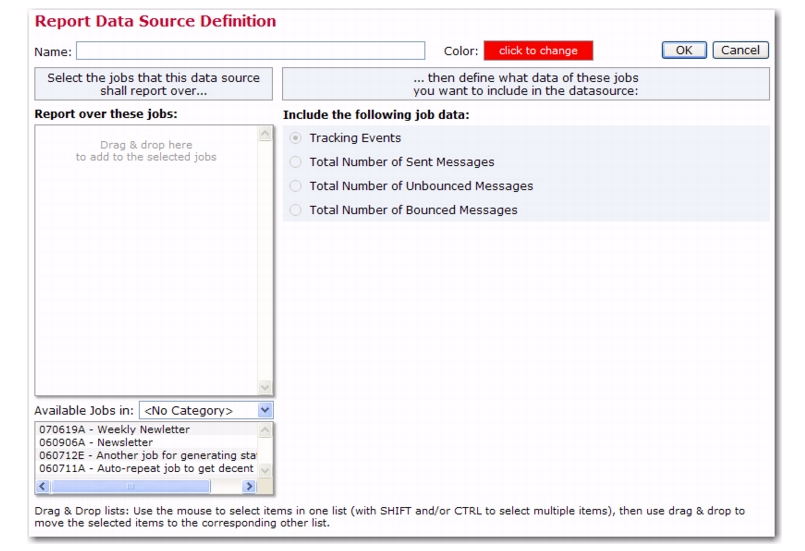
Action Tracking is a cookie-based method to track actions and page visits that recipients perform after they have read your email message and followed the links to the target website.
For this to work properly, you need to embed pre-defined “action tags” into the HTML code of your web pages. Whenever a recipient visits one of these pages using a link from your email message, then the corresponding action tracking event is registered by LISTSERV Maestro.
To activate Action Tracking in the User Interface, click on the Report menu and then select
Recipient Action Tracking. The Recipient Action Screen opens. Check the
Activate Recipient Action Tracking box, and then use the
Cookie Lifetime drop-down menu to define the cookie’s lifetime. The Cookie Lifetime determines how long the recipient’s browser will remember that the recipient viewed/clicked on the tracked email. The cookie’s lifetime can be defined for up to 30 days. If a marked page is visited at any time while the cookie is still valid, then this visit will be counted as an event even if the page is not revisited by an email link.
Tip: Cookies can be disabled by the recipient so your tracking results will never be 100% accurate; however, this feature can be extremely useful when analyzing trends.
Next, you’ll need to define the action tags that will be used to track your recipient’s actions. To do so, click on the
Add Action Tag link, enter the name of the action tag, and then click
[OK]. Repeat this process until you are finished adding your actions tags. Once you are finished, all action tags will be listed in the
Action Tags section.
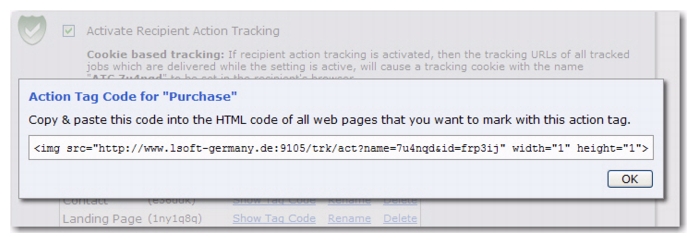
Once you’ve added your action tags, click on the Show Tag Code link for each tag to get the code that needs to be inserted into the HTML code for all web pages that you want to mark with action tags.
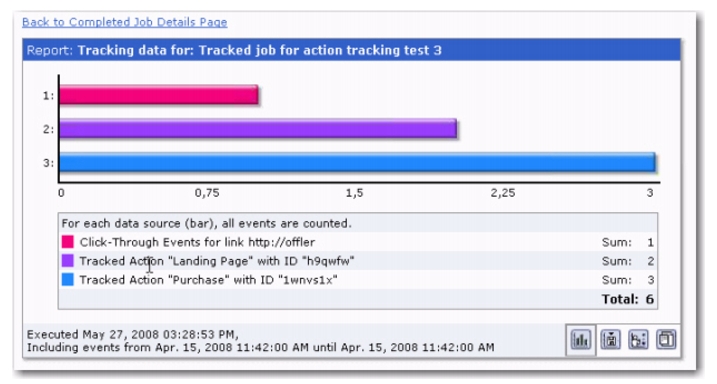
Once these tags are setup on your web pages, then any actions performed by your recipients that relate to these tags will be tracked by LISTSERV Maestro and can be viewed in your reports. In addition, when creating a target group based on a hosted recipient list or dataset, a job based condition node can now be based on action tracking.
Let’s say that you have an online catalog that sells various products. In addition, online shoppers can subscribe to your site to receive emails advertising special sales and promotions.
These links and action tags will let you know when a subscriber visits your site, visits specific product pages, and when they purchase products. This will help you keep track of how successful your promotions are and what most interests your subscribers.
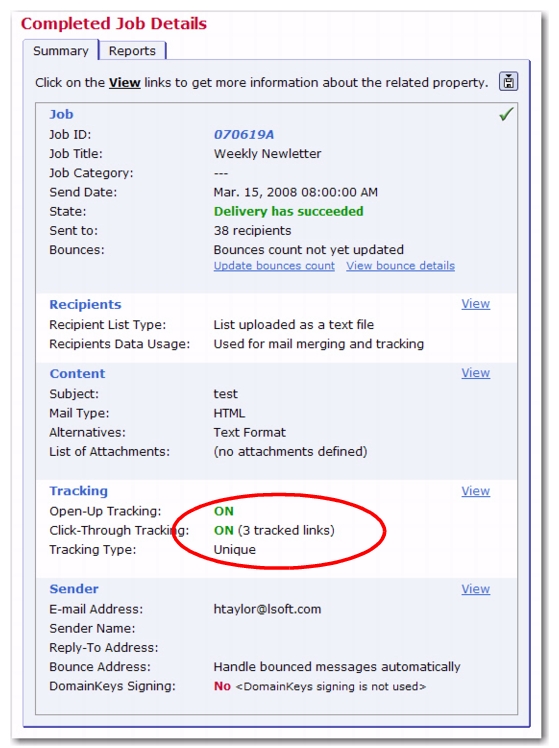
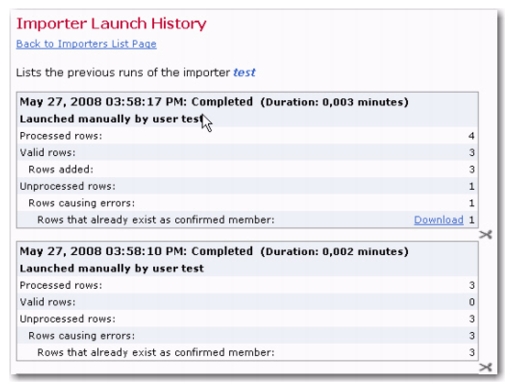
To access this screen, click on the Mail Job menu and select
Completed Jobs. From the Completed Jobs screen, click on the job’s
ID that you’d like to view. The Completed Job Details screen opens.
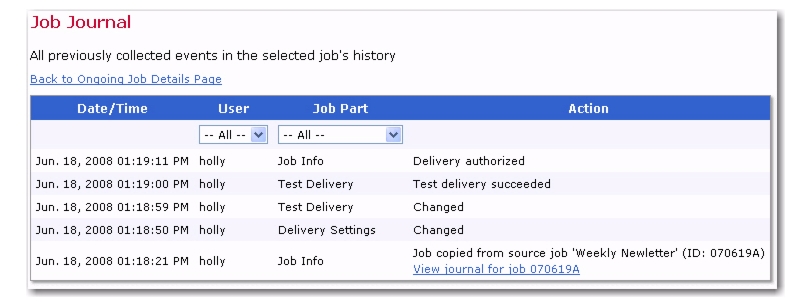
LISTSERV Maestro now provides you with a Job Journal that lists all previous events in the selected job's history, beginning with the job's creation in the system. All changes to the job are recorded together with information about the user who performed the change and what part of the job was changed. In addition, each record is reported with a timestamp, and the list shows the newest entries first.
The Job Journal can be accessed from any of the Job Details screen (Open, Ongoing, or Completed) by selecting a job, clicking on the
Mail Job menu, and then selecting
Job Journal.
If the job began its life as a copy from another job that still exists in the system, then the job creation history entry contains a shortcut link to this job. Click this
View journal for job [JOB_ID] link to open the journal of the source job.
To restrict the list to events triggered by a certain user and/or changes performed to a certain job part, simply choose the appropriate options from the
User and
Job Part drop-down menus at the top of the list.
When defining the content for an HTML message, you can now use a new system drop-in,
{{*ViewInBrowserURL}}, that will allow the recipient to view the HTML message in their own browser.
Note: The system drop-in’s name is case-sensitive and requires this exact spelling as well as the correct drop-in enclosing tags.
The system drop-in will be replaced with a http:// URL that points to a special page that displays the HTML part of your message. This lets the recipient view it in a separate browser window if, for some reason, the recipient can not view the HTML message in their own email client.
In an HTML message that also contains a text alternative part, you can use this system drop-in both in the HTML part and in the text alternative. By including the system drop-in in the text alternative, you will give those recipients that normally only view the text alternative the option of using the URL to display the full HTML message in a separate browser window.
Note: Viewing the message in a browser window will also display the HTML message with the same personalized merge values of the recipient as the original email. These merge values are coded into the URL. Therefore, in a mailing with a very large number of merge values (per recipient) and/or values with a very long text, this mechanism of coding the merge values into the URL may produce URLs that exceed the size limits imposed by the browser software that is in use. Consequently, you should limit the usage of this system drop-in to mailings where the merge field names and their values do not combine to form an excessively long URL.
Note: This system drop-in can not be used in messages that use conditional blocks (of the style
.BB ... .EB). The only system merge fields (beginning with
&*) allowed in the message are
&*TO;,
&*URLENCODE(...);, and
&*INDEX;.
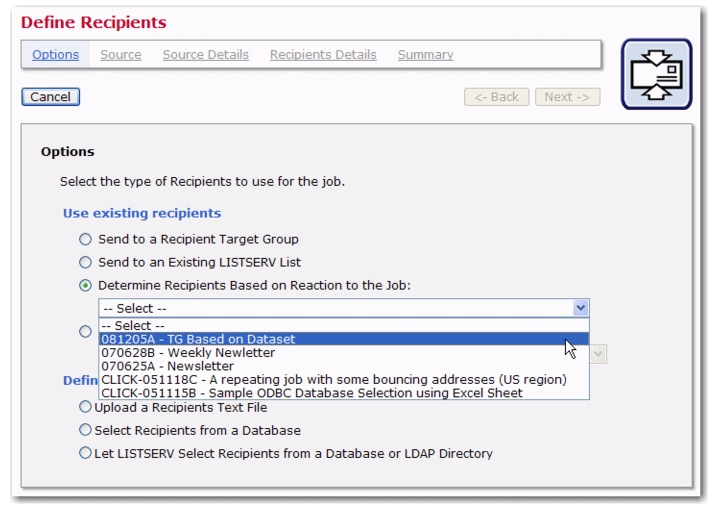
You can now choose to define recipients based on a reaction to a previous job that had its recipients defined from a target group based on a hosted recipient list or a target group based on a dataset.
Because of this new feature, in order for the
Determine Recipients Based on Reaction to the Job option to be available on the Options screen of the Define Recipients wizard,
all of the following conditions must be met by the previous job:
All previous jobs that match these conditions will appear in the drop-down menu associated with this option. If there are no jobs in the menu, then this
Determine Recipients Based on Reaction to the Job option is not available.
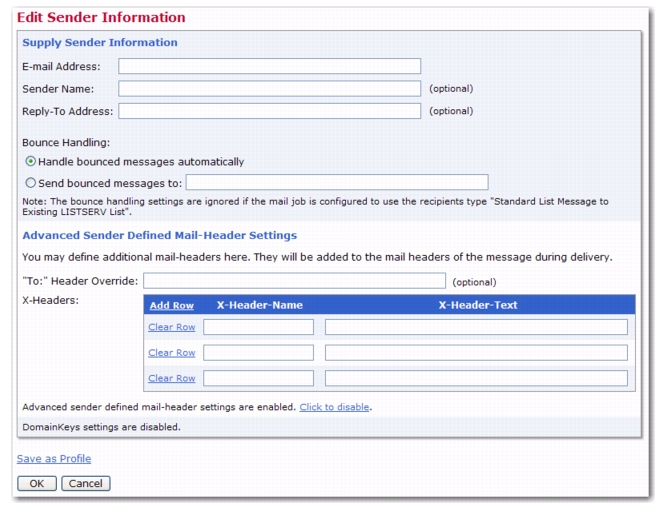
The Advanced Sender Defined Mail-Header Settings on the Edit Sender Information screen are disabled by default. To enable, simply click the
Click to enable link.
This section lets you define additional user defined mail headers following the X-Header convention as described in RFC822. These mail-headers will be added to the mail headers of the message during delivery.
|
•
|
"To:" Header Override – This allows you to override the value of the "To:" header for all recipients. Normally, the "To:" header will contain the recipient's address and optionally also his name, so that for each recipients an individual "To:" header is used.
|
Note: The "To:" header override is ignored if the recipients type is "Send to an Existing LISTSERV list" of the type "Send job as standard list message to list members".
|
•
|
X-Headers – This allows you to define additional sender defined mail headers following the X-Header convention as described in RFC822.
|
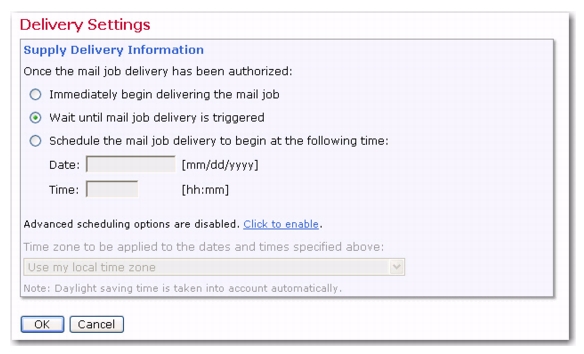
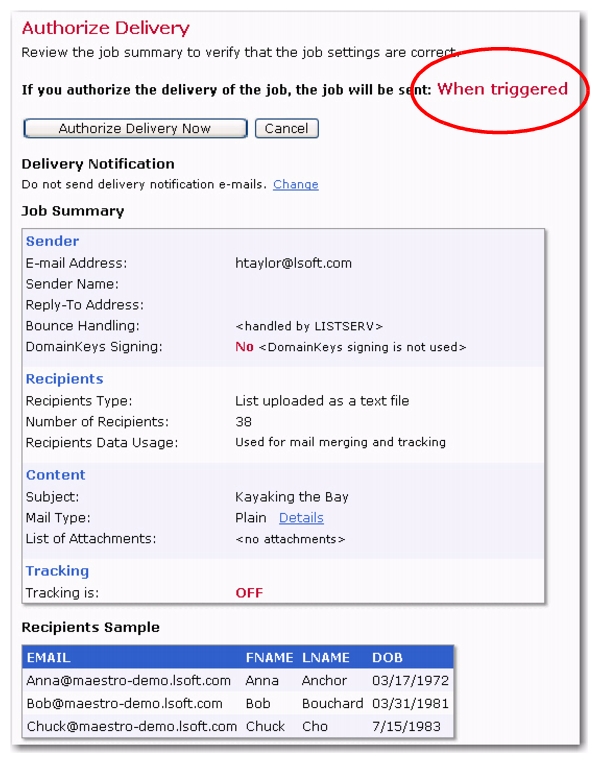
In some cases, it may be desired that the moment for an email job delivery be determined outside of LISTSERV Maestro. For example, if the message content is defined as a drop-in file that is generated by an external process, then the job should not be delivered until this file has been successfully completed. Because of circumstances like this, you now have the ability to schedule the email job’s delivery for a future time that will be determined after the email job has been approved.
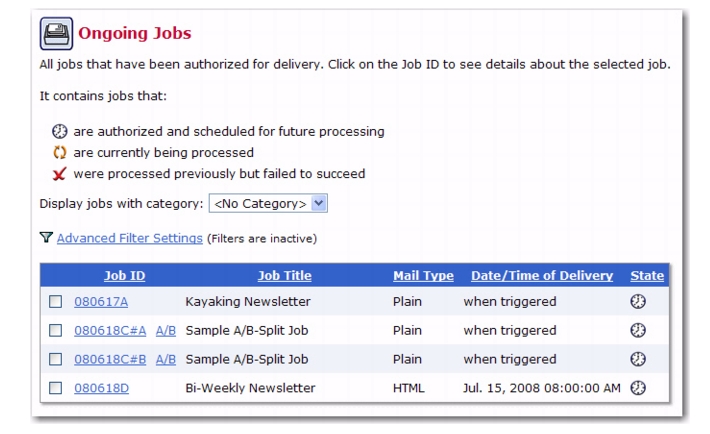
On the Authorize Delivery screen, click the [Authorize Delivery Now] button to authorize delivery. The email job is then placed in the “when triggered” delivery state on the Ongoing Jobs screen. The job will only be delivered once you trigger it.
To manually trigger the delivery of an email job, go to the Ongoing Jobs screen and click on the job’s
ID. This opens the Ongoing Job Details screen. From here, click on the
Mail Job menu and select
Trigger Job Delivery. Click
[OK] to confirm the delivery.
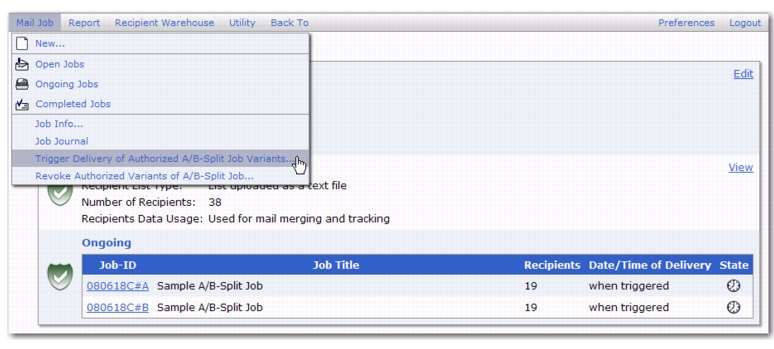
To manually trigger the delivery of an A/B-Split Job, go to the Ongoing Jobs screen and click on the
A/B Job ID. The A/B-Split Job Details screen opens. From here, click on the
Mail Job menu and select
Trigger Delivery of Authorized A/B-Split Job Variants. Click
[OK] to confirm the delivery.
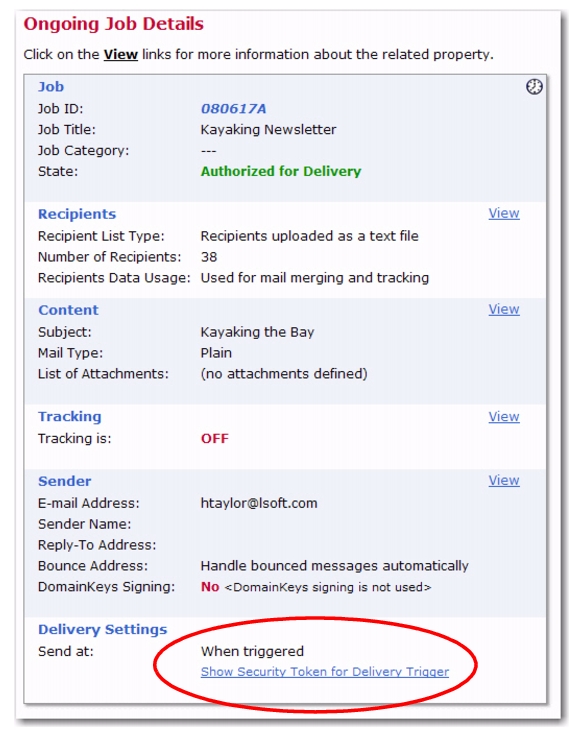
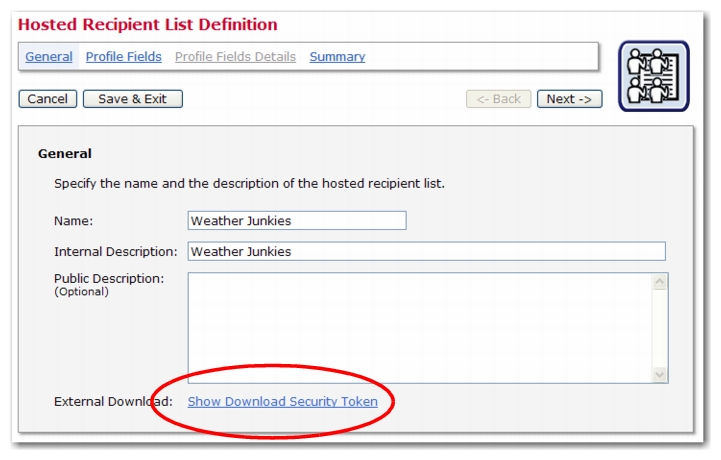
In order to trigger delivery externally, the external process or application has to access the server where the LISTSERV Maestro User Interface (LUI) is running via HTTP (or HTTPS, depending on your setup). In addition, a security token must be obtained.
Note about Security Tokens: Since triggering an email job delivery is a highly privileged operation, LISTSERV Maestro requires that the external process or application delivers a security token for authorization. This security token is assigned internally by LISTSERV Maestro.
|
•
|
Standard Job – Each standard job has a unique security token, which is found on the job's details page once the job has been authorized.
|
|
•
|
Auto-Repeat Job – All jobs in an auto-repeat chain have the same security token, which is found on the details page of one of the jobs in the chain (while the job is authorized). Whenever the external process uses the security token to trigger the delivery of the job, the job will be delivered and a new job in the auto-repeat chain will be spawned, which then turn waits in the Ongoing Jobs list until the external process uses the same security token again to trigger this job's delivery. Because of this, the external process can independently determine how often a new job in the auto-repeat chain is to be delivered.
|
|
•
|
A/B-Split Job – The delivery trigger security token for A/B-split jobs are assigned depending on one of the following four cases:
|
|
•
|
Sampling A/B-Split Job with Common Delivery Settings for the Sampling Variants: The A/B-split job has a common security token that is found on the A/B-split job's details page once the variants have been authorized. Neither the sampling variants nor the main variant have individual security tokens. If the common security token is used to trigger the action, then this will trigger either the delivery of the sampling variants or the delivery of the main variant, depending on which variants are currently authorized for delivery. Because of this, the security token has to be used twice: At first the sampling variants are authorized, then the security token is used to trigger their delivery. Then, the main variant is authorized and the same security token is used to trigger its delivery as well.
|
|
•
|
Standard A/B-Split Job with Individual Delivery Settings for Variants: The A/B-split job does not have a common security token. Instead, each variant has an individual security token that is found on the variant job's details page once the variant job has been authorized. Each individual security token must be used to trigger the delivery of each individual variant job. This allows you to trigger the variants at different times. The security tokens of the variant jobs are very similar: Each security token is the same as the security tokens of its sibling variants, except for a unique suffix. The first variant will have the suffix "-A", the second the suffix "-B", and so on. This means that you only need to know the security token for one variant, and how many variants there are, to be able to trigger all variants. This is especially useful when setting up an external script or process to do this triggering because you only need to tell the process the common part of the security token, plus how many variants there are. The process can then build the complete security token for each variant by extending the common part with the correct suffix for each variant job.
|
|
•
|
Sampling A/B-Split Job with Individual Delivery Settings for Variants: The A/B-split job does not have a common security token. Instead, each sampling variant and the main variant has an individual security token that is found on the variant job's details page once the variant job has been authorized. Each individual security token must be used to trigger the delivery of each individual variant job. This also allows you to trigger the variants at different times. The same similar security tokens with different suffixes are used for the variants as described above for Standard A/B-Split Job with Individual Delivery Settings for Variants.
|
Important: Everyone who is in possession of this security token and who can also access LISTSERV Maestro on its HTTP port (for example, with a normal web browser) will be able to trigger the delivery of the job. Therefore, the security token should be closely guarded and not be given out to unauthorized persons.
The security token is found in the Delivery Settings section on any of the Job Details screens. To show the security token, click the
Show Security Token for Delivery Trigger link. Copy the security token from this box and make sure that the external process or application accesses the URL described below, replacing
[SECURITY_TOKEN] with the value pasted from the security token popup box.
Note: To create a new security token for a standard job, click the
Create New Security Token link in the popup box. To create a new security token for an A/B-split job variant, click on the
Create New Security Token for all Variants link. This will create a new security token for all of the A/B-split job variants. Once a new security token is created, the old token is no longer valid and cannot be used to trigger a job externally.
|
•
|
where SERVER_NAME is replaced with the name of your LISTSERV Maestro server. If a non-standard HTTP port is used, also include the port separated with a colon ":". If access to your LISTSERV Maestro is protected with HTTPS, you need to specify "https://" instead of "http://".
|
|
•
|
where SECURITY_TOKEN is replaced with the security token for the action that the URL will trigger.
|
The external delivery trigger is of the Simple URL Access type and does not contain any download data in its response. With this type, the action is triggered by accessing the external trigger URL with a HTTP GET-request.
By accessing this URL, a HTTP GET-request is made to LISTSERV Maestro. The server then verifies the given security token and, if it is valid, triggers the corresponding action. The result of the action will be returned in the form of a HTTP response.
Important: If you type the value manually, then make sure to maintain the exact spelling because security tokens are case sensitive.
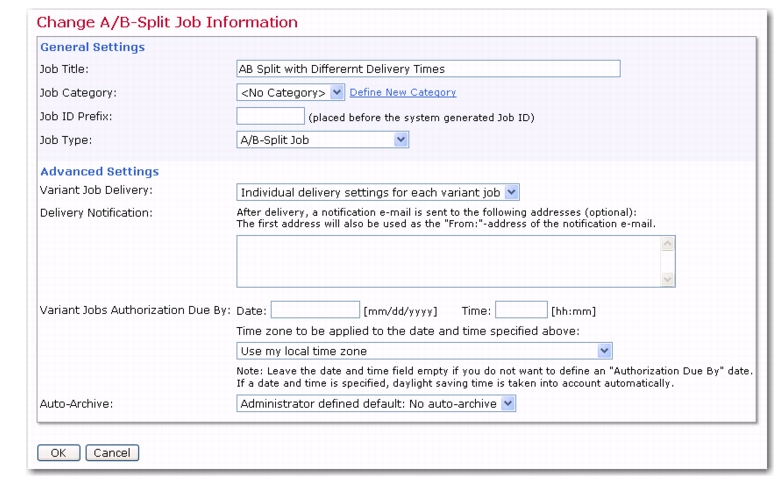
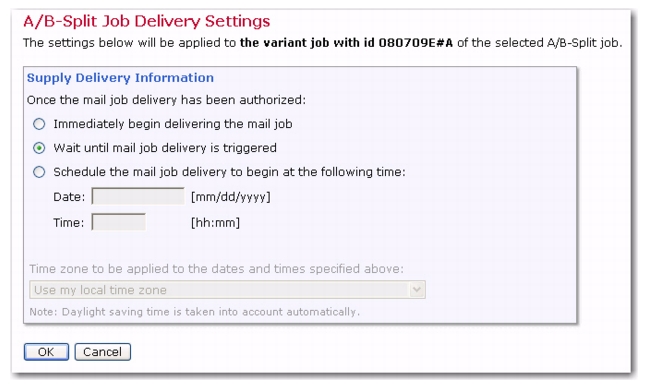
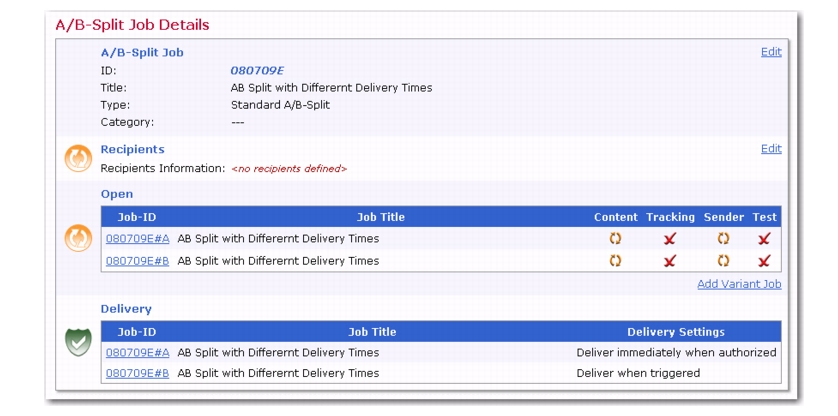
When performing A/B-split testing in LISTSERV Maestro, it is now possible to test the delivery time. To define the A/B-split job’s variants separately, follow the directions below:
|
2.
|
Click the Variant Job Delivery drop-down menu and select the Individual delivery setting for each variant job option.
|
|
3.
|
Click [OK] to accept your changes and return to the A/B-Split Job Details screen. The Delivery section now has each variant job’s ID listed.
|
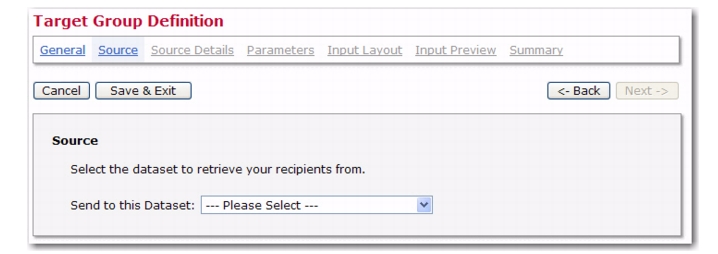
To create a target group based on a dataset, click on the Recipient Warehouse menu, select
New Recipient Target Group, and then select
Based on Dataset. The Target Group Definition wizard opens. See the following sections for details on using this wizard.
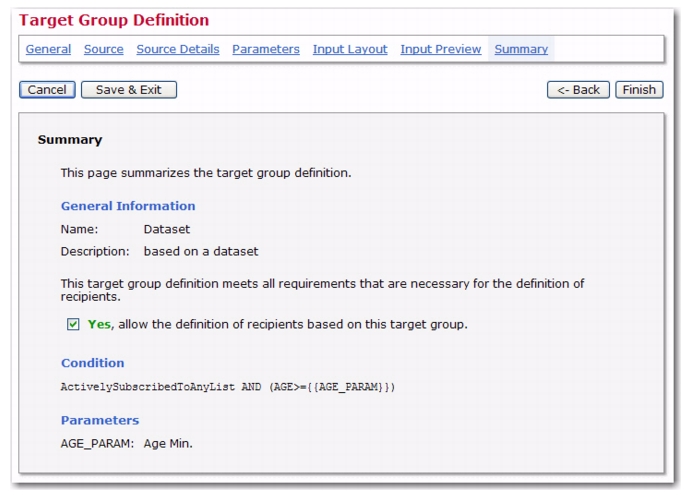
Both the Name and
Description fields are mandatory. Enter a meaningful name and a good description so the end users who are selecting target groups in the recipients wizard will have all the information they need to decide which target group to use.
Target groups can be clustered in categories, making it easier for the end user to select a target group. A category is meant to contain target groups that are related to each other. The intent of categories is to minimize the time users need to locate a specific target group. By selecting a category first, users do not need to browse through all the available target groups, but only those in the relevant category.
To add a target group to a category, simply choose the category for the target group from the
Category drop-down menu. To create a new category, click the
New Category link and define a new category by entering its name into the field. Target group categories are optional. If no category is selected or created, then your target groups will be placed into
<No Category>.
To define, click on the Send to this Dataset drop-down menu and then select the desired recipient dataset.
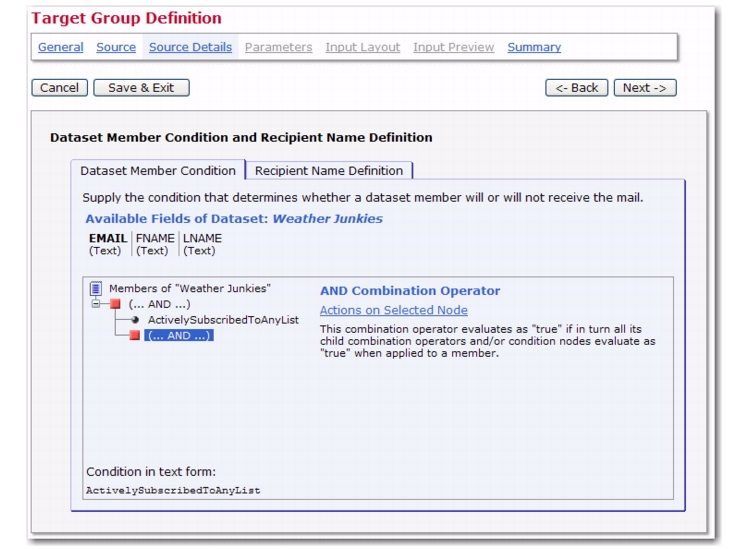
The Source Details screen allows you to define a filtering condition that can be used to select a subset of the subscribers from the dataset on which the target group is based. The only requirement is the “ActivelySubscribedToAnyList” condition, which simply means that the member/subscriber must belong to at least one list in the dataset. For details on defining a filtering condition, please see the online help.
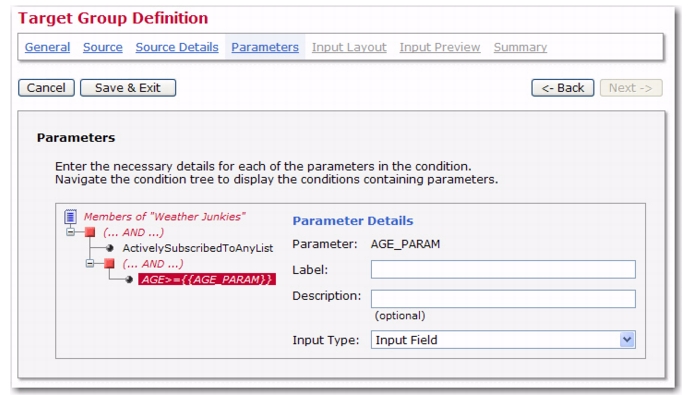
The parameters will be presented to the end user one below the other, in the order defined here. The selection box shows all parameters. Each parameter is listed with its name and label. Select a parameter and click
Up or
Down to change its position in the list.
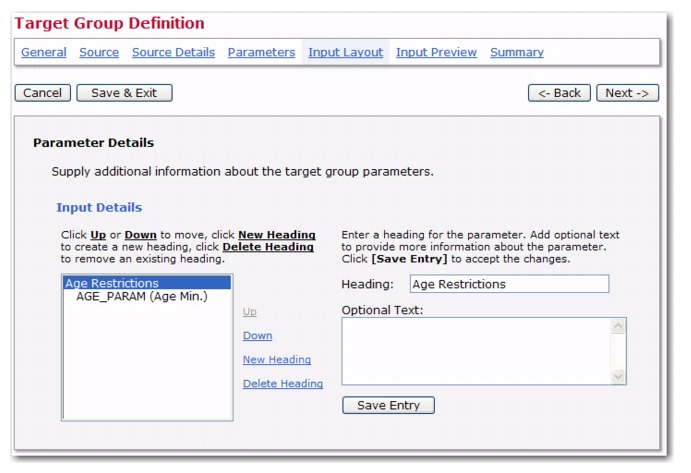
In addition to the parameters themselves, special "headings" may also be defined, which are similar to title rows or section headings. Use headings to add additional explanatory text to the layout and to group parameters together in a way that underlines their semantics. Click on
New Heading to create a new heading. Each heading consists of the heading text, rendered in an emphasized manner, and an optional text, rendered in a smaller font. Fill out at least the heading text, then click
[Save Entry]. This will create a new entry in the selection box to the left, which now stands for the heading just defined.
To edit an existing heading, select it in the selection box, then edit its texts in the edit fields to the right. Click
[Save Entry] again. If
[Save Entry] is not clicked after editing or creating a heading, the changes will be lost as soon as any other link or button is clicked.
Headings can be inserted between the existing parameters at any location. A new heading will always be created just before the selection box entry that is currently selected. If no entry is selected it will be created as the first entry. To add a heading just before a given parameter, first select that parameter and then click on
New Heading. The headings and parameters can be re-ordered at any time with the
Up and
Down links.
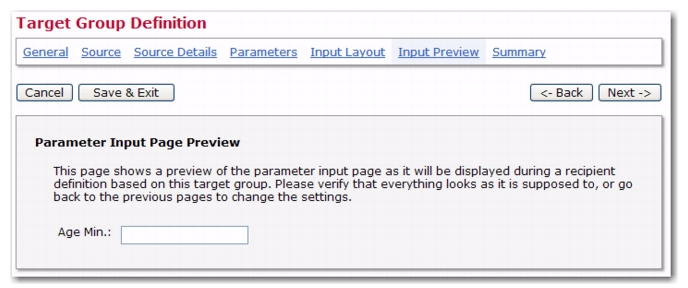
The Input Preview screen displays the parameters in exactly the same way as they will be displayed to the end user when this target group is used in the recipients wizard. It allows you to verify that the labels, descriptions, parameter types, and values, as well as the parameter ordering and any optional headings that you may have added appear as expected. You can also check that the input validation for integer or floating point numbers is enabled for the input fields where this is required.
This screen also contains another important feature - enabling the target group for use in the recipients wizard. A target group that has been created is not automatically enabled for use in the recipients wizard. The data administrator must explicitly enable the use of each target group. To do so, check the
Yes, allow the definition of recipients based on this target group option. Target groups need to be enabled individually, giving the data administrator control over the use of each target group. This way, groups can be created in advance, and only enabled when needed. Similarly, target groups can be disabled, preventing users from accessing them, without permanently deleting them.
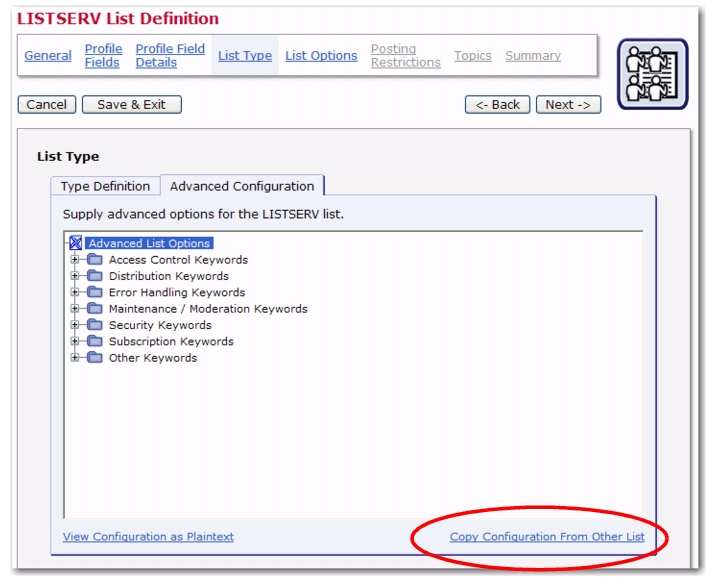
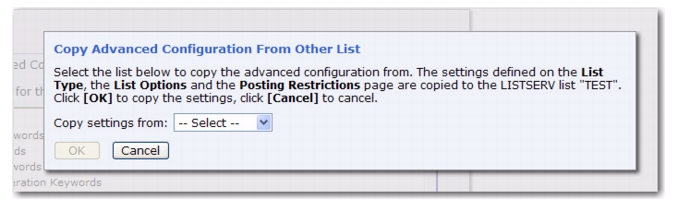
Click on the Copy settings from drop-down menu, select the HLL to copy, and then click
[OK]. The settings on the List Type, List Options, and Posting Restrictions pages will be automatically filled in with the settings from the selected HLL.
Note: The subscriber information and profile field definitions will not be copied into the new HLL.
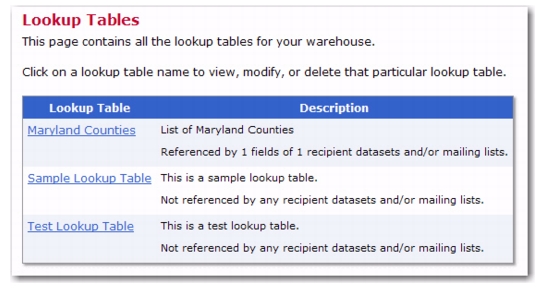
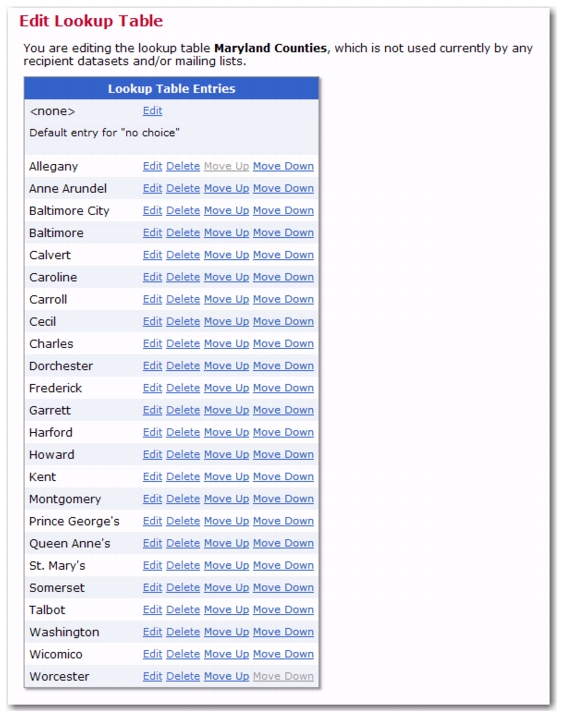
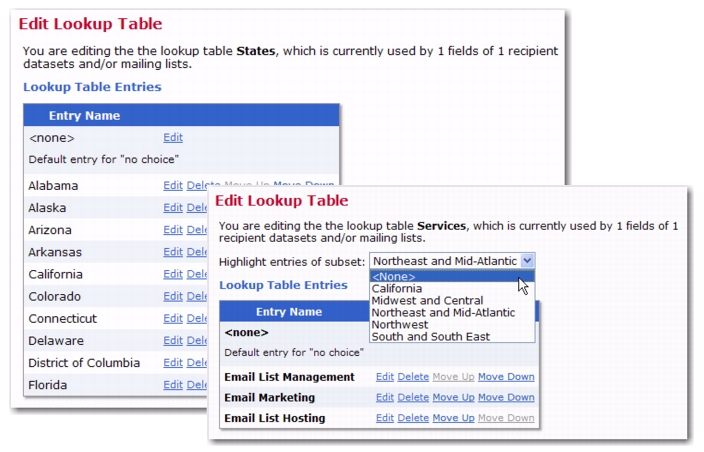
You can now further define lookup table entries and create a subset for the lookup table. This gives you the ability to create customized selections for your subscribers. For instance, let’s say that you have a lookup table listing every county in the state of Maryland. You can take this a step further and create subsets that only contain counties that are on the Eastern Shore, that border the Chesapeake Bay, that border the District of Columbia, etc. With lookup table subsets, your ability to create customized entries for your subscribers is endless.
To define a subset for a lookup table, click on the Recipient Warehouse menu and select
Lookup Tables. The Lookup Tables screen opens.
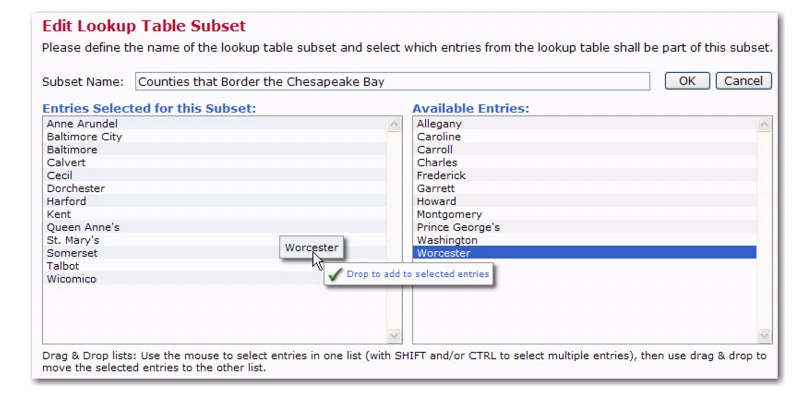
Click on the Lookup Table menu and select
Define New Subset. The Edit Lookup Table Subset screen opens. Enter the
Subset Name, and then drag and drop the entries you’d like to include in the subset from the
Available Entries box to the
Entries Selected for this Subset box.
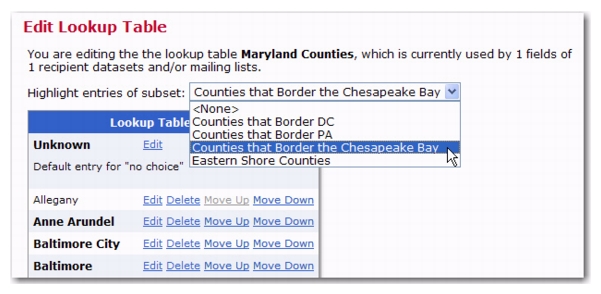
Once you are finished defining the subset, click [OK] to return to the Edit Lookup Table. The newly added subset will be highlighted in the list of entries.
If you’d like to view a different subset, click on the Highlight entries of subset drop-down menu and select the subset from the menu.
To edit the highlighted subset, click on the Lookup Table menu and select
Edit Highlighted Subset.
To delete the highlighted subset, click on the Lookup Table menu and select
Undefine Highlighted Subset.
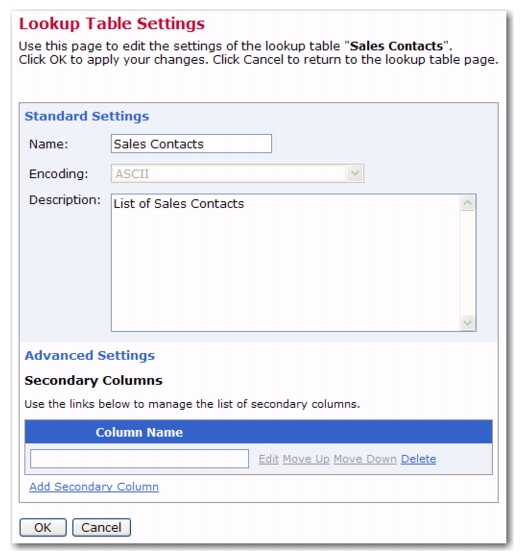
In addition to the standard settings, a lookup table can have additional secondary columns. The standard column of a lookup table holds the lookup table entries' names, which are used to create the entries of a drop-down menu for the user and must therefore be unique. Contrary to this, a secondary column of a lookup table holds entry information that is subordinate to the entry name, such as the sales region code or the sales contact phone number for a lookup table containing sales contact addresses. Uniqueness of secondary column values is not enforced by the system; therefore, the system supports using the same value for several lookup table entries.
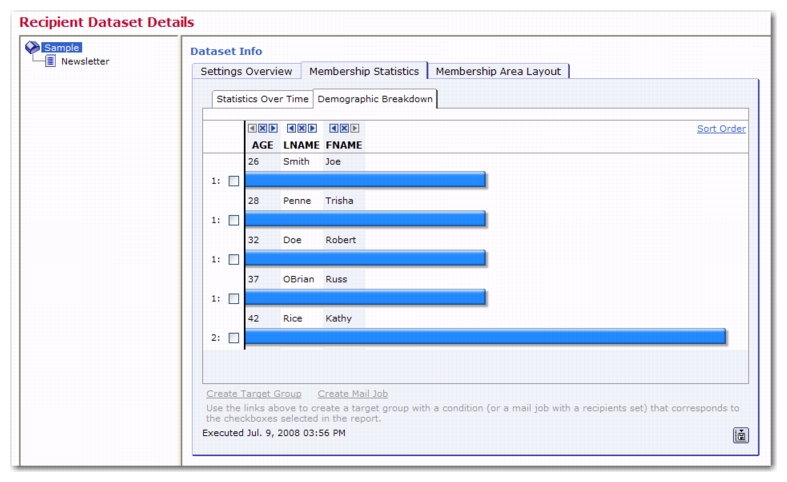
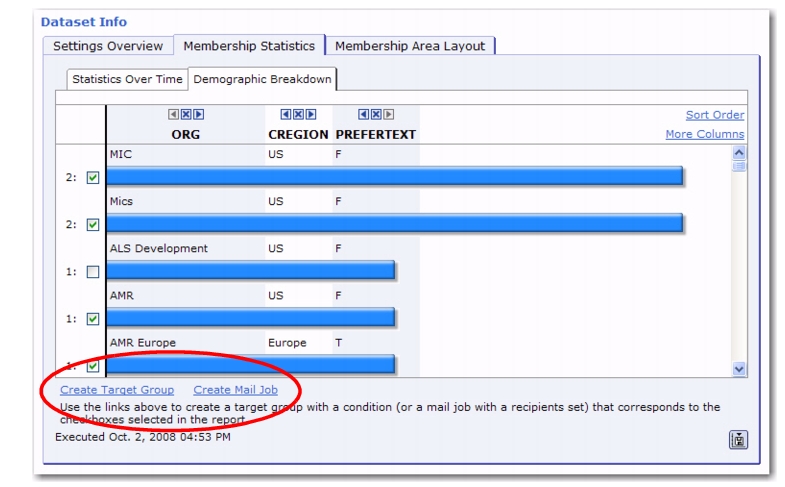
Secondary lookup table values are currently accessible via the calculation formula function
SecondaryValue(...) and in the Demographic Breakdown report for a dataset or hosted mailing list (see Section 1.25
Viewing Demographic Reports for a Dataset or List for details on this report).
To add secondary columns to a specific lookup table, go to the Edit Lookup Table screen for that lookup table, click on the
Lookup Table menu, and then select
Lookup Table Settings. The Lookup Table Settings screen opens. Click on the
Show Advanced Settings link, and then click on the
Add Secondary Column link. Enter the name of the secondary column and click
[OK]. To add more than one secondary column, simply click the
Add Secondary Column link again.
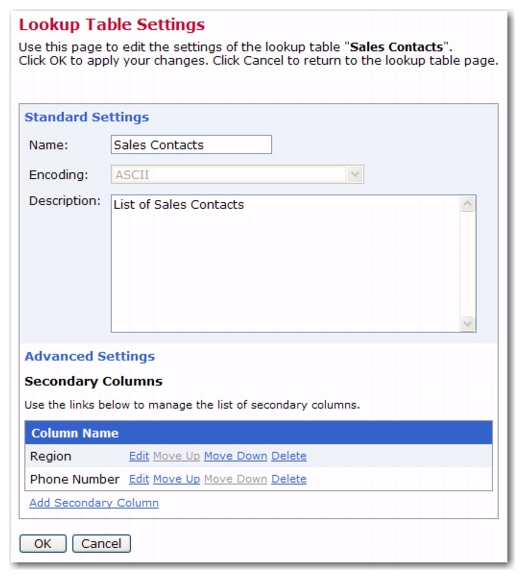
To implement the sales contact lookup table sketched above, you would for example add the secondary columns named
Region and
Phone Number to your
Sales Contacts lookup table. By editing the lookup table entries, you assign one of four different sales region codes and unique phone numbers to each of your twenty sales contact addresses.
Now you add a single select column named SALES_CONTACT to your hosted recipient list and select your
Sales Contact lookup table as basis for this column. Subscribers then choose their sales contact from a drop-down menu that lists each contact by its unique name. Once this is accomplished, the value of the secondary lookup table column
Phone Number is immediately available for mail merging in the form of the system drop-in
*Calc SecondaryValue(&SALES_CONTACT;,"Phone Number"), which is replaced with the correct phone number assigned to the sales contact that the subscriber had selected via the sales contact name.
Secondary columns are also available for Demographic Breakdown reporting; and for this purpose, columns like
Region yield meaningful grouped results due to their non-uniqueness: If you add the
Region secondary column of the
SALES_CONTACT list field to the Demographic Breakdown report and remove all other fields, then the report will show four different bars, each corresponding to the count of subscribers who have a sales contact in that region.
Using secondary columns in tracking reports is also supported, but it requires that you first employ a derived field that pre-calculates the secondary value and adds it to the tracking profile data. For details on using derived fields, see Section 1.17
Using Derived Profile Fields.
Take extra care when renaming a secondary column that is used in any of the ways described above. Due to the widespread availability of secondary column values, the system does not automatically adjust the name of a secondary column if it is referenced in a calculation formula. If you, for example, rename a secondary column that is referenced from within a calculation formula in the condition tree of a target group based on a dataset or hosted recipient list, then this formula becomes invalid (this invalidity is detected by LISTSERV Maestro and is shown in the form of a delivery error message or an error message when the target group is selected in the Define Recipients wizard).
To repair the invalid formula after you have renamed the secondary column, open the Target Group Definition wizard and review the condition tree. Then open the tree node with the formula in it and edit the formula manually to use the correct secondary column name.
If the main value from the CSV-file is already present in the lookup table, then the associated secondary values are used to update the already existing secondary values of the existing main value in the lookup table.
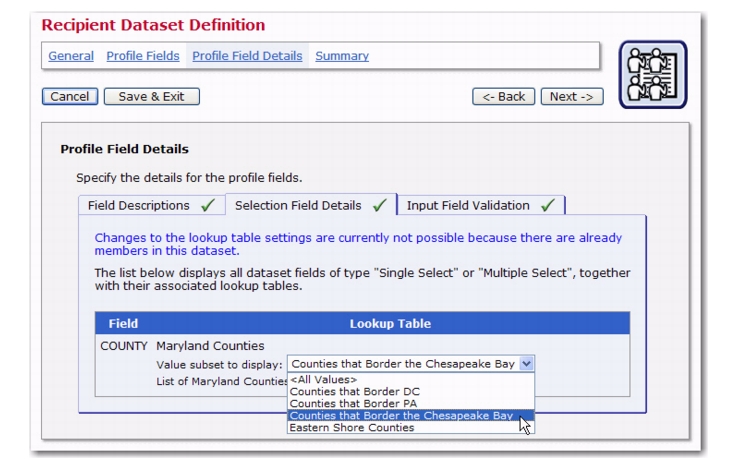
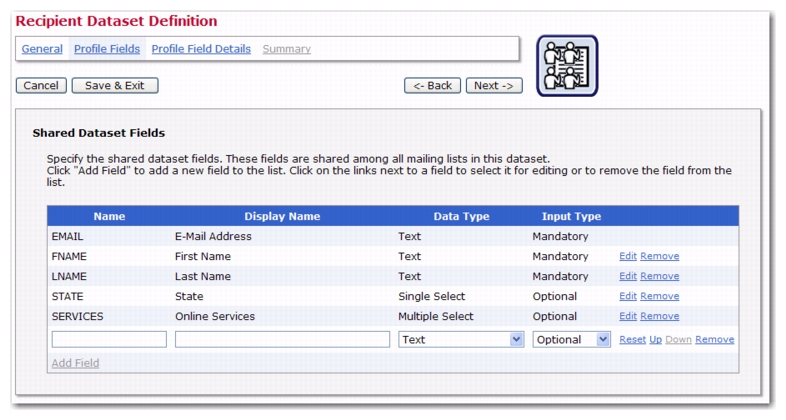
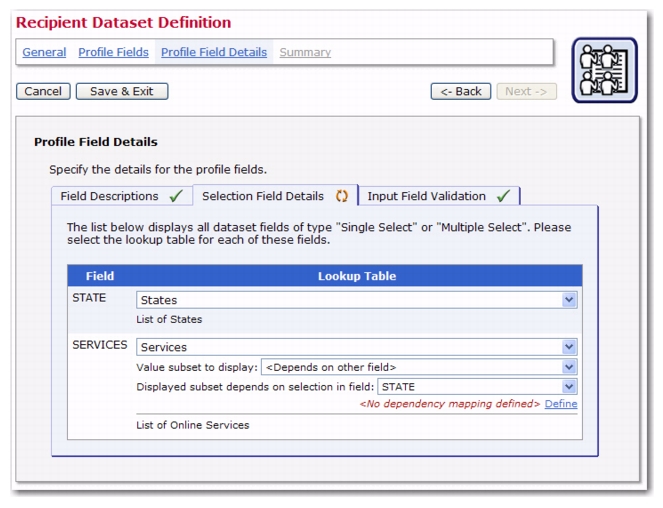
Recipient dataset and hosted recipient lists (HRL) now have additional features available when creating and defining profile fields. If there are several single- or multiple-select fields defined on the Profile Fields page, of which at least one is a single-select field; then, when entering the Selection Field Details on the Profile Field Details page, the second drop-down menu will have the additional option of
<Depends on other field>. This option allows you to dynamically change the lookup table subset that is displayed by the profile field, depending on the user choice in another (single-select) profile field.
For example, imagine a dataset or list that is used to market various online services in the United States, where each subscriber is supposed to be able to individually decide which services they’d like to learn more about. The easiest solution for this would be to set up a lookup table called
Services with an entry for each available service.
However, assume that for legal reasons some of these services can not be offered in certain states. In the above scenario, all subscribers would still be able to pick from all entries in
Services, which means that we would potentially send offers about certain services to subscribers that live in a state where these services are not available.
As the next step, we define several subsets in the Services lookup table, where each subset groups together the services that are available in certain states. At worst, we would have to define one subset per state (if the available services in all states are different). However, more likely, many states have the same group of available services, so for each of these groups, we create one subset.
Next, we include a multi-select profile field for Services and a single select profile field for
State in the dataset/hosted list.
Finally, in the Selection Field Details tab on the Profile Field Details page, we edit the definition of the existing multiple-selection field so that it does not always display all entries from
Services, but only a subset. And, which subset is displayed depends in turn on the
State single select field. Because of this, subscribers can first select the state they live in, which then will change the
Services field so that it only displays the subset of services that are actually available in that state. If setup correctly, this means that a subscriber can never select a service that is not available in his/her state.
To setup, select the States lookup table for the
States profile field. Next, for the
Services profile field, select the
Services option from the first drop-down menu, and then the
<Depends on other field> option from the second drop-down menu. Finally, from the third drop-down menu, select the source field that the subset depends on (this third drop-down menu only appears if the
<Depends on other field> option in the second drop-down menu is selected). By doing this, you are telling the system that the subset (for the selected lookup table) that is to be used for display may vary depending on the choice in this other field.
And as your last step, you need to tell the system how this dependency will be defined. To do so, click on the
Define link that appears right below the third drop-down menu once you have selected a source field name. (This will be an
Edit link if you’ve previously defined the dependency.)
This link opens the Dependency Mapping screen where you can define the dependency mapping between the values of the selected source field and the subset that is to be displayed by the profile field for which you are currently defining the settings. The screen shows a table where each possible value in the source field (which is always a single-select field) is displayed in the left column. The right column displays an associated drop-down menu for each value. For any given value, the selection in the drop-down menu defines which lookup table subset shall be displayed by the profile field, if the associated value from the left column is selected in the source field. The available choices are:
|
•
|
<Empty List> – If selected, then the profile field will display an empty list, if the associated value is selected in the source field.
|
|
•
|
<Full List of Values> – If selected, then the profile field will display the full list of lookup table values (i.e. no subset, but all values), if the associated value is selected in the source field.
|
|
•
|
Any Subset Name – If one of the subset names is selected, then the profile field will display only the lookup table values that are elements in this subset, if the associated value is selected in the source field.
|
Once you have defined the dependency mapping, click [OK] to close the screen and save your changes, or click
[Cancel] to close the screen without saving.
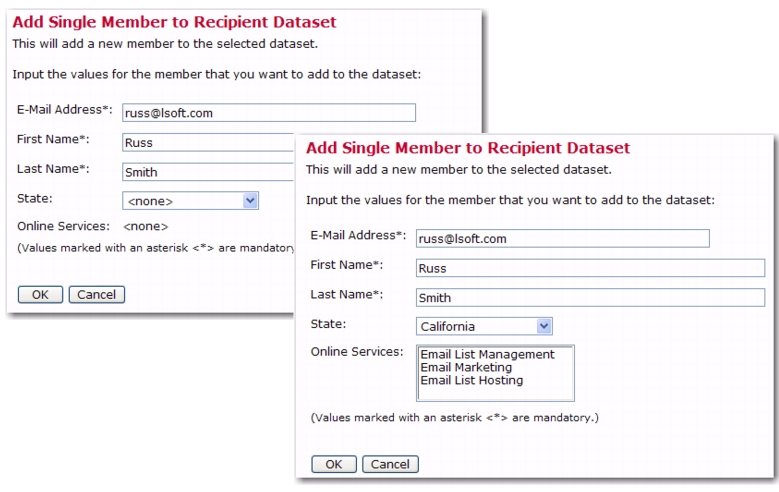
Once you are finished defining the dataset/hosted list, these fields will now be available to your members/subscribers on any one of the add/join member/subscriber screens. For example, if you, as the data administrator, are adding a member to a dataset that has these fields defined, then the screen might look something like this:
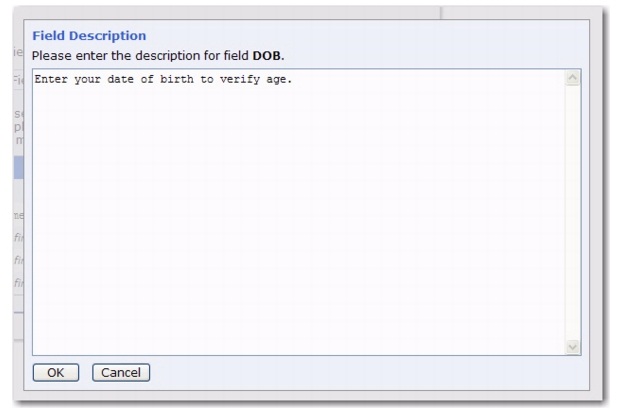
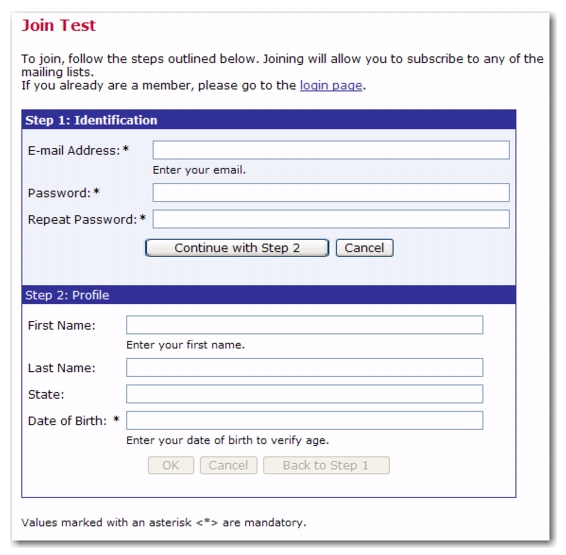
Previously, the profile fields of a dataset and hosted list only had a “display text” attribute. Now, there is a
Description field where you can enter a longer description of the profile field. This description will appear on the subscriber pages where the display name is not meaningful enough for the subscriber.
To define, go to the Profile Fields Details page of the Recipient Dataset Definition wizard or the Hosted List Definition wizard, and then click on the Field Descriptions tab. A list of all dataset fields is shown.
Click the Edit link next to the field you’d like to add a description to. The Field Description screen opens. Enter a description for the field, making sure that it explains what the subscriber needs to do to fulfill the field requirements.
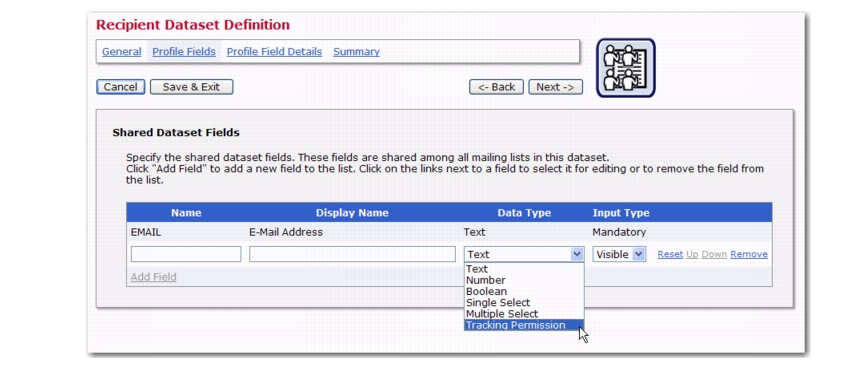
The Tracking Permissions data type can now be used when defining the profile fields for a dataset. This data type will let you ask your dataset members and list subscribers whether or not you can use their information for personal tracking.
To define a profile field using this new data type, go to the Profile Fields page of the Recipient Dataset Definition wizard. Enter the field’s information, click on the
Data Type drop-down menu, and then select
Tracking Permission.
Once the dataset definition is finished, this Tracking Permissions profile field will be displayed in several areas:
Notes: Clicking on the dataset member’s email will open the Edit Member - Dataset Specific Fields screen, which is where you can edit this setting, if necessary. In addition, the data administrator can define this field when adding members/subscribers to a dataset/list.
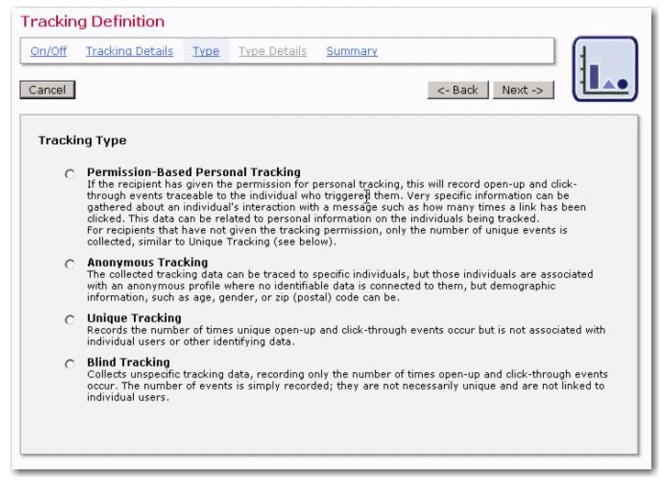
Once this field is defined for a dataset, and a target group from that dataset is selected to define recipients for an email job, then the
Personal Tracking option in the Tracking Definition wizard changes to the
Permission-Based Personal Tracking option.
|
•
|
Any change to the Tracking Permission field will be logged in the changelog, if enabled.
|
A Derived profile field is determined from one or several other profile fields in the same dataset or list (the source fields). This is defined by a special derivation rule. The value of the derived field will be automatically calculated whenever the values of the source fields are changed. In addition, a derived field can only be a "Read Only" or "Hidden" field, which means that its value can not be entered directly.
If a Derived profile field is present in a dataset or hosted recipient list, then the Profile Fields Details page will contain a Derivation Rules tab. These rules must be supplied for each derived field and will define how the value for the field is determined. To define, click on the associated
Define or
Edit link. This opens the Derivation Rule screen.
Depending on your profile fields, you may have one or two options available to define the derivation rule. If you have two options, then the dialog will display two radio buttons that allow you to choose between the two options. Once you have selected an option, you can then provide the details for that option.
Note: Only the single-select fields that are defined in the same object as the derived profile field are available in the
Mirror value of field drop-down menu. This means that if the derived field is a dataset field, then it can only reference a single-select field that is also defined in that dataset. If the derived field is a field of a hosted list, then it can only reference a single-select field in the same hosted list. It can not reference a single-select field from the dataset the hosted list resides in.
|
•
|
Calculate value with the formula below – This option is always available. Simply enter the calculation formula that will be evaluated to determine the value for the derived profile field. This can be any kind of formula, using all the formula features that are available.
|
The formula can be a constant formula, which would mean that all subscribers will have the same value in this derived profile field. However, a formula as a derivation rule is most useful if it is (at least partially) based on other profile fields, meaning that it is not constant. In such a case, each subscriber will have an individual value in the derived profile field (although not necessarily a unique value), as the formula is individually calculated based on the values of his profile fields.
Note: In the formula, you can only reference other profile fields that are defined in the same object as the derived field itself. This means that a formula of a derived field in a dataset can only reference other fields from the same dataset. It can not reference fields from any lists in the dataset. And, a formula of a derived field in a hosted list can only reference other fields from the same hosted list. It can not reference fields from the dataset the list resides in or fields from other hosted lists. However, a derived field can reference other derived fields as long as this does not create an endless recursion of references (i.e. a chain like "DERIVED1 references DERIVED2 references DERIVED3 etc." is possible; a recursion like "DERIVED1 references DERIVED2 references DERIVED1" is not possible).
When you are finished editing the derivation rule, click [OK] to save your changes, or click
[Cancel] to close the dialog without saving.
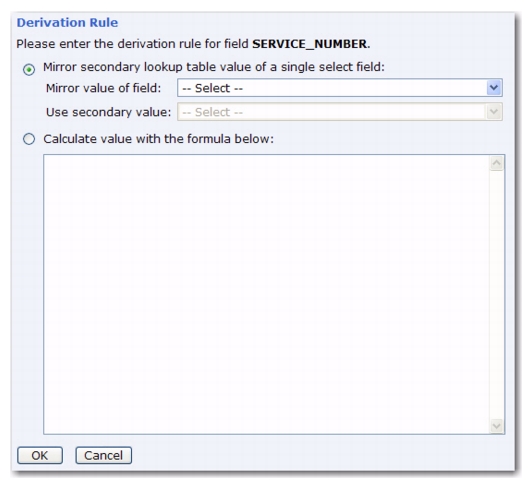
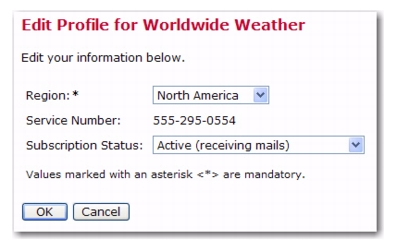
Let’s say that you want to create a subscriber profile that will contain a single-select field where the subscribers select the region they live in. And, you want each of these regions to have a specific service phone number, and each subscriber to automatically see the correct service number for their region.
In order for this to work, create a Region lookup table with all available regions as the main values; in addition, add a secondary column called
Service Number to the lookup table. Fill this column with the corresponding service phone numbers for each region.
Tip: Values in the secondary columns do not have to be unique, so it would be no problem if some regions have the same service number.
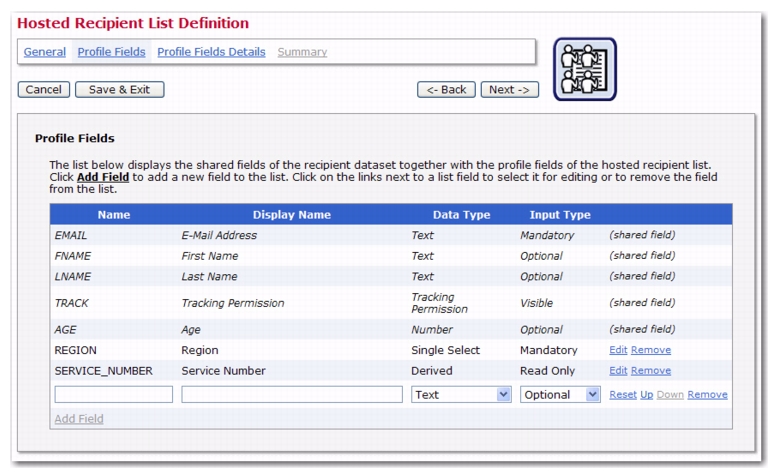
Next, start creating your list. On the Profile Fields page in the Hosted Recipient List Definition wizard, create a single-select field called
REGION and a read-only derived field called
SERVICE_NUMBER.
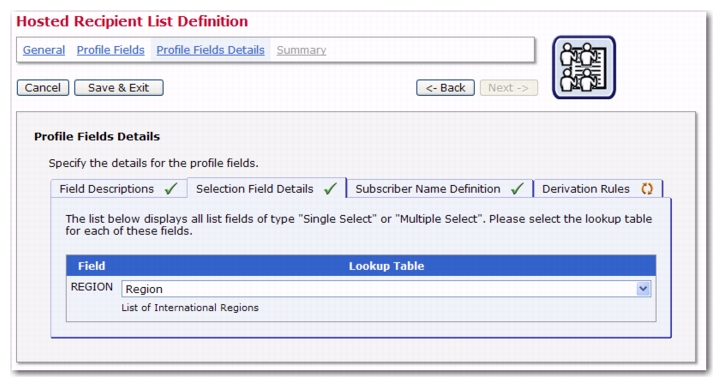
On the Profile Fields Details page, first click on the Selection Field Details tab and assign the
Region lookup table to the
Region field. Each subscriber can now select the region he lives in, which will be stored as part of his profile.
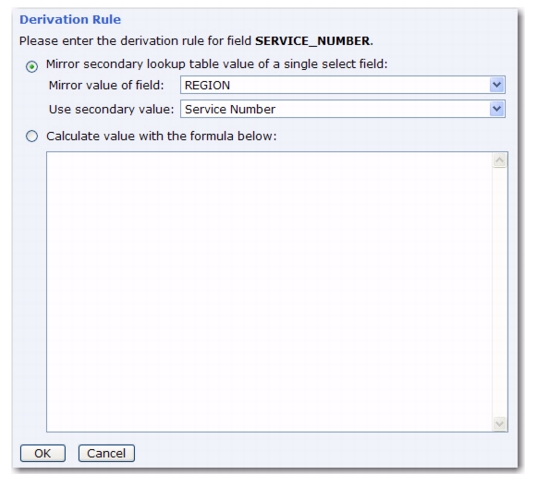
Click the Define link to open the Derivation Rule screen. Select the
Mirror secondary lookup table value of a single select field option. Click the
Mirror value of field drop-down menu and select
REGION. Finally, click the
Use secondary value drop-down menu and select
Service Number.
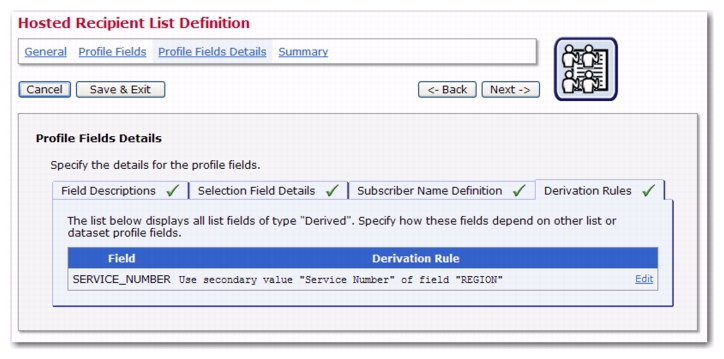
Click [OK] to return to the Derivation Rules tab, which now contains the field’s derivation rule, which is
Use secondary value “Service Number” of field “Region”. To edit this rule, simply click on the
Edit link.
Now when a subscriber selects his/her region for the REGION field, the derived
SERVICE_NUMBER field will automatically reflect the service phone number for the selected region. And, since this derived field is read-only, it will be displayed to the subscriber in his/her profile so that this information is always available. In addition, should the subscriber change regions, this service phone number will automatically be adjusted accordingly.
Derived fields require additional storage space in the system database and additional processing power by the server when their values are calculated. Because of this, a derived field should only be used if there is actually a need for it. Some situations where a derived field seems like a solution can actually be solved without a derived field; in which case, this other solution should be used.
You should also be aware that you can always add an additional derived field to an already existing dataset or hosted list, even if there are already members in the dataset or subscribers on the list. Therefore, you should usually refrain from creating a certain derived field if you have any doubts about whether or not your will actually be using this field. Instead, you should only add it once it turns out that you actually require it.
A derived field is the correct solution for the following situations:
|
•
|
Include Field in Subscriber Profile – The value of the derived field will appear as a visible value in the subscriber profile so that the subscriber can view this value on the corresponding profile page in the membership area.
|
|
•
|
Include Field in Tracking Reports – The derived field will be available in the Recipient Details tracking report (for a job with either personal or anonymous tracking).
|
For example, a derived field that extracts the domain name from the subscriber's email address would allow a tracking report that can show you how many recipients clicked on a certain link (or opened the email, etc.), broken down by recipient domains. For this, usually a "hidden" derived field is the correct choice (although you can also use a "read-only" field, if you also want to display the value in the subscriber profile, see above).
|
•
|
Include Field on Browse/Edit Screen – The derived field will be included in the subscribers list on the Browse/Edit screen, so that you can see the various values there, and also filter the list over these values.
|
In contrast, a derived field is usually not the correct solution for the following situations:
|
•
|
Mail Merging – A certain derived value will be included as a merge value in the body of a mail message. For this, you should not use a derived field (unless you need the derived field for other situations, see above).
|
Instead, simply include a *Calc system drop-in in your mail message, with the same calculation formula that you would have used for the derived field.
|
•
|
Target Group Condition Tree – A certain derived value will be used to filter the recipients in the condition tree of a target group. For this, you should not use a derived field (unless you need the derived field for other situations, see above).
|
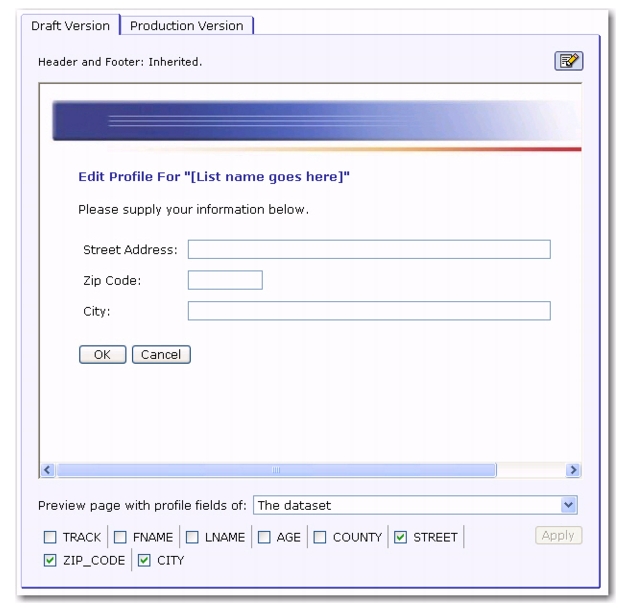
When creating the message content for a job, you can now add a special system drop-in that will direct your subscribers to the External Profile Edit Page. This page will let your subscribers update specific profile fields without logging into the Membership Area.
This drop-in is called ProfileEditPageURL and, if included in the mail body, it is replaced with a URL to the External Profile Edit Page.
The drop-in must be written in a special form because when you write this drop-in into your message you will need to include information about which profile fields will be queried from the subscriber. The syntax is as follows:
where FIELDNAME_LIST must be replaced with a comma-separated list of the names of all profile fields that the External Profile Edit Page will query from the subscriber.
The External Profile Edit Page is a dynamic page that queries certain profile fields from the subscriber. The fields that are queried by the page during a visit depends on the parameters in the URL by which the page was accessed. And, the parameters in the URL in turn are created by the
ProfileEditPageURL system drop-in depending on the field names that you include in the
FIELDNAME_LIST of that system drop-in.
With the examples of above: If you are planning to use {{*ProfileEditPageURL STREET,ZIP_CODE,CITY}} to query the address data of the subscriber, and you first want to check that the page will look correctly if these three profile fields are displayed, then go to the External Profile Edit Page, check the boxes for STREET, ZIP_CODE, and CITY, uncheck all other boxes, and then click
[Apply]. The preview will then show the page just as it will look to subscribers if you use the system drop-in with STREET, ZIP_CODE, and CITY.
|
2.
|
If the {{*ProfileEditPageURL FIELDNAME_LIST}} system drop-in is used in a mailing to a dataset (see Section 1.10 Sending Messages to an Entire Dataset), then FIELDNAME_LIST must only contain profile fields that are fields of the dataset. It can not contain any fields that belong to any of the HRLs or HLLs in the dataset.
|
The Subscriber Interface for the External Profile Edit Page reflects this: just above the previously mentioned checkboxes, you have a
Preview page with profile fields of drop-down menu that allows you to select which profile fields you want to see. If you select
The Dataset, then you will only see checkboxes for the dataset profile fields. This simulates the situation when you use the system drop-in in a mailing to the dataset. If you select
The “LIST”, then you will see all checkboxes for the list XYZ plus all of the dataset. This simulates the situation when you use the system drop-in in a mailing to list XYZ where you can use all combined profile fields from the list and dataset in
FIELDNAME_LIST.
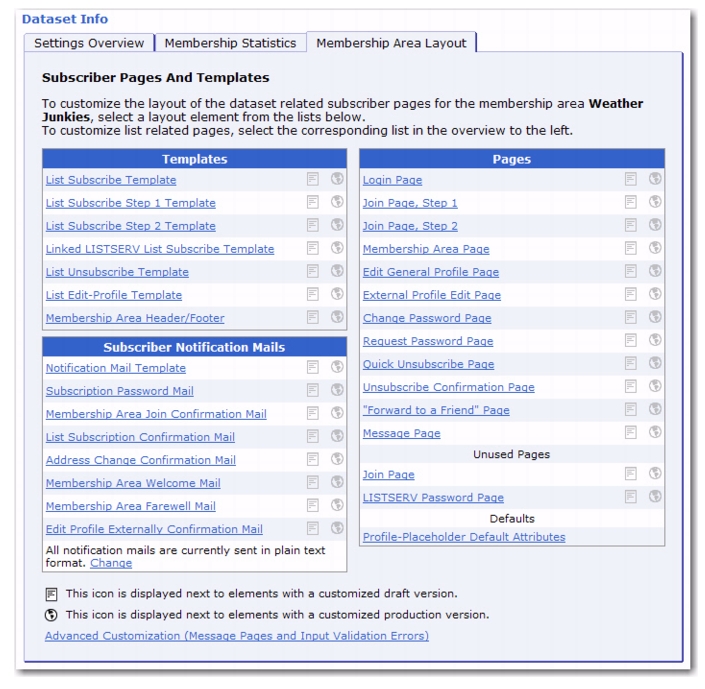
Because of this new feature, there are now several new message pages available for customization. To locate, go to the Recipient Dataset Details screen for the dataset, click on the Membership Area Layout tab, and then click on the
Select a page link. At the bottom of tab, click on the
Advanced Customization (Message Pages and Input Validation Errors) link. The message pages are located in the
Yes/No Confirmation section of the
Message Page Texts table.
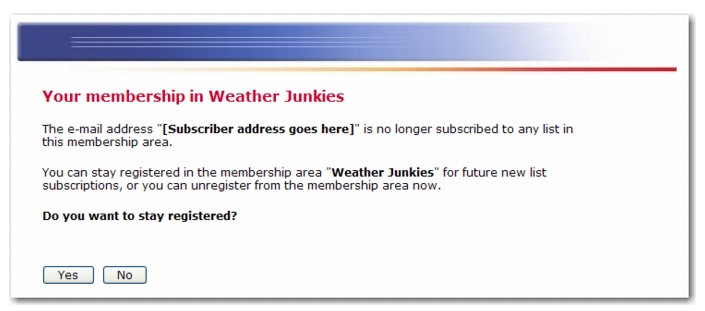
The new message pages are: Unregister Confirmation; Unregister Confirmation (for Restricted Dataset); Stay Registered Confirmation, After Unsubscribe from Last List; and Stay Registered Confirmation, After Unsubscribe from Last List (for Restricted Dataset).
All notification email messages for a dataset, such as the welcome or farewell messages, can now be sent as an HTML message with an optional plain text alternative. In addition, these messages can be formatted and customized.
To customize notification emails for a dataset, go to the Recipient Dataset Details screen for the dataset you’d like to work with. Click on the Membership Area Layout tab, and then click on the
Select a page link. The Subscriber Pages and Templates table is displayed.
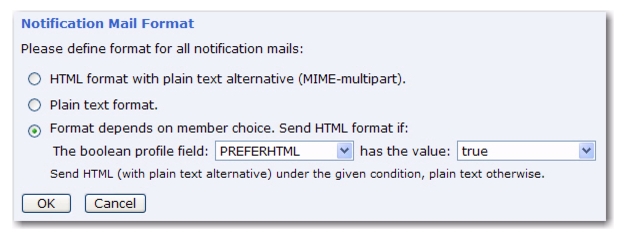
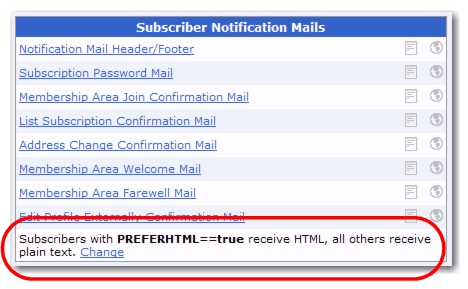
To change the format of all notification emails for this dataset, click on the Change link at the bottom of the
Subscriber Notification Mails section of the table. The Notification Mail Format window pops up. From here, you can choose to:
|
•
|
Evaluate the following condition to decide if a subscriber receives HTML or plain text. If this is selected, then select the boolean field and its value from the drop-down menus. When selected, then HTML emails will only be sent to those subscriber that meet the requirements of this condition. Those subscribers who do not meet these requirements will receive a plain text email.
|
Once you finished, click [OK]. The new format status will be displayed at the bottom of the
Subscriber Notification Mails section of the table next to the
Change link. This format status will be applied to all notification emails in the dataset.
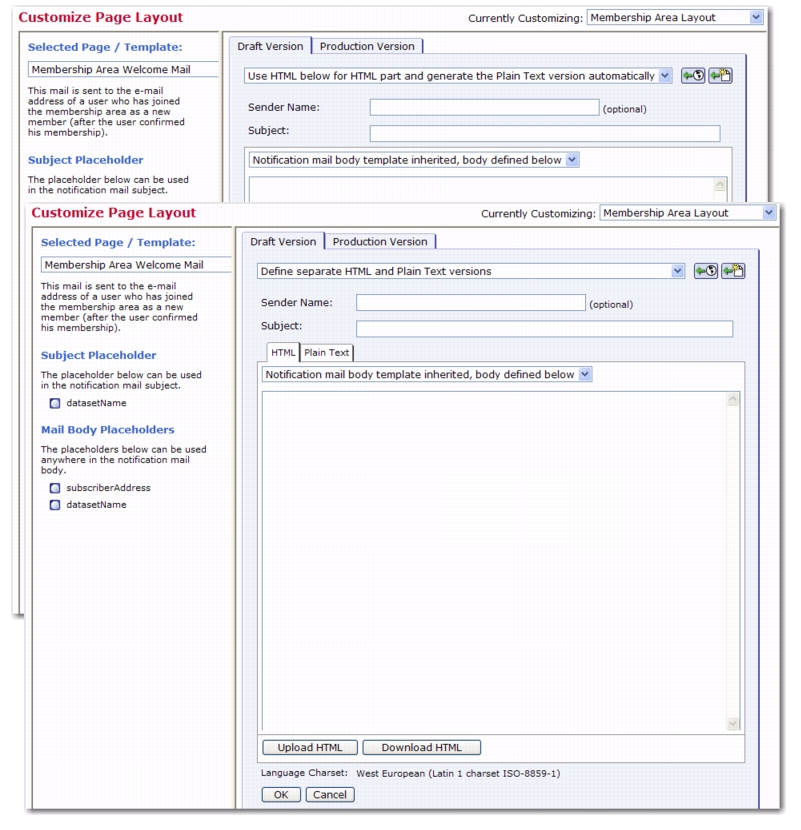
To format and customize a specific notification email for a dataset, go to the Recipient Dataset Details screen for the dataset you’d like to work with. Click on the Membership Area Layout tab, and then click on the
Select a page link. The Subscriber Pages and Templates table is displayed. Click on the name of the notification email. The Customize Page Layout screen opens with the Draft Version tab displayed. Click the
Edit Source icon. The Draft Version tab refreshes and a new drop-down menu appears at the top of the tab. This option gives you the ability to create an HTML version of the email along with a plain text alternative.
To create an HTML message with the plain text alternative created automatically, click the drop-drown menu and select
Use HTML below for HTML part and generate the Plain Text version automatically.
To create an HTML message with a separate plain text alternative, click the drop-down menu and select
Define separate HTML and Plain Text version. When this option is selected, two tabs will appear for defining the body’s content.
Note: When defining the HTML and plain text versions of the email separately, then this drop-down menu is available on both the HTML and Plain Text tabs.
To upload HTML into the body of the email, click the [Upload] button. Browse to the location of the HTML file and click
[OK].
Use the Language Charset drop-down menu to select the language encoding used for mail delivery. The charset should match the language that is used in the body of the email.
To submit the changes, click [OK]. To cancel editing without submitting any changes, click
[Cancel].
Many changes and updates have been added to the Formula Calculation system drop-in
{{*Calc}}. The following sections will give you a summary of what has changed.
|
•
|
Number – The value is an integer number in the following range:
|
|
•
|
Text – The value is a character string that may contain any sequence of characters, including an empty sequence.
|
|
•
|
Boolean – The value is a boolean value, either true or false.
|
|
•
|
Number Set – The value is a set of numbers that is a collection of distinct values of the type number. That is, each number can be contained only once. The set can either have no elements (an empty set), single elements, or any number of elements.
|
|
•
|
Text Set – The value is a set of text strings. Similar to a number set, a text set is a collection of distinct values of the text type that can have zero, one, or several elements.
|
Operators and functions usually require their operands and arguments to be of a certain type. However, under some circumstances it is possible to supply an expression of a different type as an operand or argument, which will then automatically be converted to the required type.
|
•
|
Automatic conversion to Text – Whenever an operand or argument of type Text is required, an expression either of type Text or of type Number can be supplied. In the latter case, the number will then first be converted into a text before the operator or function is applied. For this conversion, the number-value is simply converted into the corresponding string representation, for example the number 157 becomes the text string "157".
|
|
•
|
Automatic conversion to Number Set – Whenever an operand or argument of type Number Set is required, an expression either of type Number Set or of type Number can be supplied. In the latter case, the number will then first be converted into a number set with a single element, before the operator or function is applied.
|
|
•
|
Automatic conversion to Text Set – Whenever an operand or argument of type Text Set is required, an expression either of type Text Set, Number Set, Text or Number can be supplied. In the latter cases, a conversion to Text Set will be performed before the operator or function is applied:
|
Calculation formulas are now available in the context of the special *Calc system drop-in, in the condition tree of target groups of the Dataset or Hosted Recipient List type, and in the derivation rule of a derived profile field in a dataset or hosted recipient list. Because of this, a few of the existing expressions have been updated. See Section 1.20.3.1
Standard Merge Field Expressions and Section 1.21.3.2
Optional Merge Field Expressions for details.
Restriction: Standard merge field expressions are only allowed if the formula is used in one of the following contexts:
|
•
|
In a *Calc system drop-in of a job with the following recipient types:
|
If the system drop-in is used in a job with a different recipient type, the formula must not contain any merge field expressions. If it does, an error message will be displayed about this during test delivery.
Type: Standard merge field expressions can be of type Number, Text, Boolean or Text Set, depending on their context and content (see "Type Determination" below for details).
Usage: To include a standard merge field in a formula, type the merge field name enclosed in (&) and (;). Only use merge field names that are actually defined in the recipient list.
Type Determination: Whenever any such merge field appears in a formula, it will first be replaced with the field value for the current recipient. This occurs before the result of the formula is calculated for that recipient. To be able to do this calculation, the expression's type is determined as follows:
|
•
|
If the formula is used in a *Calc system drop-in with the recipients types "uploaded CSV text file" or "LISTSERV Maestro selects from a database", then the type of the field is determined by the field's content as follows:
|
Special Note for "Datasets" and "Hosted Recipient Lists": If the formula is used in the condition tree of a "Dataset" or "Hosted Recipient List" target group or in a
*Calc system drop-in together with recipients based on such a target group, then there are special rules for profile fields of type "Number" or "Text". If such a profile field is defined in the dataset or hosted recipient list as "optional" then this field can not be used in a "standard merge field" expression. Instead, use the "optional merge field" expression instead (see next section.)
Restriction: Optional merge field expressions are only allowed if the formula is used in one of the following contexts:
|
•
|
In a *Calc system drop-in of a job with the following recipient types:
|
If the system drop-in is used in a job with a different recipients type, the formula must not contain any merge field expressions. If it does, an error message will be displayed about this during test delivery.
Type: Optional merge field expressions can either be of type Number or of type Text, depending on their context and content (see "Type Determination" below for details).
Usage: Optional merge fields are fields that may be undefined (empty) for at least some recipients in the recipient list. If such a field would be used normally in a formula, it would not be possible to calculate the result of the formula for those recipients. Therefore, such "possibly undefined" fields must be included as "optional merge field" expressions, not as "standard merge field" expressions. An optional merge field expression is written in the following way:
The whole expression must be enclosed in brackets "[" and "]". Between the brackets the name of the merge field to be addressed appears first, enclosed with (&) and (;), then the default content that will be used for all recipients where the merge field is undefined.
Note: The second example defines an empty text as the default for
&NAME;.
Type Determination: Whenever any such merge field appears in a formula, it will first be replaced with the field value for the current recipient, or if that value is undefined or empty, it will be replaced with the given default. Next, the result of the formula is calculated for that recipient. To be able to do this calculation, the expression's type is determined just like for "standard merge field" expressions.
In addition, if the field's value is empty or undefined, the type will be determined by the type of the given default. Therefore, make sure that the type of the default matches the field's type or is at least convertible to that type.
Special Note for "Datasets" and "Hosted Recipient Lists": If the formula is used in the condition tree of a "Dataset" or "Hosted Recipient List" target group or in a
*Calc system drop-in together with recipients based on such a target group, then only profile fields of type "Number" or "Text" can be used in an "optional merge field" expression, and also only if that field is actually defined as "optional". For fields of other types, or for fields that are defined as "mandatory", use the "standard merge field" expression instead (see previous section.)
Restriction: None. Constant boolean expressions can be used in any formula.
Type: Constant boolean expressions are, as the name implies, always of type Boolean.
Usage: To include a constant boolean in a formula, simply type either "true" or "false" (without the quotes).
Restriction: Target group parameter expressions are only allowed if the formula is used in the condition tree of a "Dataset" or "Hosted Recipient List" target group. They must not be used in a formula of a
*Calc system drop-in.
Type: Either Number or Text, depending on how the parameter is specified (see below).
Usage: A target group parameter is a parameter that is specified during target group definition, but whose value is not yet known at that time. The parameter will later be "filled out" with content by a user choice made in the recipients wizard, when the target group is used for recipient definition.
To include a target group parameter in a formula, simply type the name of the parameter enclosed in double curly brackets "{{" and "}}". The parameter name must only contain the characters "A" to "Z", "a" to "z", "0" to "9" and the underscore "_".
If a parameter is enclosed with quotes (") like a text string, its content is interpreted as Text. If it is not enclosed in quotes, its content is interpreted as Number, so it is important to make sure that all possible parameter values are indeed valid numbers (for type "number").
Notes: If you include the same parameter name several times in the same formula, it will be interpreted as one parameter that simply appears several times. All appearances will have the same content value and must also all appear in the same type context as Number or Text and they must either all be enclosed in quotes to be interpreted as Text parameters, or none of them must be enclosed in quotes (to be interpreted as Number).
Similarly, if a parameter is used with the same name in the same target group but outside of a formula or in a different formula, then all these appearances of the parameter name (in the same target group) will reference the same parameter. All of them will be replaced with the same final content during usage in the recipients wizard.
Note: In LISTSERV Maestro, division is strictly an integer division; therefore, any decimal places in the result are discarded (not rounded off, but simply ignored).
Notes: If only one operand is of the Text type and the other is of the Number type, then this number operand will automatically be converted into a text before the operator is applied.
Text comparisons are case sensitive, so "this" is not equal to "THIS".
Also the "less-than" and "greater-than" comparisons are based on the character ordering of the Unicode standard, which makes a difference between lowercase and uppercase characters. For example, even though "ABC" < "XYZ" is true, "abc" < "XYZ" is not true, because in Unicode all uppercase characters come before all lowercase characters.
If you need to perform a case insensitive comparison, you should first convert both operands to the same case (either lowercase or uppercase) using the "ToLower(arg)" or "ToUpper(arg)" functions.
If only one operand is of type Set and the other is of type Text or Number, or if both operands are sets, but one is of type Number Set and the other of type Text Set, then the following conversion will automatically be performed before the operator is applied:
|
•
|
One operand is of type Text Set: Depending on the type of the other operand, one of the following conversions may be performed:
|
|
•
|
Number – The number operand is converted into a text set by creating a new set with a text representation of the number as the single element of the set. After this, both operands are of type Text Set and the set operator can be applied to them.
|
|
•
|
Text – The text operand is converted into a text set by creating a new set with the text as the single element of the set. After this, both operands are of type Text Set and the set operator can be applied to them.
|
|
•
|
Number Set – The number set operand is converted into a text set by creating a new set that contains text representations of all numbers in the number set. After this, both operands are of type Text Set and the set operator can be applied to them.
|
|
•
|
Text Set – No conversion necessary. Both operands are of type Text Set and the set operator can be applied to them.
|
|
•
|
One operand is of type Number Set: If the other operand is of type Text Set, then we are dealing with a case that was already described above. If the other operand is not of type Text Set, then depending on the type of the other operand, one of the following conversions may be performed:
|
|
•
|
Number – The number operand is converted into a number set by creating a new set with the number as the single element of the set. After this, both operands are of type Number Set and the set operator can be applied to them.
|
|
•
|
Text – The text operand is converted into a text set by creating a new set with the text as the single element of the set. In addition, the Number Set argument itself is also converted into a text set by creating a new set that contains text representations of all numbers in the number set. After this, both operands are of type Text Set and the set operator can be applied to them.
|
|
•
|
Number Set – No conversion necessary. Both operands are of type Number Set and the set operator can be applied to them.
|
Operators with higher precedence are processed first. If several operators with the same precedence level are encountered, they are processed from left to right. Parenthesis can be set freely to influence precedence where inner parenthesis will be processed before outer parenthesis.
15 + 3 * 4 Result: 27
8 * (7 - 3) Result: 32
17 * 22 / 2 % 5 Result: 2
17 * (22 / 2 % 5) Result: 17
17 * (22 / (2 % 5)) Result: 187
|
•
|
IsNum – Checks if the given argument can be converted into a number.
|
|
•
|
ToNum – Converts any non-number data type into a number.
|
|
•
|
If – Evaluates a condition and determines one of two possible values as a result.
|
|
•
|
Count – Counts all elements in a set.
|
|
•
|
In – Determines if a set contains a certain element.
|
|
•
|
SetOf – Builds a set out of a list of elements.
|
|
•
|
SetToString – Converts a set into a string by listing all elements in the set.
|
|
•
|
SetToStringWithMaxLen – Converts a set into a string (with a maximum length) by listing all elements in the set.
|
|
•
|
IsDate – Checks if a textual date/time representation is valid.
|
|
•
|
ToMillis – Converts a textual date/time representation into a milliseconds time value.
|
|
•
|
SecondaryValue – Retrieves the secondary values fro a single/multiple select profile field.
|
Function: Checks if the given argument can be converted into a number or set of numbers. Returns "true" if the argument can be converted into a number or set of numbers, "false" if not.
This function is a companion function to “ToNum”: If
IsNum returns "true" for a given argument, then it is safe to use
ToNum on the same argument (i.e.
ToNum will not generate an error when used with the same argument).
|
•
|
arg - This argument can be of any type:
|
|
•
|
Text: The text is parsed and an attempt is made to convert it into a number. If this is successful, then "true" is returned, otherwise "false".
|
|
•
|
Text Set: All elements in the set are parsed and converted into numbers. If this is successful for all elements in the set, then "true" is returned, otherwise "false".
|
|
•
|
Boolean: Always results in a return value of "true".
|
Function: Tries to convert the given argument into a number or set of numbers. It generates a runtime error if that is not possible (for example, if the argument is a text that contains characters that are not part of a number representation, like letters). If you are unsure if a certain argument can be converted into a number without an error, and you want to avoid this error, then use the companion function
IsNum to first check if the argument can be converted at all, together with the function
If.
This function can, for example, be used to convert a profile field of type Text, which only contains numbers, to the type Number, which can then be used in contexts that require the type Number (such as number operators and functions that require a number argument).
Return-Type: Number or Number Set
|
•
|
arg - This argument can be of any type:
|
|
•
|
Text: The text is parsed and an attempt is made to convert it into a number. This is possible if the text contains only digits and optionally a leading minus sign (otherwise an error is generated). A single number is returned.
|
|
•
|
Text Set: All elements in the set are parsed and converted into numbers (if possible, otherwise an error is generated). A Number Set that contains all these numbers is returned.
|
|
•
|
Boolean: The boolean value "true" is converted into the number "1", the boolean value "false" is converted into the number "0". This number is then returned.
|
ToNum("12345")
ToNum(&AGE;)
ToNum(true)
ToNum("123" + "456")
If(IsNum(&TEXTFIELD;), ToNum(&TEXTFIELD;), 0)
Notes: The result of the second-to-last example will not be the number 579, but will instead be the number 123456. The string concatenation operator "+" is first applied to the two text strings and then the resulting string is converted into a number.
The last example shows how ToNum is used together with
IsNum and If, to make sure that no runtime error is generated: If the field TEXTFIELD contains a number, then this number is supposed to be used. If not, then instead the default of "zero (0)" is to be used. So the result of this If function is in turn a number: Either the number that was parsed from TEXTFIELD, or the number "0". Thus, the result of the If function can safely be used in a context where a Number type is required, without fearing a runtime error if TEXTFIELD should contain a non-number text.
Function: Evaluates the "condition" and returns either the "value1" (if the condition is "true") or the "value2" (if the condition is "false").
Return-Type: Depends on "value1" and "value2" (see below).
|
•
|
condition - This argument can be of type Boolean, and its the condition to evaluate.
|
|
•
|
value1 - This argument can be of any type (see below), and its the value to return if the condition evaluates to "true".
|
|
•
|
value2 - This argument can be of any type (see below), and its the value to return if the condition evaluates to "false".
|
Note: Even though "value1" and "value2" can be of any type, the types of these two values must either be the same, or one type must be convertible into the other. If both types are the same, then this is also the return type of the function. If the types are different, but one type can be converted into the other type, then this other type is the return type of the function (even if the value with the first type should be selected by the condition). For details on conversions, see
Auto Type-Conversion.
Function: Counts and returns the number of elements in the given set.
|
•
|
set - This argument can be of type Text Set or Number Set, and its the set to count the elements of.
|
Function: Checks if the given "element" is contained in the given "set". Returns "true" if the element is found in the set, or "false" if not.
|
•
|
element - This argument can be of type Number or Text, and its the element to look for.
|
|
•
|
set - This argument can be of type Number Set or Text Set, and its the set to search in.
|
Function: Returns a set that contains all arguments. If some arguments are also sets, then the resulting set will contain all elements from these sets individually (i.e. the resulting set will not contain the other sets themselves as its elements, but rather will contain all elements from these other sets). If no argument is given at all, then an empty set is returned.
Return-Type: Number Set or Text Set, depending on the arguments (see below).
Arguments: (All arguments are optional)
|
•
|
arg1 - This argument can be of any type, except Boolean. The first element to include in the result set.
|
|
•
|
argN - This argument can be of any type, except Boolean. The Nth (and last) element to include in the result set.
|
If any of the arguments is of type Text or Text Set, then the resulting set will also be a Text Set. If all arguments are either of type Number or Number Set, then the resulting set will be a Number Set. Arguments of type Boolean are not allowed.
SetOf(3, 19882, -4, 3371)
SetOf("abc", "def", "ghi")
SetOf("abc", 15, SetOf("xyz", "qvw"), 28, "def")
SetOf(&VALUE1;, "xyz", &MULTI_SELECT_FIELD;)
Function: Converts a set into a text string by listing all values in the set (if any), separating them with a specified separator character and optionally also enclosing the values in specified delimiters.
Important: The final result of a formula in a
*Calc system drop-in must not exceed the maximum length of 900 characters. Similarly, if the formula is used in the derivation rule of a derived profile field (in a dataset or hosted list), then the result must not exceed the maximum length of 100 characters. Using
SetToString in a formula does increase the danger of exceeding these limits, especially if the result of the function is also used as the direct result of the formula (without further processing by other functions), and if the set contains a large number of values (e.g. this may easily be the case if the set is defined by a multiple-select merge field). In such a situation, the mail job delivery may fail (if used in a
*Calc system drop-in) or the recalculation of the derived profile field may fail (if used in a derivation rule). If in doubt, it may be better to use the
SetToStringWithMaxLen function instead, which allows you to control the output length of the result. If the formula is used in the condition tree of a "Hosted Recipient List" target group, then such a restriction does not apply.
|
•
|
set - This argument can be of type Number Set or Text Set, and its the set that is to be converted into a text.
|
|
•
|
default - This argument can be of type Text, and it defines the default text that shall be the result of the function if the given set is empty. If not specified, then an empty text string is used as the result for an empty set. This argument is optional.
|
|
•
|
separator - This argument can be of type Text, and its the separator text that is to appear between two values. The separator will only appear between values, i.e. it will not appear before the first or after the last value. So if the set has less than two elements, the separator will not appear at all. Note, that "separator" may be any text, not only a single character. If not specified, the comma "," is used by default as the separator. This argument is optional but may be supplied if the "default" argument has been supplied too.
|
|
•
|
delimiter - This argument can be of type Text, and its the delimiter text that is to be used to enclose values. In some situations, it may happen that the values from the set already contain the chosen "separator" as part of their value texts. In such a case, the occurrences of the separator text in the values may be confusing, as such an occurrence may be misinterpreted as an actual separator, after which a new value starts, while it actually is only part of the value. To avoid this, it is possible to enclose the values in delimiters, to better mark the beginning and end of a value (if such a value then contains the separator text, then this does not matter, as the end of the value is no longer marked by the separator, but instead by the delimiter). For this, the "delimiter" argument can be used. If specified, then individual values may be enclosed in the specified delimiter text (depending on the "delimitAll" argument, see below). If a value is enclosed with delimiters, and the value itself also already contains the delimiter text, then this delimiter text is escaped (in a way depending on the "delimiterEscape" argument, see below). Note that "delimiter" may be any text, not only a single character. If not specified, then values are never enclosed with extra delimiters. This argument is optional but may be supplied if the "default" and "separator" arguments have been supplied too.
|
|
•
|
delimitAll - This argument can be of type Boolean. If set to "true", then all values will be enclosed with the given delimiter text. If set to "false", then only values that actually contain the separator text will be enclosed with delimiters. If not specified, then all values will be enclosed with delimiters (default is "true"). This argument is optional but may be supplied if the "default", "separator" and "delimiter" arguments have been supplied too.
|
|
•
|
delimiterEscape - This argument can be of type Text, and it defines which text will be used to escape an occurrence of the delimiter text in a value. If a value is enclosed with delimiters, but the value already contains the delimiter text itself, then this contained delimiter text could be confused with the end-delimiter, that ends the value. Therefore, if the delimiter text appears in the value, it needs to be "escaped". The escaping is done by inserting the "delimiterEscape" text just before the delimiter text in the value. If "delimiterEscape" is not specified, then the delimiter text itself will be used for escaping, i.e. this has the effect, that if the delimiter text appears in the value, then it will be escaped by doubling it. For example: If the delimiter text is the standard quote character <">, and the value already contains quotes, like this: <value "contains" quotes>. And if no "delimiterEscape" is specified, so that the default is applied, then the escaped value will contain "doubled" quotes, like this: <value ""contains"" quotes>. If instead for example the backslash is supplied for "delimiterEscape", then the escaped value will look like this: <value \"contains\" quotes>. Note that "delimiterEscape" may be any text, not only a single character. This argument is optional but may be supplied if the "default", "separator", "delimiter" and "delimitAll" arguments have been supplied too.
|
SetToString(&MULTI_SELECT_FIELD;)
SetToString(&MULTI_SELECT_FIELD;, "empty")
SetToString(&MULTI_SELECT_FIELD;, "empty", "; ")
SetToString(&MULTI_SELECT_FIELD;, "empty", "; ", "'")
SetToString(&MULTI_SELECT_FIELD;, "", "; ", "'", false)
SetToString(&MULTI_SELECT_FIELD;, "", "; ", "'", true, "\")
Function: This is a specialized version of the
SetToString function.
SetToStringWithMaxLen also converts a set into a text string, but observes a given maximum text length, by listing only so many values from the set as may fit into the maximum length. Similarly to
SetToString, the values are separated with a specified separator character and optionally enclosed in the specified delimiters. If not all values fit the maximum length, then optionally an omission text may be appended.
The SetToStringWithMaxLen function is useful if you want to make sure that the final output length of the converted set does not exceed a certain limit. For example the maximum of 900 characters if the formula is used in a
*Calc system drop-in, or 100 characters if the formula is used in the derivation rule of a derived profile field.
|
•
|
set - This argument can be of type Number Set or Text Set, and its the set that is to be converted into a text.
|
|
•
|
maxlen - This argument can be of type Number, and its the maximum length for the resulting text. If a positive "maxlen" is supplied, then the returned text will never be longer than this value (although it may be shorter if there are not enough elements in the set). If "0" or a negative "maxlen" is supplied, the returned text will always be an empty text string.
|
|
•
|
omissionText - This argument can be of type Text: If at least one of the elements from the set has to be left out from the enumeration because of the specified "maxlen", then this "omissionText" will be appended to the resulting text, to signify that some values have been left out. this argument is optional.
|
Note: The length of the omission text also counts against the given maximum length. So if an omission text is to be appended (because some values have been left out), but with the omission text the result would then be too long, then even more values will be left out, until there is enough space to fit in the omission text too. If you do not want an omission text to appear at all, then specify an empty text string "" for this argument.
Special Feature: If inside of the omission text you specify the placeholder #COUNT (with this exact spelling, in all UPPERCASE), then this placeholder will be replaced with the number of omitted elements before the omission text is appended. So if you for example specify the text "and #COUNT more", and in the result twelve elements have been omitted, then the omission text in the result will read "and 12 more". If not specified, then "..." is used as the default omission text. The remaining arguments "default", "separator", "delimiter", "delimitAll" and "delimiterEscape" work exactly as with the
SetToString function. Please see there for details. These arguments are optional but may be supplied if the "omissionText" argument has been supplied too.
SetToStringWithMaxLen(&MULTI_SELECT_FIELD;, 100)
SetToStringWithMaxLen(&MULTI_SELECT_FIELD;, 100, " and more...", "empty")
SetToStringWithMaxLen(&MULTI_SELECT_FIELD;, 200, " and #COUNT more...", "empty", "; ")
SetToStringWithMaxLen(&MULTI_SELECT_FIELD;, 200, "", "empty", "; ", "'")
SetToStringWithMaxLen(&MULTI_SELECT_FIELD;, 200, "", "", "; ", "'", false)
SetToStringWithMaxLen(&MULTI_SELECT_FIELD;, 200, "", "", "; ", "'", true, "\")
Function: Checks if the given format specifications can be used to correctly parse a numerical date/time value from the given "datetext" text argument. Returns "true" if a date/time value can be correctly parsed from the arguments, "false" if not.
This function is a companion function to ToMillis. If
IsDate returns "true" for a given set of arguments, then it is safe to use
ToMillis on the same set of arguments (i.e.
ToMillis will not generate an error when used with the same arguments).
Please see Date and Time Patterns for details about how to write the format pattern.
Note: For formatting purposes, LISTSERV Maestro will by default use the U.S. locale and the time zone of the server where the LUI component is running. Therefore, locale specific texts, like weekday names, names of months, and so on, will be formatted using the U.S. locale. Similarly, times will be formatted using the server's time zone. If you want to specify a different locale, you can do so with the optional parameter "localename" to choose a predefined locale or with the optional parameters "langcode" and "countrycode" to specify your own locale. See
Predefined Locales for details. If you want to specify the time as relative to a different time zone, you can include a time zone value in the date/time text.
|
•
|
datetext - This argument can be of type Text, and its the date/time text string to parse. Must contain the desired date/time in a textual format that can be parsed by applying the given format pattern.
|
|
•
|
formatpattern - This argument can be of type Text, and it specifies the format pattern to use to parse the "datetext".
|
|
•
|
localename - This argument can be of type Text, and its the name of a predefined locale. If specified, any locale specific text in "datetext" will be expected according to this locale. This argument is optional. Either you supply no further argument at all or you only supply this argument.
|
|
•
|
langcode - This argument can be of type Text, and its a lowercase two-letter ISO-639 language code specifying the language for the locale. For example, see here http://ftp.ics.uci.edu/pub/ietf/http/related/iso639.txt for one list of the ISO-639 language codes. This argument is optional. Either you supply no further argument at all or you supply both the following this argument and the next.
|
|
•
|
countrycode - This argument can be of type Text, and its an uppercase two-letter ISO-3166 country code specifying the country for the locale. For example, see here http://www.iso.org/iso/country_codes/iso_3166_code_lists.htm for one list of the ISO-3316 country codes. If "langcode" and "countrycode" are specified, they are used to create a locale for the given language and country, and any locale specific text in "datetext" will be expected according to this locale.
|
IsDate("February 22. 2004", "MMMM dd. yyyy")
(parses the given date using the default U.S. locale)
IsDate("Februar 22. 2004", "MMMM dd. yyyy", "Germany")
(parses the given date using the pre-defined locale for Germany)
IsDate("februari 22. 2004", "MMMM dd. yyyy", "de", "AT")
(parses the given date using a custom locale for language "de" =German and country "AT" =Austria)
Function: Returns the numerical value representing the date/time as parsed from the "datetext" argument, where the numerical value specifies the date/time in milliseconds since "Jan. 1st 1970, 00:00:00 GMT" (which can, for example, then be compared to the output of the functions
CurrentMillis and
SubscribeTimeMillis, or be used as input to
ToDate.
It generates a runtime error if there is a parse error. If you are unsure if a certain "datetext" and "formatpattern" can be parsed without an error, and you want to avoid this error, then use the companion function
IsDate to first check if the arguments can be parsed at all, together with the function
If (see the examples below.)
Note: For formatting purposes, LISTSERV Maestro will by default use the U.S. locale and the time zone of the server where the LUI component is running. Therefore, locale specific texts, like weekday names, names of months, and so on, will be formatted using the U.S. locale. Similarly, times will be formatted using the server's time zone. If you want to specify a different locale, you can do so with the optional parameter "localename" to choose a predefined locale or with the optional parameters "langcode" and "countrycode" to specify your own locale. See
Predefined Locales for details. If you want to specify the time as relative to a different time zone, you can include a time zone value in the date/time text.
|
•
|
datetext - This argument can be of type Text, and its the date/time text string to parse. Must contain the desired date/time in a textual format that can be parsed by applying the given format pattern.
|
|
•
|
localename - This argument can be of type Text, and its the name of a predefined locale. If specified, any locale specific text in "datetext" will be expected according to this locale. This argument is optional. Either you supply no further argument at all or you only supply this argument.
|
|
•
|
langcode - This argument can be of type Text, and its a lowercase two-letter ISO-639 language code specifying the language for the locale. For example, see here http://ftp.ics.uci.edu/pub/ietf/http/related/iso639.txt for one list of the ISO-639 language codes. This argument is optional. Either you supply no further argument at all or you supply both the following this argument and the next.
|
|
•
|
countrycode - This argument can be of type Text, and its an uppercase two-letter ISO-3166 country code specifying the country for the locale. For example, see here http://www.iso.org/iso/country_codes/iso_3166_code_lists.htm for one list of the ISO-3316 country codes. If "langcode" and "countrycode" are specified, they are used to create a locale for the given language and country, and any locale specific text in "datetext" will be expected according to this locale.
|
ToMillis("February 22. 2004", "MMMM dd. yyyy")
(parses the given date using the default U.S. locale)
ToMillis("Februar 22. 2004", "MMMM dd. yyyy", "Germany")
(parses the given date using the pre-defined locale for Germany)
ToMillis("februari 22. 2004", "MMMM dd. yyyy", "de", "AT")
(parses the given date using a custom locale for language "de" =German and country "AT" =Austria)
If(IsDate(&FIELD;, "MMMM dd. yyyy"), ToMillis(&FIELD;, "MMMM dd. yyyy"), 0)
(checks if FIELD contains a date that can be parsed with the given pattern and the default U.S. locale, and if so, returns the numerical representation of this date, otherwise returns the default "zero (0)".)
Function: This is an alternative method to retrieve the selected value of a single-select profile field, or the selected values of a multiple-select profile field. If such a profile field is included in the formula as a standard merge field (simply by supplying its merge field name &NAME;), then what you get is the currently selected entry name (for single-select) or a set of the currently selected entry names (for multiple-select). While this is usually the desired behavior, in special cases a different behavior may be required:
This is what is done with this function: It retrieves the currently selected secondary value as a return value of type Text (for single-select), or the set of currently selected secondary values as a return value of type Text Set (for multiple-select) of the specified single/multiple-select profile field. From which secondary column the values are retrieved is specified with the
secondaryColumnName argument.
Note: If this function is used to retrieve the secondary values of a multiple-select profile field, then the resulting set may have less elements than there are currently selected values for the profile field. This is because secondary values are not necessarily unique. So two or more of the selections of a certain subscriber could actually have the same secondary value. And since the return value of the function is a set (for multiple-select), and a set contains each element only once, those selections will result in only one entry in the resulting set.
Restriction: Can only be used in the derivation rule formula of a derived profile field, or in a formula in the condition tree of a "Dataset" or "Hosted Recipient List" target group, or in a "*Calc" system drop-in together with recipients based on such a target group. Will not be accepted in formulas for a different recipients type! Also, the specified profile field must be a single or multiple select field. Fields of other types will not be accepted. In addition, the specified
secondaryColumnName must be the name of a secondary column that is defined in the lookup table on which the profile field is based.
Important: Please remember that the secondary column is referenced in this function by name only. So if you use this function in a formula anywhere, and then later edit the name of the secondary column in the lookup table definition (or delete the secondary column from the lookup table), then this will not automatically change the formula too. The effect will be, that the formula becomes invalid, as it now references a non-existent secondary column. This in turn could for example cause mail job delivery errors (if the function is used in a *Calc formula, or in a target group condition tree), or prevent the re-calculation of a derived profile field value (if the function is used in the derivation rule formula of a derived field).
Therefore, take care when renaming or deleting secondary lookup table columns and, if necessary, also edit/repair any formulas that make use of such columns.
Return-Type: Text or Text Set
|
•
|
&MERGE_FIELD; - (single or multiple select profile field): This argument must be the name of a merge field (complete with the starting "&" and the closing ";") that corresponds with a single/multiple select profile field in the dataset or hosted recipient list. It can not be a constant value (a number, text, boolean or set).
|
|
•
|
secondaryColumnName - This argument can be of type Text. It must specify the name of a secondary column in the lookup table that is associated with the specified &MERGE_FIELD;.
|
The system drop-in for the multiple selection fields has been deprecated. It is still available for backwards compatibility with existing email jobs. For LISTSERV Maestro 4.0, please use the Formula Calculation system drop-in
{{*Calc}}, with the "
Count" and "
SetToStringWithMaxLen" functions, as well as the "=", "<>", "<", "<=", ">", and ">=" set comparison operators.
The format of the date and time patterns must be specified for the functions “ToDate” and “
ToMillis” to convert a numerical date/time value (represented in milliseconds since “Jan. 1
st 1970, 00:00:00 GMT”) into a formatted output string or vice versa.
The pattern format described here applies to the formatting process, when a numerical date/time value is converted into a formatted text string, and to the parsing process, when a text string is parsed to convert it back into the numerical date/time value.
Important: For date/time formatting and parsing, by default the U.S. locale and the current time zone of the server where the Maestro User Interface (LUI) component is running is used. This means that if locale specific values (names of months, weekdays, era-designators, and the like) are required, they will be given as the U.S. locale values by default. Similarly, if a time is given, it will be formatted (or interpreted) as relative to the time zone of the server (although for parsing a specific time zone can be supplied). If the default U.S. locale is not desired, specify a locale in the “
ToDate” or “
ToMillis” function.
Date and time formats are specified by pattern strings. Within pattern strings, unquoted letters from ‘
A’ to ‘
Z’ and from ‘
a’ to ‘
z’ are interpreted as pattern letters representing the components of a date or time string (see below for details). Text can be quoted using single quotes <
'> to avoid interpretation. In a quoted text, the “double” single quote <
''> represents a single quote. All other characters are not interpreted; they are simply copied into the output string during formatting or matched against the input string during parsing.
The following pattern letters are defined (all other characters from ‘A’ to ‘
Z’ and from ‘
a’ to ‘
z’ are reserved). The letters are case-sensitive. The same letter has different meanings in its uppercase or lowercase version. Each pattern letter has a specific “presentation” in the created final string (during formatting) or in the parsed string (during parsing). For example, presentation types may be
Text,
Number,
Year or similar. More details about the presentations and their meanings follow below.
Notes: The value of “calendar week in year” and “calendar week in month” depends on the locale that is used. The locale determines the conventions about which weekday is interpreted as the first day of the week (usually “Monday” or “Sunday”) and under which circumstances a week that falls partially into one year (or month) and partially into the next, is interpreted as belonging to the one year (or month) or the other. The “weekday ordinal in month” indicates the ordinal number of the weekday of the given date/time in the given month. For the first Monday in a month, the ordinal is “1”, as it is for the first Tuesday, Wednesday and so on. For the second Monday in a month, the ordinal is “2”, and so on.
|
•
|
Text: For formatting, if the number of pattern letters is four or more, the full form is used; otherwise, a short or abbreviated form is used if available.
|
|
•
|
Number: For formatting, the number of pattern letters is the minimum number of digits, and shorter numbers are zero-padded to this amount.
|
|
•
|
Year: For formatting, if the number of pattern letters is two, the year is truncated to 2 digits; otherwise it is interpreted as a “Number” (see above).
|
For parsing with the abbreviated year pattern (“y” or “
yy”), LISTSERV Maestro must interpret the abbreviated year relative to some century. It does this by adjusting dates to be within 80 years before and 20 years after the current time. For example, using the pattern “
MM/dd/yy” on Jan. 1, 1997, the text “
01/11/12” would be interpreted as Jan. 11, 2012, while the text “
05/04/64” would be interpreted as May 4, 1964. During parsing, only strings consisting of exactly two digits will be parsed into the default century. Any other numeric string, such as a one digit string, a three or more digit string, or a two digit string that is not all digits (for example “
-1”), is interpreted literally. Therefore, “
01/02/3” or “
01/02/003” are parsed, using the same pattern, as Jan. 2, 3 AD. Likewise, “
01/02/-3” is parsed as Jan. 2, 4 BC.
|
•
|
Month: If the number of pattern letters is one or two, the month is interpreted as “Number”, if it is 3 or more, it is interpreted as “Text”. Therefore, if the month is interpreted as “Number” or “Text”, the applicable “Number”/ “Text” interpretation rules apply (see above). For example: 1 letter will be a “Number” that is not padded, 2 letters will be a “Number” that is padded, 3 letters will be a “Text” using the abbreviated form and 4 or more letters will be a “Text” using the long form.
|
|
•
|
General time zone: For formatting, the time zone is handled as “Text” if it has a name. If not, it is given as a GMT offset value in the format “ GMT[+|-]HH:MM”, where “ HH” is the hours between 0 and 23 (one or two digits, may be zero-padded to the left) and “ MM” is the minutes between 00 and 59 (always two digits, zero-padded to the left if necessary). For example, “ GMT+8:00”, “ GMT+08:00”, “ GMT-12:45”.
|
|
•
|
RFC 822 time zone: For formatting, the RFC 882 4-digit time zone format is used: “ [+|-]HHMM”, where “ HH” is the hours as two digits, between 00 and 23 (zero-padded to the left if necessary) and “ MM” is the minutes as two digits, between 00 and 59 (zero-padded to the left if necessary).
|
|
•
|
Time zone parsing: For parsing of a time zone, it does not matter if the format pattern specifies a “General time zone” or a “RFC 822 time zone”: In both cases, all three types of time zone specifications are accepted:
|
The following examples show how date and time patterns are interpreted in the default U.S. locale with the “U.S. Pacific Time” time zone. The given date and time are “
2001-07-04 12:08:56” local time in that time zone.
When specifying a locale to be used for date/time formatting in "ToDate" or for parsing in ToMillis, you can either specify the specific ISO codes of the desired country and language (see "ToDate" and "ToMillis”), or you can simply specify one of the following predefined locale names, which stands as a shortcut for the given language and country combination..
The Upload wizard that LISTSERV Maestro uses to assist the data administrator with modifying the data in an existing dataset or list has changed. The wizard is now considered an Import Members or Import Subscribers wizard and allows the data administrator to import recipients from a database directly into the Recipient Warehouse without having to first export the data into an CSV-file. Now all the data administrator has to do is specify a user database connection and a select statement to directly pull the recipients from that database.
When the option is selected, click the Database Plugin drop-down menu to select the database you’d like to import recipients from. Once you’ve selected the database, the Source screen refreshes and contains fields for your database information, such as
Database Name,
SQL Server User Name,
Password,
Database Host Name, and
TCP/IP Port or Instance Name.
For those occasions where you’d like to manage your dataset members or list subscribers on a regular basis, LISTSERV Maestro 4.0 now contains a feature that allows you to define these member or subscriber imports once. This lets you store these settings and run the import whenever necessary.
To define a Recipient Import for a dataset, go to the Recipient Warehouse, click on the dataset you’d like to work with, click on the
Dataset menu, select
Member Importer, and then select
New Member Importer. The Edit Member Importer wizard open. This wizard mirrors the Import Members wizard. Define each page as you would the Import Members wizard (see Section 1.22
Importing from a Database Directly into the Recipient Warehouse for details).
Once you’re finished defining the Member Importer, it will be listed on the Member Importers screen. To access this screen, click on the
Dataset menu, click on
Member Importer, and then select
Member Importers.
To define a Recipient Import for a list, go to the Recipient Warehouse, and then click on the dataset that contains the list you’d like to work with. From the Recipient Dataset Details screen, click on the list name, click on the
Hosted List menu, select
Subscriber Importer, and then select
New Subscriber Importer. The Edit Subscriber Importer wizard open. This wizard mirrors the Import Subscribers wizard. Define each page as you would the Import Subscribers wizard (see Section 1.22
Importing from a Database Directly into the Recipient Warehouse for details).
Once you’re finished defining the Subscriber Importer, it will be listed on the Subscriber Importers screen. To access this screen, click on the
Hosted List menu, click on
Subscriber Importer, and then select
Subscriber Importers.
Before the Recipient Importer can be used, it needs to be enabled. To enable, click the Enable link. If you no longer want the importer available for use, but you don’t want to permanently delete it, then click the
Disable link. The Recipient Importer will remain on the Member Importer/Subscriber Importer screen.
To edit a Recipient Importer, click the Edit link associated with that importer. The Edit Member Importer/Edit Subscriber Importer wizard opens.
To delete a Recipient Importer, click the Delete link associated with that importer.
To run a Recipient Importer, click the Launch link associated with that importer. The Import Member/Import Subscriber wizard runs automatically according to the settings you defined for the Recipient Importer.
In order to trigger the launch externally, the external process or application has to access the server where the LISTSERV Maestro User Interface (LUI) is running via HTTP (or HTTPS, depending on your setup). In addition, a security token must be obtained.
Note about Security Tokens: Since triggering a launch externally is a highly privileged operation, LISTSERV Maestro requires that the external process or application delivers a security token for authorization. This security token is assigned internally by LISTSERV Maestro.
To obtain the security token, simply click the Show Launch Security Token link to open a popup box. Copy the security token from this box and make sure that the external process or application accesses the URL described above, replacing
[SECURITY_TOKEN] with the value pasted value from the popup box.
Note: To create a new security token, click the
Create New Launch Security Token link in the popup box. Once a new security token is created, the old token is no longer valid and cannot be used to trigger a job externally.
where SERVER_NAME is replaced with the name of your LISTSERV Maestro server. If a non-standard HTTP port is used, also include the port separated with a colon ":". If access to your LISTSERV Maestro is protected with HTTPS, you need to specify "https://" instead of "http://".
and where SECURITY_TOKEN is replaced with the security token for the action that the URL will trigger.
|
•
|
Simple URL Access – The action is triggered by accessing the external trigger URL with a HTTP GET-request.
|
Important: If you type the value manually, then make sure to maintain the exact spelling because security tokens are case sensitive.
To download error records, click on the Download link next to the error description. The data will be downloaded as a ZIP-file that contains the data in the form of a text file with comma separated values (a CSV-file). This CSV-data can then be imported into 3rd party tools (for example Excel) for further analysis.
To delete entries from the Launch History screen, click on the Scissor icon above the entries you’d like to delete. The entries below this marker will be removed.
LISTSERV Maestro 4.0 now gives you the ability to download dataset members and/or list subscribers externally. For this to work, the external process or application has to access the server where the LISTSERV Maestro User Interface (LUI) is running via HTTP (or HTTPS, depending on your setup). In addition, a security token must be obtained.
Note about Security Tokens: Since downloading dataset members and list subscribers is a highly privileged operation, LISTSERV Maestro requires that the external process or application delivers a security token for authorization. This security token is assigned internally by LISTSERV Maestro.
To obtain the security token for a dataset, open the Recipient Dataset Details screen, click on the
Dataset menu, and then select
Edit Dataset Settings. The Recipient Dataset Definition wizard opens. On the General screen, the
External Download field will contain a
Show Download Security Token link. Click this link to open a pop-up box that contains the security token. Copy the security token and make sure that the external process or application accesses the URL described above, replacing
[SECURITY_TOKEN] with the value from the popup box.
To obtain the security token for a list, open the Recipient Dataset Details screen, select the list, click on the
Hosted List menu, and then select
Edit List Details. The Hosted List Definition wizard opens. On the General screen, the
External Download field will contain a
Show Download Security Token link. Click this link to open a pop-up box that contains the security token. Copy the security token and make sure that the external process or application accesses the URL described above, replacing
[SECURITY_TOKEN] with the value from the popup box.
Note: To create a new security token, click the
Create New Download Security Token link in the popup box. Once a new security token is created, the old token is no longer valid and cannot be used to trigger a job externally.
where SERVER_NAME is replaced with the name of your LISTSERV Maestro server. If a non-standard HTTP port is used, also include the port separated with a colon ":". If access to your LISTSERV Maestro is protected with HTTPS, you need to specify "https://" instead of "http://".
and where SECURITY_TOKEN is replaced with the security token for the action that the URL will trigger.
|
•
|
Simple URL Access – The action is triggered by accessing the external trigger URL with a HTTP GET-request.
|
Important: If you type the value manually, then make sure to maintain the exact spelling because security tokens are case sensitive.
To view the Demographic Breakdown report for a dataset, go to the Recipient Dataset Details screen for that dataset, click the Membership Statistics tab, and then click on the Demographic Breakdown sub-tab.
To view the Demographic Breakdown report for a list, go to the Recipient Dataset Details screen for the dataset that the list belongs to, click on the list name, click on the Subscriber Statistics tab, and then click on the Demographic Breakdown sub-tab.
The Demographic Breakdown report is most useful if profile fields with only a few different values are shown (fields that contain larger geographic regions or product groups are good candidates). Each profile values group is shown with its numeric count to the left and a bar whose length corresponds to this count.
To rearrange the order of the columns, use the left and right arrows associated with each column. To remove a column, simply click the
[x] box. When you’re finished rearranging the columns, click
[Apply].
To add a previously removed column to the report, click the More Columns link. This opens a drop-down menu with the previously removed columns; select the desired column to once again add it to the report header columns.
Note: You can add, remove, or reorder the report columns several times all at once. When you are satisfied with your report header columns, click the
[Apply] button.
Important: The email and tracking permissions column types are never part of the Demographic Breakdown report. For more information, see the online help.
Use the Sort Order link to modify the ordering of the report result bars.
This message bar also contains the Download icon for the report at the very right. Click on the icon to open a popup menu that lets you chose between two different download formats:
|
•
|
Download as PDF – The report will be downloaded in the form of a PDF file, for easy distribution or printing.
|
|
•
|
Download as Text File (CSV) – The report will be downloaded in the form of a ZIP-file that contains the current report in the form of a text file with comma separated values (a CSV-file), plus an additional readme.txt file with details about the report. This CSV-data can be imported into 3rd party tools (such as Excel) for further analysis.
|
LISTSERV Maestro 4.0 has made it easier than ever to send a message to a specific demographic in your dataset or list. Each bar in the report describes one particular demographic of the subscriber base. This gives you the chance to use the Demographic Breakdown report as a visual means to define the recipients set for either a target group or a mail job
To send a message to a specific subscriber base and immediately create a new mail job, go through the report and place a check next to each subscriber group you’d like to include in the mailing. Once this is done, click the
Create Mail Job link. This opens the Start New Job screen. Enter the email jobs information and click
[OK]. You’ll be taken to the Workflow Diagram with the
Define Recipients section completed for you. From here, finish creating your email job and authorize it for delivery. Only the selected subscribers will receive this message.
To reuse the subscriber base for several mail jobs, go through the report and place a check next to each subscriber group you’d like to include in future mailings. Once this is done, click the
Create Target Group link. This opens the Target Group Definition wizard with settings that match the recipients selection defined by your selected checkboxes on the report. Use the Target Group Definition wizard to further refine the target group settings and to store the target group under a name of your choice for later use.
Previously, when you defined a data source for a report, LISTSERV Maestro would guide you through a wizard. Now, with LISTSERV Maestro 4.0, the multi-paged wizard has become the sleek and user-friendly Report Data Source Definition screen.
In the Name field, enter the name for the data source.
To change the color, click on the color swatch in the Color field and select the color from the color palette that appears.
To add jobs to the report, click on a job in the Available Jobs box and drag it to the
Report over these jobs box. Click
[Apply] when you are finished.
To remove a job from the Report over these jobs box, simply drag and drop it in the
Available Jobs box. Click
[Apply] when you are finished.
|
•
|
Tracking Events – This requires additional information to be defined. See below for details.
|
|
•
|
Total Number of Unbounced Messages – This includes the number of sent messages, minus the number of messages that were detected as bounces at the time the report is executed.
|
When the Tracking Events option is selected, additional information becomes available, letting you choose what tracking events will be included in the report:
Note: Action Events are part of the new Action Tracking feature. For details see Section 1.2
Action Tracking.
For example, if Click Events is selected, then you can select the links you’d like tracked in the report. To do so, simply drag and drop the links from the
Available Tracked Links box to the
Count only the links below box. If you want to track all of the links, click on the
Count only the links below link and select
Count all links.
Similarly, if Action Events is selected, then you can drag and drop the links from the
Available Tracked Actions box to the
Count only the actions below box. If you want to track all of the actions, click on the
Count only the actions below link and select
Count all actions.
|
•
|
Original Recipients Only – If selected, then the report will only use events that were triggered by the original recipients of the email (there will be no events triggered by friend-recipients). This is the same behavior that was present in earlier versions of LISTSERV Maestro (that is, before the 4.0 release). In addition, this is the same behavior found in Quick Reports.
|
|
•
|
Forward-to-a-Friend Recipients with Level – If selected, then an additional field becomes available. In this field, enter a number greater than or equal to 1. This number defines the forward-level you are interested in. The report will not include the events of the original recipients, but only of the friend-recipients of the given level. If you enter "1", then only events for friend-recipients of the 1st level will be included (i.e. only those friends that got the emails forwarded by the original recipients). If you enter "2", then only events for friend-recipients of the 2nd level will be included (i.e. only those friends who received the email forwarded by other friends from the 1st level), and so on...
|
When you’re finished defining the data source, click the [OK] button to return to the Define Report screen. Once you are finished defining the remaining report settings, click the
[Save & Execute] button. The report is generated and displayed for viewing.
On the Reports tab of the Completed Job Details screen, the options for defining the Recipient Details report has been streamlined. When you select the
Recipient details option, the
Include Data Sources For section will contain the
Open-Up Events and
Click-Through Events options. When
Click-Through Events is selected, you can select to
Separate data sources per link or
Bundle all links in one data source.
Once you are finished defining the report, click [OK]. The Recipient Details Report is displayed. The usability features for the report have changed.
To rearrange the order of the columns, you can use the left and right arrows associated with each column. In addition, to remove a column, simply click the
[x] box. When you’re finished rearranging the columns, click
[Apply].
Another way to change the order of the data is to click on the Sort Order link and select a sort option from the pop-up menu.
From here, click on the Select link that is associated with the data source you’d like to use. The report will be refreshed using this new data source.