The ability to track information about email jobs is a powerful resource for understanding how recipients respond to messages, when messages are accessed, and what types of recipients are actually seeing messages. By understanding the types of recipients who are opening messages, when they are opening them and whether they are clicking on links contained in them, senders can precisely tailor future messages to specific recipients. Recipients who are genuinely interested in the information contained in a message are much more likely to open and interact with the message. Senders who understand their recipients’ needs and interests and target messages appropriately, will experience higher levels of user satisfaction and enhance their own reputation.
|
Tracking and recording recipient and user information has ethical and legal implications. L-Soft expects that each user will utilize the software responsibly. Responsible use of the software includes, but is not limited to, observation of all laws and legal requirements that apply to use of the software and specifically privacy concerns of the recipients. It is the full responsibility of the user to be apprised of all relevant ethical and legal implications regarding use of the software. |
LISTSERV Maestro can track a variety of different information about recipients and how they interact with a sent message. Tracking statistics reports are available in a number of formats. Tracking data can also be downloaded so that it can be used in other statistical and reporting software packages. With a special Microsoft® Excel Add-In, downloaded statistics can be easily imported to generate tables and graphs in Excel. For more information, see Section 10.7 Using the Excel Add-In.
Note: It is not necessary for tracking to be enabled to send out an email job.
Tip: Let recipients know that they are being tracked and how tracking information is being used by providing a statement in the company or institution’s privacy policy. Post the policy on the web and provide users and recipients the URL for reference.
There are five basic steps to define tracking for a single email job that are reflected in the screens that make up the Tracking Definition wizard. These steps are:
· On/Off – Turn tracking on or off. If tracking is switched off for a job, the only other screen that will appear is the Summary screen.
· Tracking Details – Select the type of tracking event (open-up or click-through) and define the URLs within the message to track.
· Type – Select the type of tracking to use (i.e. personal, anonymous, unique, or blind).
· Type Details – For anonymous tracking, select the columns that are anonymous and which are used for identifying purposes.
· Summary – Displays a summary of the tracking selections for the job.
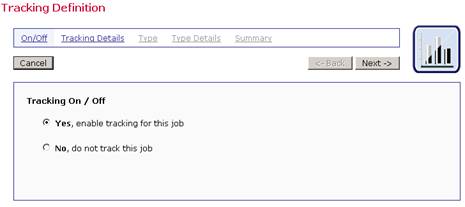
To begin defining tracking for an email job, click on the Define Tracking icon from either the Workflow or Summary diagram on the Job Details screen. The Tracking On/Off screen opens. Select the Yes, Enable tracking for this job option, and then click [Next ->].
Figure 52 Turn Tracking On or Off
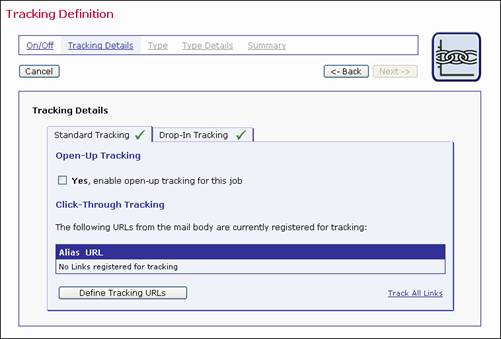
The Tracking Details screen lets you determine the type(s) of recipient behavior to track. LISTSERV Maestro will track two different types of recipient interaction with a message – Standard Tracking and Drop-In Tracking. If both types of tracking are available, then the Tracking Details screen will contain two tabs – the Standard Tracking tab and the Drop-In Tracking tab. If only one type of tracking is available, then only that type of tracking will be shown on the Tracking Details screen.
If the content of the message is HTML or if there is at least one trackable link in the message, then the Standard Tracking tab will be displayed. There are two types of Standard Tracking available:
· Open-Up Tracking – LISTSERV Maestro will register when an email message is opened by its recipient, and will log each event, together with date, time, and recipient information (who opened the email). Open-up tracking is only available for HTML messages. Some email clients can be configured to block open-up tracking; therefore, open-up tracking cannot provide an exact count of open-ups, but can give you a lower estimate. In other words, if a job has a 50% open-up rate, then this indicates that at least 50% of the messages were opened, but it’s probably more.
· Click-Through Tracking – LISTSERV Maestro will register each time a recipient clicks on a link in the message and will log each event, together with date, time, and recipient information (who clicked the link). To specify which links to track, click [Define Tracking URLs].
The Track All Links shortcut will automatically register all links in the message for tracking. The [Next ->] button will become active and it is possible to continue to the next screen in the wizard. This shortcut will not assign link aliases, a means to name links for easier identification in reports. See Section 6.3.2 About Link Aliases for more information.
Use the [Define Tracking URLs] button to select links for tracking and to assign aliases. Once links are registered, another shortcut, Remove All, will appear. Clicking this link will un-register all links from tracking. See Section 6.3.1 Defining Tracking URLs for more information.
Figure 53 Standard Tracking
If drop-ins are enabled in the content of the message and if the content contains at least one user-defined drop-in (not a system drop-in), then the Drop-In Tracking tab will be displayed, letting you track any trackable links that may appear in the content of the drop-ins.
Figure 54 Drop-In Tracking
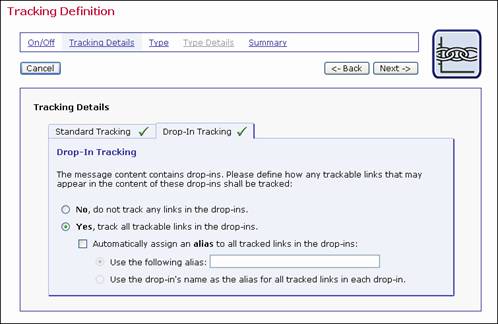
Select No if you do not want to track links that appear in the drop-in content. Select Yes to track all trackable links that appear in the drop-in content. If you selected Yes, then you can also define if a link alias will be assigned to these links. If you choose to assign an alias, then you have the choice between a user-defined alias and using the name of the drop-in as the alias. To assign an alias, select Automatically assign an alias to all tracked links in the drop-ins. To define a user-defined alias, select Use the following alias, and then enter the alias name in the text box. To use the name of the drop-in as the alias name, then select Use the drop-in’s name as the alias for all tracked links in each drop-in.
Once you finished defining the type(s) of recipient behavior to track, click [Next] to continue.
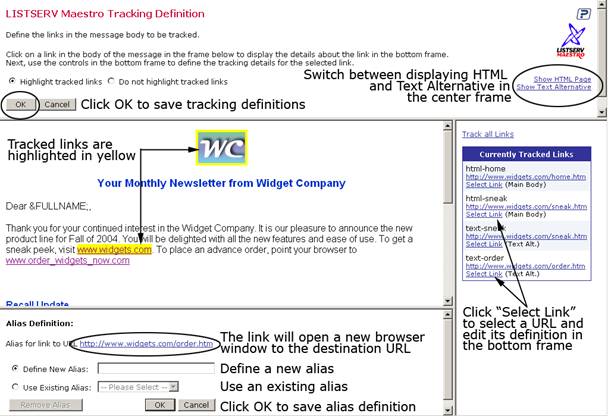
This page defines the links in the email message that are to be tracked. LISTSERV Maestro is able to track all Internet links that have a URL starting with the "http://" or the “https://” protocol. LISTSERV Maestro is able to track image map links as well as form submission links. The page is divided into four separate frames:
· Top Frame – Contains several general options, links, and buttons:
° Highlight tracked links – Select this option button to highlight tracked links. (Due to the nature of image maps, links selected for tracking within them will not be highlighted.)
° Do not highlight tracked links – Select this option button to turn highlighting tracked links off.
° Show HTML page – Click this link to show the HTML message in the center frame.
° Show alternative text – Click this link to show the alternative text of a message in the center frame.
° OK – Click this button to save all the tracking selections and return to the Tracking Details screen.
° Cancel – Click this button to discard any tracking selections and return to the Tracking Definition wizard.
· Main Center Frame – Displays the body of the email message. All trackable links in the message body (either text links or image links) are clickable. When a link is clicked, it will appear in the bottom frame. If the URL is clicked from the bottom frame, a separate browser window will open to that URL. This is a good way to check the validity of URLs in the message. If the body is composed of plain text, (or the alternative text of an HTML message) then all links enclosed in quotation marks and starting with “http://” or “https://” are clickable.
· Right Center Frame – Contains the Track all Links link, a fast way to select all links for tracking. Records each selected link to be tracked and an alias if one has been defined. Edit an alias or remove a tracked link by clicking Select Link.
· Bottom Frame – Shows the details of the selected link and allows the user to define whether the link will be tracked or not. If the links will be tracked, aliases can be defined to help distinguish different links that go to the same URL from one another. The buttons in the bottom frame change depending on previous selections.
Figure 55 Click-Through Tracking Definition
To track a link:
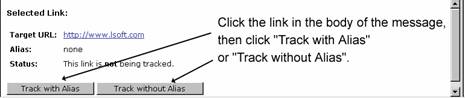
1. Click on the link in the message in the main center frame. If the link is a form submission, click on the [Submit] button of the form. The link will appear in the bottom frame.
2. Click [Track with Alias] or [Track without Alias].
Figure 56 Track Link With or Without Alias
3. For tracking with an alias, enter an alias in the Define New Alias text box or select an existing alias from the drop-down menu. Click [OK] to save the alias definition. The new definition will appear in the right frame.
4. Tracking links will appear in the right frame. It is possible to add or change an alias by clicking Select Link under the URL and then following step three.
5. To edit or remove a tracked link, click Select Link under the URL in the right frame, and then click the [Edit Alias] or [Do not track this Link] button in the bottom frame.
Figure 57 Edit Tracked Link

Tip: Selecting the Highlight tracked links option will display all links that are currently marked for tracking on a bright yellow background in the body of the message. This makes it easier to tell which links have already been selected for tracking and which have not. Images that are links will be shown with a bright yellow frame when they are selected for tracking. Since this frame makes the images a bit larger, it may impact the overall page layout. Switch off the link highlighting to restore the original layout.
6. Once the tracking links have been chosen and aliases defined, click [OK] in the top frame to continue. A summary of the tracking details will be presented. From this screen, you can re-edit the tracking definitions by clicking [Define Tracking URLs], remove any of the links by clicking the Remove link adjacent to each URL, or remove all the links by clicking the Remove All link at the bottom of the listing. Click [Next ->] to continue.
A link alias gives each tracked link a special name that distinguishes it from other links, even if they go to the same URL. This becomes significant when viewing tracking data, making it possible to discern tracking events by alias name instead of just the target URL.
Assigning aliases depends, in part, on what is being measured and compared in tracking reports. Aliases can be assigned to individuate URLs that go to the same source, or to group URLs that go to different sources together under one name. Aliases are also helpful when reading tracking reports. In a tracking report, each tracked link is labeled with its URL. Many times URLs, even when different from each other, are not significant to those viewing reports. By assigning an alias, the tracked link is labeled with meaningful text as well as the URL.
Aliases are optional. When aliases for tracked links are not defined, LISTSERV Maestro will only be able to find the URL of the link in the tracking data. This may be adequate if each URL appears only once in the email message, or if there is no need to track which of several instances were clicked. If the same URL appears in several links in the message, it will not be possible to know which of the links was actually clicked without using aliases.
For example, a message may have both an image link and a textual link, both of which link to a company homepage. When looking at the tracking data, the company might like to know if more people click on the image link or on the text link. To get this information, mark both links for tracking and give them different aliases. LISTSERV Maestro will then be able to report which of the links was clicked when reviewing the tracking data.
Other examples include finding out if links at the top of a message are clicked more often than those at the bottom, or if animated images motivated more people to click on a link when compared with smaller, more conservative images. When aliases are used to group links with different target URLs together, larger comparisons can be made. For example, all image links in a message can be given the one alias and all text links in a message can be given another if the purpose of tracking is to determine whether people click on image links or text links more often.
LISTSERV Maestro supports four different levels of tracking information about email recipients. Set the tracking type on the Tracking Type screen of the Tracking Definition wizard. Each type of tracking will yield different data sets based on the recipient list and any database information available to the system. However, not all types of tracking are available for all types of recipient definitions. Choose the level of tracking desired based on the kinds of information already in the system and the permission received from recipients, keeping within the boundaries of what is legally allowable in the user’s jurisdiction.
Note: The tracking types available for use vary per user or group. The system administrator has the ability to limit what type of tracking each user or group is able to perform while tracking a LISTSERV Maestro email job. For more information, see the Administrator’s Manual.
· Personal Tracking – Records open-up and click-through events traceable to the individual who triggered them. Very specific information can be gathered about an individual’s interaction with a message such as how many times a link has been clicked. This data can be augmented with information from the database the recipient data was extracted from. Personal tracking is available:
° For recipients uploaded from a text file when the Use additional recipient data for mail merging and tracking option is selected on the Recipients Details screen of the Define Recipients wizard.
° For recipients selected from a database by LISTSERV Maestro when the Use additional recipient data for mail merging and tracking option is selected on the Recipients Details screen of the Define Recipients wizard.
° For recipients defined by a LISTSERV list and the special list message option is selected on the Source screen of the Define Recipients wizard.
° For recipients defined by a database selected by LISTSERV.
° For recipients defined as Based on Reaction to a Previous Job, which is selected on the Options screen of the Define Recipients wizard.
° For recipients defined by a LISTSERV list with the standard list message option selected on the Source screen of the Define Recipients wizard and mail-merge selected for the LISTSERV list.
° For target groups based on any of the above.
When personal tracking is used, LISTSERV Maestro creates a profile for each individual mail recipient and stores this information in the system database. The creation of this profile takes place during the delivery of the mail, as the job is being transferred to LISTSERV. With a large recipient list, the additional work of creating profile entries in the database will make the transfer to LISTSERV noticeably slower. If general statistics are required, without the need to trace events back to individuals, use unique tracking instead because the processing time is much faster.
· Anonymous Tracking – A unique ID is assigned to each recipient that cannot be followed back to identifying information about the individual recipient, but that is associated with non-identifying demographic information, such as age, gender, or zip (postal) code. It is the responsibility of the user to analyze the data and determine what is and what is not identifying data.
For example, zip codes are commonly used for anonymous demographic analysis. However, if the data contains one zip code that corresponds to just one recipient, the zip code becomes identifying data for that recipient and is no longer an anonymous field. In this instance, the input data could be changed so that sparsely populated zip codes are all lumped together into an “other” category for the purposes of tracking, and then the zip code would remain anonymous. Anonymous tracking is available:
° For recipients uploaded as a text file and the Use additional recipient data for mail merging and tracking option is selected on the Recipients Details screen of the Define Recipients wizard.
° For recipients selected from a database by LISTSERV Maestro and the Use additional recipient data for mail merging and tracking option is selected on the Recipients Details screen of the Define Recipients wizard.
° For recipients defined as Based on Reaction to a Previous Job, which is selected on the Options screen of the Define Recipients wizard, as long as the Use additional recipient data for mail merging and tracking option is selected on the Recipients Details screen of the Define Recipients wizard.
° For target groups based on any of the above.
When anonymous tracking is used, LISTSERV Maestro creates a profile for each individual mail recipient and stores this information in the system database. The creation of this profile takes place during the delivery of the mail, as the job is being transferred to LISTSERV. With a large recipient list, the additional work of creating profile entries in the database will make the transfer to LISTSERV noticeably slower. If general statistics are required, without the need to correlate events with demographics, use unique tracking instead because the processing time is much faster.
· Unique Tracking – Records the number of times open-up and click-through events happen to unique recipients but is not associated with individual users or other identifying data. Unique tracking is available:
° For recipients uploaded as a text file and the Use additional recipient data for mail merging and tracking option is selected on the Recipients Details screen of the Define Recipients wizard.
° For recipients selected from a database by LISTSERV Maestro and the Use additional recipient data for mail merging and tracking option is selected on the Recipients Details screen of the Define Recipients wizard.
° For recipients defined by a LISTSERV list with the special list message option selected on the Source screen of the Define Recipients wizard.
° For recipients retrieved from by a database by LISTSERV.
° For recipients defined as Based on Reaction to a Previous Job, which is selected on the Options screen of the Define Recipients wizard, as long as the Use additional recipient data for mail merging and tracking option is selected on the Recipients Details screen of the Define Recipients wizard.
° For recipients defined by a LISTSERV list with the standard list message option selected on the Source screen of the Define Recipients wizard and mail-merge selected for the LISTSERV list.
° For target groups based on any of the above.
· Blind Tracking – Collects unspecific tracking data, recording only the number of times open-up and click-through events occur. Blind tracking cannot discern between a single person clicking a link 100 times and 100 people each clicking a link once. The total count will be 100 events in both instances. Therefore, all blind tracking events are considered “non-unique.” This has specific implications for the Sum of Events report types. See Section 7.3 Running Test Reports and Section 10.1 Tracking Reports for more details. Blind tracking is always available for every recipient type.
The following table summarizes the types of tracking available based on the way the recipients are defined.
Table 3 Types of Tracking Available Based on Recipient Definition
|
Recipients defined from: |
Types of tracking available: |
|||
|
Blind |
Unique |
Anonymous |
Personal | |
|
LISTSERV Maestro Dataset HRL HLL with Mail-Merge HLL without Mail-Merge |
● ● ● |
● ● |
● |
● ● |
|
Uploaded text file with non-identifying fields with only identifiable fields |
● ● |
● ● |
●
|
● ● |
|
Database Connected to LISTSERV Maestro with non-identifying fields with only identifying fields |
● ● |
● ● |
●
|
● ● |
|
LISTSERV list Standard list message with Mail-Merge* Standard list message without Mail-Merge Special list message |
● ● ● |
●
● |
|
●
● |
|
LISTSERV connected database |
● |
● |
|
● |
|
Based on a previous job |
● |
● |
● |
● |
*List header includes the keyword Mail-Merge=Yes
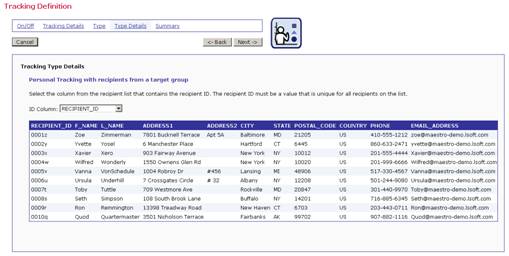
If Personal Tracking or Anonymous Tracking is selected, the Type Details screen appears. For personal tracking, the Tracking Type Details screen is used to select a value that is unique for each recipient. For anonymous tracking, the Tracking Type Details screen is used to separate columns containing identifying information, such as a name or telephone number, from columns containing anonymous information, such as age, gender, or city. There are three versions of the Tracking Type Details screen:
1. This version is for personal tracking when the recipients are defined from a text file, from a LISTSERV Maestro selected database, or a target group based on either one. Select the column from the recipient list that contains the recipient ID using the drop-down menu. The recipient ID must be a value that is unique for all recipients on the list. This means that the value can never be repeated for any other recipient and is never empty for any recipient. A customer number, registration number, or other unique identifier in the data works well for this purpose. Click [Next ->] to continue.
Figure 58 Tracking Type Details
2. This version is for personal tracking when recipients are defined from a database selected by LISTSERV, by a LISTSERV list with the Special list message option selected, or by a LISTSERV list with the standard list message and mail-merge options selected.
Figure 59 Personal Tracking Type Details
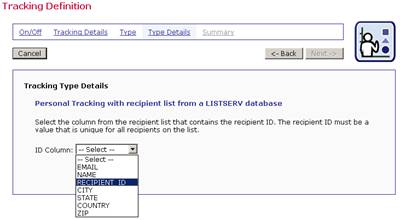
Click the ID Column drop-down menu, and then select the column that contains the unique recipient ID. Click [Next ->] to continue.
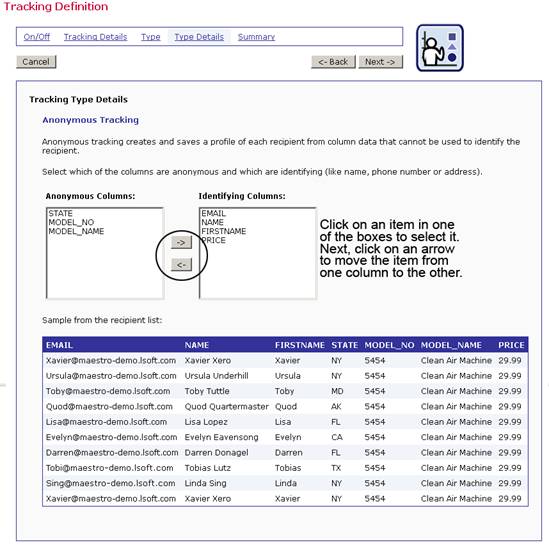
3. This version is for when anonymous tracking is selected. Anonymous tracking is independent of recipient type, but columns have to be selected as either anonymous or identifying. Identifying columns contain information about individual recipients than can be used to identify them, such as name and telephone number. Using identifying columns in recipients’ profiles creates profiles that are not anonymous, and could violate recipients’ privacy. Anonymous columns, on the other hand, contain information about individual recipients that cannot be used to identify them, such as gender, age, or city. Using anonymous columns creates recipient profiles that will not identify individual recipients. See Section 10.5 Recipients Details Reports for more information on running reports from anonymous tracking jobs and downloading demographic information.
Figure 60 Anonymous Tracking Type Details
Once you’ve selected your Tracking Type Details, click [Next ->] to continue.
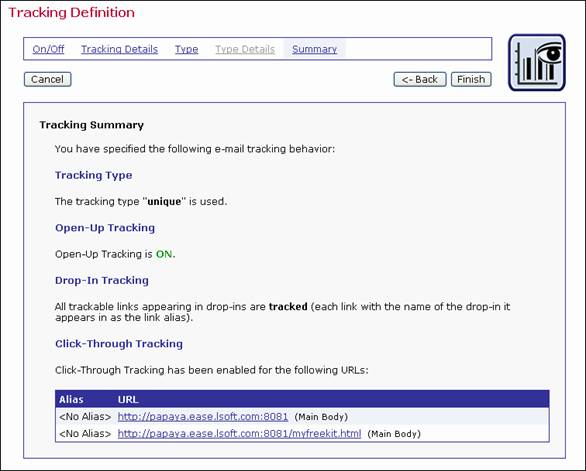
A summary of the tracking behavior will be presented. Click [<-Back] to return to an earlier screen to change selections. Click [Finish] to return to the Job Details screen, the Workflow diagram, or the Summary diagram.
Figure 61 Tracking Definition Summary