Creating and sending customized email messages with LISTSERV Maestro is a multi-step procedure. Some of the steps can be done at any time during the process of defining an email job, and other steps are dependent on the completion of previous steps.
· A new job is started and assigned a title and a job ID.
· The message is created and recipients are defined.
· Tracking is set up, if desired.
· The sender of the message is defined.
· Testing takes place.
· The message is scheduled for delivery.
· Final approval is recorded, and when the scheduled time arrives, the message is delivered.
· Delivery and tracking data, if requested, can then be retrieved as messages are received and opened by recipients.
To begin creating a new email job, click the Start New Job icon. By default, the individual who initiates a new email job becomes the “owner” of that job. A job owner:
· Automatically has the rights (privileges) to all the different functions of the job from assigning a job title to final approval for delivering the message.
· Is the only account holder that can change the Job Title and Job ID.
· Is the only account holder that can designate team members that are allowed to participate in creating the job, called Team Collaboration.
· Is the only account, besides the Administrator account, that can delete a job.
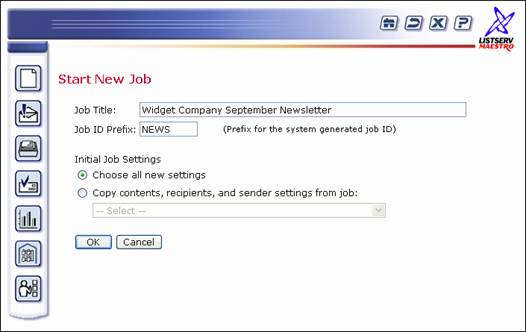
The first step to creating a new job is to assign it a Job Title and a Job ID Prefix. A Job Title is the way individual users identify specific jobs by name. The Job Title can be composed of letters and numbers, and may contain spaces. The Job ID is generated by the system to ensure each ID is unique and is used by the system to identify each individual job.
Job owners can enter a Job ID Prefix. The prefix will appear at the beginning of the system generated Job ID and will be separated from the generated part by a hyphen. Depending on the settings of the account, the Job ID prefix may already be set or limited to pre-set options. If a choice of Job IDs has been pre-set by the system administrator, a drop-down menu will be available instead of the Job ID Prefix text box. Use the prefix to identify jobs or group jobs for reporting or billing purposes. For more on Job Titles and Job IDs, see the LISTSERV Maestro online help or the LISTSERV Maestro Administrator’s Manual.
Once a Job Title and Job ID have been assigned, they will appear in the upper left side of the screen on every screen that is associated with that particular job.
Figure 3 Start New Job Screen
A new job can be created one of two ways. The first way is by selecting the Choose all new settings option, which requires you to enter all new information. The second way is by selecting the Copy contents, recipients, and sender settings from existing job option, which automatically takes the settings from an existing job as the basis for the new job. Once you select the Copy contents, recipients, and sender setting from existing job option, click the drop-down menu and select the job you want to copy information from.
A new, empty job needs to have the email message defined as well as the sender and recipient information determined. A job based on a copy of an existing job can reuse a previously composed message, sender information, testing information, and recipient information. The settings from the existing job can always be edited to suit the new job.
Once you’re finished selecting your job setting, press [OK] to continue or [Cancel] to return to the previous screen. If you pressed [OK], then the Job Details screen opens. See the following section more information on defining your job details.
Tip: Copying an existing job can save time and effort by reusing messages and recipients lists. For example, a monthly newsletter would change its message each month but would be sent to the same recipient list. Or, a new product announcement could contain the same message but be sent to different recipient lists.
Once a new job has been created, the next steps are to define the recipients of the message and create the email message itself (unless these components are being based on an existing job). Both of these operations must take place before defining any tracking data to be collected for reports. Defining the sender and scheduling the delivery can take place at any time. The Job Details screen displays either a Workflow or Summary diagram. These diagrams serve to guide account holders through the proper sequence of events for defining an email job. Both of these displays chart the process of creating an email job and contain links that allow each step to be edited.
The Workflow diagram is a visual representation of the process of creating an email job. To reach this diagram, click on the Workflow tab from the Job Details screen. Clickable icons represent each of the steps, the order in which they must occur, and the status of each step. By clicking an icon on the Workflow diagram, the account holder opens up a wizard in LISTSERV Maestro that defines and edits that step of the email job. After the definition or editing has occurred, the account holder will be returned to the Workflow diagram to select the next step.
The Summary diagram is a textual listing of the process of creating an email job. To reach this diagram, click on the Summary tab from the Workflow diagram. Each area of LISTSERV Maestro is listed in the left column, the status of the step is listed in the middle column and an Edit link is listed in the right column. Access to each function is obtained by clicking the Edit link. After the definition or editing has occurred, the account holder will be returned to the Summary diagram to select the next step.
Tip: Individual account holders can set their preference for the Job Details screen to open as either the Workflow diagram or the Summary diagram. See Section 11.4 Setting User Preference for more information.
The Test Reports tab will only become active once an email job had been completed through the delivery test phase. At that point, it becomes possible to run quick reports on the test messages containing tracked links for open-up and click-though events. For information on using the Test Reports functions, see Section 7.2 Delivery Testing for a Job.
This flow chart serves as a visual representation of the process of creating a new email job. Clicking on each icon opens up the interface for defining the components or details of the job. As components are defined, the next steps for the job become available. For example, it is not possible to define tracking data for a job until the message and the recipients are defined.
Once all the components of the email job are defined, they can be edited in any order from this screen or the Summary diagram. If an earlier step is edited, the later steps must be revisited. For example, if the recipient list is changed under Define Recipients, the Delivery Test step will have to be redone.
The job owner can delete the current job from this screen by clicking the [Delete Job] button. The job owner can change the Job Title, Job ID, and Team Collaboration by clicking the [Change Job Info] button.
Icons on the Workflow diagram change appearance to signal the status of the step they represent. Icons that are not clickable represent steps that cannot be started until earlier steps are completed.
Icons may also not be clickable for an individual, even though the step is available, because the account holder does not have permission to execute that particular step of the job. Permission to execute certain steps in an email job is granted by the job owner or by the LISTSERV Maestro Administrator when the user’s account was set up. For more information on team collaboration, see Section 3.5 Team Collaboration. For more information on individual user account privileges see the LISTSERV Maestro Administrator’s Manual.
Figure 4 Workflow Diagram on Job Details Screen

The Summary diagram has all of the same functionality as the Workflow diagram, but the information is presented in a different manner. The Summary diagram is most helpful in reviewing and editing aspects of an email job once they have been defined. It is possible to delete the current job and to authorize the delivery of a job from the Summary diagram.
Individual account holders may set a personal preference in the User Settings that will open the Summary diagram first when entering the Job Details screen instead of the Workflow diagram.
Click on the Edit link adjacent to each function to enter or change existing settings. If the Edit link is not clickable, it will appear grayed out or a lighter color. This means that a preceding step has not been successfully completed or the user does not have permission to execute that step.
Figure 5 Summary Diagram from the Job Details Screen

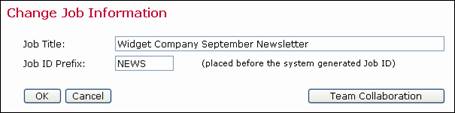
The [Change Job Info] button is located at the top of the Job Details screen displaying the Workflow diagram. Clicking this button will allow the Job Title and Job ID Prefix to be changed. A [Team Collaboration] button becomes available if there are other account holders in the group. This function makes it possible to set up a team of people to collaborate on a job. From the Job Details Summary screen, Team Collaboration is the bottom section and can be edited if the Edit link is active.
The job owner can choose team members and assign each person privileges (rights) to perform certain functions within that job. The job owner always has privileges to all the functions of his/her job and other account holders may not revoke these privileges. Other team members can have different responsibilities for different aspects of a job. Team members can also share responsibilities for the same aspects of a job.
Figure 6 Change Job Information Screen
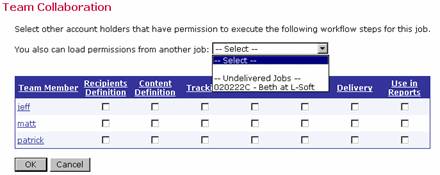
Clicking [Team Collaboration] reveals other account holders in the job owner’s group. The job owner can choose the privileges to grant or revoke by clicking in the check boxes next to each account. To grant or revoke a certain privilege for all accounts in the group, click on the corresponding privilege in the title bar. To grant or revoke all privileges for a certain account, click on the account holder’s name. To grant or revoke all privileges for all accounts, click on Team Member in the top left corner of the table. It is also possible to copy permissions from another job by selecting the job from the drop-down menu. Click [OK] to save the settings.
Figure 7 Team Collaboration Screen
Tip: Separating responsibilities for different aspects of an email job to team members with expertise in those aspects will help to ensure an effective message is sent to the right recipients and useful tracking data is collected. For example, a company wants to send new product information to clients and find out which clients opened certain links contained in the message. A team would be assembled to send out this message. The project leader would initiate the job in LISTSERV Maestro and become the job owner. The job owner would enlist an HTML expert to create the content of an HTML message, a marketing expert to determine the recipients of this message, and an analyst to decide the types of information to be tracked for a company report.