The Subscriber’s Corner screen lets you see all the lists you are subscribed to or all the public lists on the server. The list table can display selected subscription settings for each list. The following actions can be performed from this screen:
The Search for Subscriber field lets the site maintainer narrow the selection of lists to those subscribed by a particular email address. Enter the email address, for example "mirjam@example.com", and click
[Search].
The Search for List field lets the list subscriber narrow the selection of lists to those containing a specific text in the listname. Enter the text to search by (e.g. sales) and click
[Search].
If Show Subscribed Lists Only is selected (the default) from the
Show All Lists drop-down menu, then only lists that you are subscribed to are displayed. If
Show All Lists is selected, then all lists on the server that you are subscribed to and any public lists on the server that you are not subscribed to are displayed. The selection of lists is also subject to the setting of the
Narrow Selection field (if in Expert Mode). Lists that you are subscribed to will be highlighted with a clickable link.
The Lists per Page field controls how many lists will be displayed on a single page. The default is 50. If you want to break the list table into pages of 10 lists, then type "10" in the box and click
[Submit].
To subscribe to one or more lists, click the Show All Lists drop-down menu and select
Show All Lists. Check the boxes next to the lists that you want to subscribe to, and then click the
Invert drop-down menu and select
Subscribe. Check the
Send email notification of changes option to have a notification email sent with information about the changes.
Finally, click the
[Submit] button.
Note: If you select the
Invert checkbox, then the changes selected will be applied to the lists that are NOT checked.
Tip: To subscribe to one list at a time, you can simply click the
Settings option next to the list name (this option is located on both tabs). This opens the Join or Leave List screen. For more information on this screen, see the online help or see Section 9.5
Joining, Leaving, or Updating a List from the Archives.
To unsubscribe to one or more lists, click the Show All Lists drop-down menu and select
Show Subscribed Lists Only. Check the boxes next to the lists that you want to unsubscribe from, and then click the
Invert drop-down menu and select
UnSubscribe. Check the
Send email notification of changes option to have a notification email sent with information about the deletions.
Finally, click the
[Submit] button.
Note: If you select the
Invert checkbox, then the changes selected will be applied to the lists that are NOT checked.
Tip: To unsubscribe from one list at a time, you can simply click the
Settings option next to the list name (this option is located on both tabs). This opens the Join or Leave List screen. For more information on this screen, see the online help or see Section 9.5
Joining, Leaving, or Updating a List from the Archives.
The My Settings tab on the Subscriber’s Corner screen lets you select which columns will be displayed in the list table. In addition, you’ll be able to change specific list settings for one or all of your lists.
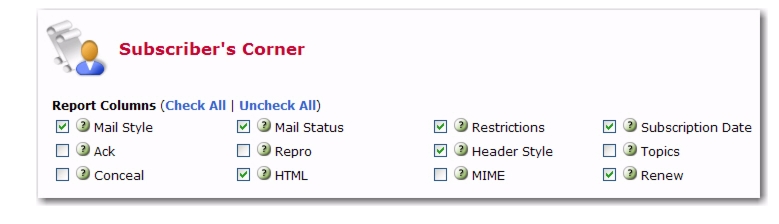
To select the columns to view in the list table, check one or more boxes in the Report Columns section, and then click the
[Submit] button to display the relevant subscription options. To check all boxes, click on
Check All. To clear all of the selections click on
Uncheck All.
•
Mail Style – Check this box to report on whether subscriptions are set to receive individual postings (
Regular), or
Digest or
Index versions of the list.
•
Regular – You receive each individual posting as they are processed by LISTSERV. With this subscription type you may receive mail throughout the day. Each posting will arrive as an individual message in your mailbox. For small lists, or less active lists, this type of subscription works well. Large busy lists can send many messages throughout the day and it may become distracting or fill up you mailbox.
•
Digest – You receive a large message containing many individual posts bundled together into one, at regular intervals, usually once a day. Some very active lists will produce several digests a day. Receiving the digested version of a large active list will limit the number of messages you get during the day.
•
Index – You receive a short index of messages at regular intervals, usually once a day or once a week. The index displays the date, author's name, e-mail address, the subject of the message, and the number of lines in the message. You can download the full text of any messages that are of interest without having to receive every message. If you have limited inbox storage, this form of subscription will cut down on the amount of space messages take. You do, however, have to be online to retrieve any messages you wish to read.
•
Mail Status – Check this box to report on whether subscriptions are set to receive postings (
Mail) or not (
No Mail) from the list.
•
Restrictions – Check this box to report on what, if any, posting restrictions are in effect for the subscriptions. The following restrictions are available:
•
Post – Normal posting privileges according to the list's configuration.
•
No Post – The subscriber is not allowed to post to the list.
•
Editor – Posts bypass moderation on a list that is configured for moderation as policy.
•
Review – All posts are sent to a moderator for approval before being permitted on the list.
•
No Review – Posts are not sent to a moderator for approval before being permitted on the list.
•
Subscription Date – Check this box to report the date on which each subscription was registered. If this is blank, the subscription was registered before the LISTSERV server was upgraded to version 1.8c (which was released in 1997).
•
Header Style – Check this box to report on the "header style" subscriptions that are set to receive for list postings. Possible header styles are:
•
Full – Normal headers for list postings. List name is always the To: header.
•
Subject – Same as
Full, but a subject-tag identifying the list is added to the subject header of all postings.
•
Short – Only the bare minimum headers (To:, From:, Date:, and Subject:) are included.
Warning: This setting will break MIME messages; therefore, it should only be used on lists that allow plain text or for subscribers using mail clients that cannot handle MIME mail.
•
Dual – Same as
Full, but the main headers are repeated inside the message text as well. This is to accommodate some old mail software that did not process Internet mail properly, and is mostly obsolete.
•
IETF – Headers are exactly the same as those sent by the original sender, with the possible exception of adding a "Sender:" line (depending on the list configuration). This may break filters on some mail clients that rely on all list mail having certain mail headers look the same on all list postings.
•
Full (822) – "Full" mail headers (like the default) except that the To: header contains the recipient's email address instead of the list address.
•
Short (822) – Only the bare minimum headers (To:, From:, Date:, and Subject:) are included. In addition, the To: header contains the recipient's email address instead of the list address.
Warning: This setting will break MIME messages; therefore, it should only be used on lists that allow plain text or for subscribers using mail clients that cannot handle MIME mail.
•
Conceal – Check this box to report on whether or not subscriptions are listed in a "Review" of the list of subscribers. This setting is only of interest for lists where the list of subscribers is viewable by other list members or the general public.
•
Topics – Check this box to report on which topics subscriptions are set to receive on lists configured with topics.
•
HTML – Check this box to report on whether or not subscriptions are set to receive Digest or Index versions of the list as HTML. This setting is irrelevant for subscriptions set to receive individual postings ("Regular" mail style).
•
MIME – Check this box to report on whether or not subscriptions are set to receive Digest versions of the list as MIME. This setting is irrelevant for subscriptions set to receive individual postings ("Regular" mail style). This setting is required for HTML Digests; therefore, it should be viewed in conjunction with the HTML setting.
•
Ack – Check this box to report on whether or not subscriptions are set to receive an "acknowledgement" message when they post to the list. For example:
•
Repro – Check this box to report on whether or not subscriptions are set to receive a copy of their own postings. Some subscribers want to receive a copy of their own postings, others are satisfied with just a short acknowledgement (see the
Ack setting) and the copy that their mail client keeps, while others want both or neither.
•
Renew – Check this box to report on whether or not subscriptions are set to receive renewal notices on lists that are configured to request subscription renewals. This setting may only be changed by a list owner.
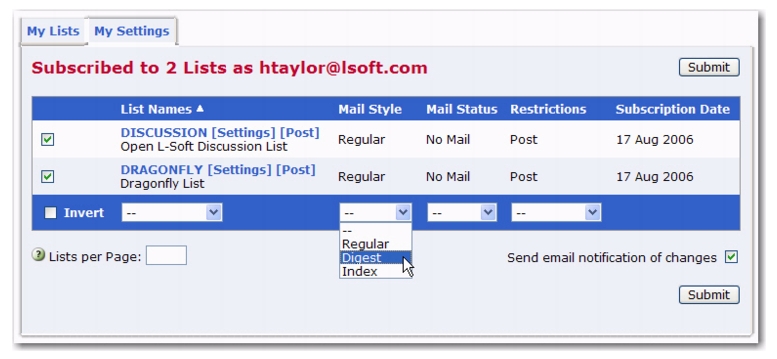
To change specific list settings for one or all of your lists, check the box that corresponds with that setting in the
Report Columns section and click
[Submit]. The My Settings tab refreshes, displaying the settings you selected. Next, click the box next the name of the list you want to change, click the drop-down arrow at the bottom of the column for the setting you want to change, and then click
[Submit].
For example, if you wanted to change the Mail Style setting on all of your lists, simply click that checkboxes for those list, click the drop-down arrow at the bottom of the
Mail Style column, select the setting you want (i.e.
Digest), and then click
[Submit].
After you have subscribed to a list you will eventually want to participate in the discussion, assuming that you have joined a list where subscribers have permission to post (on some lists you are not allowed to post mail back to the other subscribers). For more information on the different types of mailing lists, see Section 3.4
Mailing List Types.
•
The archives for a list give you the option to post a message from the List Archive screen, the Archive Index, and the Archive Browsing screen. For more information on these screens, see Section 9.2
Viewing List Archives, Section 9.3
The Archive Index, and Section 9.4
Viewing an Archived Message. To access the list archives, click
Email Lists on the Toolbar. To compose and send a message to the list from the archives, click the
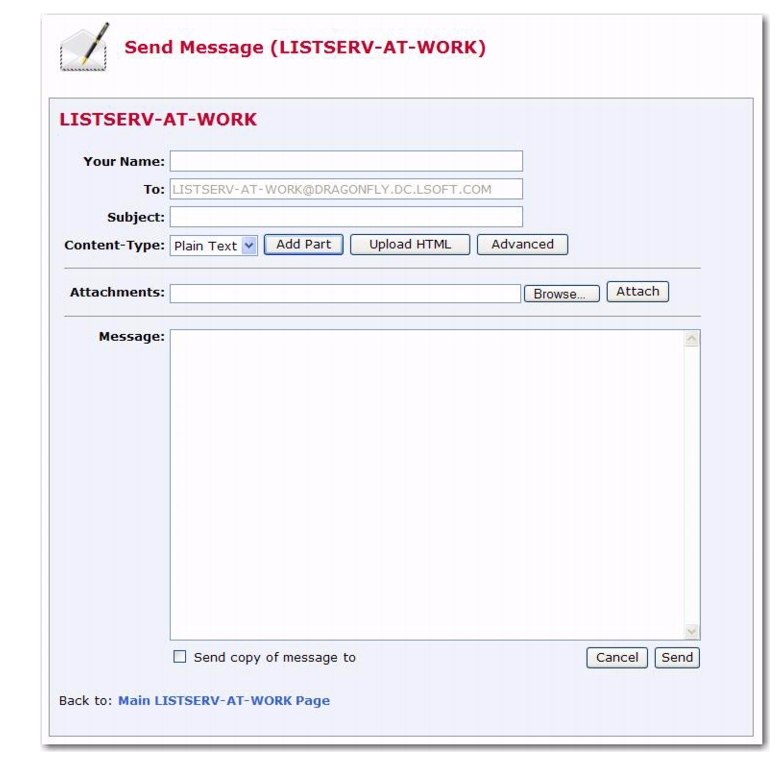
Post New Message option on any of the screens previously mentioned. The Send Message screen opens (shown in Figure 8-3), which is where you compose your plain text, HTML, or multi-part messages. See below for information on the Send Message screen.
•
The Subscriber’s Corner screen lets you see the lists that you’re subscribed to or all public lists on the server. To access the Subscriber’s Corner screen, simply click
Subscriber’s Corner on the Toolbar. (For more information on the Subscriber’s Corner screen, see Section 8
Subscriber’s Corner.) To display the lists that you are subscribed to, click the
Show All Lists drop-down menu and select
Show Subscribed Lists Only. Next, to compose and send a message to the list, click the
Post option next to the list name (this option is located on both tabs). The Send Message screen opens (shown in Figure 8-3), which is where you compose your plain text, HTML, or multi-part messages. See below for information on the Send Message screen.
•
Your Name – Enter your name as you wish it to appear in the
From field of the email header of the message. The email address that will be used in the
From field is the one that is logged into LISTSERV and may not be changed.
•
To – This line is automatically filled out with the name of the LISTSERV list to which your message will be sent. If you want to receive a copy of your post at the email address listed, then check
Send copy of message to.
•
Topic – Select the topic, if any, that you want to apply to your message. This option will only be shown if topics are enabled for the list.
•
Subject – Enter the subject line for the email message posted to the list.
•
Content-Type – Use the drop-down menu to select the format of your email message. You may select
Plain Text or
HTML.
•
Plain Text – To add a plain text message, type directly into the text box or copy and then paste your text into the text box.
•
HTML – To add an HTML message, click the
[Upload HTML] button. This will start an applet that will allow you to browse for your HTML file and then automatically upload it along with any inline image files. If your HTML file contains links to remote image files, the applet will check them for errors. After the upload is complete, your message will be displayed as HTML code in the text box. Any inline files will be displayed as attachments. To add an HTML message without using the upload applet, select
HTML from the
Content-Type drop-down menu. Next, copy and paste your HTML source code into the text box.
•
Add Part – Click the
[Add Part] button to compose a multi-part message. Multi-part messages usually have a plain text part and an HTML part. To build a multi-part message, select the content type of the first part of your message. Next, add the first part by one of the methods described above. Click the
[Add Part] button to open a second text box. Select the content-type of the second part and then add it to the second text box.
•
Advanced – Use the
[Advanced] button to display a drop-down menu that can be used to select the charset (character set) of the message. If your message requires a charset that is different from the default charset for LISTSERV (American charset US-ASCII), then you can use the drop-down menu to select the matching one before you type or paste in your message. This selection will not translate one charset to another. It is used to sync the charset of the original message with LISTSERV so that it can be encoded correctly for sending.
•
RSS Abstract – If available, enter the information you’d like available to those who use RSS feeds.
•
Attachments – Use the
[Browse...] button to find your file on a local drive. Click the
[Attach] button to attach your file to your outgoing message.
Note: Each list can have its own rules for accepting or rejecting messages with attachments. The
[Browse...] and
[Attach] buttons will function regardless of individual list settings. As a result, your message may be rejected or stripped of its attachment by the list. Be sure to check with the list owner if you have any questions.
To send mail to the list by using your email client program, simply compose a message and address it to the list address in your email client. The list address is the one that sends mail to the list moderator, if there is one, or directly to all the other subscribers. List addresses are formatted with the name of the list followed by the domain address (e.g. listname@someserver.com).