|
Q: How can I use web fonts in my HTML emails?
By Johannes Hubert
Senior Applications Programmer, L-Soft
When creating a beautifully styled HTML email, the designer may be tempted to also use a nice font that matches the design. But while it's easy in most HTML editors to specify any font you like, with email, recipients can generally only see the font if it's also installed on their device. If not, then the recipient only sees a more or less matching fallback font as a substitute.
Using Web Fonts in Email
One approach that tries to solve this problem are web fonts. A web font is not installed locally on the recipient's device but is downloaded from a font server on demand by the recipient's browser, or in case of email, by the recipient's email client. Support for web fonts in HTML email is not perfect as some email clients are still unable to display them. But more and more can, so web fonts are slowly but surely becoming an intriguing new option for HTML email designers.
A challenge with embedding a web font into an HTML message is that it's a quite technical process and, if done improperly, may even negatively impact the rendering of the fallback fonts. And even if you manage to embed the font properly by editing the raw HTML code, the new font may not be supported by the editor itself, so you cannot see the actual font while designing the message.
Defining Web Fonts in LISTSERV Maestro
LISTSERV Maestro addresses all of these problems. You only need to go through the technical process of defining a web font once per font (which can be done by a single user who prepares the fonts for all other users in the group). Once defined, you can then freely use each web font in your email messages, templates and on the customized subscriber pages. LISTSERV Maestro will properly show the web fonts in the editor and automatically embeds all web fonts that are used in a message so that they are compatible with as many email clients as possible. And those clients that cannot display web fonts will show the defined fallback fonts instead.
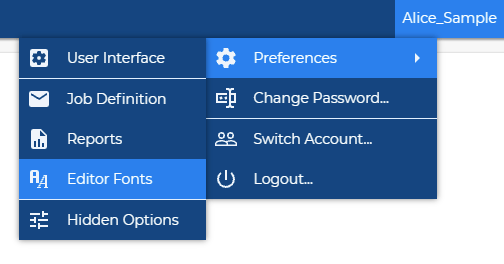
To define a new web font, use the navigation menu and go to Account Name > Preferences > Editor Fonts.
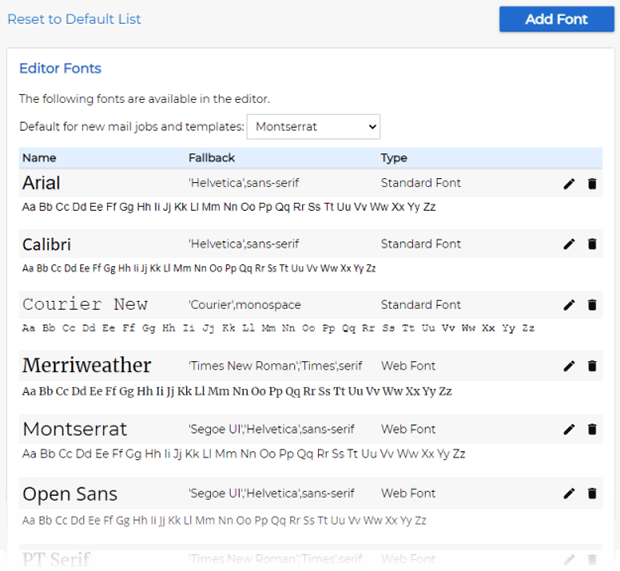
The Editor Fonts screen lists all currently defined fonts. As you can see, some standard fonts and some web fonts are already defined by default and are, therefore, already available in the LISTSERV Maestro editor.
Web fonts are hosted on font servers, from where the recipients' email clients can download the fonts on demand. You could theoretically host such a server yourself, but usually you will simply use a web font from one of the freely usable web font repositories, like for example Google Fonts. Usually, you will find the font that you want to use by browsing through such a repository in the first place.
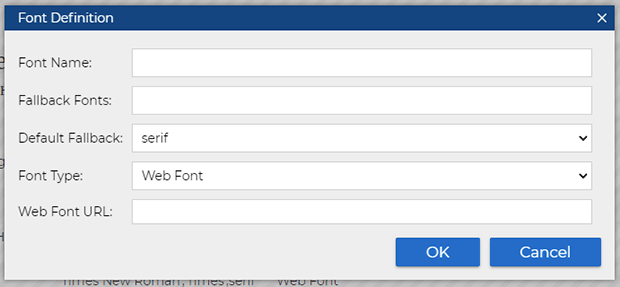
When you find a font that you would like to use in LISTSERV Maestro (make sure that the font's license allows you to use it), go to the Editor Fonts screen as shown above and click the Add Font button in the top-right corner. In the dialog that opens, enter the following properties of the font:
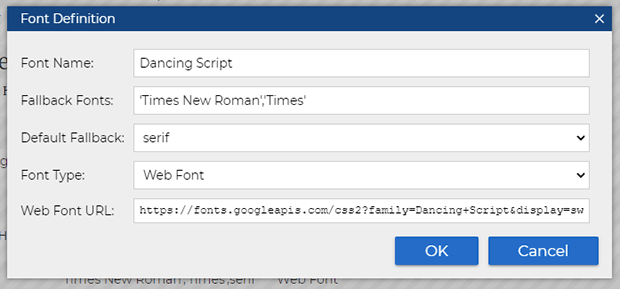
- Font Name: Specify the name of the font. This must be a single name. Do not enclose the font name in any quotes and do not add any additional escape characters. Simply enter the plain and exact font name, for example Dancing Script.
- Fallback Fonts: This property is optional. Use it to specify one or more fonts that will be used as fallback fonts if the recipient's email client cannot render web fonts. If you specify multiple fonts, they must be separated by a comma. The fonts must be specified using the correct spelling, quoting and escaping rules for fonts in CSS, for example 'Times New Roman','Times'.
Note that a fallback font must be present on the recipient's system to be considered. If the first fallback font is not present, then the email client uses the next fallback font and so on. If none of the fallback fonts are available (or none is specified in the first place), the email client will fall back to the "Default Fallback" (see next item).
- Default Fallback: This property defines the final fallback if the web font itself cannot be rendered and if none of the fallback fonts specified above are available. Select one of the available options, for example serif.
- Font Type: As you are defining a new web font, you must set this selection to Web Font.
- Web Font URL: This is where it starts to get a bit technical. To find out the URL that you need to enter here, use a browser to visit the online font repository where you found the font in the first place. On the page for this font, you should find an option that tells you how to "embed" or "use" the font on your web page. The details for this are different between repositories and frequently change over time, so you may have to look around a bit to find it. This is usually shown as embedding either a <link> tag or an @import directive, both of which are fine for our purposes. The <link> tag is quoted with some HTML code to copy & paste, the @import directive with some CSS code. Both contain the font URL at some location.
Copy & paste this font URL (without any of the surrounding HTML or CSS code) into the Web Font URL field of the dialog, for example https://fonts.googleapis.com/css2?family=Dancing+Script&display=swap
The filled-out dialog then looks something like this:
Click the OK button to save the settings and, if everything was specified correctly, the new font will appear among the list of available fonts:
And that's it. From now on, you can use this font in all editors in LISTSERV Maestro that allow a font selection, and LISTSERV Maestro will take care of embedding the necessary HTML code for you so that the font also appears correctly in all web font compatible email clients.
Got Feedback?
Let us know about topics and tasks you'd like to see covered in future tech tips. |
 |
Next Steps
|