| ||||
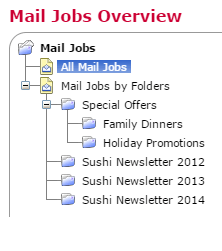
Q: What are some of the most significant feature changes in LISTSERV Maestro 6.0? LISTSERV Maestro 6.0 not only introduced new features but also made changes to some existing ones, including how mail jobs are displayed and organized, how to switch between source code and design mode in the HTML content editor, and how to create job comparison reports using a new, more flexible reporting system. In this tech tip, we'll take a look at five commonly used features that have been streamlined in LISTSERV Maestro 6.0. 1. List of All Mail Jobs In LISTSERV Maestro 5.0, the mail jobs tree on the "Mail Jobs Overview" page had two top level nodes: "All Mail Jobs" and "Mail Jobs by Folders". These two nodes gave you two different views on your collection of mail jobs. With the "All Mail Jobs" node selected, the job list displayed all of your mail jobs at once, in a flat list. With the "Mail Jobs by Folders" node selected, the tree displayed a hierarchy of your own user-defined folders and with a certain folder selected, the job list displayed only the mail jobs in this folder. This allowed you to view your mail jobs in a structured fashion.
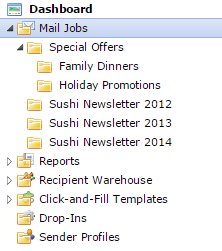
In LISTSERV Maestro 6.0, the "Mail Jobs Overview" page has been integrated into the new LISTSERV Maestro Explorer in form of the "Mail Jobs" node. This node no longer has separate sub-nodes for "All Mail Jobs" and "Mail Jobs by Folders". Instead, it always displays your user-defined folder hierarchy and with a certain folder selected, the job list shows only the mail jobs in this folder. 
So at first glance it seems as if there is no longer a way to view all of your mail jobs at once, in a flat list. However, this is still possible, via the search option at the top right corner of the job list. Click this Search link to open the search options page. Then activate the search and change the "Folder" choice from "This folder only, ignore subfolders" to "This folder and subfolders (recursively)". Then click [OK]. 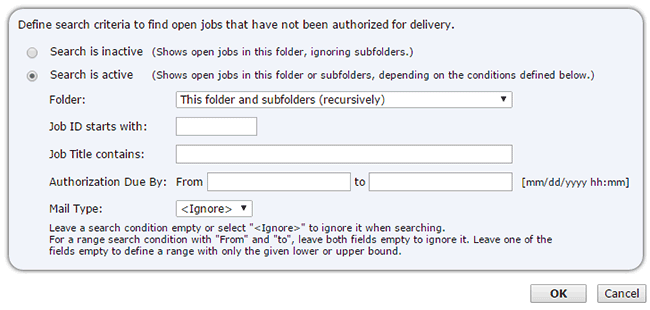 With the folder option set to "recursive", whenever you select a job folder in the explorer tree, the job list shows not only the mail jobs in this folder, but also all mail jobs from all subfolders. So to view a list of all your mail jobs, no matter in which subfolder they are located, set the option to "recursive" and then select the "Mail Jobs" root node in the explorer tree. 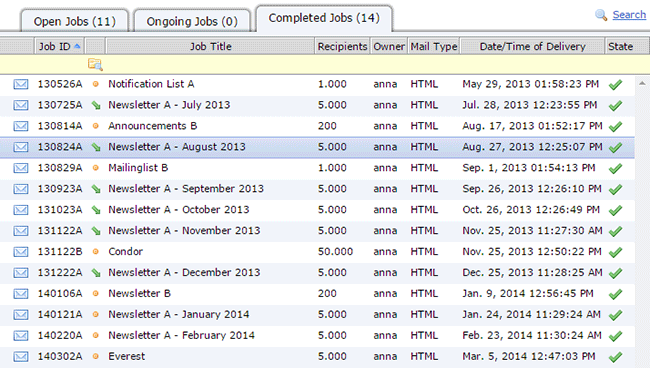 The job list displays the active search in form of a yellow bar just below the table headers, and in this yellow bar, it shows the currently configured search criteria. The recursive folder search is displayed in form of a "folder + magnifying glass" icon. The icons in the column below show you the location of each mail job: A yellow dot means that this mail job is located directly in the selected folder, while a slanted green arrow means that this mail job is located in one of the subfolders. Hover the mouse over the green arrow to display the name of this subfolder. 2. Using or not Using the WYSIWYG Content Editor In LISTSERV Maestro 5.0, when you created an HTML email, you had the option of either using the built-in WYSIWYG HTML editor or using a simple text editor to edit the HTML code directly. You made this choice by clicking on the "HTML" icon in the icon bar at the top of the "Define Message" page and then selecting either the "HTML source code editor (text editor)" or "Visual HTML editor (WYSIWYG)" on the "Message Content Type Settings" page. 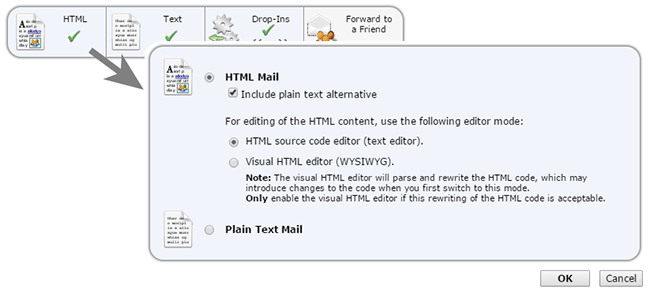 In LISTSERV Maestro 6.0, this icon bar and the "Message Content Type Settings" are no longer available and there are also no longer two different editors for HTML content. Instead, there is only a single HTML editor, which has two modes: "Design" mode to edit the HTML content in WYSIWYG fashion and "Code" mode, with syntax highlighting, to edit the underlying HTML source code. You can freely switch between these two modes in the editor itself.  In some situations, especially if you create the HTML code outside of LISTSERV Maestro or if you need to hand code special HTML features that are not supported by the design mode of the HTML editor, it is not desirable for LISTSERV Maestro to switch the editor into design mode. This is because in design mode, the HTML editor parses the given HTML code and reformats it according to the requirements of the editor and also removes HTML tags and properties that are incompatible with the editor. To avoid this, you can activate the "HTML Code Protection" mode of the HTML editor. You can do this in the editor itself. First switch into code mode, then click on the "HTML Code Protection" button. 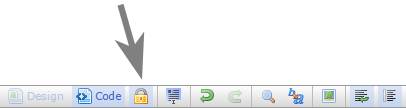 Or you can activate the code protection on the "Options" tab of the "Define Message" page. 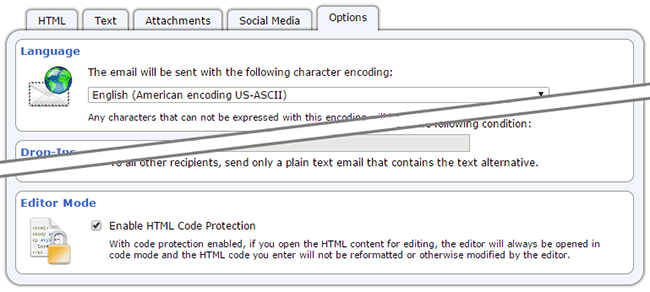 With code protection enabled, if you open the HTML content for editing, the editor will automatically start up in code mode instead of design mode, and the HTML code you enter will not be parsed or modified by the editor. The code protection is automatically enabled for all HTML content that is uploaded into LISTSERV Maestro via the template gallery option "HTML Content Created in External Editor (Uploaded)". For HTML content that you create directly in LISTSERV Maestro, code protection is initially disabled and you can enable it manually. Of course, you can also disable the code protection again at any time. 3. Job Comparison Reports In LISTSERV Maestro 5.0, if you selected several jobs in the "Completed Jobs" list, you had the option to create a "Job Comparison Report" to compare the tracking events of the selected jobs. 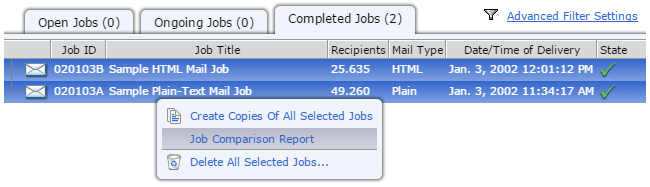 In LISTSERV Maestro 6.0, this type of comparison report no longer exists. You can, however, easily create a normal tracking report that allows you the same kind of tracking event comparison. Simply select the desired jobs in the "Completed Jobs" list and then select the option "Create Combined Report On All Selected Jobs". 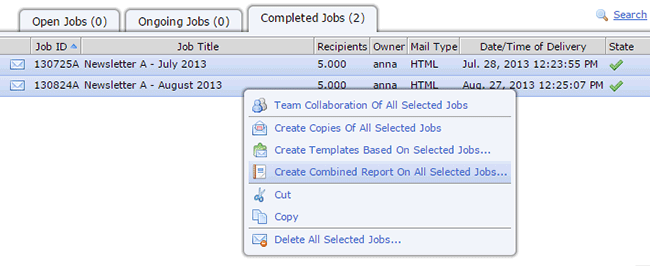 Then on the report definition page, set the "Grouping" setting to "Jobs separately (to compare job results)" and select the set of events that you want to include. Then click the [Show Report] button to view and, if desired, save the report. 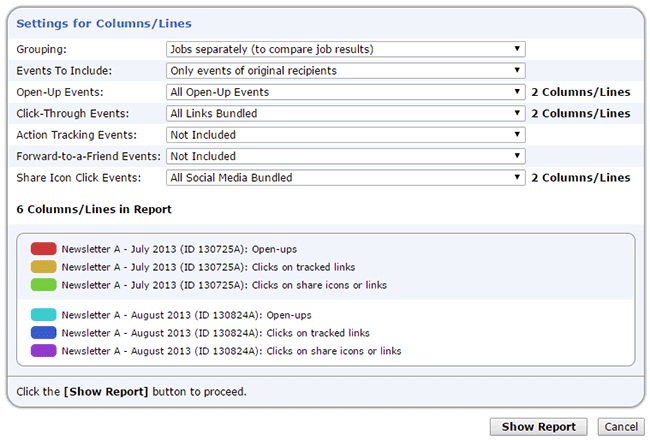 4. Unique and Non-Unique Event Reporting In LISTSERV Maestro 5.0, a tracking report of the type "Sum of events" could be set to count all events or to only count events unique for each recipient. In the latter case, only one event of each type was counted for each recipient, even if the recipient triggered the same event several times. Or a report could be set to the type "Event distribution over time" so that it would plot all events, even duplicates, over a timeline. In LISTSERV Maestro 6.0, tracking reports no longer have these distinct types "Sum of events" or "Event distribution over time". Instead, a tracking report always displays two charts – a bar chart at the left and a timeline distribution chart at the right. 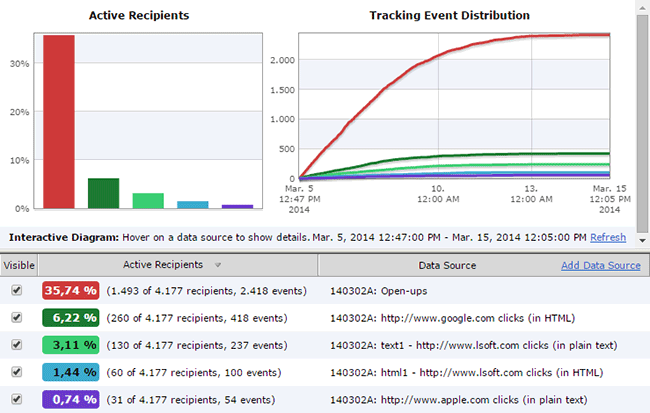 The distribution chart at the right always plots all events over time and is comparable to the old "Event distribution over time" report with the option "Accumulate interval values". The bar chart at the left is comparable to the old "Sum of events" report. The question is: Does it show all events or only unique events? The answer is: It depends on your preference. Literally, because the behavior of this bar chart can be defined via one of the user preferences in LISTSERV Maestro. Select the "Reports" option from the "Preferences" menu and define the desired behavior in the "Tracking Reports Main Metric" section. 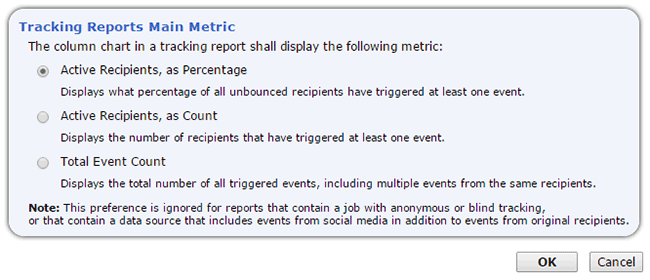 The "Active Recipients" options are comparable to the old "Count only events unique for each recipient" option. A recipient counts as "active" if he triggered at least one event, so the number of active recipients in the new report is equal to the number of "unique events" in the old report. This active recipients count can be expressed either as a percentage relative to the number of unbounced recipients or as a simple number. The third option "Total Event Count" is comparable to the old "Count all events" option. Whatever selection you make on the preferences page impacts all tracking reports that you view, i.e., all tracking reports are displayed with the same main metric. Note that this main metric is not only used for the bar chart, but also for the report summary table below the two charts, where the main metric is displayed in the color patches. 5. Special Report Data Sources In LISTSERV Maestro 5.0, it was possible to add special data sources to a tracking report that were not based on actual tracking events, but that were based on other metrics. These were the data sources of the types "Total Number of Sent Messages", "Total Number of Unbounced Messages" and "Total Number of Bounced Messages". These data sources were added to the report in the form of horizontal dashed lines at the Y-axis level that corresponded to the data source's value, like for example the pink dashed "Number of recipients" line in the image below. 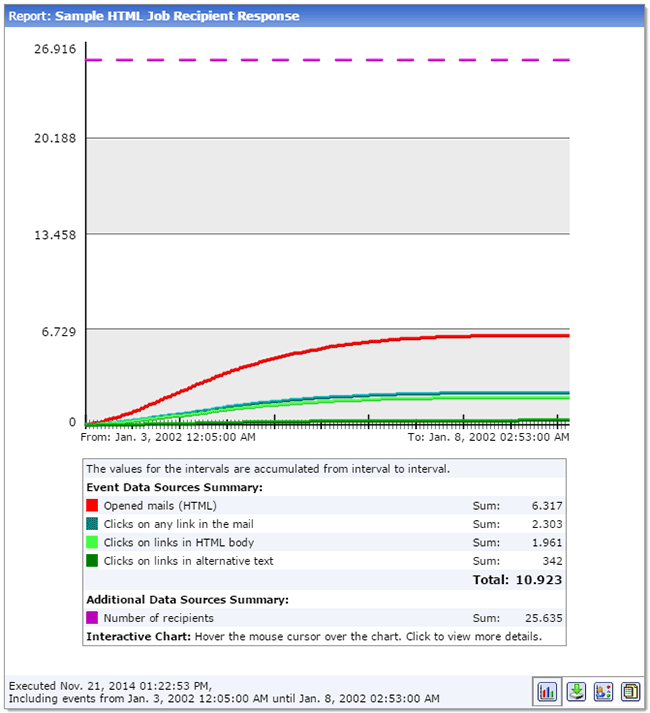 In LISTSERV Maestro 6.0, these special data sources are no longer available. Instead, it now has a new system report called "Delivery Statistics" that contains the same information but for all jobs at once. The report chart plots the delivered (unbounced) recipients and bounced recipients of all jobs over a timeline, with each job plotted at the time of its delivery. Click on a data point in the chart to open a popup that shows the exact delivered, bounced and total recipients counts for that job. 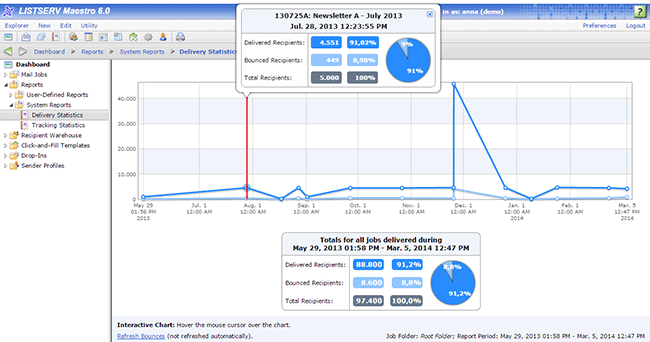 Subscribe to LISTSERV at Work. | ||||
© L-Soft 2014. All Rights Reserved. |