|
Q: How can I create effective content templates in LISTSERV Maestro?
By Johannes Hubert
Senior Applications Programmer, L-Soft
If you have a recurring mailing, for example a regular newsletter, that uses a consistent format and style every time, then it's usually a good idea to create a content template for it. The benefit of using content templates is that it separates the newsletter formatting and styling from the actual content, which will make your overall workflow more efficient.
The Benefits of Content Templates
Of course, you could probably get by without using a template. For example, you could create the mail job for the first issue of the newsletter and enter the desired format and style directly in the content editor. And for the second issue, you can make a copy of the first mail job and again edit the content in the editor, switching out the old content with that of the new issue.
However, this can be an error-prone approach because it's not possible to separate the newsletter formatting and styling from the actual content. The designer of a newsletter is often a different person than the content writers. The content team could, by mistake or unknowingly, change the structure in an undesired way, mess up colors or styles, or delete an important legal note or contact information.
Instead, if you create a template for the newsletter, you can put the format and style into the non-editable parts of the template so that the people who later enter the content cannot change it. You can fill the template with sample content or placeholders, which are easily recognizable as fillers that need to be replaced with real content.
Creating a Content Template
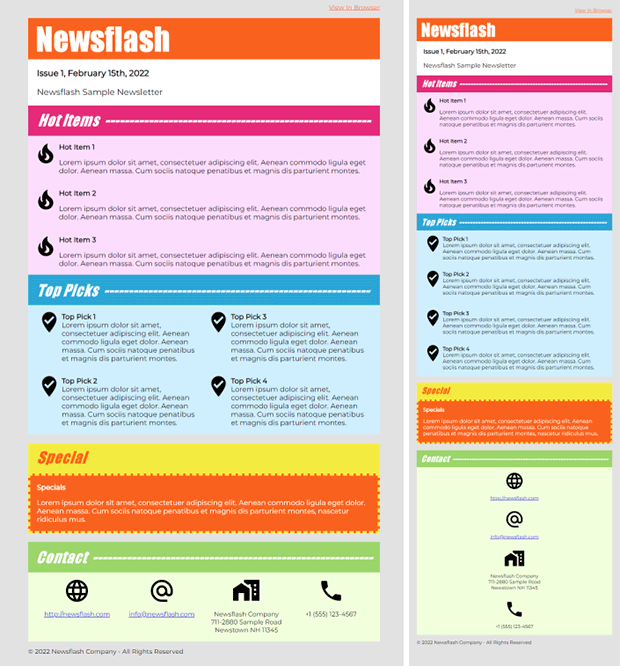
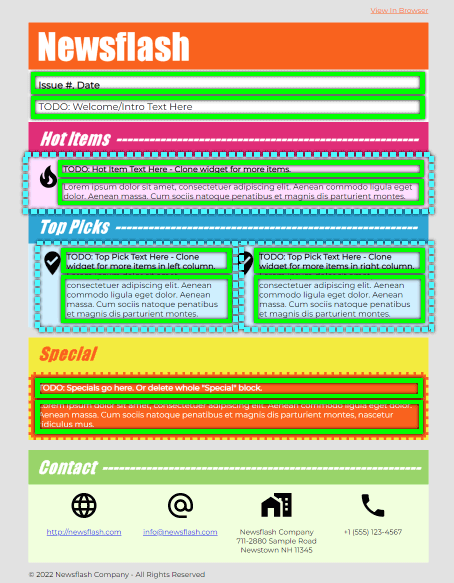
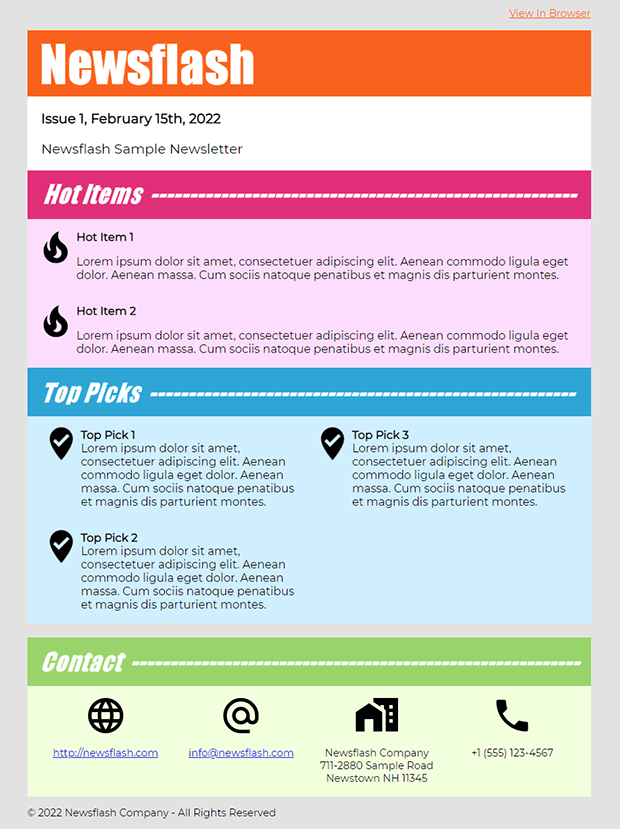
For our example, we use a fictitious "Newsflash" newsletter. It has two sections, "Hot Items" and "Top Picks", where one or more corresponding articles are supposed to be included in each issue. It also has an optional "Special" section that can be left out in a given issue. Finally, it has a "Contact" section, plus some smaller elements like a "View In Browser" link and a copyright notice, which are supposed to appear in each issue. And, of course, we have designed this newsletter using the fluid design widgets of LISTSERV Maestro so that it renders properly on larger screens and mobile devices.
The following image shows this newsletter, with the wide version on the left and the narrow version on the right, where the multi-column elements are automatically rendered one after the other instead of side-by-side:
To create this template, you would probably start off with a centered content box widget of a defined width (800px in our example) as the main element on the page.
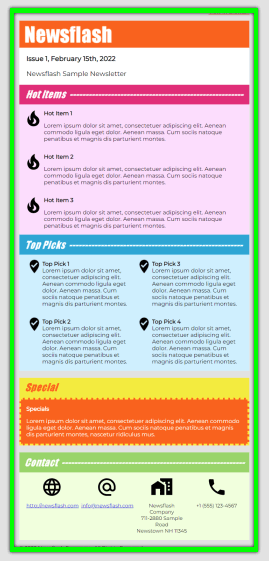
At this point, we need to take a moment to talk about the concept of an "editable block". As explained earlier, one of the main purposes of a content template is to provide a framework that can be used later when adding the content of a mail job, where some parts of the framework are fixed and cannot be changed in the content editor, while other parts are editable.
Returning to our sample newsletter, we see that the user is supposed to make changes in various locations. There needs to be a unique issue number, date and an introduction. You also need to provide articles for "Hot Items" and "Top Picks" and, optionally, information in the "Special" section.
So the first idea may be to put all of this into an editable block as this image illustrates. In the image, the editable block is highlighted with the bright green frame. And as you can see, it simply encompasses all of the content of the newsletter, so all of it is editable. In other words, with this approach, we would put a single editable block into the template at a rather high level and simply define all the template content in this editable block.
But would this be a good idea? Probably not because it once again treats almost all details of the template as editable parts. So this template wouldn't be any better than not having a template at all, like simply copying and modifying the content of the previous issue. Again, the person who provides the content would have more control over the actual structure and design of the newsletter than we would like.
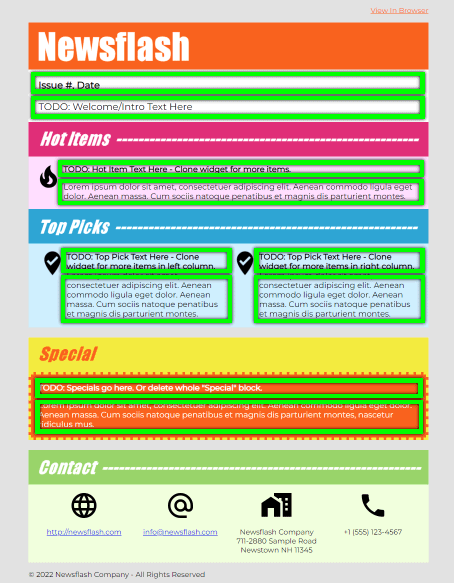
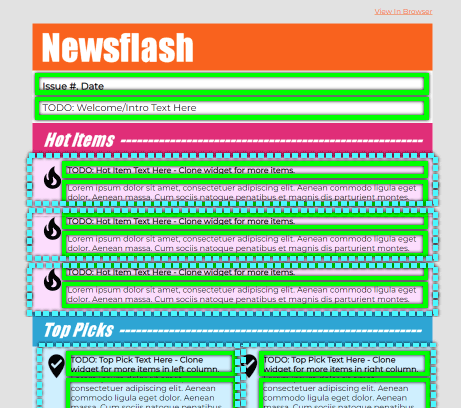
So instead, we use several editable blocks and make them as "small" as possible so that only those parts that are supposed to be editable are inside such a block. The following image illustrates this. It shows that we now have ten different editable blocks, as highlighted by the green frames:
We now have an editable block for the issue number, date and introduction, another pair of editable blocks for the title and the body of the "Hot Items" article, two pairs of editable blocks for the title and the body of the "Top Picks" articles (one for the left and one for the right column) and another pair of editable blocks for the title and the body of the "Special" section.
Everything outside of these ten editable blocks won't be editable when the template is used for populating the content. In our examples, that includes the various title bars, as well as the whole "Contact" section, which is not supposed to be edited. The actual structure and order of the sections and all of the colors and other styles, including the bold style for the various article titles and the yellow/orange dotted border of the "Special" section, are also defined outside of the editable blocks, so those are fixed too. The person who later enters the actual newsletter content now only has access to the ten editable blocks.
This is already a great improvement over having only a single editable block for the whole template, but there's more.
Defining Cloneable Blocks
As you can see, now there is only one sample article specified in the "Hot Items" section. And there is only one sample article in each of the two "Top Picks" columns. So what happens if the newsletter is supposed to have more "Hot Items" or "Top Picks"? Well, editable blocks can be defined as "Cloneable" (this can be set in the editable block's properties dialog) so that the person who later provides the newsletter content can make a copy of an editable block on the fly. With a cloneable editable block that contains the article, we could solve this problem, allowing the content provider to create as many articles as needed.
But in our case, we don't want to have a single editable block that contains both the article title and body. Because that would allow the content provider to override the title/body structure as defined in the template, for example by not making the title bold, or by removing it altogether. By using two separate editable blocks instead, of which the one for the title also has the bold style defined, we hardwire the title/body structure with its styling into the template, leaving fewer options for the content provider to deviate from this structure.
But now we have the problem that we cannot simply make these editable blocks cloneable, because if we did, then cloning an article title would simply create a second title right after the first, just like cloning the body would simply create a second body without a matching title. But we want the content provider to be able to clone the title/body pair as a whole and, while we are at it, we also want the illustrative icon image to the left of the article to be cloned at the same time.
Defining Cloneable Surrounding Content Widgets
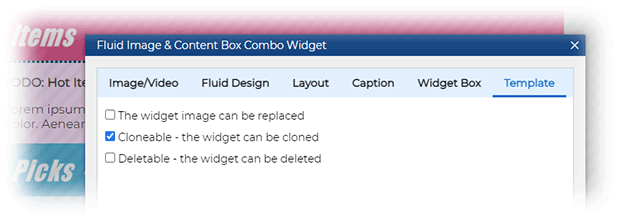
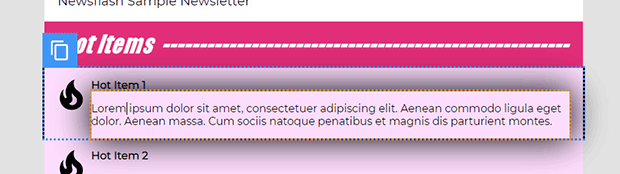
The solution is to not make the individual editable blocks cloneable, but instead activate the cloneable option for the surrounding content widget that contains both the title and the body (and also the illustrative icon). This option allows the template creator to define a widget that is outside of an editable block, and therefore normally not changeable by the content provider, to still be cloneable, even though it is not otherwise editable. This option can be found on the "Template" tab of the surrounding widget's properties dialog, for widgets that have an editable block nested into their content block.
In our sample template, we have set this "Cloneable" option for the "Hot Items" widget, as well as for the two "Top Picks" widgets as shown below, where the cloneable widgets are highlighted with the dotted blue borders. Notice how these top-level widgets contain both editable blocks, for title and body, as well as the illustrative icon.
Cloning and Deleting Content Widgets in the Content Editor
So when this template is used in the content editor of a mail job, the user can easily duplicate (or clone) each of these articles. When the user puts the cursor into one of the editable blocks of an article, not only is the editable block highlighted with a border, but also the surrounding cloneable widget is highlighted. And the outer widget border has an associated clone icon that the user can click to clone this widget with all its content, including the editable blocks.
When a template widget (or editable block) is cloned, then a new widget appears right after it in the content. This new widget is initially identical to the cloned widget, but it can be edited separately.
So if our newsletter's content team needs to provide three "Hot Items" articles, they would use the above icon to clone the original article widget twice, for a total of three articles.
It's important to understand that this cloning of the template widgets is done in the content editor of the mail job, not the template editor.
In the template editor, during template definition, only a single article widget (with its editable blocks and sample content in it) is created, with the "Cloneable" option selected. And when this template is later used in the content editor of a mail job, the person who provides the content can then clone the widget as often as required.
In our example, the two article widgets in the left and right columns of the "Top Picks" section were also defined with this "Cloneable" option so that the user can later add more articles to each of these columns too.
Another notable case is the "Special" section in our sample template. When we described our "Newsflash" newsletter, we said that this "Special" section is supposed to be optional. In other words, some newsletter issues may have it, while others may not. The decision whether to include or omit it is up to the user who fills out the newsletter content, not the person who creates the template.
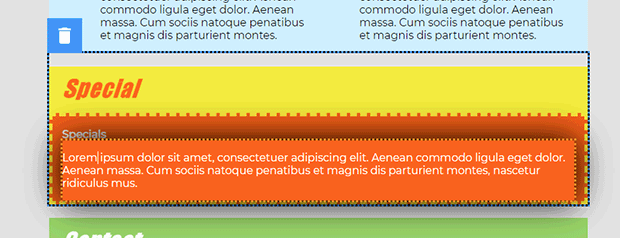
To facilitate this, we have defined the surrounding widget of this "Special" section with the "Deletable" option set. The option can be set on a widget similar to the cloneable option described above.
When this template is then used in the content editor of a mail job, the user can now delete the "Special" section by putting the cursor into one of the editable blocks of the section. This highlights not only the editable block but the surrounding deletable widget too. And the outer widget border has an associated delete icon that the user can click to delete this widget with all its content, including the editable blocks.
To wrap up, the following image shows how our newsletter would look in the content editor of a mail job if the cloning feature was used to create two "Hot Items" and three "Top Picks", and the delete feature was used to the remove the "Special" section:
Bonus: If you want to take a detailed look at the sample "Newsflash" template, or maybe even use it as a starting point for your own template, you can download it at:
https://www.lsoft.com/news/issue1-2022/newsflash.zip
You can then use the downloaded template file by importing it into your LISTSERV Maestro account by going to New > Content Template > Import Template from the main menu. Then select the template ZIP file for import (do not unpack the content of the ZIP file first, but simply import it as it is).
Got Feedback?
Let us know about topics and tasks you'd like to see covered in future tech tips. |
 |
Next Steps
|