|
Behind the Scenes: Creating a Fully Automated Email Campaign
By Jani Kumpula
Senior Webmaster/User Interface Designer, L-Soft
In the previous issue, we announced the launch of a new email course, allowing people to sign up to receive weekly LISTSERV video tutorials directly in their inboxes. This 12-week course is fully automated and runs continuously in the background, so whenever new people subscribe, they will always go through the entire course in a sequence without human intervention. Let's go behind the scenes and find out how to set up this type of automated email campaign.
Creating a Subscriber List
The first step in the process is to create a list for the new email campaign in LISTSERV Maestro. Use the main menu and select "Subscriber List" under "New" to get started. Then follow the steps and add any number of profile fields that you'd like to require. To keep things simple, we'll make only the EMAIL and NAME fields mandatory. We'll also add a special "Consent to Terms" field, which new subscribers need to agree to in order to subscribe to the list. This field can be used to explain the course and to set expectations.
After you are finished, right-click on the name of your new list in the subscriber warehouse and select "Customize Layout" under the "Public Subscriber Website" menu. Here you can customize your sign-up pages to match your website or graphic profile and create custom confirmation and welcome messages for your new subscribers.
When you are satisfied with all of your customizations, you are now ready to start setting up the automated email campaign.
Creating the First Message in the Sequence
Creating the first message in the sequence is mostly like creating any other type of mail job in LISTSERV Maestro. Simply follow the steps in the workflow.
On the recipient definition step, select the name of the list that we just created and continue.
After we have entered the content for the first message in the sequence, the next step is the tracking definition. The plan for this course is not only to send a weekly email of tutorials but to also send reminder messages to those subscribers who have not yet viewed the current tutorials a few days before the following week's course email is scheduled to be sent out. In order to send these types of follow-up messages to select subscribers, you need to use "Personal Tracking" for all of of your jobs. If the system doesn't know exactly which of the subscribers have clicked on the tutorials and which haven't, it cannot send follow-up messages like reminders. Depending on what type of data you're interested in, you can choose to track just open-ups, or you can also track clicks on the individual tutorial videos.
Scheduling the First Message in the Sequence
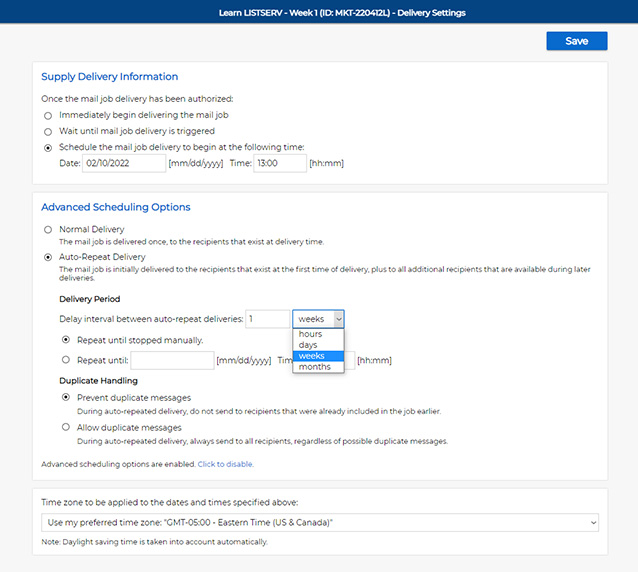
The next important step for creating automated jobs and sequences is the scheduling. For this course, we want to send out each weekly course email at 1:00 p.m. on Thursdays. Enter the date and time that you'd like this first message to be sent out and click the "Enable" link to show the advanced scheduling options. Check the box for "Auto-Repeat Delivery" and use the pulldown menu to select "1 Week" for a weekly delivery interval. Finally, make sure that you select "Prevent Duplicate Messages" under duplicate handling.
 What this does is that after the initial delivery of the Week 1 course message, the system will repeat the delivery of the job every Thursday at 1 p.m. – but only to those who haven't already received it. In other words, subscribers who have already received the Week 1 email will never get another copy. Only those subscribers who are new to the list will be included in the mailing. This auto-repeat delivery will continue until you stop it, which means that you can have the email campaign running for as long as you like, and every time you attract new subscribers, they will receive the Week 1 tutorial email on the first Thursday at 1 p.m.
Creating the First Reminder Message
The reminder email is created in the same way as the original message with one major difference. On the recipient definition step, instead of sending it directly to the list, click the link at the bottom of the screen to change the source and select "Determine Recipients Based on Another Job".
Then select the Week 1 message from the pulldown menu.
On the next step, you have many different options. You can choose to send the follow-up job to only those subscribers who opened the message, those who ignored the message, those who clicked on a link in the message or those who ignored one or all of the links in the message. In this case, since this message is a reminder, we can either choose to send it to those who never opened the original Week 1 message or those who didn't click on a link to view any of the tutorials. Since click tracking is a much more reliable metric than open-up tracking, we'll send the reminder message to those subscribers who received the Week 1 course email but didn't click on any of the links to the video tutorials.
To do this, select "Clicked, Shared or Performed Other Actions" from the first pulldown menu, "None of the Following" from the second one and "Clicked Any Link in the Email" from the third one.
The summary screen allows you to make sure that you've made all of your selections correctly. In this case, we can see that the follow-up job is based on the original Week 1 message. We can also see that the reminder message will leave out all subscribers who clicked on at least one link in the original message, which is what we want since it would be redundant to send reminders to those who have already viewed the tutorials.
Scheduling the First Reminder Message
Since each new weekly course message will be sent on Thursdays, it makes sense to send the reminder message a few days before that to ensure that subscribers have had a chance to review the current week's tutorials before the new ones arrive. So we'll schedule the reminders to be sent out on Tuesdays. To do this, for the initial delivery, enter the date of the Tuesday the week after the original Week 1 message. Just like with the first message, select "Auto-Repeat Delivery" with a 1-week delivery interval and with duplicates suppressed.
Extending the Sequence Beyond the First Week
We have now finished the course message and the reminder message for Week 1, but we're not done. Since this is a 12-week course, we need to extend the sequence beyond Week 1. To create the Week 2 course message, the workflow is identical. The only difference is the recipient definition. Since we want the Week 2 message to be sent only to those who have already received the Week 1 message, we need to again determine the recipients based on the reaction to another job, just like with the reminder message. Again, the recipients will based on the "Week 1" message.
On the "Source Details" screen, since everyone should get the Week 2 course email (unlike the reminder message, which should only be sent to those who ignored all of the links) we'll choose "Further Activity Irrelevant" from the pulldown menu.
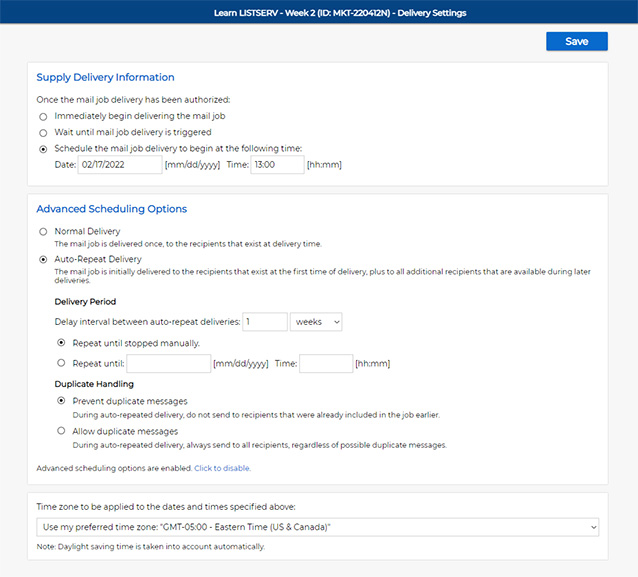
What this means is that the Week 2 course email will be sent to everyone but only if they have already received the Week 1 email. On the scheduling step, we will once again make this an auto-repeat job with a 1-week interval and duplicates suppressed. Since this is the second weekly message in the sequence, the initial delivery date will be the Thursday after the Week 1 message.
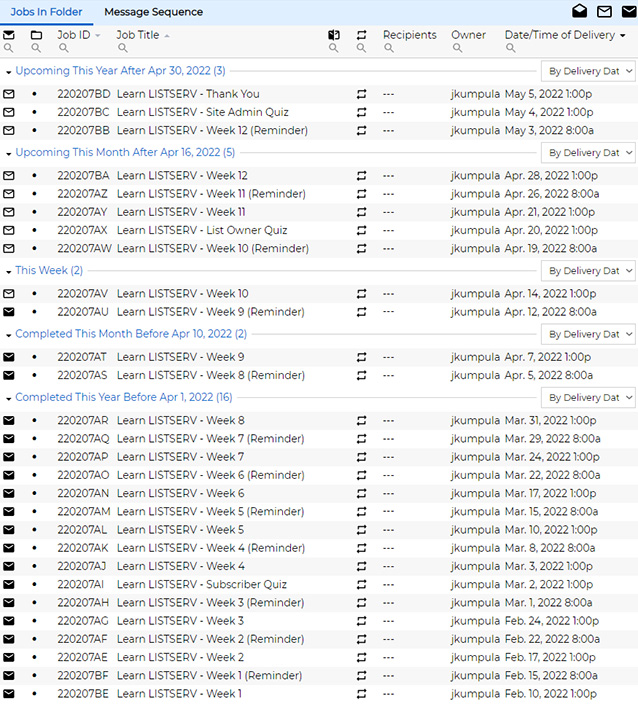
 Now that we have a handle on how to create sequences, the rest is easy. The recipient selection for every message after the very first Week 1 course email is based on a previous job. In other words, to create the Week 2 reminder message, we would set everything up exactly like the Week 1 reminder message except that this one would be based on the tracking data from the Week 2 message instead and with an initial delivery date one week later. The Week 3 message would be set up exactly like the Week 2 message except that you would send it to only those subscribers who have already received the Week 2 message, with an initial delivery date one week later. To finish the entire 12-week course, just follow this pattern.
Note that the initial delivery date doesn't really matter in the long run. It's just the date when each weekly course email is activated, delivered for the very first time and starts auto-repeating weekly. The only thing that matters is that all of the weekly course emails are scheduled and put into production in the correct order because a follow-up email can never be authorized if it's based on a job that hasn't been delivered yet. You don't even need to have any subscribers to set up a sequence like this since a job is considered "delivered", and therefore active, even if it was delivered to zero subscribers.
 The end result is a fully automated sequence that can be left running for years. Every time someone new subscribes, they will proceed through the sequence in order, with reminder messages and quizzes in between, depending on their interaction with previous messages, after which the course ends for the subscriber. The auto-repeating for each job occurs in the background, so if you have new subscribers that fit any of the selection criteria, then they will receive the message. If you don't, then nothing is sent, and the system will wait a week and check again.
To join the Learn LISTSERV email course and see how it works in practice, visit:
https://www.lsoft.com/courses/learnlistserv.asp
Next Steps
|