The first thing to understand is that LISTSERV
Maestro’s functionality centers on characterizing the various parts of an email “job.” A “job” refers to all of the elements that make up the creation, scheduling, delivery, and tracking of customized email messages. Throughout the LISTSERV
Maestro documentation, “job”, “email job”, and “mailing” are used interchangeably and represent the same thing – the summation of the multiple functions that make up the definition and distribution of customized email messages.
Next, The LISTSERV Maestro Interface contains two main features that enable users to easily navigate from one area to another. These two features are the
Toolbar and
Dashboard. The following sections describe each in detail.
The Mail Job menu lets you create a new job, view a list of open jobs (jobs that you have not finished setting up the criteria for), view a list of ongoing jobs (jobs that repeat), and a list of completed jobs. The options available vary depending on where you are in the application and what function you are performing. The possible options are:
|
•
|
Import – Import a previously archived job from the archives.
|
|
•
|
Open Jobs – Display the list of open jobs that have not been authorized for delivery.
|
|
•
|
Ongoing Jobs – Display the list of ongoing jobs that are authorized for delivery and that are currently being processed or awaiting delivery.
|
|
•
|
Completed Jobs – Display the list of completed jobs that have been delivered or closed after a delivery failure.
|
|
•
|
Job Info – Define the general information of the email job, such as the job title.
|
|
•
|
Copy Settings From Other Variant – Copy the job definition settings from another variant job of the same A/B-split job to the current variant job. The copied settings will include the message definition, tracking definition, sender definition, and test delivery definition.
|
|
•
|
Authorize Delivery – Authorize the job for delivery.
|
|
•
|
Team Collaboration – Define the team collaboration settings for the job.
|
|
•
|
Revoke Send Authorization – Revoke the delivery authorization of the job.
|
|
•
|
Stop Sending – Stop delivery of the job.
|
|
•
|
Close Job – Close the job in its failed state.
|
|
•
|
Retry Sending – Retry the delivery of the failed job.
|
|
•
|
Resume Sending – Resume the delivery of the job to the pending recipients.
|
|
•
|
Move Job to Archive – Move the selected job to the archive. An archived job will no longer be accessible in the normal LISTSERV Maestro User Interface; it will appear as if the job was deleted. Only the Maestro administrator can import an archived job. Also, an imported job will be “frozen” into the state that it had when it was initially archived (for example, no more tracking events will be collected for this job).
|
|
•
|
Select All – Select all jobs in the current job list.
|
|
•
|
Enable Multiple Job Actions – Enable the multiple job actions. Checkboxes will appear next to every job, allowing multiple job selection, and the Multiple Job Actions menu will be displayed.
|
Notes: By default, multiple job actions are disabled and the menu contains only the
Enable Multiple Job Actions option. By selecting this option, multiple job actions become enabled, which has two effects: The menu now contains more options, and in the job list, a checkbox is shown in front of each listed job. Check those jobs that you want to manipulate, then select the desired option from the
Multiple Job Actions menu. This action will then be applied to all selected jobs. For the administrator, the multiple job actions are always enabled and can not be disabled.
The Report menu lets you create a new report, view any existing reports, and open the Delivered Jobs Statistics and Delivered Recipients Statistics reports. The options available vary depending on where you are in the application and what function you are performing. The possible options are:
|
•
|
New Report – Create a new tracking statistic report.
|
|
•
|
Reports – Display the list of currently available tracking statistics reports.
|
The Recipient Warehouse menu lets you create new and manage datasets, lookup tables, and target groups. You can also edit the bounce process settings for the warehouse. The options available vary depending on where you are in the application and what function you are performing. The possible options are:
|
•
|
New Dataset – Create a new recipient dataset.
|
|
•
|
Datasets – Display a list of currently available recipient datasets.
|
|
•
|
Datasets & Lookup Tables – Display the administrator’s page for recipient datasets and lookup tables.
|
|
•
|
New Lookup Table – Create a new lookup table.
|
|
•
|
Lookup Tables – Display the list of currently available lookup tables.
|
|
•
|
New Recipient Target Group – Create a new target group using one of the following options:
|
|
•
|
Based on Dataset – Create a new target group that is based on a recipient dataset.
|
|
•
|
Based on Database Access by LISTSERV Maestro – Create a new target group based on a database accessed by LISTSERV Maestro.
|
|
•
|
Based on Database Access by LISTSERV – Create a new target group based on a database accessed by LISTSERV.
|
|
•
|
Target Groups – Display the list of currently available target groups.
|
|
•
|
Bounce Processing – Define the bounce processing strategy for the Recipient Warehouse.
|
The Utility menu lets you create new and manage drop-in content and sender profiles; plus, it lets you change your account password. The options available vary depending on where you are in the application and what function you are performing. The possible options are:
|
•
|
Upload Template – Create a new content template by uploading a content template definition file (ZIP-file).
|
|
•
|
Drop-Ins – Display the list of currently available drop-ins.
|
The Dashboard menu lets you create new and manage the configuration of your Dashboard(s). This menu is only available from the Dashboard screen. The available options are:
|
•
|
Switch Dashboard – Show the list of available Dashboards. From this list, select which one will be displayed as the current Dashboard in the current session. Once selected, that particular Dashboard will be displayed.
|
|
•
|
Hide/Show Default Sections – Hide or show any of the default Dashboard sections (applies only to the currently selected Dashboard).
|
|
•
|
Create New Dashboard – Create a new Dashboard with all default sections, in default order, without any Dashboard reports.
|
The Dataset menu lets you manage the datasets, categories, and members. The options available vary depending on where you are in the application and what function you are performing. The possible options are:
|
•
|
Edit Category – Edit the settings of the category that is currently selected in the dataset tree.
|
|
•
|
Create – Create hosted lists and categories using one of the following options:
|
|
•
|
Create Category – Create a new category (either in the currently selected category or in the root of the dataset tree).
|
|
•
|
Convert or Clone Standard LISTSERV List – Covert an existing, non-hosted LISTSERV list into a Hosted LISTSERV List or creates a Hosted LISTSERV List as a clone of an existing non-hosted LISTSERV list without changing the original list.
|
|
•
|
Member Import – Add, update, or delete members in the dataset by uploading or importing a file.
|
|
•
|
Import Members Now – Open the Import Members wizard where you can define which members to import at this moment.
|
|
•
|
Refresh and Manage Linked LISTSERV Lists – Define which of the non-hosted LISTSERV lists at the LISTSERV server to include in the dataset as Linked LISTSERV Lists. This option will also refresh the settings of the already linked LISTSERV lists by reading their current settings (as defined in the list headers) from LISTSERV so that LISTSERV Maestro will be aware of any changes to the lists.
|
|
•
|
Tree Structure – Manage operations in a dataset tree using one of the following options:
|
|
•
|
Cut – Cut the selected category from the dataset tree in preparation for a Cut & Paste operation (more precisely, the node will be marked as “cut”, but it will only be removed from its current parent node once you select Paste in another node).
|
|
•
|
Copy (Categories Only) – Copy the selected category (and its subcategories) in the dataset tree in preparation for a Copy & Paste operation (more precisely, the category will be marked as “copied”, but it will only be created once you select Paste in another node).
|
Note: Any hosted lists in the category or sub category will not be copied.
|
•
|
Paste – Paste a node into the currently selected node or root of the dataset tree. The node to paste must have been marked for “cut” or “copy” (see the Cut and Copy options).
|
|
•
|
Clear Cut/Copy State – Clear the current “cut” or “copy” state and unmarks the node that was to be “cut” or “copied” (see the Cut and Copy options).
|
|
•
|
Delete Dataset – Delete the dataset, including all members and lists contained within it.
|
|
•
|
Delete Category – Delete the category that is currently selected in the dataset tree.
|
The Hosted List menu contains options that are related to the hosted list currently selected in the dataset tree. The options available vary depending on where you are in the application and what function you are performing. The possible options are:
|
•
|
Subscriber Import – Add, update, and delete subscribers in the hosted list by uploading or importing a file.
|
|
•
|
Import Subscribers Now – Open the Import Subscribers wizard where you can define which subscribers to import at this moment.
|
|
•
|
Tree Structure – Manage operations in a dataset tree using one of the following options:
|
|
•
|
Cut – Cut the selected hosted list from the dataset tree in preparation for a Cut & Paste operation (more precisely, the node will be marked as “cut”, but it will only be removed from its current parent node once you select Paste in another node).
|
|
•
|
Copy – Copy the selected hosted list in preparation for a Copy & Paste operation (more precisely, the list will be marked as “copied”, but it will only be created once you select Paste in another node).
|
|
•
|
Clear Cut/Copy State – Clear the current “cut” or “copy” state and unmarks the node that was to be “cut” or “copied”
|
|
•
|
Delete List – Delete the hosted list with all subscribers.
|
The Linked LISTSERV List menu contains options that are related to the Linked LISTSERV List currently selected in the dataset tree. The options available vary depending on where you are in the application and what function you are performing. The possible options are:
|
•
|
List Configuration – Open the corresponding LISTSERV Web Interface page for management of the selected Linked LISTSERV List.
|
|
•
|
Convert To or Clone As Hosted List – Convert the selected Linked LISTSERV List into a Hosted LISTSERV List or clone a Hosted LISTSERV List from it (cloning will not change the original Linked LISTSERV List).
|
|
•
|
Tree Structure – Manage operations in a dataset tree using one of the following options:
|
|
•
|
Cut – Cut the selected Linked LISTSERV List from the dataset tree in preparation for a Cut & Paste operation (more precisely, the node will be marked as “cut”, but it will only be removed from its current parent node once you select Paste in another node).
|
|
•
|
Clear Cut/Copy State – Clear the current “cut” or “copy” state and unmarks the node that was to be “cut” or “copied”
|
|
•
|
Remove Link to LISTSERV List – Remove the link to this LISTSERV List (removes the Linked LISTSERV List node from the dataset tree and the actual list at LISTSERV will remain the unchanged).
|
The Lookup Table menu contain options for the currently selected lookup table. The possible options are:
|
•
|
Lookup Table Settings – Edit general lookup table settings (name, description, encoding, secondary columns).
|
|
•
|
View References – View the dataset and hosted list profile fields that reference the lookup table.
|
|
•
|
Delete All Entries – Delete all entries from the lookup table (but not the lookup table itself).
|
The LISTSERV menu takes you to specific areas in the LISTSERV Web Interface. The options available vary depending on where you are in the application and what function you are performing. The possible options are:
|
•
|
Server Reports – Contains options for reports in the LISTSERV Web Interface.
|
The Back To menu is a quick way to return to the previous screen or to one of the recently visited screens. The possible options are:
The Preferences menu contains options for defining various user preferences. The possible options are:
|
•
|
User Interface – Contains options for defining preferences for the User Interface.
|
|
•
|
Display – Define the display preferences for the User Interface.
|
|
•
|
Mail Jobs – Contains options for defining job-related preferences.
|
|
•
|
New Mail Job – Define the preferences for a new job, including the team collaboration preferences.
|
|
•
|
Recipients – Define the preferences for the recipient definition of a job.
|
|
•
|
Content – Define the preferences for the content definition of a job.
|
|
•
|
Tracking – Define the preferences for the tracking definition of a job.
|
|
•
|
Delivery Test – Define the preferences for the delivery test of a job.
|
|
•
|
Scheduling – Define the preferences for the schedule definition of a job.
|
|
•
|
Reports – Contains options for defining preferences for reports.
|
|
•
|
New Report – Define the general tracking report preferences.
|
|
•
|
Datasets – Contains options for defining preferences for datasets.
|
|
•
|
Team Collaboration – Define preferences for the team collaboration settings of a recipient dataset.
|
The Logout menu logs you out of the LISTSERV Maestro Interface. For a user account that is not part of an identity, then this menu appears as a single item, which, if you click on it, allows you to log out from LISTSERV Maestro. For a user account that is part of an identity, then this menu has the following options:
|
•
|
Switch Account – Switch to a different account in the same identity (without the need to logout and login again).
|
The Help icon is used to access the help associated with the current screen.
The behavior of the Dataset menu on the Toolbar has been updated to accommodate those who may need to access this menu while working with lists. Because of this, there are several changes to the Toolbar:
|
•
|
As soon as you select a dataset, the Dataset menu is displayed. This menu remains visible the entire time the dataset is selected. Therefore, if you select one of the Hosted Recipient List (HRL), Hosted LISTSERV List (HLL), or Linked LISTSERV List (LLL) nodes in the dataset tree, then the Dataset menu is still displayed.
|
|
•
|
If you select a category node (folder) in the dataset tree, then, as before, only the Dataset menu is visible. However, previously, this Dataset menu only showed the category/folder related menu items. This behavior has been changed. If a category is selected, then the Dataset menu now continues to show the full set of dataset related menu items, and the category specific items are shown in addition to the other menu items.
|
|
•
|
In the Hosted List menu, the following menu items have been removed, as they were duplicates of menu items that already exist in the Dataset menu (they are no longer required in the Hosted List menu because the Dataset menu is visible):
|
|
•
|
Similarly, in the Linked LISTSERV List menu, the following duplicate menu items have been removed:
|
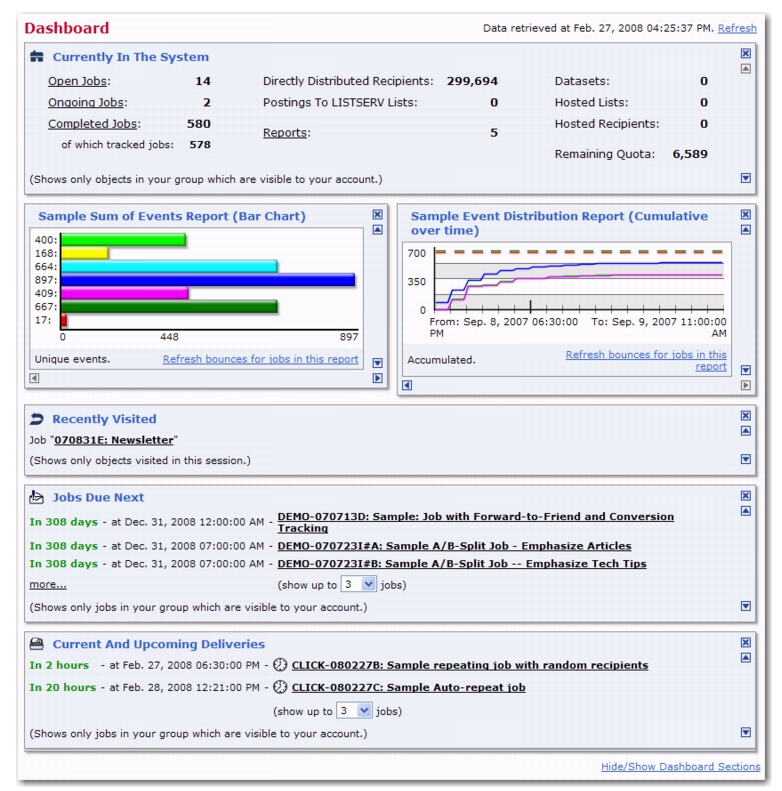
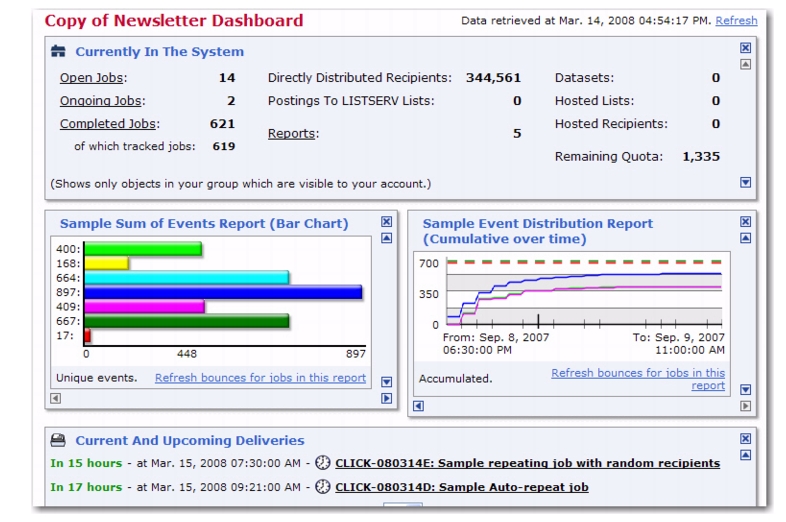
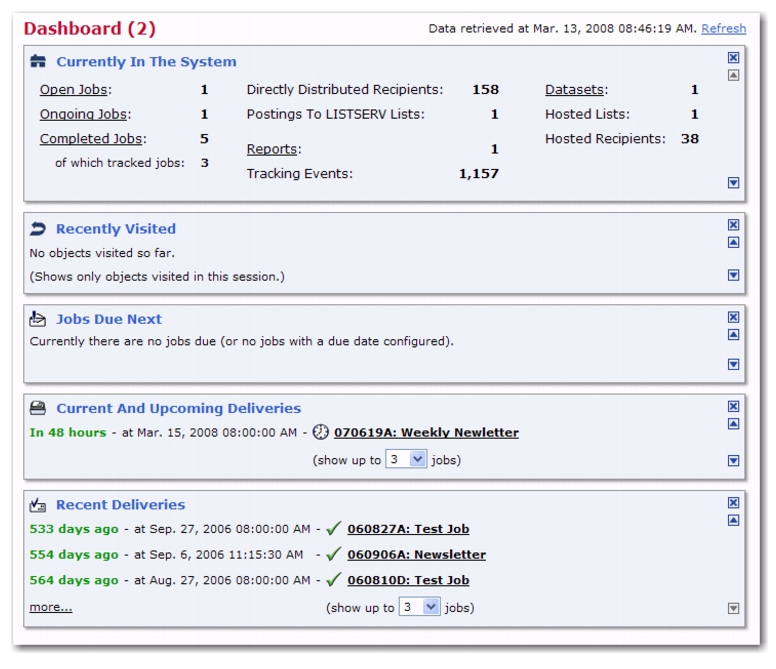
The opening screen of LISTSERV Maestro’s interface is called the Dashboard, providing a quick summary of what has happened recently and what is due to happen in the future.
The Dashboard contains five sections that may be displayed, hidden, or rearranged. This allows for a convenient and easy way to customize the information shown, making it possible for you to see what is most important to you. The Dashboard sections are:
|
•
|
Currently in the System – This section displays general statistics about the objects that are currently in the system (as far as these objects are visible to your account). Some of these items are also clickable links that take you directly to a screen where you can view the corresponding objects.
|
|
•
|
Open Jobs: The number of currently open jobs. (This item is clickable.)
|
|
•
|
Ongoing Jobs: The number of currently ongoing jobs. (This item is clickable.)
|
|
•
|
Directly Distributed Recipients: The number of recipients directly distributed with LISTSERV Maestro. This number does not count any mailings that were standard postings to LISTSERV lists (see below).
|
|
•
|
Postings to LISTSERV Lists: The number of completed jobs that were standard postings to LISTSERV lists (and whose recipients are not counted under Directly Distributed Recipients, see above).
|
|
•
|
Reports: The number of tracking reports. (This item is clickable.)
|
|
•
|
Tracking Events: The number of tracking events collected so far. >Dataset: The number of datasets. (This item is clickable.)
|
|
•
|
Hosted Recipients: The total number of hosted recipients (dataset members) in all datasets.
|
|
•
|
Remaining Quota: If enabled, the remaining delivery quota for your account (not visible for unlimited quota).
|
|
•
|
Recently Visited – This section provides shortcuts to the most recently used jobs, reports, etc., making it easy for you to resume work in one area if you interrupted it to visit another area. The areas visited may also be available in the Back To menu on the Toolbar
|
|
•
|
Jobs Due Next – This section contains a list of jobs that are currently open and that are due next for authorization. This section does not show any jobs that have a “Authorize Due By” date configured.
|
|
•
|
Current and Upcoming Deliveries – This section contains a list of jobs that are currently being delivered and that are scheduled for an upcoming delivery. From this section, you can also view any failed jobs that have yet to be closed or re-opened.
|
|
•
|
Recent Deliveries – This section contains a list of jobs that have been recently delivered and jobs that have attempted delivery but failed.
|
Note: The administrator has the option to show a summary of all user accounts, certain user accounts, or just your user account on the Dashboard.
In LISTSERV Maestro, you can have several independent Dashboard configurations. Each Dashboard can contain its own unique set of default sections and/or reports. These sections can be easily rearranged and added so that the most important information appears at the top. For example, perhaps you are interested in seeing an overview of all jobs and subscriptions; maybe you want to focus on a particular category of jobs; or perhaps you would like to monitor the activities related to a particular dataset or even a single list. With the LISTSERV Maestro Dashboard, all of this is possible. In fact, you can even add reports to the Dashboard, giving you immediate access to your most important report statistics.
To update the data displayed on the Dashboard, click the Refresh link. The date and time of the data being viewed is shown next to this link.
Note: The Refresh link does not update the data for any Dashboard reports. Dashboard reports will automatically update their data in regular intervals.
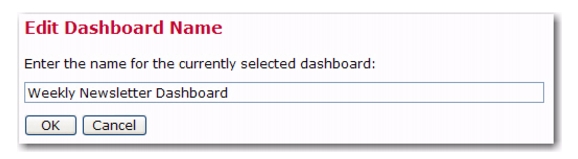
To edit the name of the Dashboard currently being displayed, click on the Dashboard menu, and then select
Edit Dashboard Name. The Edit Dashboard Name screen opens. Enter the new name for the Dashboard and click
[OK].
When using the LISTSERV Maestro Dashboard, you’ll notice that it is divided into multiple sections that can be re-organized quite easily. For instance, you can move any section up or down in order of importance, hide sections that don’t interest you, and show only those that do. Changes to the Dashboard are constant from session to session, which means that any rearranging you do or reports that you add will be available each time you log in.
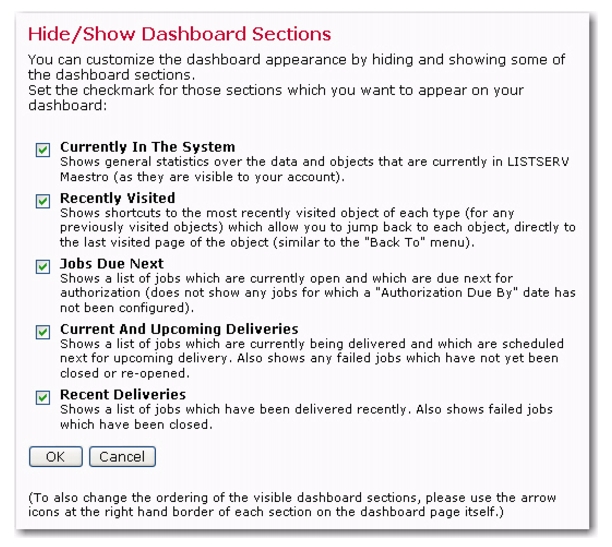
Each Dashboard section can be hidden or moved. The “x” box in the top right corner of each section will hide that particular section. The up and down arrows in the top and bottom right corners will cause the section to trade places with the section above/below it.
In addition, to display or hide a section, you can click on the Dashboard menu, and then select
Hide/Show Default Sections. The Hide/Show Dashboard Sections screen opens.
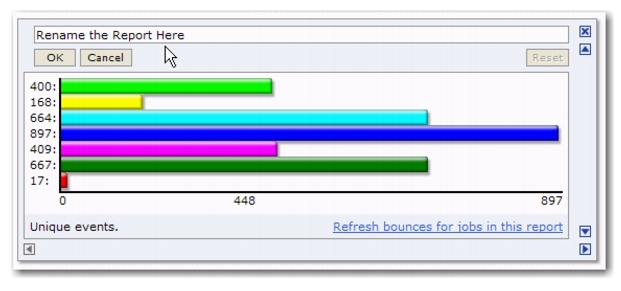
Dashboard reports are for users who want immediate access to key email reports and statistics at a single glance, helping you make better decisions for any future email communication initiatives. Once a report is placed on the Dashboard, you can drill down to problem areas, share success stories and best practices with your team, and quickly adjust your email campaigns. In addition, with one click, you have full access to the report for closer inspection.
LISTSERV Maestro gives you the ability to add up to 20 reports to the Dashboard. Each report is displayed in its own section, showing a "miniaturized" version of the report, and each report is automatically updated when new data is available.
Click [OK] to add the report. If you want to view the added report on the Dashboard, click the
Back To menu, and then select
Dashboard. The report section will be located at the bottom of the Dashboard.
To move the report, you can use the up and down arrows. If you add another report to the Dashboard and move it up to the location directly below the first report, then the two reports will be displayed side by side. New left/right arrows are displayed for each report, giving you the ability to move the reports left and right. If you move the report up or down, each report will again be on a line by itself and these new arrows will no longer be available.
To view the full report with all details on its own screen, click on the report. Once you have opened the Dashboard report, you can change the view settings; however, these changes are only temporary and only apply to the current report details. To apply these changes to the report on the Dashboard as well, click on the
Report menu, and then select
Apply Settings to Report on Dashboard.
Click [OK] to confirm the deletion of the current Dashboard.
Users can define and configure several Dashboards, each with a unique collection of standard sections and reports. Once these Dashboards are created, a user can easily switch back and forth between these Dashboards.
After customizing the Dashboard, you can create a new Dashboard based on your changes. To do so, click on the
Dashboard menu and select
Copy Current Dashboard. The copied Dashboard is displayed.
To rename the Dashboard, simply use the Edit Dashboard Name option on the
Dashboard menu. For details, see Section 2.2.1.2
Editing the Dashboard’s Name.
To create a brand new Dashboard from scratch, click the Dashboard menu and select
Create New Dashboard. The new Dashboard is displayed with the default sections showing.
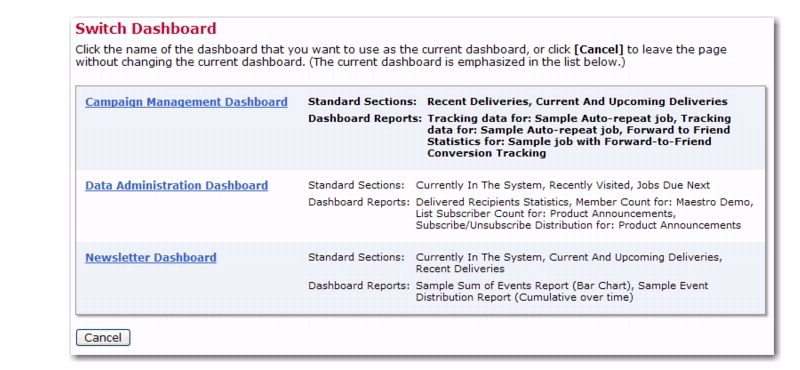
If you have more than one Dashboard and would like to display a different Dashboard other than the one currently displayed, then you can simply click on the
Dashboard menu and select
Switch Dashboards. The Switch Dashboard screen opens.
From this screen, select the Dashboard you want to use in your current LISTSERV Maestro session. The currently selected Dashboard is emphasized in the list of available Dashboards. To select a different Dashboard, simply click on the name of the Dashboard.
Note: The choice you make here will only apply to the current session. This means that any parallel sessions that you may have open in other LISTSERV Maestro windows can have their own current Dashboard displayed.