This target group type is based on the Let LISTSERV Select Recipients from a Database recipient type in the Define Recipients wizard. Multiple screens take the data administrator through the process of defining a recipient target group using LISTSERV to select recipients from a database.
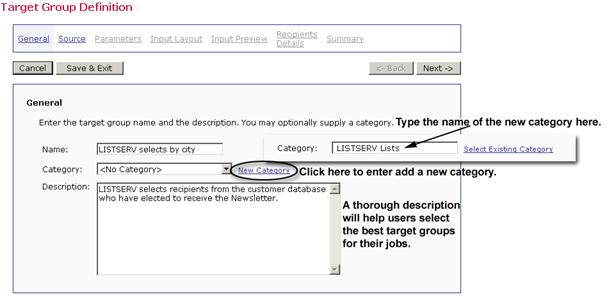
The General screen in the Target Group Definition wizard defines the name, category, and description of the target group. Both name and description are mandatory. Enter a meaningful name and a good description so the users who are selecting target groups in the Define Recipients wizard will have all the information they need to decide which target group to use.
Target groups can be clustered in categories, making it easier for users to select a target group. A category is meant to contain target groups that are related to each other. The intent of categories is to minimize the time needed to locate a specific target group. By selecting a category first, users do not need to browse through all the available target groups, but only those in the relevant category.
To add a target group to a category, select the category for the target group from the drop-down menu. To create a new category, click the New Category link and define a new category. Target group categories are optional. If no category is selected or created, target groups are placed into the "<No Category> category by default.
Figure 129 The Target Group Definition Wizard – General Screen for a Database Accessed by LISTSERV
Once you’re finished entering the name and description, click [Next ->] to continue.
On the Source screen of a target group, where LISTSERV retrieves the recipients from a database, enter the database server if the default database as configured in LISTSERV is not going to be used. For more information about configuring databases for LISTSERV, see the LISTSERV Developers Manual.
Enter the SQL statement. The statement may be a fixed statement or it may contain parameters that are later filled out when this target group is used in defining the recipients.
If parameters are being used, opening and closing tags are used to denote the parameter. The tags can be changed from their default values of opening “{“ and closing “}” curly brackets by entering other characters in the corresponding boxes. The quote character and an escaped quote character used by the database to enclose string literals also needs to be entered in the corresponding boxes. See Section 18 Defining Parameters for more information on how to parameterize the SQL statement and for details about the meaning of the opening and closing tag input fields.
Figure 130 The Target Group Definition Wizard – Source Screen for a Database Accessed by LISTSERV

Once you’re finished entering the database information, click [Next ->] to continue.
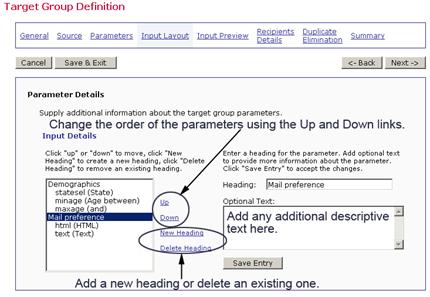
If parameters are part of the SQL statement on the Source screen, then they will need to be further defined on this screen. All parameters appear as links. Parameters highlighted in yellow are undefined; parameters appearing as normal links have already been defined. Click on any parameter, highlighted or not, to select it. Fill out the parameter’s initial definition, or edit an existing definition in the lower part of the screen. The definition of the parameters made here will affect the choices that the end user will have when using this target group in the Define Recipients wizard. For information on creating parameters and the different parameter types available, see Section 18 Defining Parameters.
Input values for parameters to determine the values of single selection or multiple selection lists must be manually entered. This is because LISTSERV Maestro is not connected directly with the database and therefore does not know what values exist in the data tables.
Figure 131 The Target Group Definition Wizard – Parameters for a Database Accessed by LISTSERV

Once a label and an optional description have been entered, select the input type of the parameter. There are four different types of input for parameters, check box, edit field, selection list, and date/time. Click [Next ->] to continue.
The Input Layout screen allows the data administrator to design how the recipient target group appears to end users. Headings and additional screen text can be added to further describe the choices users have among the different selections available in the target group. If there are multiple parameters, they can be grouped under headings and their order can be arranged. The more description users have, the easier it will be for them to decide how to use the target groups to select the recipients they want for their email jobs.
If one or more parameters are of the Restrict values(s) to floating point numbers type, then the decimal separator that the database uses needs to be defined. This will be either a dot (period) “.” or a comma “,”. The selection of dot or comma here only defines how the floating point number will be formatted for replacement in the SQL statement. In the Define Recipients wizard, the end user will always use a dot as the decimal separator when entering a floating point number.
Figure 132 Input Layout - LISTSERV Selects from a Database
Once you’ve finished entering any additional information, click [Next ->] to continue.
The Input Preview screen appears as it would to users
who are selecting recipients using this target group in the Define Recipients
wizard. Use this screen to verify order, labels, descriptions, parameter
types, and values. If the parameter order needs to be changed, click
the [<- Back] button. If labels or descriptions need to be changed,
click the Parameters link to re-enter the Parameters screen.
Figure 133 Input Preview for LISTSERV Selects from a Database

Using the selections lists, checkboxes, input fields, and/or date fields, make selections for each parameter type. Click [Next ->] to continue.
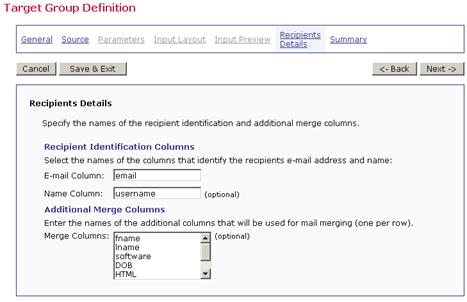
When LISTSERV selects recipients from a database the screen is split into two sections –Recipient Identification Columns and Additional Merge Columns.
In the Recipient Identification Columns section, specify which of the recipient columns in the database contains the email addresses that will be used for delivery. Enter the column name in the corresponding text box. Optionally, specify which of the recipient columns in the database contains the names of the recipients by entering the column name in the corresponding text box. If a column name is entered, the names of the recipients will be included in the "To:" field of each individual message, making the mail more personalized.
If other data in the database is going to be used for mail merging, it is necessary to identify each of the column names. In the Additional Merge Columns section, enter each column name in the corresponding text box, one name per row. Mail merging is optional, but if engaged, other recipient data can be used in the message making it more personal. For more information on using merging fields, see Section 5.6 Merge Fields and Conditional Blocks in the LISTSERV Maestro User’s Manual.
Figure 134 Recipient Details for LISTERV Selects Recipients from a Database
Once you’re finished specifying the columns, click [Next ->] to continue.
The Summary screen displays all the important details about the target group for verification. The screen is split into categories listing the relevant details for each part of the target group. A target group that has been created by the data administrator is not automatically enabled for use in the Define Recipients wizard. The data administrator must explicitly enable the use of each target group. Target groups need to be enabled individually, giving the target group administrator control over the use of each target group. This way, groups can be created in advance, and only enabled when needed. Similarly, target groups can be disabled, preventing users from accessing them, without permanently deleting them.
To enable a target group, check Yes, allow the definition of recipients based on this target group. Target groups that are enabled meet all the requirements for defining recipients, and they are available for use in the Define Recipients wizard. To disable a target group, uncheck the option. This will put the target group into a state called Complete, meaning that all the requirements for defining recipients are met, but the target group is not released for use.
Figure 135 The Target Group Definition Wizard – Summary Screen for a Database Accessed by LISTSERV

Click [Finish] to complete the target group and return to the Recipient Target Groups screen.