The
Utilities menu on the Toolbar allows individual users to save and change their advanced user settings specific to their account. The following options are available:
|
•
|
Content Templates – These options are only available if the system administrator has given the user permission to administer content templates. Once enabled, content templates are shared among all members of a group.
|
|
•
|
Sender Profiles – These options are only available if the system administrator has given the user permission to define sender profiles. Sender profiles are shared among all members of a group. A group member does not need permission to create new sender profiles in order to use existing profiles.
|
|
•
|
Drop-In Content Elements – These options are only available if the system administrator has given the user permission to create new drop-in content elements. Drop-ins are shared among all members of a group. A group member does not need permission to create new drop-ins in order to use any existing drop-ins.
|
|
•
|
Change Password – This option is only available if the system administrator has given the user permission to change his or her password.
|
|
•
|
Print – This option will print the current page.
|
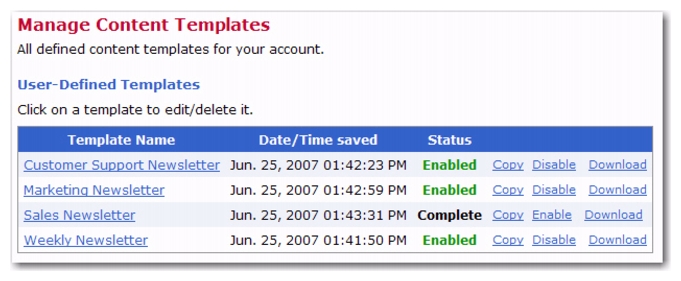
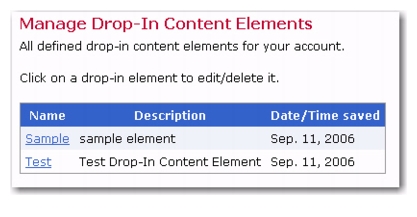
To open the Manage Content Templates screen, click on Utility >
Content Templates. The Manage Content Templates screen lists all currently available content templates for editing and other management of the templates. To access this screen, click on the
Utility menu from the Toolbar, and then select
Content Templates.
The user-defined templates are the content templates that can actually be used in the content definition of a mail job. These templates are located at the top of the Manage Content Templates screen.
|
•
|
Incomplete – The template definition is not yet complete; therefore, the template can also not be enabled.
|
|
•
|
Complete – The template definition is complete; however, the template has not yet been enabled and can not be used in the content definition of a mail job (the template will not appear in the list of available templates when defining a job's content).
|
|
•
|
Enabled – The template is complete and enabled and can be used in the content definition of a mail job. For information on enabling a template, see the Interface Customization Manual for LISTSERV Maestro. For information on using a template to define the content of a job, see Section 6.2 Message Templates.
|
System templates are pre-defined templates that come together with LISTSERV Maestro. A system template can not be used for content definition directly, but they can be copied and used as a base for a new user-defined template.
Note: For information on creating message templates, see the Interface Customization Manual for LISTSERV Maestro.
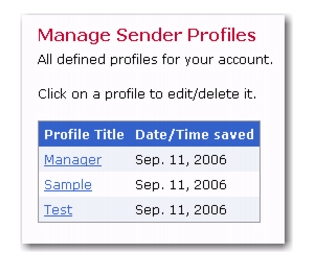
To open the Manage Sender Profiles screen, click on Utility >
Sender Profiles. This screen displays a list of all saved profiles.
To add a new profile to the list, click on Utility >
New Sender Profile. To edit an existing profile, click on the title of the profile you want to edit.
|
•
|
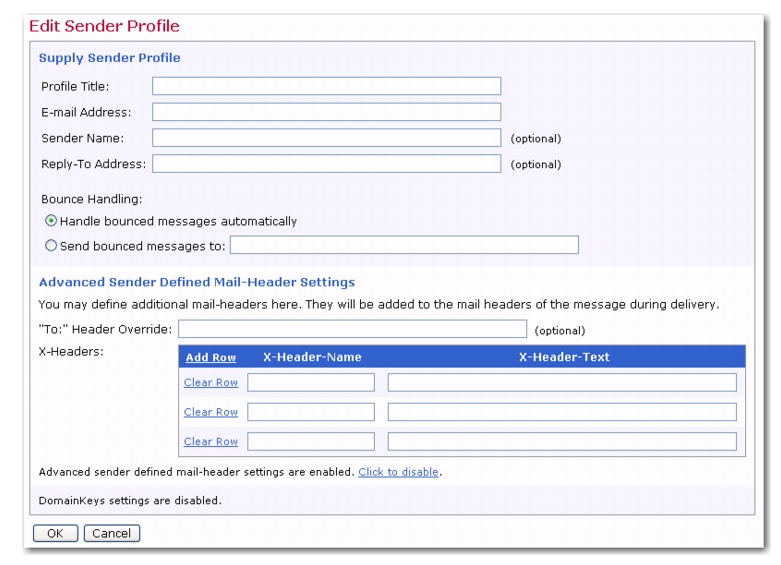
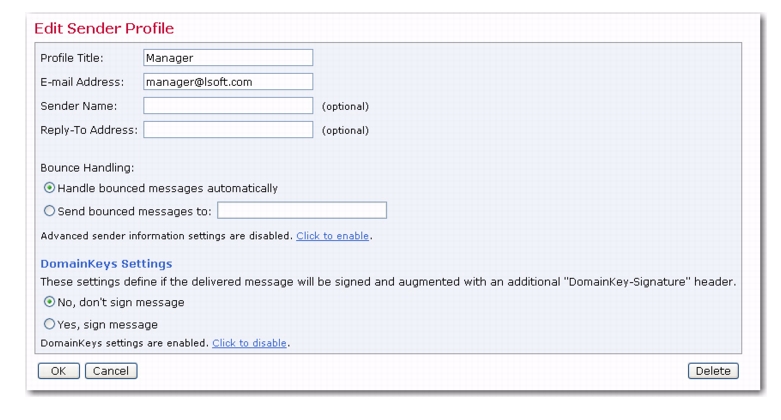
Profile Title – Enter a title that will identify the profile when it appears on the saved profiles list.
|
|
•
|
Email Address – Enter the email address of the sender of the message.
|
|
•
|
Sender Name – This is an optional field; but, if it is filled in, then the sender’s name will appear in the “from” field of the email message. If the sender name is left blank, then the “from” field will be filled in with the email address.
|
|
•
|
Reply-To Address – This is an optional field. Include an email address if replies are an option for recipients and if the reply-to address is different from the sender’s email address.
|
|
•
|
Bounce Handling – Select Handle bounced messages automatically to have LISTSERV handle bounced messages, or select Send bounced messages to and enter an email address in the text box. This email address will be the address where all bounced messages are sent.
|
To enable advanced sender information, click the Click to enable link. The
Advanced Sender Defined Mail-Header Settings section lets you define additional user defined mail headers following the X-Header convention as described in RFC822.These mail-headers will be added to the mail headers of the message during delivery.
|
•
|
"To:" Header Override – This allows you to override the value of the "To:" header for all recipients. Normally, the "To:" header will contain the recipient's address and optionally also his name, so that for each recipients an individual "To:" header is used.
|
Note: The "To:" header override is ignored if the recipients type is "Send to an Existing LISTSERV list" of the type "Send job as standard list message to list members".
|
•
|
X-Headers – This allows you to define additional sender defined mail headers following the X-Header convention as described in RFC822.
|
Rows where both the name and the text columns are empty are ignored; therefore, to remove a certain header, simply click the
Clear Row link of the corresponding row. If you need more rows than are currently visible, click the
Add Row link.
To enable DomainKeys Signatures, click the Click to enable link. The DomainKeys Settings section lets you define whether or not the delivered message will be signed and augmented with an additional DomainKey-Signature header.
To enable, click Yes, sign message.
To disable, click No, don’t sign message.
Click [OK] to save the profile, click
[Cancel] to return to the Manage Sender Profiles screen without saving the profile, or click
[Delete] to delete the profile.
The first three input fields – Email Address,
Sender Name, and
Reply-To Address are supplied with static values (the
Sender Name and
Reply-To Address fields are optional). These static values are then used as the sender address, sender name, and reply-to address of the email jobs. The resulting jobs have the same sender information and reply-to address for all recipients.
As an advanced feature, you can provide each recipient with personalized values by entering any text containing one or several merge fields into the corresponding field.
The only merge fields that are available for use in the Email Address,
Sender Name, and
Reply-To Address fields must come from the merge fields provided by the recipients of the job. These fields may be used to personalize the sender information and reply-to address. The merge field names must be entered in exactly the same format as when they are used as merge fields in the content. This format begins with an ampersand "&", is followed by the exact name of the field, and ends with a semi-colon";".
If, in your recipient data, you have a merge field called "SENDER_ADDRESS" that contains the individual sender address to be used for each recipient, then you would fill out the
Email Address field with the following text: "&SENDER_ADDRESS;"
If, in your recipient data, you have a merge field called "DEPARTMENT" that contains the name of the department the recipient belongs to, and you have created management email accounts of the form "manager_DEPARTMENT@company.com" for your departments (where "DEPARTMENT" stands for the department's name), and you want all replies from recipients to go to the manager address of the department the recipient belongs to, then you would fill out the
Reply-To Address field with the following text: "manager_&DEPARTMENT;@company.com"
Important: It is critically important that the sender and reply-to addresses resolve into authentic Internet email addresses when the merge fields have been replaced with corresponding data. Failing to provide a valid working Internet email address violates the law in certain countries. It will also disable the reply functionality of the email, hurting the reputation of the sender
1. The user must verify that merged addresses are valid; LISTSERV Maestro cannot accomplish this.
See Section 6.9 Merge Fields and Conditional Blocks for more information on using merged fields. See the online help for examples of using this feature to personalize sender information.
Note: For more information about the nature of drop-in content, see Section 6.4
Drop-In Content or the online help.
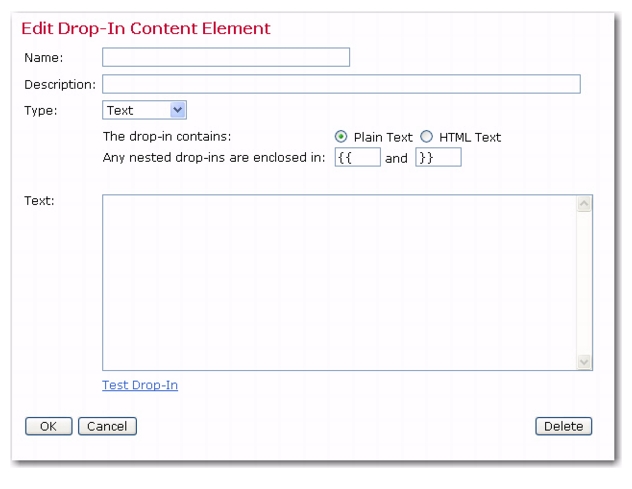
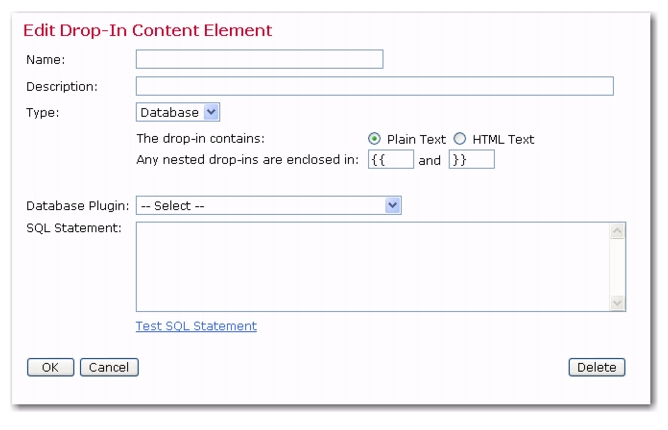
From the Edit Drop-In Content Element screen, select the type of drop-in from the drop-down menu. The Edit Drop-In Content Element screen will refresh and display the options associated with the drop-in type you selected.
|
•
|
Text – Text elements can be Plain Text or HTML Text. Plain text elements are best suited for plain text or alternative text messages. HTML text drop-ins contain HTML tags to format the text such as <br> for a line break and <b> for bold. Plain text can be inserted into an HTML message, but formatting such as line breaks will not necessarily appear as expected. HTML text containing tags is not compatible with a plain text message because the tags will be seen in the message and will not format the text.
|
Select either Plan Text or
HTML Test for the formatting of the drop-in. Plain Text does not support the use of HTML Tags but HTML Text does.
Drop-in content for plain text messages should be rendered using the Plain Text option and drop-in content for HTML should be rendered using the HTML Text option. For HTML messages with alternative text, create two separate drop-ins, one in each format, and use each in its appropriate message part.
Click the Test Drop-In link to open a new browser window in order to test the formatting of the drop-in.
Click [OK] to save the new drop-in content element. Click
[Cancel] to discard any changes and return to the Manage Drop-In Content Elements screen. Click
[Delete] to delete the drop-in.
|
•
|
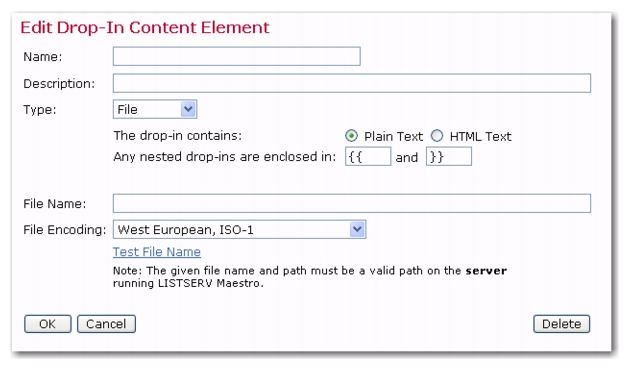
File – The content of this type of drop-in element is loaded from a text file that is accessed by a file name defined here. The file itself must be accessible from the server and not a local file on a workstation computer. See the LISTSERV Maestro Administrators Guide or the system administrator for more information.
|
In the Name field, enter a name that will serve as the placeholder in the message. Next, select either
Plain Text or
HTML Text for the format of the drop-in. In the
File Name field, enter the path and file name. Finally, click the
File Encoding drop-down menu and select the type of file encoding.
Click the Test File Name link to test the new file name. Click
[OK] to save the new drop-in content element. Click
[Cancel] to discard any changes and return to the Manage Drop-In Content Elements screen. Click
[Delete] to delete the drop-in.
|
•
|
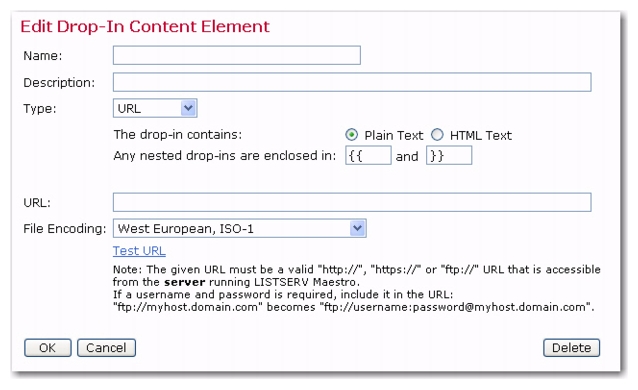
URL – The content of this type of drop-in element is loaded from a text file accessed by an http:// or ftp:// URL defined here. The URL must be accessible from the server and have an http://, https://, or ftp:// protocol. See the LISTSERV Maestro Administrators Guide or the system administrator for more information.
|
In the Name field, enter a name that will serve as the placeholder in the message. Next, select either
Plain Text or
HTML Text for the format of the drop-in. In the
URL field, enter the URL. Finally, click the
File Encoding drop-down menu and select the type of file encoding.
Click [OK] to save the new drop-in content element. Click
[Cancel] to discard any changes and return to the Manage Drop-In Content Elements screen. Click
[Delete] to delete the drop-in.
|
•
|
Database – The content of this type of drop-in element is queried from a database. The database connection settings and the SQL statement are defined here. See the LISTSERV Maestro Administrator's Guide or the system administrator for more information.
|
In the Name field, enter a name that will serve as the placeholder in the message. Next, select either
Plain Text or
HTML Text for the format of the drop-in. Click the
Database Plugin drop-down menu and select the database plugin. Finally, in the
SQL Statement field, enter a SQL statement.
Click the Test SQL Statement link to test
the new SQL statement.
Click [OK] to save the new
drop-in content element. Click
[Cancel] to discard any changes and return to the Manage Drop-In Content Elements screen. Click
[Delete] to delete the drop-in.
System drop-ins are special drop-in content elements that are named and controlled by LISTSERV Maestro. Some system drop-ins are only available for mailing lists that derive their recipients from data hosted by LISTSERV Maestro. They make it possible to include login and unsubscribe links to specific lists in the message as well as the use of other recipient data to create personalized messages.
The names of system drop-ins start with an asterisk “*”. System drop-ins need to be enclosed in the drop-in opening and closing tags just like normal drop-ins, and drop-in usage needs to be enabled for the mail content; otherwise, the system drop-ins will be ignored and will not be replaced.
The login URL system drop-in is named *LoginURL. This name is case-sensitive and requires this exact spelling as well as the correct drop-in enclosing tags, for example “
{{*LoginURL}}”.
This system drop-in is replaced with a URL that points to the login page for the member area of the hosted list that is used in the job’s recipient list. The URL will have a format similar to this:
http://YOUR.SERVER/list/login.html?...
|
•
|
Recipients type of target group, with a target group of Based on Classic LISTSERV list, where the LISTSERV list it is based on is a hosted LISTSERV list in LISTSERV Maestro.
|
|
•
|
Recipients type of LISTSERV list, where the list is a hosted LISTSERV list in LISTSERV Maestro.
|
The unsubscribe URL system drop-in is named *UnsubscribeURL. This name is case-sensitive and requires this exact spelling as well as the correct drop-in enclosing tags, for example “
{{*UnsubscribeURL}}”. This system drop-in is replaced with a URL that points to an unsubscribe page for the member area of the hosted list that is used in the job’s recipient list. The URL will have a format similar to this:
http://YOUR.SERVER/list/unsubscribe.html?...
|
•
|
Recipients type of target group, with a target group of Based on Classic LISTSERV list, where the LISTSERV list it is based on is a hosted LISTSERV list in LISTSERV Maestro.
|
|
•
|
Recipients type as LISTSERV list, where the list is a hosted LISTSERV list in LISTSERV Maestro.
|
When creating the message content for an email job, you can now add a special system drop-in that will direct your subscribers to the External Profile Edit Page. This page will let your subscribers update specific profile fields without logging into the Membership Area.
This drop-in is called ProfileEditPageURL and, if included in the mail body, it is replaced with a URL to the External Profile Edit Page.
The drop-in must be written in a special form because when you write this drop-in into your message you will need to include information about which profile fields will be queried from the subscriber. The syntax is as follows:
where FIELDNAME_LIST must be replaced with a comma-separated list of the names of all profile fields that the External Profile Edit Page will query from the subscriber.
When defining the content for an HTML message, you can now use a new system drop-in,
{{*ViewInBrowserURL}}, that will allow the recipient to view the HTML message in their own browser.
Note: The system drop-in’s name is case-sensitive and requires this exact spelling as well as the correct drop-in enclosing tags.
The system drop-in will be replaced with a http:// URL that points to a special page that displays the HTML part of your message. This lets the recipient view it in a separate browser window if, for some reason, the recipient can not view the HTML message in their own email client.
In an HTML message that also contains a text alternative part, you can use this system drop-in both in the HTML part and in the text alternative. By including the system drop-in in the text alternative, you will give those recipients that normally only view the text alternative the option of using the URL to display the full HTML message in a separate browser window.
Note: Viewing the message in a browser window will also display the HTML message with the same personalized merge values of the recipient as the original email. These merge values are coded into the URL. Therefore, in a mailing with a very large number of merge values (per recipient) and/or values with a very long text, this mechanism of coding the merge values into the URL may produce URLs that exceed the size limits imposed by the browser software that is in use. Consequently, you should limit the usage of this system drop-in to mailings where the merge field names and their values do not combine to form an excessively long URL.
Note: This system drop-in can not be used in messages that use conditional blocks (of the style
.BB ... .EB). The only system merge fields (beginning with
&*) allowed in the message are
&*TO;,
&*URLENCODE(...);, and
&*INDEX;.
WARNING: The system drop-in for the multiple selection fields has been deprecated. It is still available for backwards compatibility with existing email jobs. For LISTSERV Maestro 4.0, please use the Formula Calculation system drop-in
{{*Calc}}, with the "
Count" and "
SetToStringWithMaxLen" functions, as well as the "=", "<>", "<", "<=", ">", and ">=" set comparison operators.
Normally, multiple selection fields cannot be used for mail-merging. Mail merging is only compatible with fields that have a single value. Any field that was defined to allow subscribers to select more than one choice is classified as a multiple selection field. To work around this situation, a system drop-in has been introduced to allow merging the information from a multiple selection field into the text of a message. This system drop-in is only usable if the recipient type of the mail job is a target group with the
Based on Hosted Recipient List type.
Replace “FIELD_NAME” with the name of the multiple selection field being used as the merge field. For example, a multiple selection field with the name “hobbies” would appear as “
{{*Multi hobbies count}}”.
*Multi FIELD_NAME separated by "
SEPARATOR"
Replace “FIELD_NAME” with the name of the multiple selection field being used as the merge field. Replace “
SEPARATOR” with any string (which must be enclosed in quotation marks). This string will be used to separate the enumerated values if more than one choice has been made by the subscriber. For example, if a subscriber selected “surfing”, “poker”, and “reading” from a selection list field named “hobbies” and a comma is the desired separator character in the mail text, the drop-in would appear as “
{{*Multi hobbies separated by ","}}” and the text "surfing, poker, reading" will be dropped in the message body.
|
•
|
default "CUSTOMIZED_DEFAULT" – If a subscriber does not have any of the choices from the multiple selection list selected, the drop-in would normally be replaced with an empty string. By setting a customized default parameter, all subscribers that do not have any selections will have the text inside the quotation marks dropped into the message. For example, a subscriber who did not select any hobbies from the multiple selection list “hobbies” could have the word “other” dropped into the message text. The drop-in would appear as “ {{*Multi hobbies separated by "," default "other"}}”. If quotation marks are used in the replacement string, then they must be escaped by using them twice in succession.
|
|
•
|
more "CUSTOMIZED_ELLIPSIS" – If a subscriber’s selections from the list are longer than approximately 800 characters, the enumeration will break off and will be finished with an ellipsis "...". By setting the customized ellipsis parameter, any text string may be added to the enumeration field, replacing the standard “…”. In addition, the number of items left off the list can be added by using “#COUNT” anywhere in the string. For example, a subscriber selected many hobbies from the selection field “hobbies” and exceeded the 800 character limit for the drop-in text. Setting the customized ellipsis and the #COUNT like this: “{{*Multi hobbies separated by ", " default "other" more "and #COUNT more"}}” would create a drop-in that read “surfing, poker, reading, and 15 more”. If quotation marks are used in the replacement string, they must be escaped by using them twice in succession. If both the “default” and the “more” optional parameters are used together in one string, the “default” must be used first and then “more”.
|
|
•
|
Multiple Selection Field Advanced Set-Operators – This set of operators allows for the creation of drop-ins to personalize content for recipients based on their selections from the multiple selection field. This is a complex, yet very powerful tool that can be used to send specialized content to individual recipients based on their recipient data. For example, in a message to subscribers who selected a hobby or hobbies from the selection list “hobbies”, a special advertisement for Hawaiian vacations for those who selected “surfing” as one of their choices will be included. Hobbyists without surfing as a selection will not receive the ad, but will receive another general advertisement.
|
This type of system drop-in is based upon comparing two sets. The first set of items is taken from the multiple selection list, and the second set of items is created by the user. The two sets (two groups of items) can then be compared using four different operators to see what relationship they have to one another. The outcome of this comparison can be either “true” or “false” and will determine which content is dropped into which message.
Note: The brackets around the word “
not” are not part of the syntax, but they are used to denoted that the word “
not” itself is optional, meaning that it can be included (without brackets) to negate a field.
|
•
|
Replace “FIELD_NAME” with the name of the multiple selection field being used as the merge field. The content of this field for any given subscriber defines the content of the first set of the comparison.
|
|
•
|
Replace “OP” with the set operator being employed for the comparison. Available operators are (without the quotes):
|
|
•
|
“=” Equality – Checks if the two sets are equal. Two sets are equal only if they contain exactly the same elements.
|
|
•
|
“<=”Subset – Checks if the first set is a subset of the second set. The first set is a subset of the second set if the first set is fully contained in the second set (all elements from the first set also are in the second set).
|
|
•
|
“>=” Superset – Checks if the first set is a superset of the second set. The first set is a superset of the second set if the first set contains the entire second set (all elements from the second set also are in the first set).
|
|
•
|
“&” Intersection – Checks if there is a non-empty intersection between the first and the second set. A non-empty intersection exists if at least one element of the first set also appears in the second set. It does not matter how many elements appear in both sets, as long as at least one appears in both, the intersection is non-empty and the check will result in “true”. In other words, the check is “true” if at least one element appears in the first set and in the second set.
|
|
•
|
Replace “COMPARE_SET” with the second set of the comparison. Specify this set as a comma-separated list of all values in the set. Each value must be enclosed within quotation marks < ">. Type the textual names of those choices from the multiple selection field column specified in “ FIELD_NAME” that are to be part of the second set. Enclose each name individually in quotes and use commas to separate the values if there is more than one.
|
|
•
|
Replace “TRUE_TEXT” with the drop-in text for comparisons that result in a “true” match and replace “ FALSE_TEXT” with the drop-in text for comparisons that result in a “false” match. If the quote character <”> appears in the text of either field it must be escaped. To escape the quote character, use it twice in a row.
|
For example, to send a special advertisement for Hawaiian vacations to all those subscribers who selected “surfing” as one of their hobbies in the multiple selection field “hobbies” in a mail job going out to all hobbyists, the system drop-in would appear like this:
“{{*
Multi HOBBIES & "surfing" ? "Follow your dreams and ride the big curl in Hawaii. See your travel agent today and mention this email offer for a 10% discount on hotel rates at the Sheraton on Waikiki" : "Visit your local Hobby Master store today! Check here for the nearest one ““http://www.hobbymaster.com”””}}
The name of this system drop-in is *Calc. The name is case-sensitive and requires this exact spelling, followed by a valid mathematical formula, and the appropriate enclosing tags, for example “
{{*Calc ToDate(SubscribeTimeMillis,“MMMM dd, yyyy”)}}” will return a drop-in that reads the date the subscriber signed on to the list.
Merge fields from subscriber data can be combined with other merge fields or number- or text-constants and even predefined functions into a formula. The formula will then be calculated individually for each recipient to determine an individual drop-in replacement text for that recipient.
Formulas can be used to calculate drop-in content based on existing recipient data to determine a birth date, a subscription date, a bank balance, and much more. For more information on how to write formulas for system drop-ins, see Section 18
Calculation Formulas.
The *Calc drop-in is not available for jobs with recipient definitions of
Send to an Existing LISTSERV List,
Let LISTSERV Select Recipients from a Database, or Target Groups based on these. However it is available for all other recipient definition options. Certain special variables usable in
*Calc, for example
SubscribeTimeMillis, are available only for Hosted Recipient Lists.
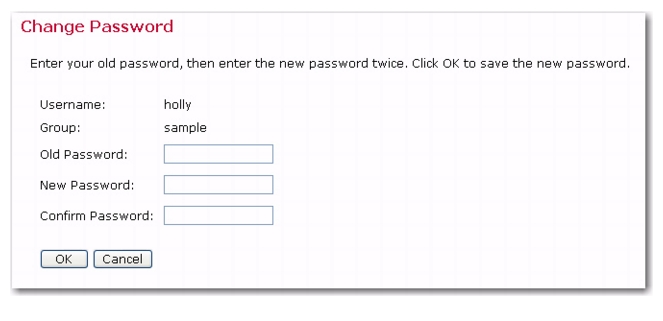
To open the Change Password screen, click Utility >
Change Password. Enter the old password first, and then type in the new password twice for confirmation.
Click [OK] to save the new password and return to the User Settings screen. Permission to change an account password is set by the system administrator. If this right is not given, then user accounts will not have permission to change their passwords.