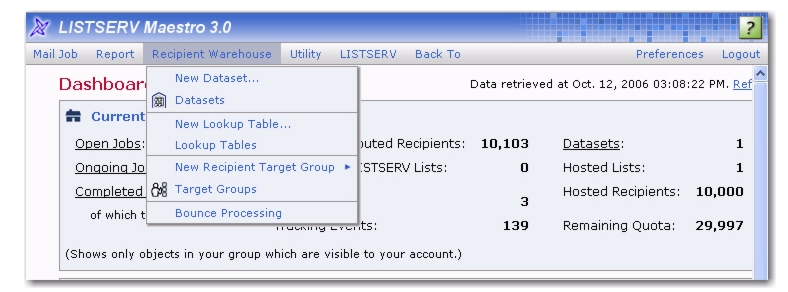
The Recipient Warehouse is LISTSERV Maestro’s name for the method of creating, storing, and retrieving data within the system. Every group or single user account has its own recipient warehouse that is the repository for recipient datasets, lookup tables, and recipient target groups. Use the
Recipient Warehouse menu on the Toolbar, and then select either
Datasets,
Lookup Tables, or
Target Groups to begin working with recipient data. Creating and administering recipient target groups is covered beginning in Section 12
Introduction to Recipient Target Groups.
A recipient dataset is a collection of data organized into fields and pertaining to recipients. The fields making up a dataset can have different types of properties that determine the kind of data within them, such as text, numbers, menu selections, dates and so on. The data administrator designs the datasets within a recipient warehouse, defining each field and the type of data it holds. The recipient dataset also contains mailing lists created by the data administrator that use the recipient data for job definition. The data is shared across all mailing lists that are created within the dataset. Individual lists within the dataset are allowed to have additional fields of data that pertain just to those lists.
As the dataset is being created, a web form is also being created that reflects the exact design of the dataset, including the order of the fields, the descriptions of each field, and the types of data to be collected. Each organization has to decide what kinds of data to collect, including the acceptable format of that data, and how the data is entered into the web form by anyone wishing to join a mailing list. Careful consideration of the dataset design will produce user-friendly web forms, and will collect the types of recipient data that can be used to send personalized and targeted messages to subscribers.
A link to the dataset web form can be placed on a website where anyone can fill it out, entering their data, and then joining available mailing lists. Data collected from the web form is automatically placed in the matching dataset, where it becomes available for use when sending emails to subscribers. Subscribers and their data can also be added to the dataset directly by the data administrator. Managing subscribers and their data is covered in Section 9.1
Managing Dataset Members and List Subscribers.
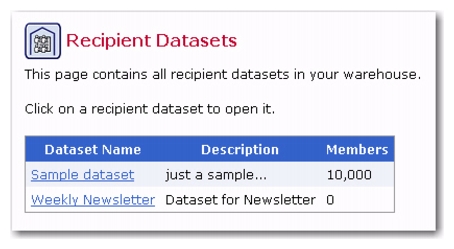
The Recipient Datasets screen contains a listing of the names of any existing datasets, their descriptions, and the number of members in each. Each dataset name is a link that opens the dataset for editing, member management, and customization of the web form.
Part of the dataset design process is deciding the format of the data collected and how it is presented on the web form. One type of data that needs special mention is the selection list. A selection list is presented as a drop-down menu where one (single select) or more (multi select) items can be chosen. LISTSERV Maestro handles the creation of selection lists under the function of Lookup Tables. A lookup table is a collection of entries for a selection list. Lookup tables can be used by any dataset in the warehouse. When designed well, they can serve multiple functions across a warehouse. For example, a listing of university departments in one dataset can be used as a list of college majors in another. A listing of years can be used for graduation year in one dataset and anniversary year in another. Creating Lookup tables is covered in depth in Section 4.2.1
Creating a Lookup Table.
Tips: If your dataset is going to use selection menus, to save time, create the lookup tables first and the then create the dataset.
The Recipient Dataset Definition wizard guides you through all the steps of designing a dataset with its accompanying web form. From the
Recipient Warehouse menu, select the
New Dataset option. The Recipient Dataset Definition wizard opens. Use the
[Next ->] and
[<- Back] buttons to navigate through the wizard. Use the links at the top of the screen to open a particular page of the wizard. The
[Save & Exit] button will save the current dataset settings of the open dataset even though the wizard may not be completed. The
[Cancel] button will void any current selections and return to the Recipient Datasets screen.
|
•
|
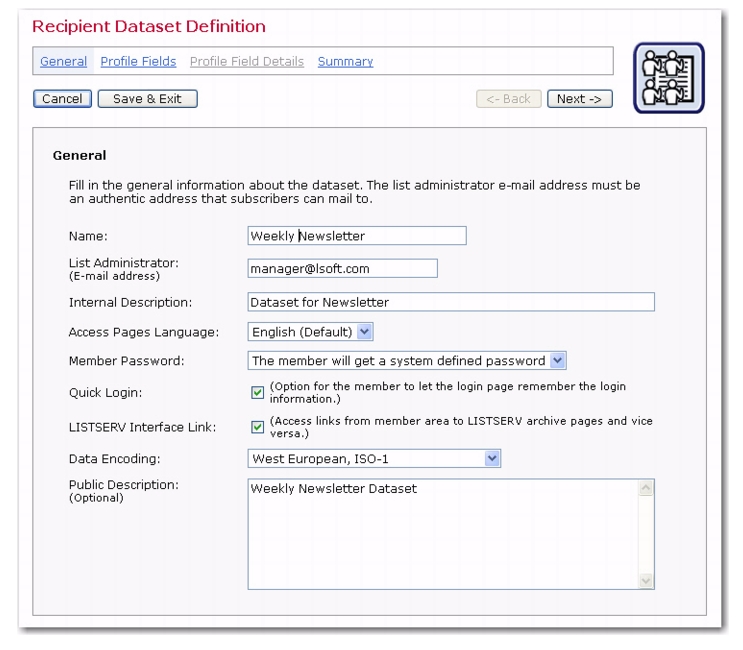
Name – The name of the dataset will appear on all the “public” subscriber pages. It is important to select a name that is reflective of the organization sponsoring the web pages and descriptive of the types of mailing lists available for members.
|
|
•
|
List Administrator (email address) – The list administrator email address is the address that confirmation email messages come from. Confirmation email is sent to all subscribers who join a member area and/or subscribe to a mailing list in the dataset. Confirmation email is also sent to members to when they change their passwords. It is important that this address be an authentic email address that can receive mail from subscribers.
|
|
•
|
Internal Description – This description information is used internally on the Recipient Datasets tab for identification purposes.
|
|
•
|
Access Pages Language – Select the language to use on the subscriber access pages of the dataset (and lists within the dataset). The drop-down list contains the languages that are currently available on your system. Choose English (Default) to use the system default language text. If available, choose English (Customized) to use your own customized English text. Other languages may also be available (depending on the foreign language translations you’ve created using the Resource Translation Tool; for more information on the Translation Tool, see the Interface Customization Manual for LISTSERV Maestro 2.1).
|
|
•
|
Member Password – Select how the membership area password is to be defined for each member. You can choose between Must be defined by the member when joining and The member will get a system defined password . This option only affects how the initial password is defined when a member joins the membership area. In both cases, it is still possible for the member to change the password at a later time.
|
Note: If the LISTSERV Interface Link option (see below) is enabled, then the only available choice for the member password is the
The member will get a system defined password option.
|
•
|
Quick Login – Define if a special "quick login" option will be available on the login page of the membership area. If checked, then an additional checkbox will appear on the membership area login page. If a member checks this additional option during login, then their login information will be remembered by the system; therefore, when the member visits the login page again (with the same browser on the same computer), the email address and password fields are already filled out and the member only needs to click the [Login] button to login.
|
|
•
|
LISTSERV Interface Link – Define if additional links to the LISTSERV Archive pages will appear in the membership area. If checked, then these additional links can be used by members to switch over to the LISTSERV Archive pages without having to login separately; therefore, they can view any LISTSERV list archive that are accessible. Consequently, enabling this option only makes sense if the dataset contains any Hosted LISTSERV Lists or Linked LISTSERV Lists for which an archive is available.
|
Notes: This option is only available if it has previously been enabled by the LISTSERV Maestro administrator (this is a setting in the Administration Hub). In addition, if you enable this option for a dataset, then the
Member Password option (see above) will automatically be set to
system defined password and can no longer be changed to
user defined password.
|
•
|
Data Encoding – Select the type of encoding for the data entered in the dataset from the drop-down menu. This encoding will also be inherited by all mailing lists in the dataset, meaning that it also determines the encoding used to store the profile values of all list subscribers in all lists of the dataset.
|
Note: The encoding can no longer be changed once there is at least one member or list in the dataset. It can only be changed while the dataset is still empty.
|
•
|
Public Description – This optional information appears on the web form and will assist anyone wanting to join a member area and subscribe to a mailing list to understand what the benefits of membership are. Any additional information about the organization can be placed here.
|
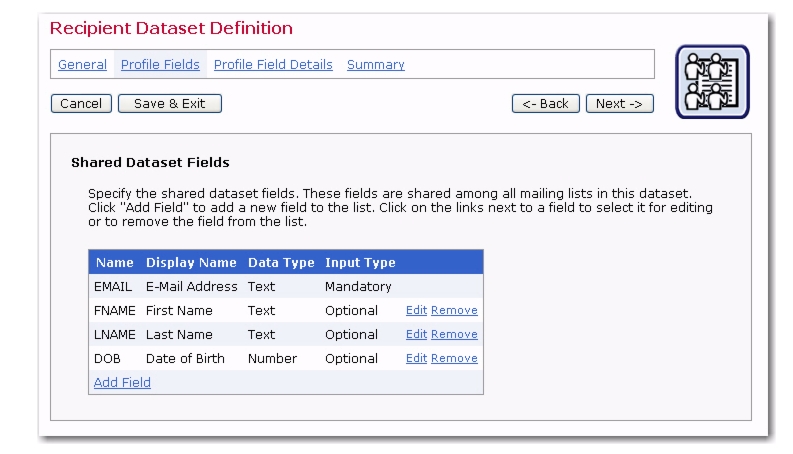
The Profile Fields screen displays a list of shared dataset fields. Every new dataset begins with one mandatory field, called
EMAIL. With just this one field, it is possible to create an entire dataset. The email address of each member will be shared among all the lists created in this dataset. Other fields can be added to the dataset, and they too will be shared among all of the lists in the dataset. To add a new field, click the
Add Field link.
|
•
|
Name – The name of the field as it will be used internally by the system for mail merging and querying. Field names can only use upper and lower case letters A-Z and a-z, the numbers 0 – 9 and the underscore “_”. Spaces and other special characters are not allowed.
|
|
•
|
Display Name – The label that identifies the field on the web form. The display name will be seen by anyone accessing the public web pages to the membership area. It is also used in the data entry forms used in the Recipient Warehouse for entering and changing subscriber data. All alphanumeric characters are permitted, as well as spaces and special characters allowed by the encoding scheme selected in the General Settings for the dataset.
|
|
•
|
Data Type – Choose the type of data to be entered in the field from the drop-down menu. Five different classifications of data are available:
|
|
•
|
Text – Text fields can accept any type of text, including dates in specific formats such as dd/mm/yyyy or mm.dd.yyyy.
|
|
•
|
Number – Number fields accept any whole integers.
|
|
•
|
Boolean – Boolean fields are based on two states – true or false.
|
|
•
|
Single Select (lookup table) – A single selection field consists of a drop-down menu from which one item may be chosen. It may optionally be represented as a set of radio buttons.
|
|
•
|
Multiple Select (lookup table) – A multiple selection field consists of a drop-down menu where one or more items may be chosen. It may also be represented as a set of checkboxes.
|
|
•
|
Tracking Permissions – Used to ask for permission to use your dataset members’/list subscribers’ data for personal tracking.
|
|
•
|
Derived – When using single- or multi-select profile fields in a dataset, you can set up these two fields to be reliant on each other by using this profile field data type. A Derived profile field is determined from one or several other profile fields in the same dataset (the source fields). This is defined by a special derivation rule. The value of the derived field will be automatically calculated whenever the values of the source fields are changed. In addition, a derived field can only be a "Read Only" or "Hidden" field, which means that its value can not be entered directly.
|
Important: If you have any profile fields of the
Single Select or
Multiple Select type in your dataset, then you will not be able to add a Hosted LISTSERV List to the dataset (only Hosted Recipient Lists) because all profile fields defined in the dataset are shared by all lists in the dataset and Hosted LISTSERV Lists cannot have fields of these types.
|
•
|
Input Type – Decide whether the data is mandatory for subscribers to enter into the web form or optional. Optional fields can be designated as hidden or read-only if the subscribers are not allowed to enter or change the data in those fields. Boolean fields cannot be optional due to the nature of the data type. Boolean fields may be visible or hidden.
|
Profile field rows are displayed in the edit state or in the display state. Any row in the display state has two associated links,
Edit (sets the row into the edit state) and
Remove (deletes the row after confirmation). Any row in the edit state appears with the corresponding edit controls so that it can be edited. It also has four associated links,
Reset (forgets the changes made to the row and resets all row values to their state when the edit mode was last entered),
Up (moves the row up in the ordering),
Down (moves the row down in the ordering), and
Remove (deletes the row, after confirmation).
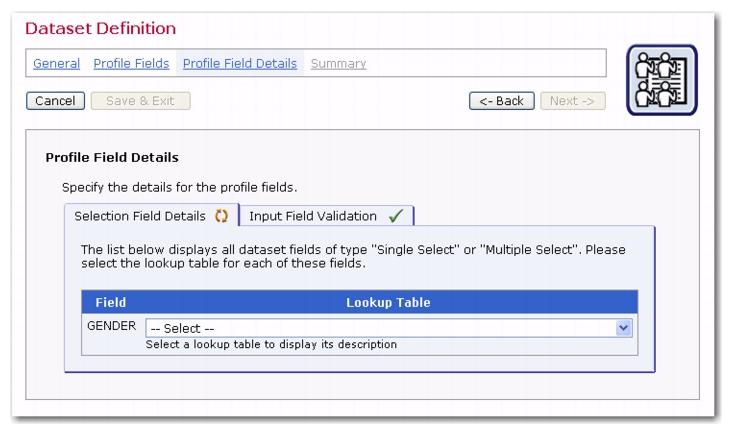
The Profile Field Details screen appears differently depending on the data types in the dataset. Datasets containing selection fields need the relevant Lookup Table assigned to the field.
If the dataset contains profile field that are of the Single Select or
Multiple Select type, then the Selection Field Details tab is displayed. This tab displays the name of each such profile field together with a drop-down menu that contains all lookup tables that can be used together with the profile field. Select a lookup table from the drop-down menu to associate it with the corresponding profile field. The description of the selected lookup table appears beneath the drop-down menu so that the selected lookup table can be verified as the desired one.
Notes: This step needs to be performed for each profile field that has one of the two types listed above.It is possible to assign the same lookup table to several different profile fields (if that is desired).
Only lookup tables that are using the charset encoding "ASCII" or that are using the same charset encoding as was specified for the dataset (or in case of a list, the encoding that was specified for the dataset the list belongs to) can be selected.
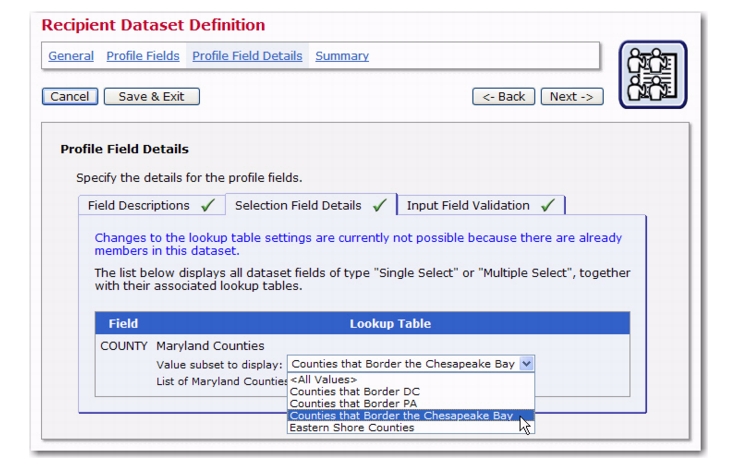
For a dataset that already contains members or lists, or for a list that already contains subscribers, then the lookup tables assigned to the already existing profile fields can no longer be changed. If a new field is added to such a dataset or list (on the Profile Fields screen), then the lookup table for this new field can be assigned, but the lookup tables of the other fields still cannot be changed.
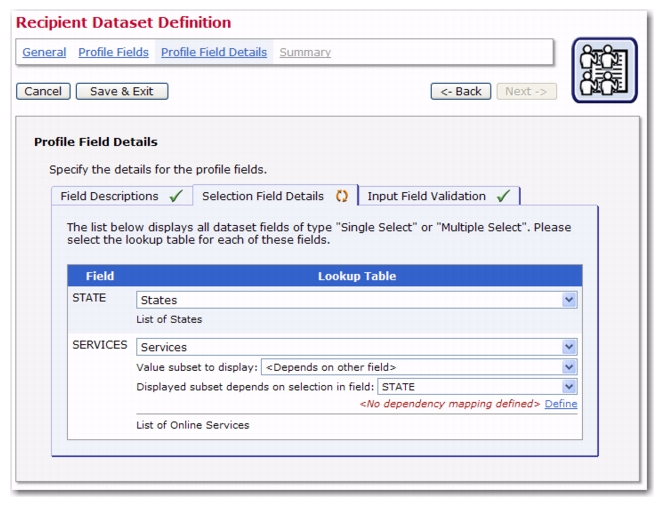
In addition, recipient datasets now have additional features available when creating and defining profile fields. If there are several single- or multiple-select fields defined on the Profile Fields page, of which at least one is a single-select field; then, when entering the Selection Field Details on the Profile Field Details page, the second drop-down menu will have the additional option of
<Depends on other field>. This option allows you to dynamically change the lookup table subset that is displayed by the profile field, depending on the user choice in another (single-select) profile field.
With this new option, you’ll need to tell the system how this dependency will be defined. To do so, click on the
Define link that appears right below the third drop-down menu once you have selected a source field name. (This will be an
Edit link if you’ve previously defined the dependency.)
This link opens the Dependency Mapping screen where you can define the dependency mapping between the values of the selected source field and the subset that is to be displayed by the profile field for which you are currently defining the settings. The screen shows a table where each possible value in the source field (which is always a single-select field) is displayed in the left column. The right column displays an associated drop-down menu for each value. For any given value, the selection in the drop-down menu defines which lookup table subset shall be displayed by the profile field, if the associated value from the left column is selected in the source field. The available choices are:
|
•
|
<Empty List> – If selected, then the profile field will display an empty list, if the associated value is selected in the source field.
|
|
•
|
<Full List of Values> – If selected, then the profile field will display the full list of lookup table values (i.e. no subset, but all values), if the associated value is selected in the source field.
|
|
•
|
Any Subset Name – If one of the subset names is selected, then the profile field will display only the lookup table values that are elements in this subset, if the associated value is selected in the source field.
|
Once you have defined the dependency mapping, click [OK] to close the screen and save your changes, or click
[Cancel] to close the screen without saving.
The Input Validation tab only appears if there are any profile fields of the Text type (other than the
EMAIL column of the dataset) or the
Number type in the dataset or mailing list. In this case, the tab allows for optionally defining additional input validation rules for each of these fields.
|
•
|
Accept all values – No validation will be applied, all text input is valid (with a maximum length of 100, which is imposed by LISTSERV Maestro). Note that for some encodings, like UTF-8 or asian language encodings, the maximum character length may even be less than 100, depending on the specified value.
|
|
•
|
Date with format – Input will be validated as a date (day, month, and year) according to the date format specified. For the date format, four different formats are available:
|
|
•
|
yyyy-mm-dd – Year, followed by month, followed by day, separated by a hyphen.
|
|
•
|
mm/dd/yyyy – Month, followed by day, followed by year, separated by a slash.
|
|
•
|
dd/mm/yyyy – Day, followed by month, followed by year, separated by a slash.
|
|
•
|
dd.mm.yyyy – Day, followed by month, followed by year, separated by a dot.
|
|
•
|
Full Name – Input will only be accepted if it can be interpreted as a valid "Full Name", meaning a first name followed by a last name. To fulfill this requirement, the input must consists of at least two text strings separated by at least one space character. Examples for valid "Full Names" include: "John Doe", "Frank N. Furter", "Dr. Dolittle" but also "a b".
|
|
•
|
String length range – Text input will be validated so that the entered text is no shorter than the supplied minimum length and no longer than the supplied maximum length. Minimum and maximum length can both be the same value, in which case the entered text must have exactly the given length. Any input that does not fall into the given length range is not accepted. The given minimum must be 1 or more, the given maximum must be 100 or less, and the maximum must not be less than the minimum. Note that for an optional field an empty input is also accepted.
|
|
•
|
String length minimum – Text input will be validated so that the entered text is no shorter than the supplied minimum length. Any input that is less than this value is not accepted. The given minimum must be between 1 and 100 (including). Note that for an optional field an empty input is also accepted.
|
|
•
|
String length maximum – Text input will be validated so that the entered text is no longer than the supplied maximum length. Any input that is greater than this value is not accepted. The given maximum must be between 1 and 100 (including). Note that for an optional field an empty input is also accepted.
|
|
•
|
Accept all values – No validation will be applied, all number input is valid (in the range of -9223372036854775808 to 9223372036854775807, which is imposed by LISTSERV Maestro).
|
|
•
|
Number range – Number input will be validated so that the entered number is not less than the supplied minimum and not greater than the supplied maximum. Input that does not fall into the given range is not accepted. The given minimum must be less than the given maximum. And, an optional field an empty input is also accepted.
|
|
•
|
Number minimum – Number input will be validated so that the entered number is not less than the supplied minimum. Any input that is less than the minimum is not accepted. Note that for an optional field an empty input is also accepted.
|
|
•
|
Number maximum – Number input will be validated so that the entered number is not greater than the supplied maximum. Any input that is greater than the maximum is not accepted. Note that for an optional field an empty input is also accepted.
|
The Default Values tab is only visible when modifying a dataset or list that already contains subscribers and additional profile fields on the Profile Fields screen have been added. In this case, it is necessary to define defaults for the new fields that will be used for the already existing subscribers.
This tab lists all fields that have been added. Each field has a Define link. Click the link to define the default value for the given field. (For fields of the
Single or
Multiple Select type, before the default can be defined, a lookup table must first be assigned on the Selection Field Details tab.)
If the field is of the Multiple Select type (or
"visible", which is a variation of
Mandatory), then a default will have to be supplied before leaving the wizard. For optional fields (or
"read-only" or
"hidden", which are variations of
Optional), then a default doesn't need to be supplied. If the default of such a field is left empty, then the empty value will be used for all existing subscribers.
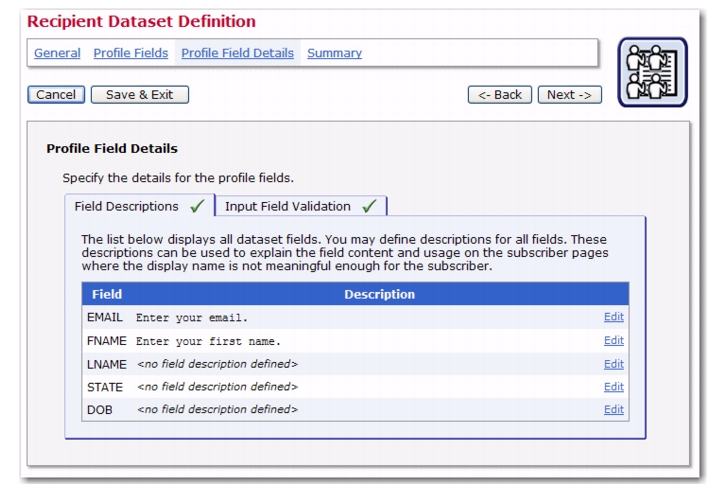
Previously, the profile fields of a dataset only had a “display text” attribute. Now, there is a
Description field where you can enter a longer description of the profile field. This description will appear on the subscriber pages where the display name is not meaningful enough for the subscriber.
To define this new field, click on the Field Description tab. Click the Edit link next to the field you’d like to add a description to. The Field Description screen opens. Enter a description for the field, making sure that it explains what the subscriber needs to do to fulfill the field requirements.
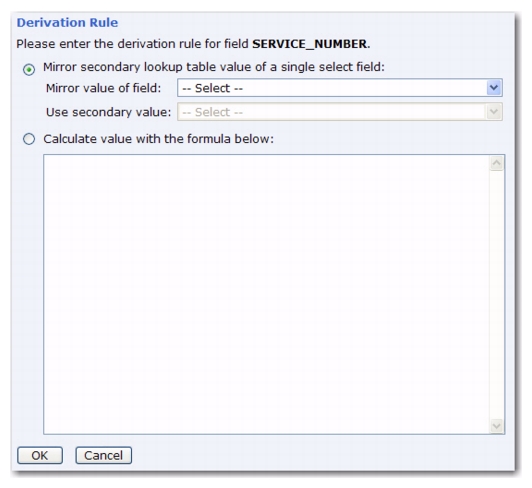
If a Derived profile field is added on the Profile Fields page of the Recipient Dataset Definition wizard, then the Profile Fields Details page will contain a new Derivation Rules tab. These rules must be supplied for each field and define how the value for the derived field will be determined. To define, click on the associated
Define or
Edit link. This opens the Derivation Rule screen.
Depending on your profile fields, you may have one or two options available to define the derivation rule. If you have two options, then the dialog will display two radio buttons that allow you to choose between the two options. Once you have selected an option, you can then provide the details for that option.
Note: Only the single-select fields that are defined in the same object as the derived profile field are available in the
Mirror value of field drop-down menu. This means that if the derived field is a dataset field, then it can only reference a single-select field that is also defined in that dataset. If the derived field is a field of a hosted list, then it can only reference a single-select field in the same hosted list. It can not reference a single-select field from the dataset the hosted list resides in.
|
•
|
Calculate value with the formula below – This option is always available. Simply enter the calculation formula that will be evaluated to determine the value for the derived profile field. This can be any kind of formula, using all the formula features that are available.
|
The formula can be a constant formula, which would mean that all subscribers will have the same value in this derived profile field. However, a formula as a derivation rule is most useful if it is (at least partially) based on other profile fields, meaning that it is not constant. In such a case, each subscriber will have an individual value in the derived profile field (although not necessarily a unique value), as the formula is individually calculated based on the values of his profile fields.
Note: In the formula, you can only reference other profile fields that are defined in the same object as the derived field itself. This means that a formula of a derived field in a dataset can only reference other fields from the same dataset. It can not reference fields from any lists in the dataset. And, a formula of a derived field in a hosted list can only reference other fields from the same hosted list. It can not reference fields from the dataset the list resides in or fields from other hosted lists. However, a derived field can reference other derived fields as long as this does not create an endless recursion of references (i.e. a chain like "DERIVED1 references DERIVED2 references DERIVED3 etc." is possible; a recursion like "DERIVED1 references DERIVED2 references DERIVED1" is not possible).
When you are finished editing the derivation rule, click [OK] to save your changes, or click
[Cancel] to close without saving.
Derived fields require additional storage space in the system database and additional processing power by the server when their values are calculated. Because of this, a derived field should only be used if there is actually a need for it. Some situations where a derived field seems like a solution can actually be solved without a derived field; in which case, this other solution should be used.
You should also be aware that you can always add an additional derived field to an already existing dataset or hosted list, even if there are already members in the dataset or subscribers on the list. Therefore, you should usually refrain from creating a certain derived field if you have any doubts about whether or not your will actually be using this field. Instead, you should only add it once it turns out that you actually require it.
A derived field is the correct solution for the following situations:
|
•
|
Include Field in Subscriber Profile – The value of the derived field will appear as a visible value in the subscriber profile so that the subscriber can view this value on the corresponding profile page in the membership area.
|
|
•
|
Include Field in Tracking Reports – The derived field will be available in the Recipient Details tracking report (for a job with either personal or anonymous tracking).
|
For example, a derived field that extracts the domain name from the subscriber's email address would allow a tracking report that can show you how many recipients clicked on a certain link (or opened the email, etc.), broken down by recipient domains. For this, usually a "hidden" derived field is the correct choice (although you can also use a "read-only" field, if you also want to display the value in the subscriber profile, see above).
|
•
|
Include Field on Browse/Edit Screen – The derived field will be included in the subscribers list on the Browse/Edit screen, so that you can see the various values there, and also filter the list over these values.
|
In contrast, a derived field is usually not the correct solution for the following situations:
|
•
|
Mail Merging – A certain derived value will be included as a merge value in the body of a mail message. For this, you should not use a derived field (unless you need the derived field for other situations, see above).
|
Instead, simply include a *Calc system drop-in in your mail message, with the same calculation formula that you would have used for the derived field.
|
•
|
Target Group Condition Tree – A certain derived value will be used to filter the recipients in the condition tree of a target group. For this, you should not use a derived field (unless you need the derived field for other situations, see above).
|
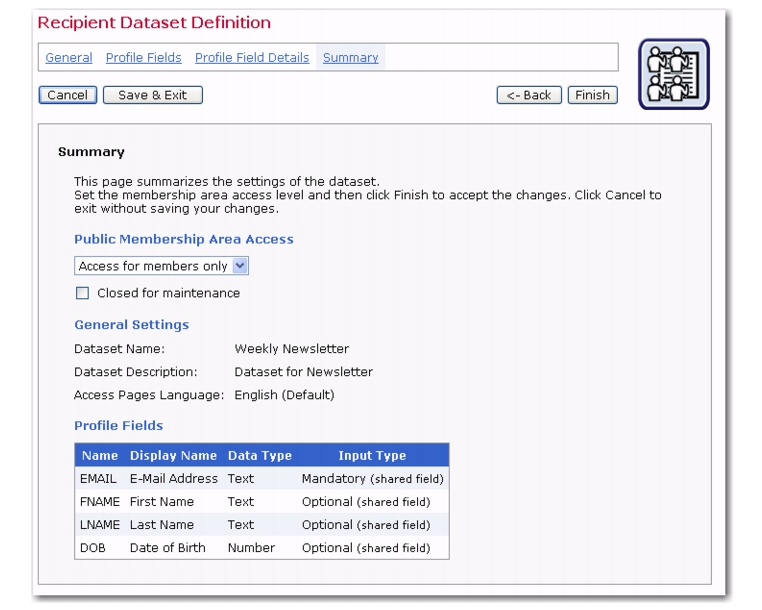
The Summary screen is the final step in the Recipient Dataset wizard. This screen summarizes the settings of the dataset. If necessary, click the
[<- Back] button to makes changes to the dataset settings.
|
•
|
Open to everyone – Anyone can click on the membership area URL and have access to the membership area in order to join the area and subscribe to lists.
|
The membership area can be temporarily closed for maintenance such as updating the membership list or other tasks by checking
Closed for maintenance. Closing the member area for maintenance will prevent anyone from joining or existing members from changing their settings while the system is temporarily closed.
Click the [Finish] button to save all the settings of the dataset. The Recipient Dataset Details screen opens.
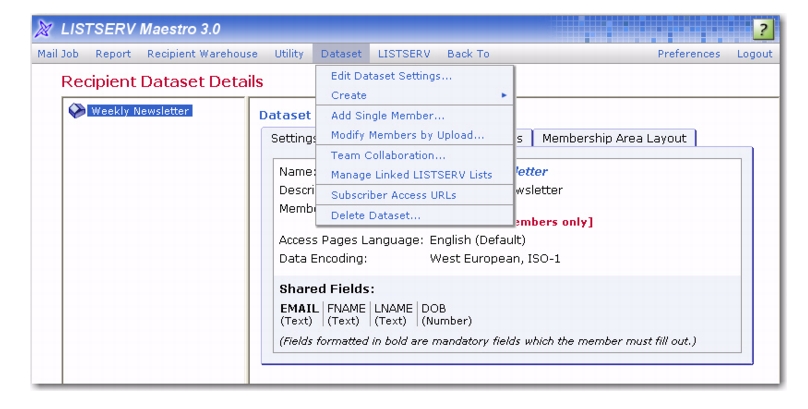
Once you have existing datasets in the Recipient Warehouse, their settings can be fully edited until there are lists or members added to them. After lists or members become part of a dataset, only limited editing capabilities are available. To edit the settings of an existing dataset, click on the dataset name from the Recipient Dataset screen. A split screen will appear showing the dataset and any lists in the left frame and the dataset information in the right frame. The
Dataset menu is now available on the Toolbar. The
Edit Dataset Settings option will open the Recipient Dataset Definition wizard so its settings can be changed.
If there are members or mailing lists in the dataset, the following settings can be changed without significant impact on the dataset: the name of the dataset, the list administrator email address, the public description, field display names, the access level of the membership area, and the closed for maintenance check box.
If there are members or mailing lists in the dataset, it is possible to add new fields, remove existing fields, reorder fields, or rename fields. However, as this requires a change in the structure of the underlying database tables, the dataset may be unavailable for a significant time while the entire dataset is rebuilt with the new structure. In order to prevent unanticipated disruptions to the dataset, these types of changes are disabled by default. In order to make such changes, it is necessary to first click on the
Enable advances changes link on the Profile Fields screen of the Recipient Dataset wizard.
If there are Membership Area Layout customizations of templates that include data fields, then adding, removing, reordering, or renaming fields will break these customized templates and the customizations must be reapplied.
Lookup tables are fields of data that are shared across datasets in a warehouse. When used wisely, they can save time and resources by reusing a single set of data for many datasets and lists. For example, a list of countries of the world can be used to create a lookup table. If this information is collected by several lists or datasets in a warehouse, making a lookup table containing a list of countries once will make this available to all datasets and lists.
To view a list of your current lookup tables, click on the Recipient Warehouse menu and select
Lookup Tables. The Lookup Tables screen opens.
To create a new lookup table, click Recipient Warehouse >
New Lookup Table from the Toolbar. The Lookup Table screen opens. Enter a name for the lookup table, select the encoding for the data in the table, and then type in a description of the contents of the table. Click
[OK] to continue.
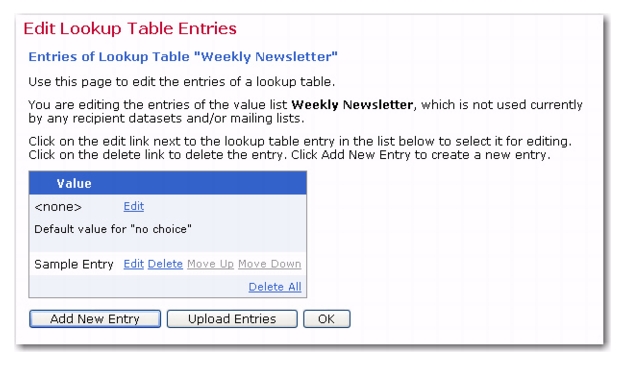
Each lookup table requires an entry that becomes the default value for “no choice”, meaning the value assigned to a field when members do not select from any of the items presented on the selection list. This entry can also be the first selection on the list, or the most popular or common selection on the list. LISTSERV Maestro defaults to an entry that says “
<none>”, but this can be changed by clicking
Edit and adding different text.
To change the default value for “no choice”, click the Edit link. The Edit Lookup Table Entry screen opens. The default, <none>, is used if a subscriber does not select a choice from the lookup table. To use a value other than the default, enter a new value in the
Entry Text field. This value may be up to 100 characters. The
Entry Text field can
not be empty.
Lookup table entries can be added manually one by one, or they can be uploaded from a text file that contains one entry per line. The number of entries for any single lookup table is limited to 1000 items. To add single entries, click the
[Add New Entry] button. Type one item in the text box, and then click
[OK]. Click the
[Add New Entry] again to add the next item. To upload a text file, click the
[Upload Entries] button. Browse for the file on a local drive, select it, and then click
[OK].
Once there are items listed in the lookup table, they can be edited, deleted, moved up, or moved down in the list. Use the adjacent links –
Edit,
Delete,
Move Up,
Move Down – to change the item in the table.
Click [OK] to accept the entries in the lookup table and return to the Lookup Tables tab.
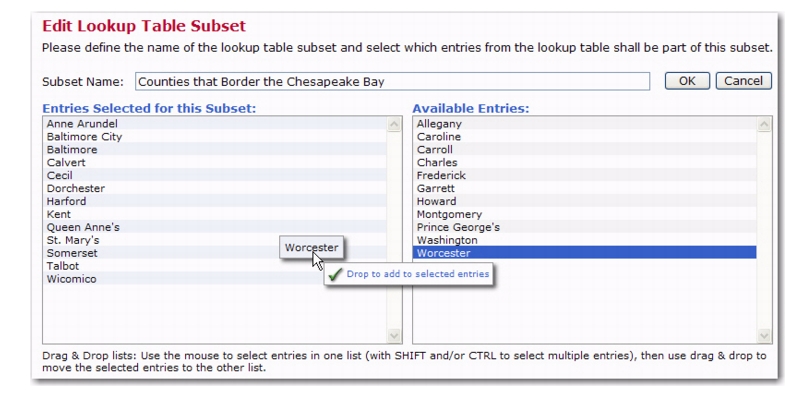
You can now further define lookup table entries and create a subset for the lookup table. This gives you the ability to create customized selections for your subscribers. For instance, let’s say that you have a lookup table listing every county in the state of Maryland. You can take this a step further and create subsets that only contain counties that are on the Eastern Shore, that border the Chesapeake Bay, that border the District of Columbia, etc. With lookup table subsets, your ability to create customized entries for your subscribers is endless.
Click on the Lookup Table menu and select
Define New Subset. The Edit Lookup Table Subset screen opens. Enter the
Subset Name, and then drag and drop the entries you’d like to include in the subset from the
Available Entries box to the
Entries Selected for this Subset box.
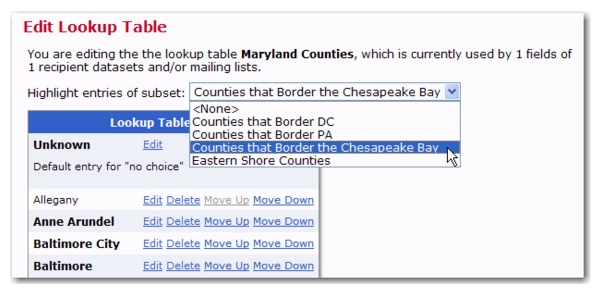
Once you are finished defining the subset, click [OK] to return to the Edit Lookup Table. The newly added subset will be highlighted in the list of entries.
If you’d like to view a different subset, click on the Highlight entries of subset drop-down menu and select the subset from the menu.
To edit the highlighted subset, click on the Lookup Table menu and select
Edit Highlighted Subset.
To delete the highlighted subset, click on the Lookup Table menu and select
Undefine Highlighted Subset.
In addition to the standard settings, a lookup table can have additional secondary columns. The standard column of a lookup table holds the lookup table entries' names, which are used to create the entries of a drop-down menu for the user and must therefore be unique. Contrary to this, a secondary column of a lookup table holds entry information that is subordinate to the entry name, such as the sales region code or the sales contact phone number for a lookup table containing sales contact addresses. Uniqueness of secondary column values is not enforced by the system; therefore, the system supports using the same value for several lookup table entries.
Secondary lookup table values are currently accessible via the calculation formula function
SecondaryValue(...) and in the Demographic Breakdown report for a dataset or hosted mailing list (see Section 9.7
Viewing Demographic Reports for a Dataset or List for details on this report).
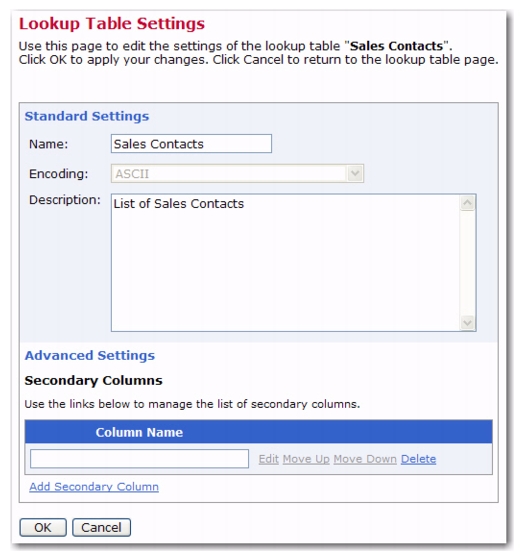
To add secondary columns to a specific lookup table, go to the Edit Lookup Table screen for that lookup table, click on the
Lookup Table menu, and then select
Lookup Table Settings. The Lookup Table Settings screen opens. Click on the
Show Advanced Settings link, and then click on the
Add Secondary Column link. Enter the name of the secondary column and click
[OK]. To add more than one secondary column, simply click the
Add Secondary Column link again.
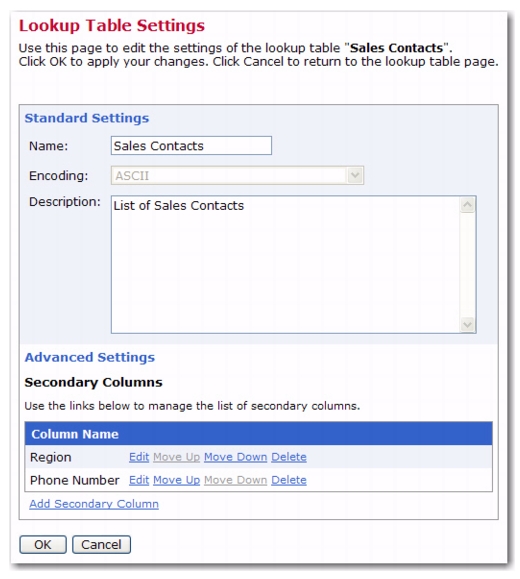
To implement the sales contact lookup table sketched above, you would for example add the secondary columns named
Region and
Phone Number to your
Sales Contacts lookup table. By editing the lookup table entries, you assign one of four different sales region codes and unique phone numbers to each of your twenty sales contact addresses.
Now you add a single select column named SALES_CONTACT to your hosted recipient list and select your
Sales Contact lookup table as basis for this column. Subscribers then choose their sales contact from a drop-down menu that lists each contact by its unique name. Once this is accomplished, the value of the secondary lookup table column
Phone Number is immediately available for mail merging in the form of the system drop-in
*Calc SecondaryValue(&SALES_CONTACT;,"Phone Number"), which is replaced with the correct phone number assigned to the sales contact that the subscriber had selected via the sales contact name.
Secondary columns are also available for Demographic Breakdown reporting; and for this purpose, columns like
Region yield meaningful grouped results due to their non-uniqueness: If you add the
Region secondary column of the
SALES_CONTACT list field to the Demographic Breakdown report and remove all other fields, then the report will show four different bars, each corresponding to the count of subscribers who have a sales contact in that region.
Using secondary columns in tracking reports is also supported, but it requires that you first employ a derived field that pre-calculates the secondary value and adds it to the tracking profile data.
Take extra care when renaming a secondary column that is used in any of the ways described above. Due to the widespread availability of secondary column values, the system does not automatically adjust the name of a secondary column if it is referenced in a calculation formula. If you, for example, rename a secondary column that is referenced from within a calculation formula in the condition tree of a target group based on a dataset or hosted recipient list, then this formula becomes invalid (this invalidity is detected by LISTSERV Maestro and is shown in the form of a delivery error message or an error message when the target group is selected in the Define Recipients wizard).
To repair the invalid formula after you have renamed the secondary column, open the Target Group Definition wizard and review the condition tree. Then open the tree node with the formula in it and edit the formula manually to use the correct secondary column name.
If the main value from the CSV-file is already present in the lookup table, then the associated secondary values are used to update the already existing secondary values of the existing main value in the lookup table.
The Bounce Processing option on the
Recipient Warehouse menu opens the Bounce Processing Setting screen, which displays the bounce removal settings for all of the datasets in your Recipient Warehouse. These settings include:
To change these settings, click the Edit Settings link. The Edit Bounce Processing Settings screen opens.
Make your changes and then click [OK] to save. Click
[Cancel] to ignore your changes and to return to the Bounce Processing Setting tab.