Table of Contents Previous Next Index

What’s New in the Administration HUB

What’s New in the Administration HUB
Version 3.2 of LISTSERV Maestro has several new features in the Administration HUB that benefit the system administrator. This section gives you detailed information about these features. For information on using other features in the Administration HUB, see the Administrator’s Manual for LISTSERV Maestro 3.1. The new features in the HUB for LISTSERV Maestro 3.2 are:
New entries for the INI-files that set the folder under which the Maestro User Interface, Administrative, and Tracker components store log files. In addition, there are other new entries for the Tomcat and Maestro User Interface components. For details, see Section 2.3 New Entries for the Maestro INI-Files.
Deleting Groups
To delete an entire group, select the group from the Administer User Accounts and Identities screen, and then select Delete Group from the Group Settings screen. The Delete Group screen opens.
This screen allows you to delete the currently selected user account using one of the following options:
Keep data owned by the group and its accounts: Only the group specific settings and the accounts in the group with their personal settings will be deleted. The other data that is owned by the group or its accounts will not be deleted, but it will remain in the system as "ownerless".
This option gives the administrator the chance to later assign ownership of this data to a different user account or group or can delete the data separately.
Delete the group and all group accounts, with all owned data and settings: Together with the group and all user accounts in it, all data and settings that are owned by or associated with this group or its accounts will also be deleted.
Click [Delete] to delete the currently selected group with the selected option, or click [Cancel] to leave the page without deleting the group.
Deleting User Accounts
To delete a user account, select the user from the Administer User Accounts and Identities screen. The Define User Account screen opens.
Click on Delete User. The Delete User Account screen opens. This screen allows you to delete the currently selected user account. Depending on what kind of user account is currently selected, one of the following option pairs will be available:
Account not in a group:
Keep data owned by the account: Only the account itself and its personal settings will be deleted. The other data that is owned by the account will not be deleted but will remain in the system as "ownerless". The administrator can later assign ownership of this data to a different user account/group or can delete the data separately.
Delete the account with all owned data and personal settings: Together with the user account, all data and settings that are owned by or associated with this account will also be deleted.
Group-account, with other accounts existing in the same group:
Keep data owned by this account: Only the account itself and its personal settings will be deleted. The other data that is owned by the account will not be deleted but will remain in the system as "ownerless". The administrator can later assign ownership of this data to a different user account/group or can delete the data separately. All group owned data will be preserved in the group.
Delete the account with all owned data and personal settings: Together with the user account, all data that is owned by or associated with this account will also be deleted. All group owned data will be preserved in the group.
Group-account, last account in the group:
Keep data owned by the account or group: Only the account itself and its personal settings will be deleted. The other data that is owned by the account or its group will not be deleted but will remain in the system as "ownerless". The administrator can later assign ownership of this data to a different user account/group or can delete the data separately. In addition, the group specific settings will not be deleted.
Delete the account with all owned data and personal settings: Together with the user account, all data that is owned by the account or its group will be deleted, as well as the personal settings of the account and the group specific settings.
Click [Delete] to delete the currently selected account with the selected option, or click [Cancel] to leave the page without deleting the account.
New Entries for the Maestro INI-Files
The following INI-file entries are new for LISTSERV Maestro 3.2:
Defines the basis for the calculation of the dashboard report lifetime, in minutes. For efficiency’s sake, a dashboard report is refreshed again only after its lifetime has expired. The lifetime until the next refresh is re-calculated after each refresh as a random value in the range from “baseTime” to “baseTime*1.5”.
Note: Tracking event reports do not use this base-time, as they determine their lifetime based on the event transfer interval instead.
Default: 4 (i.e. by default the actual dashboard lifetime is a random value in the range between 4 and 6 minutes.)
Defines the folder under which the Maestro User Interface component stores the log files.
Default: The "logs" subfolder of the LUI home folder (i.e., by default, the subfolder "lui/logs" of the installation folder).
Default: The "logs" subfolder of the HUB home folder
(i.e., by default, the subfolder "hub/logs" of the installation folder).
New Options for Administrative Email Notifications
The Administrative Email Notifications screen now has two new features:
The option to send an email after system problems now also controls whether or not to send notification after each backup to inform you of its success or failure.
Sending an Email Notification After Each Backup
Once email notifications are enabled on the Administrative Email Notifications screen, a notification will be sent after each backup process is complete, noting it’s success or failure status.
Defining Different SMTP Servers for Email Notifications
Use this information to help you define different SMTP servers and ports for each component when email notifications are sent in response to severe system problems.
In the SMTP Host / Port section on the Administrative Email Notifications screen:
SMTP Host – Enter the host name running the SMTP server that will be used for the mailing. This field is mandatory and must be filled out with a valid host name that can be used to send e-mail notification by the LISTSERV Maestro component that encounters a severe problem.
SMTP Port – Enter the SMTP port on which the SMTP server on the host specified above listens for SMTP connections. This field is optional; if left empty, the standard SMTP port "25" is used.
Important: If you only supply the default SMTP host and port in this section, then this host / port must be reachable from from all servers running one of the LISTSERV Maestro components. If not all component servers can reach this host by using this name and port (for example due to firewalls or DNS or other networking-related issues), then supply the custom SMTP Host / Port (see below for details).
In the Custom SMTP Hosts and Ports for LUI / TRK section on the Administrative Email Notifications screen:
To use the default SMTP host name and port supplied in the section above, then select the Use Default SMTP host and port as defined above option from both the LUI and TRK drop-down menus.
Note: The Administration HUB always uses the default SMTP host name and port defined in the section above.
If the default SMTP host name and port supplied in the section above can not be used for all LISTSERV Maestro components, then use the settings in this section to supply SMTP host names and/or ports for LUI and/or TRK.
LUI SMTP Host / Port – If you want to supply a custom SMTP host and/or port for the Maestro User Interface component, then choose the Use SMTP Host and port as supplied below option, and then supply SMTP host/or port that the LUI component will use for notifications.
TRK SMTP Host / Port – If you want to supply a custom SMTP host and/or port for the Maestro Tracker component, then choose the Use SMTP Host and port as supplied below option, and supply the SMTP host/port that the TRK component shall use for notifications.
Automatically Logging into the Maestro User Interface
The ability to automatically login to the Maestro User Interface has been added to LISTSERV Maestro 3.2 as an advanced feature and should only be configured by the system administrator. This feature can be set up for both non-group and group users.
For a non-group user:
http://LUIHOST/lui/index.jsp?user=USER&password=PASSWORD
For a group user:
http://LUIHOST/lui/index.jsp?user=USER&password=PASSWORD&group=GROUP
where LUIHOST is replaced with the location of your LISTSERV Maestro User Interface, USER is replaced with the URL-encoded version of the user name, PASSWORD is replaced with the URL-encoded version of the password, and GROUP is replaced with the URL-encoded version of the group name.
For example, assume that:
LUIHOST= example.lsoft.com
USER=holly
PASSWORD=example
GROUP=test
then, the following URL would be used:
http://example.lsoft.com/lui/index.jsp?user=holly&password=example&group=test
Once you access this URL, the Start screen opens with the Start LISTSERV Maestro for User link.
Click the link to start the session. The Login screen is briefly shown, and then the LISTSERV Maestro User Interface is opened and the user is automatically logged in.
Tip: The original Start screen continues to be displayed in the background; therefore, if you click on Start LISTSERV Maestro for User link again, then another LISTSERV Maestro User Interface session window will be opened, with the same user logged in automatically.

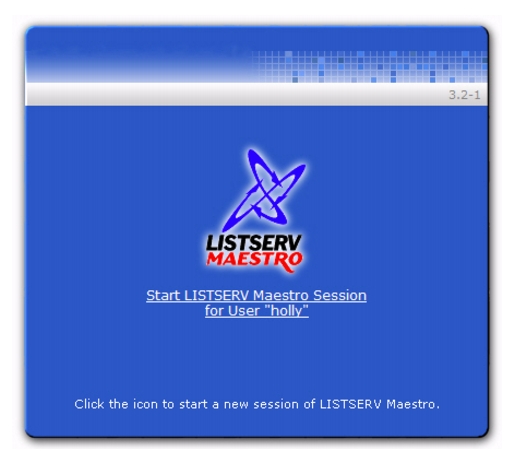
To prevent this from happening, you can add an additional URL parameter, “returnURL=YOURURL”, where YOURURL is replaced with the URL-encoded version of a page-URL from your own website. The effect of this additional parameter is that once the above URL is accessed (with the "returnURL=YOURURL" parameter included), then the Start screen will be displayed; however, when you click the Start link, two things will happen: The LISTSERV Maestro User Interface session will be opened, with the user automatically logged in (just as above). In addition, the original Start screen will be returned back to the YOURURL given in the "returnURL" parameter.