After the administrator has given you the right to administer content templates, then the Utility menu will contain two new options –
New Content Template and
Content Templates. The
New Content Templates option gives you several ways to create a new user-defined template by copying a system template, by using your own content, or by selecting content from a previous job; in addition, the
Content Templates option lets you manage and copy any existing templates.
With these options, you’ll be able to create professional-looking HTML messages with or without HTML coding. LISTSERV Maestro 3.1 now comes with ready-to-use message templates that contain placeholders that, when selected in the template designer, will let you fill in predefined areas with your own text or images. In addition, all text, including any changes you may make down the road, will be entered into both the HTML and the text part of your message so you only need to enter the text once. Each placeholder can represent one or several instances of plain text or HTML, or a linked or inline binary. When using the template designer, you can also preview each placeholder, providing a full picture of what the template will look like when it is finished.
System templates are pre-defined templates that come together with LISTSERV Maestro. A system template can not be used for content definition directly, but they can be copied and used as a base for a new user-defined template.
To copy a system template, click the Utility menu, and then select
Content Templates. The Manage Content Templates screen opens. In the System Templates section, you’ll find a list of the system templates that you can copy.
Click on the template’s name to open the View System Template screen. From this screen, you can preview the system template. To create a user-defined template based on this system template, click the
Create New Template link in the upper right of the screen. The Create User-Defined Template Based on System Template screen opens.
The user-defined template will initially be created as an exact copy of the system template, except for the following settings, which you are now asked to provide for the new template:
|
•
|
Subject – Enter the subject line for the new user-defined template. This setting is optional and can be left out, in which case the subject line of the user-defined template will remain empty.
|
|
•
|
Enable new template – Only user-defined templates that are in the "enabled" state may be used to define a message. Check this option if you want the new user-defined template to be enabled right from the beginning, or uncheck it if you want to create the new template in the disabled state (this allows you to edit it further before you enable it).
|
Note: All these settings can later be changed again, so if you are not sure about any setting, just enter what fits best at the moment.
Click the [Create Template] button to create the new user-defined template. The new user-defined template will be displayed in the
User-Defined Templates section of the Manage Content Templates screen.
To create a plain text template, click on the Utility menu, select
New Content Template, and then select
Create Empty Template. This opens the Edit Content Template screen with a new "blank" template. This template can be used to create a plain text or HTML template.
To define a plain text template, click on the Text icon, and then select
Plain Text Mail on the Message Content Type screen.
To create an HTML template, click the Utility menu, select
New Content Templates, and then select
Create Empty Template. The Edit Content Template screen opens. Click on the
HTML icon. The Message Content Type screen opens. Select the
HTML Mail option, and then check the
Include plain text alternative box. This ensures that recipients whose email client does not display HTML will default to the plain text alternative, which allows them to receive the message.
Click [OK] to save and return to the Edit Content Template screen. You are now ready to define your HTML template. The first step is to enable drop-in content (see the Section 5.9
Using Drop-In Content for details). After drop-in content is enabled, you can define the template’s content (section 5.7
Defining the Template Content for details).
To create a template based on an existing job, click on the Utility menu, select
New Content Template, and then select
Create Template Based on Mail Job. This opens the Create Template From Mail Job screen.
Click the Existing Job drop-down menu, select the job you want to use for your template, and then click
[Create Template]. The Edit Content Template screen opens with the new template pre-populated with the same content as the selected source job. From this screen, make any changes to the template, and then click
[OK] to save. For more information on the Edit Content Template screen, see Section 5.7
Defining the Template Content.
To create a new template by uploading pre-defined text, click on the Utility menu, select
New Content Template, and then select
Upload Template. The Upload Content Template screen opens.
Enter the filename of the content template ZIP-file located on your local system or use the
[Browse] button to browse for the file, and then click
[Upload] to upload the template.
Note: The uploaded template ZIP-file must be a file that has previously been downloaded from LISTSERV Maestro (which can also be a different LISTSERV Maestro instance) with the download link provided on the template list page.
Once you have uploaded the template file, you will be taken to the Edit Content Template screen, which is where you can make any additional changes to the uploaded template before saving it. For more information on this screen, see Section 5.7
Defining the Template Content.
To create a template as a copy of an existing template, click on the Utility menu and then select
Content Templates. The Manage Content Templates screen opens. This screen contains a list of all user-defined and system templates. To copy any of these templates, simply click the
Copy link next to the template you’d like to copy. A copy of the template is added to the
User-Defined Templates section. Once the copy is complete, you’ll want to rename the template. To do this, click on the name and rename it on the Edit Content Template screen. For more information, see Section 5.7
Defining the Template Content.
The Subject field is the subject line of the message. It is mandatory and must be filled out.
The HTML Preview tab is where you can upload or download the HTML body of your message. Once defined, it also displays the HTML body of the message, with all drop-in elements resolved. If errors have been encountered while LISTSERV Maestro has tried to replace the drop-in placeholders with the drop-in content, then an error message is displayed and the un-replaced drop-in placeholders are highlighted in the HTML preview.
To define the body from this tab, you can upload an HTML file. An uploaded HTML file may contain links to images on a remote server or local (inline) images embedded in the page. To upload an HTML page, click the
[Upload HTML] button. This will start a small applet that allows you to select an HTML file from your local disk for upload to the system. You will need to have Java enabled in your browser for the applet to work. Since the applet needs to access your local disk, you will need to grant rights for the applet to function correctly. The applet will load the selected HTML file and will search for all images and other binaries that are referenced in the HTML code. All binaries that are referenced locally (with a local file name and/or path) will be uploaded together with the HTML code.
Once the upload is complete, the applet displays a short summary, listing all locally referenced binaries that were uploaded, as well as all binaries that were referenced as links to files on the Internet (these are not uploaded). All binary references that are found, but could not be resolved, will also be listed.
By clicking the [Download HTML] button, a previously uploaded HTML file and its associated binaries can be downloaded to your computer in the form of a ZIP archive. This also applies to any HTML code that has been entered directly into the box on the HTML Code tab.
The HTML Code tab contains the source code of the HTML body of the message. To define the body, type HTML code directly in the box, cut and paste it from another application, or upload an HTML page. To edit the source code, simply edit the code shown on this tab, and then go back to the HTML Preview tab to view the changes.
To upload an HTML page, click the [Upload HTML] button. To download a previously uploaded HTML file and associated binaries in form of a ZIP archive, click the
[Download HTML] button.
The Text Preview tab displays the plain text alternative option for the HTML mail. For this to function properly, the plain text alternative and drop-in content must be enabled for the job.
The alternative text is a plain text body that is an "alternative" for the more elaborate HTML body of the message. Recipients whose email client does not display HTML may default to the plain text alternative allowing them to receive a message. To reach the highest number of recipients, it is generally a good idea to use an alternative text with each HTML message.
This tab is a preview of the alternative plain text body of the HTML email message, with all drop-in elements resolved. If errors have been encountered while LISTSERV Maestro has tried to replace the drop-in placeholders with the drop-in content, an error message is displayed and the un-replaced drop-in placeholders are highlighted in the alternative text preview.
The Text tab lets you define the alternative text of your choice. Type the text directly in the box, cut and paste it from another application, or upload a text file by clicking the
[Upload Text Alternative] button.
|
•
|
Allow Advanced Editing – When a template is used during the content definition of a mail job, then the user who uses the template usually only has to "fill in the blanks" that are left by the template placeholders. The user does not have to bother with the actual message body, as this body is already defined by the template. Therefore, by default, when a template is used to define the message content, it is not even possible to modify the message body, except by filling out the placeholders.
|
|
•
|
Highlight Placeholders – When a template is used to define the message content, then the user will have to provide content for all placeholders in the template. To make this process simpler for the user, LISTSERV Maestro highlights the currently selected placeholder in the preview.
|
The Template Placeholders section contains a table of all placeholders that are currently defined in the template.
|
•
|
Edit – Click this link to edit this placeholder. The Edit Placeholder screen opens. From here, make changes to the placeholder and then press [OK] to save.
|
|
•
|
Copy – Click this link to create a new placeholder as a copy of this one. A copy of this placeholder will appear in the list. Once the copy is created, rename the placeholder and make any other changes you’d like to make. To do this, click the Edit link.
|
|
•
|
Delete – Click to delete this placeholder. You will be asked if you really want to delete the placeholder. Click [OK] to confirm.
|
The [Add Placeholder...] button at the bottom of the tab lets you create a new placeholder. Once you click on this button, the Edit Placeholder screen opens. From this screen, you can enter the information for the new placeholder. For more information on using this screen, see Section 5.10.2
Editing Placeholders.
To use drop-in content in your template, you first need to enable it. Drop-in content is disabled by default for a newly created template. To enable drop-in content, click on the
Drop-Ins icon on the Edit Template Content screen. This icon is also used to change the current settings or to disable drop-ins for the template.
Drop-ins use an opening and a closing tag. These tags are used by LISTSERV Maestro to identify the names of the drop-in content. In content templates, the opening and closing tags used for drop-ins must be the same as used for the template placeholders. Therefore, changing the tags for drop-ins also changes the tags for the template placeholders and vice versa. Opening and closing tags can be any characters you like that do not contain any spaces. "{{" and "}}" are suggested as defaults, but you may change them.
To include drop-in content in your template, simply enter the name of the drop-in at the appropriate location, enclosed in the tags you have defined. For example, if your drop-in is called "sample" and you are using the suggested default tags, then you would include the text "{{sample}}" in the location where you want the drop-in content to appear in the final message.
Whenever LISTSERV Maestro finds the opening tag followed by the closing tag, it will interpret all the characters in between first as a template placeholder name. If no placeholder with this name is found, then the name is instead interpreted as the name of a drop-in. LISTSERV Maestro will then look up the list of available drop-ins for a drop-in with this name. If the name is not found, delivery of the mail fails with an error message like "Drop-In with name 'sample' not found".
If drop-in content is disabled, any drop-in placeholder names that might appear in the message will not be replaced with the corresponding content. Instead, the placeholder names will appear verbatim in the body of the message.
Template placeholders make content templates easy to use and truly customizable, as they define the "blanks" that the user will have to fill out. A template placeholder appears in the template body in the following form:
where "{{" and "
}}" are the opening and closing tags, and "
NAME" is replaced with the name of the placeholder. The "
#" character that prefixes the name must always appear for a template placeholder.
A placeholder with a given name can appear several times throughout the template body and may appear both in the HTML and the plain text part, if the placeholder's type allows this.
The opening and closing tags for the placeholders can be freely defined and can be any characters you like that do not contain any spaces. "
{{" and "
}}" are suggested as defaults, but you may change them by clicking the Placeholders icon in the icon bar.
Note: The opening and closing tags that are defined for the placeholders will also be used for drop-ins, if drop-ins are enabled for the template. It is important to choose opening and closing tags with care, making sure that they do not otherwise appear in the template. For example, if you decide to use parentheses '(' and ')' for opening and closing tags, any text that appears between any set of parentheses will be interpreted as the name of a template placeholder or drop-in. Since parentheses have a high probability for use in the normal text of a message, using them as tags is not recommended because they may cause an error in placeholder or drop-in name look up, leading to mail delivery failure.
|
•
|
Click the Click here to insert a placeholder link at the top of the Text tab. This will open the Insert Placeholder screen, which allows you to create a new placeholder by selecting the New option in the left list and filling out the placeholder attributes in the right part. The {{#NAME}} tag of the new placeholder will be automatically inserted at the current cursor position in the current text input box.
|
|
•
|
Press CTRL+Space while typing in the text box on the Text tab. This will also open the Insert Placeholder screen.
|
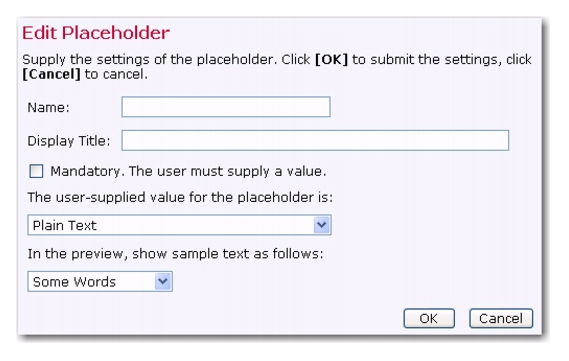
Template placeholders have various attributes that determine their appearance and behavior. These attributes can be defined on the Edit Placeholder screen during placeholder creation or by clicking the
Edit link of an existing placeholder in the list on the Template Settings tab.
|
•
|
Name – The name of the placeholder. This is the name that you must use as a replacement for NAME in the {{#NAME}} tag. Only the following characters are allowed in a placeholder name: 'a'-'z', 'A'-'Z', '0'-'9', '_' and '-'.
|
|
•
|
Display Title – This is the title or name of the placeholder that will be displayed to users that employ the template during content definition. Enter a title that makes it easy for the user to understand the purpose of the placeholder.
|
|
•
|
Mandatory – Defines if the placeholder is mandatory or not. For a mandatory placeholder, the user must supply a non-empty content. For an optional placeholder, the user may decide to leave the placeholder empty.
|
|
•
|
Value Type – Defines the placeholder's content type.
|
|
•
|
Plain Text – The placeholder's content will be interpreted literally, as plain text. If the placeholder is used in a HTML part, then any special HTML code characters in the content will be escaped before replacement. Therefore, it will not be possible to include any HTML formatting (like bold, color, font, etc.) in a placeholder of this type. Only the two plain text placeholder types can be used in a plain text template or in the alternative text of a HTML template.
|
|
•
|
HTML – The placeholder's content will be interpreted depending on the context. If the placeholder appears in the HTML part of a message, then the HTML code appears unescaped and will thus be interpreted as normal HTML. This allows the user who employs the template during content definition to include HTML formatting code in the placeholder value (e.g. for attributes like underline, bold, color, font, etc.), but it also requires the user to remember to manually escape any HTML-sensitive characters that are not be supposed to be interpreted as HTML code. If such a placeholder is used in the plain text part of a message, then the HTML code that the user enters will be converted automatically to plain text (see below). If the placeholder appears both in the HTML and the plain text part of a message, then each of the above applies for each respective part, i.e. in the HTML part the placeholder's value will be interpreted as HTML, in the plain text part it will automatically be converted to plain text. Therefore, it is, for example, safe for the user to use simple formatting tags (like <b> or <u> for bold or underlined style) so that in the HTML part some special formatting will be applied, even if the same placeholder appears in the plain text part, because there these tags will automatically be removed. However, the user should avoid complicated HTML code in such placeholders, as the rules by which the HTML code is converted into plain text are rather simple: (1) Any HTML entities (for example like "&" or """) will be resolved into the correct replacement character; (2) Any paragraph and linebreak tags (<p>, <br> and similar) will be converted to normal linebreaks; (3) Any occurences of ordered or unordered lists with list entries (<ol>, <ul> and <li>) will be converted into simple ordered/unordered lists; (4) All other HTML tags will simply be removed.
|
|
•
|
Binary (linked or inline) – This is a special placeholder that allows the template manager to define a binary (usually an image) in the HTML template of which the actual content is not yet known but will be supplied later by the user who employs the template during content definition. When doing so, the user who defines the content may decide if the binary data (the image file) is supposed to be linked remotely, from a URL at a web server, or if the binary data shall be bundled into the mail as an inline attachment. Binary placeholders can be used for images (JPEG, GIF, and PNG) or background sounds (MIDI). During content definition the placeholder will be replaced with a URL to the image (either a linked or inline URL), which is why this type of placeholder should be used only in a context in the HTML code where such a URL makes sense. Normally, the placeholder would stand in for an image and would appear in the "src" attribute of an "<img>" tag, like this: <img src="{{#SampleBinaryPlaceholder}}">
Other valid contexts would be in a style definition where an image URL is required or in a background image or sound attribute of an HTML tag. This placeholder type can only be used in the HTML part of an HTML template.
|
|
•
|
Binary (inline) – Same as the Binary (linked or inline) type above, only with this type, the binary will always be an inline binary. This means that the user who employs the template during content definition will have no choice about this.
|
|
•
|
Binary (linked) – Same as the Binary (linked or inline) type above, only with this type, the binary will always be a linked binary, i.e. the user who employs the template during content definition will have no choice about this.
|
|
•
|
Plain Text (multiple values) – Same as the Plain Text type above, but the user who employs the template during content definition has the option of supplying multiple values for the placeholder. The placeholder will be replaced with the combined multiple values (linked to each other). This is useful when using the multi-placeholder repeater and/or the special placeholder prefix and suffix because the prefix and/or suffix will appear once before/after each of the multiple values before they are concatenated to build the combined replacement value. From the values in preview drop-down menu, select how many dummy values shall be displayed for this placeholder during preview (when no values have been supplied yet). Only the two plain text placeholder types (see also above) are allowed to be used in a plain text template or in the alternative text of a HTML template.
|
|
•
|
HTML (multiple values) – Same as the HTML type above, but the user who employs the template during content definition has the option of supplying multiple values for the placeholder. The placeholder will be replaced with the combined multiple values (linked to each other). This is useful when using the multi-placeholder repeater and/or the special placeholder prefix and suffix because the prefix and/or suffix will appear once before/after each of the multiple values before they are concatenated to build the combined replacement value. From the values in preview drop-down menu, select how many dummy values shall be displayed for this placeholder during preview (when no values have been supplied yet). This placeholder type can only be used in the HTML part of an HTML template.
|
|
•
|
Binary (linked or inline, multiple values), Binary (linked, multiple values), Binary (inline, multiple values) – Same as the corresponding Binary types above, but the user who employs the template during content definition has the option of supplying multiple binaries for the placeholder. The placeholder will be replaced with a list of the URLs of all supplied binaries (both linked and inline). This is useful when using the multi-placeholder repeater and/or the special placeholder prefix and suffix because the prefix and/or suffix will appear once before/after each of the multiple URLs before they are linked to build the combined replacement value, which allows you to enclose each of the URLs with its own <img> tag to actually display the image that is represented by the binary. From the values in preview drop-down menu, select how many dummy images shall be displayed for this placeholder during preview (when no binaries have been supplied yet). This placeholder type can only be used in the HTML part of an HTML template.
|
|
•
|
Sample Preview – There are several situations where the template is supposed to be displayed while the placeholders are not yet filled out with any content. In these situations, LISTSERV Maestro fills out the placeholders with dummy content as a stand-in for the actual content that is yet to be provided. This makes it easier to assess the overall appearance of the template while the placeholders are still empty. The kind of dummy content that is used for this can be defined by the content manager, depending on the type of the placeholder:
|
|
•
|
Dummy Text – For Plain Text and HTML placeholders there are several choices to roughly define which kind of dummy text shall be displayed. The choices are: Some / Many Words
Some / Many Sentences
Some / Many Paragraphs
Some / Many Digits
Some / Many Letters
Sample URL.
|
Notes: The
Dummy Text should be selected according to the expected kind of content that will be provided by the user for the given placeholder. For example, if the placeholder appears in a context where it will be filled out with a number (like a ZIP-code or phone number), then
Some Digits would be the closest match. If the placeholder will be filled out with a lot of text, then
Many Paragraphs is probably better.
The
Sample URL option is a special choice that will result in a replacement that looks like a dummy "http://" URL. This type is appropriate if the expected content will most likely be a URL (for example, in a context like "Click this URL {{#Placeholder}} to go to...”).
|
•
|
Dummy Images – For placeholders of the binary types, the following choices are available to display dummy images: No Sample Image
Small Square (20x20 Pixel)
Medium Square (100x100 Pixel)
Large Square (500x500 Pixel)
Small Vertical Oblong (10x20 Pixel)
Medium Vertical Oblong (50x100 Pixel)
Large Vertical Oblong (250x500 Pixel)
Small Horizontal Oblong (20x10 Pixel)
Medium Horizontal Oblong (100x50 Pixel)
Large Horizontal Oblong (500x250 Pixel)
|
Note: The sizes of the dummy images will only be observed if the <img> tag itself does not have any "width" or "height" attributes. If these attributes are present, then they override the sizes of the selected dummy image and the image will be stretched or shrunk accordingly.
When using optional placeholders in a template, it is sometimes desirable that some content defined in the template will only appear if the placeholder is actually filled out and will not appear if the placeholder is left empty.
For example, consider an HTML template that is supposed to render a bulleted list with up to five bullets, where each list item (except for the first) is optional, i.e. the user who employs the template during content definition can decide how many bullets there are, simply by filling out some and leaving empty the rest, like this:
This would actually not work because if some placeholders are left empty, then their bullets (rendered by the <li> tag) would still be visible, like this (three placeholders filled out, two left empty):
It would be better if the preceding <li> tag would simply not appear at all, leaving the placeholder empty. To facilitate this, template placeholders in LISTSERV Maestro use a special syntax that allows you to define a prefix and a suffix to the content that will not appear if the user does not enter a content at all (the prefix and suffix are only included if the user actually supplies a non-empty content). An example of this is:
where #NAME is replaced with the actual placeholder name and where you replace "prefix" with the desired prefix text and "suffix" with the desired suffix text, using the following rules:
|
•
|
Any characters after "#NAME" and before "#VALUE#" will be part of the prefix, including all linebreaks (even linebreaks that appear immediately before "#VALUE#"), except for any whitespace that appears immediately after the word "#NAME" and that appears on the same line as the word "#NAME". Such whitespace is ignored. Also, if the first line contains only whitespace after the word "#NAME", then the linebreak at the end of this line will also be ignored and will not be part of the prefix. (See below for examples.)
|
If the user does not supply placeholder content, then the whole placeholder (starting with the opening tag and ending with the closing tag) will be replaced with an empty string (i.e. the prefix and suffix will not appear in this case).
If the user supplies a non-empty content, then the whole placeholder (again starting with the opening tag and ending with the closing tag) will be replaced with the text that is built by linking the prefix, content, and suffix. This means that, in the "prefix#VALUE#suffix" string, the "#VALUE#" part (including the enclosing "#" characters) is replaced with the user content, and the resulting string (including prefix and suffix) is used to replace the placeholder.
If the placeholder is a placeholder of one of the Binary types, then the special #TITLE# attribute may be used anywhere in the prefix and/or suffix of that placeholder (it may even appear several times).
If the #TITLE# attribute is used, then when the placeholder is filled out during content definition, the user will have the option of not only providing the binary source for the placeholder but also a title text. This title text will then be used to replace the #TITLE# attribute wherever it appears in the prefix or suffix.
The main use for this attribute is to provide the text for the "title" and/or "alt" attribute of the <img> tag that the binary placeholder is used to generate, for example like this (prefix and suffix color coded like above):
Note: Observe how in the example the <img> tag is opened in the placeholder prefix and closed in the placeholder suffix, and that the #TITLE# attribute appears in the suffix as a stand-in for the yet to be supplied "title" and "alt" attributes.
The prefix and suffix have an especially important role when used together with placeholders that may have multiple values – Plain Text (multiple values) or HTML (multiple values). The multiple values of these placeholders are linked to each other, and the resulting value is used to replace the placeholder. This by itself is not very useful, as the user could just as well have supplied the multiple values already as one combined text in a normal single value placeholder. However, multiple value placeholders become useful when a prefix and/or suffix are employed because the prefix/suffix is added individually to each of the supplied multiple values, and only then are the multiple values linked together to build the final replacement value. This means that if a prefix and/or suffix is defined, and the user later supplies several values for the placeholder, then not only will the prefix appear before and the suffix after the supplied value, but the prefix and/or suffix also appears between the various multiple values. This very useful if the template manager wants to define a list of items without already knowing how many items there are going to be.
Consider the bullet list example above. As the example was defined, the template manager had set up a bulleted list with up to five bullets. Since the bullet definition itself (the <li> tag) was defined in the prefix, any empty bullets were effectively avoided should the user decide not to provide values for some of the placeholders.
So far so good. The only problem is that the maximum number of bullets was predefined as five by the template manager. If the user later would want to add a sixth bullet, then he would have to ask the template manager to change the template. With a multiple values placeholder, this problem is avoided. In this case, the definition of the bulleted list in the template would look something like this:
And, the "MultiPlaceholder" placeholder would have to be defined as HTML (multiple values). Then, it would be up to the user to decide how many values to supply for this placeholder.
If no value is supplied (only allowed if the placeholder is not mandatory), then the placeholder will be replaced with an empty string and the "<li>" tag will not appear since it is defined in the prefix, which is not rendered for an empty optional placeholder.
If only a single value is supplied, then the placeholder behaves just like a normal placeholder: The value is used to replace the "#VALUE#" part, and the result, including the prefix "<li>" would be used to replace the placeholder, and the resulting HTML code would look something like this:
But if several values are supplied, then the multi-behavior comes into play. Each of the values would be used individually to replace the "#VALUE#" part, and the prefix "<li>" would be added to each of the values. Then, the result for all values would be linked together and used to replace the placeholder. Therefore, the resulting HTML code would look something like this (sample with four values supplied, linebreaks added for readability):
Another useful feature for multiple values placeholders is the "#INDEX#" attribute that can be used in the prefix and/or suffix. Any appearance of this attribute will be replaced with the index number of the multi-value. For example, assume the following template definition, where "MultiPlaceholder" is of the "HTML (multiple values)" type:
The above is an example of how the #INDEX# attribute can be used to generate a numbered list where a normal ordered list using the <li> tag would not be appropriate, or in a plain text, where this tag can of course not be used.
Assuming that "TableRow", "ParagraphWithAnchor", and "LinkToAnchor" are defined as multiple value placeholders, and assuming that the user supplies five values for “TableRow”, three values for “ParagraphWithAnchor” and matching three values for "LinkToAnchor", then the resulting HTML would look something like this (linebreaks added for readability):
Note: Observe how each table cell has a unique ID and each paragraph a unique anchor name and how the links at the bottom point to one of these unique anchors.
Of course, if two placeholders are used in this way (one to generate link anchors and one to generate the matching links to those anchors), then this will only work if the user who uses the template during content definition makes sure that both placeholders have the same number of values, and that the ordering of the values in both placeholders matches; otherwise, the links will point to the wrong anchors, or there will be links without anchors or anchors without links pointing to them.
Note: Any appearance of the #INDEX# attribute in the prefix/suffix of a normal (non-multiple value) placeholder will not be replaced. This attribute shows its special behavior only in the prefix/suffix of a multiple value placeholder.
As described above, using a placeholder with multiple values, usually together with the placeholder prefix/suffix, is very useful for creating a list of user supplied items, where the number of items is not known in advance. However, this alone does not cover a situation like the following – assume that the template is meant for a newsletter, where each article in the newsletter is supposed to appear with a heading, a sub-heading, and a body, all with different styles:
Of course, one solution would be to have a placeholder called "article" and make this placeholder a multi-value placeholder so that there could be several articles. That would mean each of the values would constitute one article. However, this would mean that the heading, sub-heading, and body of each article would all have to be supplied in the article's value, which would mean that the special styles for the heading and subheading would have to be supplied in the value by the user who uses the template to define the message content. When this happens, the definition of the heading, sub-heading, and body styles would be out of the hands of the template manager and would become the responsibility of the user who uses the template to define the message content, which is probably not what is desired.
The other solution one could think of would be to have three placeholders – one called "heading", one called "sub-heading", and one called "body", and all three would be defined as multiple values placeholders and each could contain the correct styles in the prefix/suffix. The user who uses the template to define the message content would simply have to supply the correct headings, sub-headings, and bodies of all desired articles, making sure to supply them in the correct order in all three placeholders and to supply an equal number of values for all. The styles for each would then be supplied automatically by the prefix/suffix mechanism. But, there would still be a problem because the correct way to put these three placeholders into the template code would be like this:
because each of the three multiple values placeholders would simply iterate over all its values, followed by the values of the next placeholder, and so on, which is not the desired result. Instead, what should happen is that the values of the three multiple values placeholders would be repeated in an alternating fashion. The first heading, followed by the first sub-heading, followed by the first body, only then followed by the second heading, followed by the second sub-heading, and so on.
LISTSERV Maestro does provide a mechanism for this special behavior of the multiple values placeholders in form of the multi-placeholder repeater. The syntax of the repeater looks similar to the syntax of a placeholder, even though the repeater is not really a placeholder by itself. The simple form without a separator looks like this:
|
•
|
Opening and Closing tags – The "{{" and "}}" of above must be replaced with the correct template placeholder opening and closing tags of your template.
|
|
•
|
Repeater Body – The word "BODY" must be replaced with the body text that shall actually be repeated by this repeater (i.e. the repeater will be replaced with one or more instances of this body text).
|
|
•
|
Repeater Separator – The word "SEPARATOR" must be replaced with the separator text that shall appear between two instances of the body text. Such a separator is optional (use the simple form described above if you do not want to specify a separator - more about this below).
|
The body text and the separator text of the repeater can both contain any kind of text, including template placeholders and even further nested repeater tags. Actually, the repeater only really makes sense if the body contains at least one template placeholder, which also is defined as a multiple values placeholder. And to be really useful, a repeater usually contains at least two multiple value placeholders. All occurrences of multiple values placeholders in the repeater body are examined. For each such multi-value placeholder, the number of values (as supplied by the user) is determined. The maximum number of values over all multi-value placeholders then defines the repeat count. This means that the multi-value placeholder in the repeater body with the most values defines the repeat count of the repeater.
The repeater is then replaced with as many instances of the repeater body as defined by the repeat count, all linked together into one long value. During each such instance of the repeater body, each multi-value placeholder that occurs in the body will display only one value from its multi-value list, which is the value that matches the current repeat instance. That is, in the first body instance, all multi-value placeholders will display only their first values. In the second instance, each will display only its second value (if any), and so on. If a separator is defined, then between two instances of the repeater body, one instance of the separator text is inserted. The separator appears only between two instances, it does not appear before the first instance or after the last one.
Note: When using a multi-placeholder repeater in a HTML context, then linebreaks usually do not matter so you can use them to format the repeater in a way that works best for you. However, when using a repeater in a plain text context, then any linebreaks that appear in the BODY or SEPARATOR blocks actually do matter, as they become part of the block they belong to. This is especially true for linebreaks that appear just before or after the {{multi:separator}} tag or just before the closing "}}" tag of the repeater.
To illustrate the repeater, we use the same example as above with the article with heading, sub-heading, and body, where we also want to have a horizontal line between two articles (but not before or after the first and last articles). The same three placeholders "heading", "sub-heading", and "body" as used above are required, and all three must be defined as multiple values placeholders. The correct code looks like this:
The Manage Content Templates screen lists all currently available content templates for editing and other management of the templates. To access this screen, click on the
Utility menu from the Toolbar, and then select
Content Templates.
The user-defined templates are the content templates that can actually be used in the content definition of a mail job. These templates are located at the top of the Manage Content Templates screen.
|
•
|
Incomplete – The template definition is not yet complete; therefore, the template can also not be enabled.
|
|
•
|
Complete – The template definition is complete; however, the template has not yet been enabled and can not be used in the content definition of a mail job (the template will not appear in the list of available templates when defining a job's content).
|
|
•
|
Enabled – The template is complete and enabled and can be used in the content definition of a mail job. For information on using a template to define the content of a job, see the User’s Manual for LISTSERV Maestro.
|
|
•
|
Copy – Create a new template as a copy of this template.
|
|
•
|
Enable – Enable a currently disabled complete template.
|
|
•
|
Disabled – Disable a currently enabled complete template.
|
|
•
|
Download – Download the template in form of a ZIP file that contains all data of the template. This ZIP file can then be used to create a new template in this or any other LISTSERV Maestro instance by uploading it again. This link is only displayed for the administrator.
|
System templates are pre-defined templates that come together with LISTSERV Maestro. A system template can not be used for content definition directly, but they can be copied and used as a base for a new user-defined template (see Section 5.1
Creating a Copy of a System Template).