This section gives an overview of how to translate the text of the LISTSERV Maestro User Interface to another language or make changes to the English-language text using the L-Soft Resource Translation Tool. It assumes a good acquaintance with computers and how to work with files in the file system.
To be able to translate the LISTSERV Maestro User Interface, the following basic requirements must be met:
· You need to have an installation of the L-Soft Resource Translation Tool.
· You need to have a Translation Kit that matches the LISTSERV Maestro version that you have installed.
· You need a good understanding of editing HTML code, plus the meaning of the various HTML tags and how to escape reserved HTML characters.
The Translation Kit for LISTSERV Maestro comes in the form of a ZIP file for each LISTSERV Maestro version. For example, the Maestro-2.1-1-TransKit.zip is for LISTSERV Maestro, version 2.1-1.
Important: You must not use a Translation Kit that is not meant for your LISTSERV Maestro version!
Once you have obtained the Translation Kit for the correct Maestro version, put the ZIP file into the work subfolder of your Resource Translation Tool Installation folder.
The Translation Kit contains several components, one for the Administration Hub, one for the User Interface, and one for the Subscriber Interface. Each component supports a list of target languages.
The Translation Tool does not need to be installed on the same server as LISTSERV Maestro. It may run on the workstation of the person doing the translation. Once the translation is ready to be deployed, a system administrator must copy the translated JAR files to the folders in the appropriate directories on the LISTSERV Maestro server(s).
Prior to beginning the translation:
1. Download the latest version of the Resource Translation Tool from the L‑Soft web site, and install it on your workstation or server. Instructions for installing and starting the RTT are found in the RTT installation kit zip file. As instructed, you may need to install a Java Runtime Environment (JRE) or edit the command file to point to the JRE installed with LISTSERV Maestro, for example:
set JAVA_1_5_HOME=c:\program files\l-soft\application server\java
2. Download the Translation Kit for the currently installed build of LISTSERV Maestro from the L‑Soft web site and place it in the translation tool’s work folder. It is not necessary to unzip it. If you are unsure which build you are running, browse to this web page:
[your LISTSERV Maestro domain]/lui/build
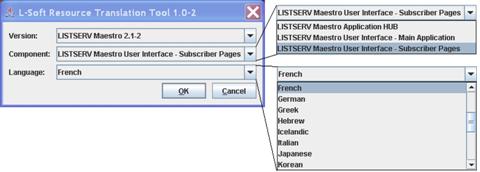
To begin translating, start the Translation Tool according to the instructions found in the RTT zip file. Upon startup, the Translation Tool performs an integrity check of the Translation Kit files in the Translation Tool’s work folder and shows a drop-down list of the valid Translation Kits. To begin your translation, select the Translation Kit, select the Translation Kit component, and then select the target language. Click [OK] to begin translating. See Figure 17.
Figure 17 Resource Translation Tool Startup
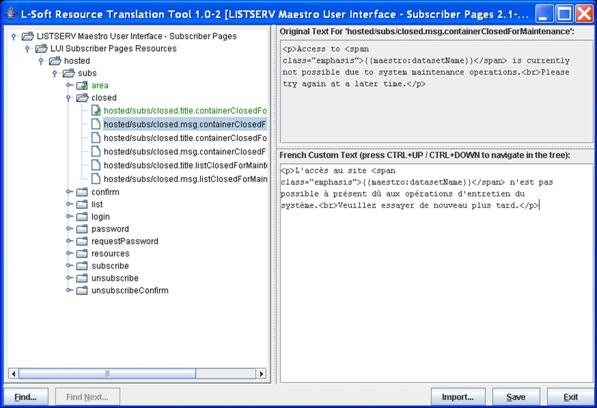
The main window of the Translation Tool is divided in two main areas – the left area contains the resource key tree of the selected component and the right area is divided into an upper and a lower part. The upper part displays the original text for the selected resource key; the lower part displays the currently defined custom text for the selected target language.
Figure 18 Translation Tool Main Window
Clicking the [Save] button prompts the tool to create an appropriate resources jar file, which is named as follows (note that [lang] is replaced with the two-letter ISO code of the selected target language; see Appendix D):
· hubResources_[lang].jar (for the HUB)
· luiResources_[lang].jar (for the LUI main application)
· luiSubscriberResources_[lang].jar (for the Subscriber Interface)
These files are written to the translationsV[version] folder of the Translation Tool’s work folder. For example, if you have chosen to translate the Subscriber Interface of LISTSERV Maestro 2.1-1 to German, then the folder is named translationsV2.1-1 and contains (among others) the luiSubscriberResources_de.jar file.
Note: Each component also lists English as a target language. This allows you to use the Translation Tool to customize text without actually performing a translation. All descriptions in this document are applicable without changes to the target language English.
Translating or customizing text for LISTSERV Maestro requires editing text that is distributed over a considerable number of property keys in the Translation Kit. Frequently, the text is only short snippets, which can be translated quickly, each on its own.
To select a property key for translation, the Translation Tool supports standard mouse navigation. However, if a cluster of text needs to be edited, navigation via keyboard shortcuts can greatly reduce the time required for the translation.
Assume that you are working on the translation for one of the property keys (i.e. in the editor for the custom text of a property key). Use the standard keyboard keys to navigate in the text that is displayed in the editor. If you want to finish editing the text for the current property key and want to edit the text for the next property key, press [Ctrl] + [Enter] or [Ctrl] + [ ]. These keyboard shortcuts locate the next property key node from the resources tree and automatically selects it for editing (the editor is refreshed with the current custom text for the new property key). If you want to review the text for the property key that precedes the current one, press [Ctrl] + [Ÿ].
Table 9 Keyboard Shortcuts for the Resource Translation Tool
|
Shortcut |
Function |
|
[Alt] + [F] |
Opens the Find screen. If this is already open, then it begins searching. |
|
[Alt] + [C] |
Closes the Find screen. |
|
[Alt] + [N] |
Finds the next occurrence of the previous search string. |
|
[Alt] + [S] |
Saves the changes. |
|
[Alt] + [E] |
Exits the Translation Tool. |
|
[Ctrl] + [Enter] or [Ctrl] + [ ] |
Used while editing a custom text; selects the subsequent properties key node for editing. |
|
[Ctrl] + [Ÿ] |
Used while editing a custom text; selects the previous properties key node for editing. |
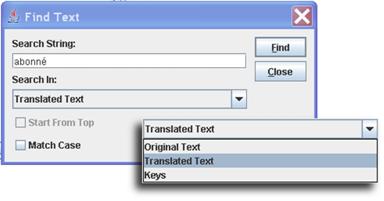
Working on a translation frequently requires that you locate a specific properties key node in the resources tree. Finding the node can be accomplished by manually navigating in the resource tree by expanding and collapsing tree nodes and scrolling until you find the node that you are looking for. To speed up this task, the Translation Tool comes with a Find feature. Click the [Find] button in the bottom left corner of the main window to open the Find screen. A node can be found by supplying a part of the property key, by supplying a part of the original text, or by supplying a part of the translated text. See Table 9 for finding nodes using keyboard shortcuts.
Figure 19 Searching for text in the resource tree
Even though the Translation Tool presents the Translation Kit contents in a tree-like structure, LISTSERV Maestro requires that the resource keys are available in the form of “key/value” pairs in a collection of text files that are bundled in a JAR file. The Translation Tool frees you from the tedious task of creating such a collection manually; however, a general understanding of how resource keys and their values are used in LISTSERV Maestro is still useful.
Each resource key pair looks as follows:
<KEY>=<VALUE>
where “<KEY>” is replaced with the name of the key and “<VALUE>” with the language specific value associated with this key. For example:
app.caption.cancel=Cancel
This defines a key called “app.caption.cancel”, which has a value of “Cancel”.
How it works: Whenever some language dependent text needs to appear in the User Interface, the program simply contains the key for that text and a replacement directive. Therefore, when LISTSERV Maestro needs to display a page containing this text, it finds the “Display the text associated with the key XYZ” directive, looks up the key in the resource bundle, and then displays the value associated with this key. Therefore, by simply changing the value of a key, you can change what LISTSERV Maestro will display.
Important: When making changes to key values, be sure to make the changes correctly in order to preserve the meaning.
If you decide to not supply the value for a key in your translation, LISTSERV Maestro will look up the original value. If you use the Translation Tool to supply custom English text for resource keys, then it is sufficient to supply the values only for the keys that you want to customize and to leave the customizations for the other keys empty. By default, the original values are correctly combined with your custom texts.
If you use the Translation Tool for a translation to a foreign language, leaving any key value empty must be considered carefully. Some resource keys define values that are actually language-independent or can be used with the default English value even for foreign languages. One example of such a value is the value for the “hosted/subs/subscribe.msg.charset.confirmMailForMemberAreaJoin” key in the Subscriber Interface component of the Translation Kit. The value for this key defines a character set, and the default value “ISO-8859-1” is suitable for many Western European languages, which means that the custom value for this key can remain empty in many cases. However, most key values are actual texts that require a translation; therefore, if you leave a key value empty for a non-English translation, then the default English text for this key is shown together with the other translated values, which results in a language mix-up.
To help you distinguish between supplied and un-supplied parts, each supplied key is marked with a green checkmark. This green checkmark is propagated to higher levels of the resource key tree display once all entries in the lower level are marked as “supplied completely”.
LISTSERV Maestro uses a web-based User Interface which consists of HTML pages that are displayed in a web browser. This means that the largest part of all language dependent text is displayed as part of a HTML page and must follow the rules imposed on HTML.
In HTML, some characters have special meanings. For example, the “<” and “>” characters are used to enclose special HTML tags that are used to format the HTML page. This type of HTML tag may look like this: <body>
The appearance of a word enclosed in “<” and “>” signals to the browser that this word is not supposed to appear as a visible word; instead, it is a special HTML tag that conveys some special meaning to the browser (i.e. how to render and format the following text).
If you actually want a “<” or “>” character to appear on the page, then you need to “escape” this character in the form of a HTML escape sequence. Another typical character that needs to be escaped in the form of a HTML escape sequence is the ampersand character, “&”:
‘<’ must be entered as the escape sequence “<”
‘>’ must be entered as the escape sequence “>”
‘&’ must be entered as the escape sequence “&”
‘"’ must be entered as the escape sequence “"”
A non-breaking, non-whitespace space may be escaped as “ ”
Note: HTML escape sequences always start with an (un-escaped) ampersand and end with a semicolon. Please see the many related resources on the web that tell you more about characters that need to be escaped in HTML, for example: http://www.w3.org/TR/html401/sgml/entities.html.
Any sequence of whitespace characters (e.g. space, tab, linebreaks, etc.) will be rendered as a single space by the web browser. Example:
word 1 \t\t\r\n\t\t\t \r\nword 2
This value starts with “word 1” followed by two spaces, two tabs, a Windows-style linebreak, three more tabs, another two spaces, another linebreak, and ends with “word 2”. All the characters between “word 1” and “word 2”, e.g. all the spaces, tabs, and linebreaks, are considered whitespace. This means that they will all be collated into a single space when rendered as part of a HTML page: “word 1 word 2”. There will not be several spaces, but only one, and there will not be any visible tab or linebreak whatsoever.
To actually include more than one space, you need to use “special” spaces that are written in the form of their HTML escape sequence. The most widely used escape sequence for a non-breaking space is “ ”. So
word 1 word 2
defines the text “word 1 word 2”, where the three spaces between the two words will actually appear on the rendered page.
Linebreaks are usually introduced by the browser that renders the page whenever a linebreak is required. A linebreak is required whenever the line length is not enough to show the rest of the text; therefore, the text will be wrapped to the next line and the browser will use whitespace between words as the places where a possible linebreak may be inserted for this wrapping.
Linebreaks that are visible on the rendered page can not be inserted by inserting a linebreak (by pressing [ENTER]) into the translated text. Instead, you need to use a special HTML tag that has the effect of introducing a visible linebreak: <br>
Example: The following text
line 1<br>line 2
will actually appear as two lines “line 1” and “line 2” on the rendered page.
The majority of text resources in the Translation Kit are pure text strings, without any formatting directives (in the form of HTML tags). All formatting is done on the pages themselves, into which the text values are inserted. However, some text resources do contain actual HTML tags, which contain formatting that can not be easily imposed from the outside.
For example, if you have a sentence in which you want to emphasize a single word in the middle by rendering it in a bold font, then you can not do so with an outside formatting directive. Instead, you have to include the corresponding bold-tag right into the text of the sentence itself, bracketing the word you want to emphasize.
If you find a HTML tag (recognizable as being enclosed in “<” and “>”) in a text, then you should see to it that the same tag, with the same semantics, appears in your translated version of the text. Most commonly used are span-tags, “<span>”. A span-tag actually consists of an opening part, “<span>”, and a closing part, “</span>”. These two tags bracket word(s) in the text to which a special formatting shall be applied. The formatting is then included in the opening span-tag, in the form of a class attribute: “<span class="emphasis">”.
Example:
Do you <span class="emphasis">really</span> want to delete this?
This defines a text with a question to the user, where the word “really” is to be emphasized; therefore, it has been bracketed with the opening and closing parts of the span-tag using the “emphasis” class.
You will need to translate this text to a corresponding meaning in your target language, and then employ the opening and closing parts of the span-tag (with the “emphasis” class) to the word that comes closest to the same semantic as the word.
Sample for Swedish:
Skall detta <span class="emphasis">verkligen</span> blir raderat?
Sample for German:
Wollen Sie dies <span class="emphasis">wirklich</span> löschen?
The span-tag is frequently used throughout the text resources of LISTSERV Maestro. Make sure that you transfer them with a similar meaning to your translation, using the same “class” attribute.
For a complete list of the HTML tags and custom styles that are used by LISTSERV Maestro, see Appendix A: Custom Styles and HTML Tags.
Even though most of the text is used inside HTML pages, there are some exceptions. Inside of these exceptions, the rules of HTML escape sequences, HTML whitespace, HTML linebreaks, and HTML tags do not apply and you must be careful not to, for example, use a HTML escape sequence in one of these texts. If you would do so, and, for example, write “&” instead of “&”, then the user would actually see the “&” text instead of the desired “&”.
The best approach to avoid this is to use HTML markup in translated text only if the original text contained HTML markup. However, in many cases, the original text does not contain HTML markup, but is used inside of an HTML page anyway. For example, the text for the “assign.title.page” key, which is the title text for the Team Collaboration page of a LISTSERV Maestro email job. A translation for this text may benefit from additional HTML markup such as an additional “<br>” in the case that the translated version is very long and a linebreak would help achieving a good page layout.
In other cases the text is used in a context where no web browser is involved, meaning that it is sent to the user as a plain text mail or is written to a downloaded text file.
In some resource texts, LISTSERV Maestro employs word replacement to ease translation. Consider the following example:
“500 duplicates have been removed from the job”.
This text contains a value that may vary at run time. Therefore, you can not simply have a value with this text in the translation; otherwise, you would need an infinite number of texts, one for each number of duplicates that may have been removed. The immediate solution is to specify the text “duplicates have been removed from the job” and let LISTSERV Maestro affix the number of deleted duplicates at runtime. For this to work, the number of deleted duplicates has to be hard coded so that it appears first in the sentence, followed by some text. What if in a different language the syntax of the language would not allow such a sentence? For example, the syntax of that other language may allow only a sentence such as “From the job, 500 duplicates have been removed”, where the variable part appears right in the middle of the sentence. If this occurs, then a “hard coded” solution is not a good idea. To compensate for this, LISTSERV Maestro uses word replacement. In the text resources, whenever there is a variable part, a replacement placeholder is used instead. At runtime, the placeholder will be replaced with the variable value, forming the desired finished sentence.
Standard numbered placeholders appear in the text as a number that is enclosed in curly brackets, such as “{0}”, “{1}”, “{2}”, etc.
Using the example from the precious section, we could write the text as follows:
{0} duplicates have been removed from the job
At runtime, the “{0}” is replaced by the variable number “500”, the desired correct English sentence “500 duplicates have been removed from the job” will be formed. If in another language the other form of the sentence would be required, then the translator can simply relocate the placeholder in the sentence, such as:
From the job, {0} duplicates have been removed
This means that whenever you find one of these numbered placeholders in the text string, then you must make sure to:
· Include exactly the same number of placeholders in your translated version, with exactly the same number-indexes.
· Determine the meaning of each placeholder (what will it be replaced with) so you can use the same placeholder with the same meaning even in your translated version.
· Use the correct order of placeholders, which may vary from the order in the original text (see the next section).
Numbered placeholders can occur in the text in any sequence; the first placeholder in a text (when read from left to right) does not necessarily have to be the one numbered “{0}”. In most cases, this may very well be so, but it is not a general rule that needs to be followed.
This {1} contains {0} two placeholders
is just as valid as
This {0} contains {1} two placehodlers
More important than the actual 0, 1, 2, ... order is that the semantically correct placeholder is used at each position.
Consider the following sentence: “250 recipients have opened mail XYZ”. This sentence contains two variable values – the number of recipients that have opened the mail (“250”) and the ID of the mail (“XYZ”). Now in another language, the syntax may require this sentence to be written as “The mail XYZ was opened by 250 recipients”. Since we are aware of this, we write the original value with placeholders:
{0} recipients have opened mail {1}
This means that “{0}” will be replaced with the number of recipients and “{1}” will be replaced with the ID of the mail. Therefore, in the “other language” version, we would have to make sure to use the correct placeholders in the right positions:
The mail {1} was opened by {0} recipients
which effectively reverses the order of the two placeholders (when read from left to right). If we did not reverse the order, and use a text like “The mail {0} was openend by {1} recipients”, then after replacement we would get a nonsense sentence like “The mail 250 was opened by XYZ recipients”. Because of this, whenever there are more than one replacement placeholders in the same text, you need to take extra care and understand the meaning of each placeholder (what will it be replaced with) so that you can use each placeholder at the correct position in your translated text (even if that should change the order of the placeholders).
The placeholders on the subscriber pages of the Subscriber Interface may require advanced attributes, and are therefore written as follows:
{{maestro:[placeholder name] [placeholder attributes]}}
The placeholder name conveys the semantics of the placeholder in a self-explanatory way, for example the {{maestro:subscriberAddress}} placeholder is replaced with the email address of a subscriber navigating the subscriber pages.
The placeholder attributes are written as a sequence of key/value pairs and are only needed for advanced placeholders, such as {{maestro:passwordLink text="Click here"}}, which is replaced with a link to the Request Password page that is rendered with the text “Click here”.
Each text that you supply as a translated version for a resource key is checked to ensure it contains exactly the placeholders (numbered or named) that are present in the original text. For example, let’s look at the original text for the “hosted/subs/login.title.login” key in the Subscriber Interface component of the translation kit:
Login for {{maestro:datasetName}}
The supplied translated text for this key is validated to contain the “{{maestro:datasetName}}” text. Any other string in the form of {{maestro:myPlaceholder}} or {[number]} (for any number) will be rejected as “placeholder unknown in original text”.
Similarly, consider the original text for the “newJobs/authorizeSending/label/clickOnNumberOfLinks” key in the LISTSERV Maestro User Interface component of the Translation Kit:
Click on at least one of {0} links
This original text defines that the placeholder “{0}” is known and supported, any other occurrence of a string that looks like a numbered or a named placeholder will be rejected upon validation as “placeholder unknown in original text”.
Date formats – the order in which day, month, and year appear when printed as a date – differ from country to country. While Americans usually write “month/day/year”, the Swedes write “year‑month‑day”, and Germans use “day.month.year”.
The user can specify which output and input formats for date and time is preferred under User Settings > Preferences.
If the user has not specified a preference, then dates and times are printed and parsed using default settings. These default settings can be influenced during translation so that the defaults match the target language you are translating to. This means that users without individual preferences set will see dates and times formatted to match the target language. Because of this, there are specific date format keys that you need to take into special consideration.
Note: The following information assumes that you are working on the User Interface Resources. All nodes mentioned here are found in this Translation Kit component.
· Output Format for Date
Whenever LISTSERV Maestro outputs dates (i.e. the send-date of a job) you have two attributes of the output format that you can manipulate:
° The name of the month:
Locate the “date” node. Underneath this node, edit the twelve keys called “date.month.1” to “date.month.12”. Assign values to these twelve keys so that they match the name of the months in your target language (starting with January), preferably in an abbreviated textual form. If there is no good abbreviated textual form in your target language, and the full textual form appears as too long, you may also use the numerical values 1 to 12 instead. (The names of the months are independent of any preferences the user sets, meaning that they are always used for date output.)
° Print month or day first:
Locate the “date” node. Underneath this node, edit the key called “date.printMonthFirst”. Set the value to “true” to get an output date format of “Month Day, Year” (i.e. American style, as in “Aug. 12, 2002”) or to “false” to get a format of “Day Month Year” (i.e. European style, as in “12 Aug. 2002”). This value defines the default for users without an individual preference setting.
· Output Format for Time
Whenever LISTSERV Maestro outputs times (i.e. the send-time of a job) you have two attributes of the output format that you can manipulate:
° Use AM/PM format or not:
Locate the “date” node. Underneath this node, edit the key called “date.useAM/PM”. Set the value to “true” if you want to use a 12 hour format with am/pm or to “false” if you want to use a 24 hour format (military time). This value defines the default for users without an individual preference setting.
° Separator character for hours and minutes:
Locate the “date” node. Underneath this node, edit the key called “date.timeSeparator”. Set the value to the character that is to be used to separate hours and minutes. For example, use “:” if the desired output is something like “09:15”. This value defines the default for users without an individual preference setting.
· Report Download Format for Date and Time
Whenever LISTSERV Maestro prepares report results for download, in the form of a ZIP file, it puts a “readme.txt” text file into that ZIP file with some information about the downloaded report. This information also contains date and time information. You can modify the appearance of this date/time format by editing the following four keys (one for each report type):
° Details Report:
Locate the “reports/reportDetails” node. Underneath this node, edit the “reports/reportDetails.msg.downloadDateFormat” key.
° Distribution Report:
Locate the “reports/reportDistribution” node. Underneath this node, edit the “reports/reportDistribution.msg.downloadDateFormat” key.
° Raw Events Report:
Locate the “reports/reportRaw” node. Underneath this node, edit the “reports/reportRaw.msg.downloadDateFormat” key.
° Sum Report:
Locate the “reports/reportSum” node. Underneath this node, edit the “reports/reportSum.msg.downloadDateFormat” key.
Any of these four “reports/XXX.msg.downloadDateFormat” keys must contain a pattern that will be translated into an actual date and time string at runtime. In this pattern, the following pattern fields must appear, but you may switch them around (change their order and insert other fill characters) in order to create a format that suits you. Remember that uppercase and lowercase are important, and that all pattern fields will be replaced with numerical counterparts (i.e. no textual names of months, etc.).
° MM (two uppercase M-characters) – Replaced with the month of the year 01-12.
° dd (two lowercase d-characters) – Replaced with the day of the month 01-31.
° yyyy (four lowercase y-characters) – Replace with the 4-digit value of the year.
° HH (two uppercase H-characters) – Replaced with the hour of the day 00-23.
° mm (two lowercase m-characters) – Replaced with the minute of the hour 00-59.
Examples: 28th of August 2002, 5 minutes after 3, p.m., will be formatted as follows:
MM/dd/yyyy HH:mm à 08/28/2002 15:05
yyyy-MM-dd HH:mm à 2002-28-08 15:05
HH:mm [dd.MM.yyyy] à 15:05 [28.08.2002]
These settings are independent of any user preferences, meaning that the user cannot influence the date and time formats of these downloaded reports.
· Input Format for Date and Time
Whenever the user needs to input a date and time value for LISTSERV Maestro to understand, then the user must follow a certain pattern.
° Date pattern:
To set the input date format, locate the “date” node. Underneath this node, edit the “date.dateFormat.default” key. Set it to a value that is either the numerical pattern number of any of the predefined date patterns (e.g. “1”, “2”, “3”, or “4”, see below) or set it to “custom” if you want to define a custom date pattern for input (see below). This value defines the default for users without an individual preference setting.
You can choose between four pre-defined date patterns or provide your own customized pattern. Each pattern exists as two versions – the pattern used for parsing the user input and the pattern that is displayed to the user – so that the user knows which format to use for the input.
Table 10 Predefined Date Patterns
|
Pattern Number |
Display Version |
Parse Version |
|
1 |
mm/dd/yyyy |
MM/dd/yyyy |
|
2 |
dd.mm.yyyy |
dd.MM.yyyy |
|
3 |
dd/mm/yyyy |
dd/MM/yyyy |
|
4 |
yyyy-mm-dd |
yyyy-MM-dd |
The parse version of the predefined patterns can not be changed; however, you may change the display version. To change the display version, open the LISTSERV User Interface Resources, locate the “date” node, and edit the keys called “date.dateFormat.N.forDisplay”, where “N” stands for the pattern number of the pattern in question.
If none of the predefined patterns match your requirements, then you may define a custom pattern. In that case, you must supply both the display version and the parse version of that pattern.
For the display version, you are free to choose what it looks like; however, you should choose a pattern that makes it easy for the user to understand the formatting that is required. To define the display version, edit the key called “date.dateFormat.custom.forDisplay” (this value is initially empty).
For the parse version, you need to follow strict rules. The pattern string must contain exactly three pattern fields “MM”, “dd”, and “yyyy”. See “Report Download Format for Date and Time” for details of these three fields and examples. You can order them in any way you like and include any separator or fill characters; however, you must be aware that the user has to enter them in exactly the same order with the same separators and fill characters so that LISTSERV Maestro can understand them. Therefore, you should probably choose an order, separators, and fill characters that are most common in the locale matching your target language (and should also provide a similar display version, with the same separators and fill characters). To define the parse version, edit the key called “date.dateFormat.custom.forParsing” (this value is initially empty).
° Time pattern:
To set the input time format, locate the “date” node and edit the “date.timeFormat.default” key. Set it to a value that is either the numerical pattern number of any of the predefined time patterns, or set it to “custom” if you want to define a custom time pattern for input. This value defines the default for users without an individual preference setting.
You can choose between two pre-defined time patterns or provide your own customized pattern. Each pattern exists as two versions – the pattern used for parsing the user input and the pattern that is displayed to the user – so that the user knows which format to use for the input.
Table 11 Predefined Time Patterns
|
Pattern Number |
Display Version |
Parse Version |
|
1 |
hh:mm |
HH:mm |
|
2 |
hh.mm |
HH.mm |
The parse version of the predefined patterns cannot be changed. However, you may change the display version of the predefined patterns. To change the display version, locate the “date” node and edit the keys called “date.timeFormat.N.forDisplay”, where “N” stands for the pattern number of the pattern in question.
If none of the predefined patterns match your requirements, then you may define a custom pattern. In that case, you must supply both the display version and the parse version of that pattern.
For the display version, you are free to choose what it looks like; however, you should choose a pattern that makes it easy for the user to understand the formatting that is required. To define the display version, locate the “date” node and edit the key called “date.timeFormat.custom.forDisplay” (this value is initially empty).
For the parse version, you need to follow strict rules – the pattern string must contain exactly two pattern fields, “HH” and “mm”. See “Report Download Format for Date and Time” in Section 4.2.5 Date and Time Formats for details of these fields and examples. You can order them in any way you want and include any separator or fill characters; however, you must be aware that the user needs to enter them in exactly the same order with the same separators and fill characters so that LISTSERV Maestro can understand them. Therefore, you should probably choose an order, separators, and fill characters that are most common in the locale matching your target language (and should also provide a similar display version with the same separators and fill characters). To define the parse version, locate the “date” node and edit the key called “date.timeFormat.custom.forParsing” (this value is initially empty).
To install a translated language into an existing LISTSERV Maestro installation, simply copy the JAR file that you have created during translation to the lib folder inside of your LISTSERV Maestro Installation folder. It is recommended that you keep the copy of the JAR file in your work folder even if you have completed the translation.
If you are installing the JAR file for the selected component and target language for the first time, you should not find a file with a conflicting name. If you are updating an existing translation JAR file, simply replace the existing file with your new version.
If you have translated only the Subscriber Interface component of the Translation Kit, then you have to copy the JAR file into the lib folder on the server where the LISTSERV Maestro User Interface is installed.
If you have translated the LISTSERV Maestro User Interface component of the Translation Kit, then the JAR file needs to be accessible to both the HUB and LUI. Therefore, if the HUB and LUI are on separate servers, then you will need to copy the file into the lib folder on both the servers where the Administration Hub and the Maestro User Interface are installed. If both components are on the same server, then they will share the same lib folder, which means you only have to copy the JAR file once.
If you have translated the Administration Hub component of the Translation Kit, then you only have to copy the JAR file into the lib folder on the server where the Administration Hub is installed. Do not copy the file to the LISTSERV Maestro User Interface server, if different.
If you installed a translation of the HUB or LUI, then you must restart LISTSERV Maestro on all of the servers where you put the JAR files.
If you installed a translation of the Subscriber Interface, then a restart is not required. Instead, new versions of the JAR files can be reloaded from the Administration HUB. Go to Global Component Settings > Maestro User Interface > General Administration. The General Administration of Maestro User Interface screen opens. In the Subscriber Access Page Translations section, click the [Refresh Translations Now] button.
If the Translation Kit and the output folder for a previous version of LISTSERV Maestro are present in the work folder, and if the corresponding resources JAR file for the selected target language is present for the previous version, then the [Import] button is enabled.
Note: If you upgraded an existing installation of a previous version of the Translation Tool to the current version, and if the work folder of the previous installation is still present, then this requirement is met automatically.
Click the [Import] button to view a list of all the available previous versions for the currently selected Translation Kit component. If, for example, the French translation of the subscriber pages of LISTSERV Maestro is selected, and the Tool work folder contains a subfolder called translationsV2.1-1, which in turn contains a jar file called luiSubscriberResources_fr.jar, then the version 2.1-1 is listed.
Select the desired version and click [OK]. The import transfers the translations for all unchanged properties to the current version. An unchanged property means that the given property existed in the previous version and that its original text has not been changed by L-Soft during the transition from the imported version to the current version. The import uses this criterion to decide if the translation for a property that was present in the previous version can safely be imported to the current version. If, in contrast, L-Soft did change the original text for a property or added a property, then an existing translation for the property is not imported to the current version. Instead, the import marks the property node in the resources tree with a yellow asterisk. When such a node is selected, the right pane shows four texts instead of the usual two. The upper two are the imported versions of the original text and (if present) the imported version of the translation. Next, follow the usual two texts, i.e. the current version’s original text and the editable text field for the current version’s translation. Looking at the upper three texts should assist you in deciding if the imported translation can be used as a translation for the current version and if you want to supply a translation for a key that did not require a translation.
The yellow asterisks remain in place during your current edit session. If you exit the tool and re-open it, the asterisks disappear. By importing the translations from the same version again, the yellow asterisks are once again created. This and all subsequent imports will not overwrite the changes that you have made in your current edit session.
All languages that are installed are cumulative (they will all be available at the same time, in parallel). This means that on any LISTSERV Maestro installation, the default language, English, will always be available, and, in addition, all other languages that were translated and installed as described above will also be available.
LISTSERV Maestro will automatically determine the correct language for any user accessing the User Interface with a web browser. The web browser sends the locale information of the user to LISTSERV Maestro, and then LISTSERV Maestro presents the User Interface using the language matching this locale. If no matching language is found, then the default language, English, is used.
To choose a language, you need to tell your web browser the language that you want to use. In Internet Explorer 5.0 and later, select Tools > Internet Options. On the General tab, click the [Languages…] button. The Language Preference screen opens. Edit the list of language preferences by adding/removing languages and changing the order of the selected languages.
In contrast to the rest of the LISTSERV Maestro User Interface, the Subscriber Interface of a given dataset ignores the locale information that is sent by the web browser and uses a fixed language that is determined differently:
· To define the server-wide default language for the Subscriber Interface, use the following setting in the lui.ini file:
DefaultCustomizationLanguage=XX
(If not specified, English will be used as the server-wide default language.)
· For datasets owned by a group: To define the default language for the Subscriber Interface of all datasets of a certain group, use the following setting in the lui.ini file:
DefaultCustomizationLanguage&group&GROUPNAME=XX
(If not specified, the server-wide default language will be used.)
· For datasets owned by a non-group single user: To define the default language for the Subscriber Interface of all the datasets of a certain single user, use the following setting in the lui.ini file:
DefaultCustomizationLanguage&account&USER_ID=XX
(If not specified, the server-wide default language will be used.)
For all of the above, replace the following:
XX: Replace with the two letter lowercase code of the desired language. For example, “en” for “English” or “de” for German.
GROUPNAME: Replace with the name of the group.
USER_ID: Replace with the ID (or SeqNo) of the single-user.
You will need to restart LISTSERV Maestro to make the changes effective.
For individual datasets, the data administrator can choose the default language for use on the Subscriber Pages when defining the General characteristics of the dataset. The Access Pages Language drop-down menu is available to choose among all the languages that have a translation file installed.