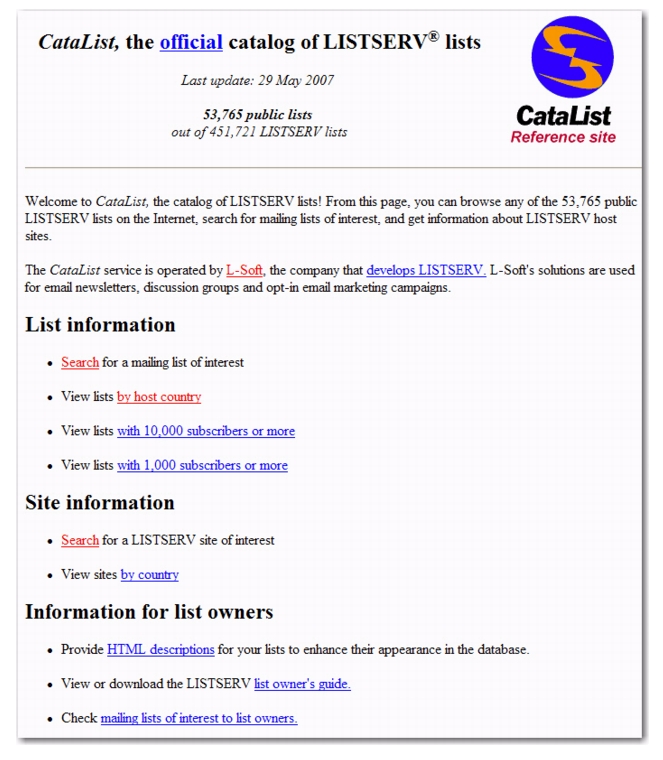
CataList, the catalog of LISTSERV lists, can be accessed at
http://www.lsoft.com/catalist.html or, if you are logged into LISTSERV, by clicking on the
CataList icon at the bottom of each screen. You can also access the CataList from the Server Archive Index (see Section 4.1
The Server Archive Index for more information.)
CataList lets you browse any of the 56,128 public LISTSERV lists on the Internet, search for mailing lists of interest, and get information about LISTSERV host sites. While many of these public lists do screen new subscriptions, this is usually done to make sure that newcomers understand what the list is about and, perhaps more importantly, what it is not about. As long as you respect the list charter (set of rules for members), you can reasonably expect to be welcomed on any of the lists that you find in this database.
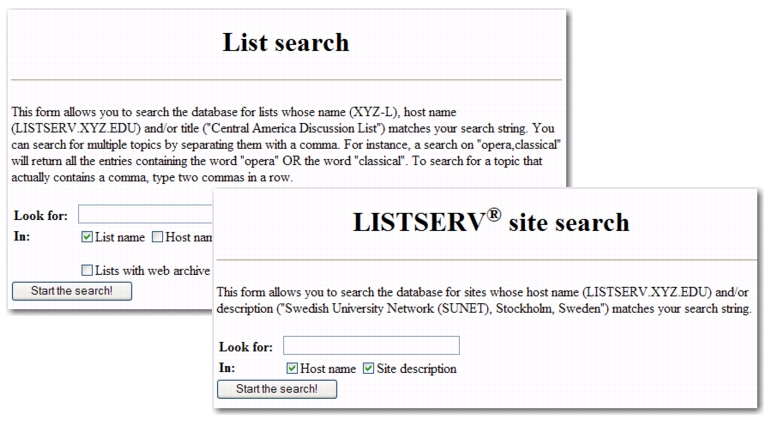
You can search this database in a variety of ways to find a list of interest. You can browse through a set of lists by country, by host country, with 1,000 subscribers or more, or with 10,000 subscribers or more by clicking on the link that corresponds with each category. Or, you can perform a search to find a list with specific criteria. To start your search, simply click on the
Search link under
List Information or
Site Information.
Read the on screen instructions for search criteria, including the use of multiple search strings. Input your search criteria in the edit box. Check the appropriate checkboxes to narrow or widen your search and then click the
[Start the search!] button. The default home page will appear for the list.
LISTSERV was created before the World Wide Web was in general use. At that time, the primary way for most people to communicate with the LISTSERV program was by email. This method is still widely used today. The most recent versions of LISTSERV include a Web Interface to make communication easier and more intuitive. The Web Interface is richly populated with on-screen information, tutorials, and wizards to help you use the program quickly and effectively.
When you want to perform actions using LISTSERV, such as subscribing to a list, the action is based on a command LISTSERV receives by email or using the Web Interface. Some commands are only available to LISTSERV maintainers and list owners, while other commands are available to subscribers and non-subscribers as well.
As a subscriber, you can use the Web Interface to issue commands directly to LISTSERV. You can also use the Web Interface to post messages to the list. To use the Web Interface you need a Web browser. L-Soft recommends Internet Explorer™ version 5.0 or greater or Netscape® 6.0 or greater for the best compatibility. You will also need the URL to the installation of LISTSERV where your list(s) is located, called the LISTSERV Homepage.
There are two main -mail addresses that are used to work with LISTSERV lists. One is to communicate with the LISTSERV program – the command address, and one is used to post mail to the list – the list address. Any time you want to change your subscription settings, communication takes place with the LISTSERV program using the command address. Whenever you post a message to the list, it is sent to the list address. It is important to understand the difference between the two addresses.
Caution: If you send commands to the list address, every member of the list will receive your command, and LISTSERV will not take any action. If you send a normal posting to the command address, LISTSERV will send you back an error message because it will not be able to interpret the message, and none of the subscribers will receive your post.
The command address will usually start with “LISTSERV@” and will be followed by the server name where the LISTSERV program has been installed, such as
LISTSERV@papaya.ease.lsoft.com. Messages sent to the command address should contain only commands to LISTSERV, one command per line. Lines containing non-commands will result in an error message being returned. For a list of LISTSERV commands, their descriptions, and how to issue them, see Appendix A:
LISTSERV Commands.
Email Command: You can also get a listing of commands by sending an email message to your LISTSERV server with
INFO REFCARD typed in the body of the message. Do not include a subject in the subject line and do not include anything else in the body of the email message such as a signature file.
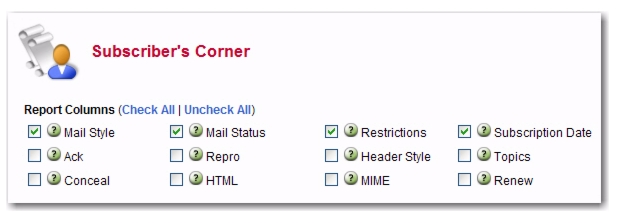
The Subscriber’s Corner screen lets you see the lists that you’re subscribed to or all public lists on the server. The list table displays the selected subscription settings for each list. The following actions can be performed from this screen:
The Report Format drop-down menu lets you select whether you want to view the report on screen or whether you want to download it as a CSV file. You can select to download as either
CSV Format (Subset) or
CSV Format (All).
Notes: For reports that span multiple pages, the
CSV Format (Subset) option will only include data from the current screen in the report. For example, if a list contains 100 subscribers but only 50 subscribers are shown on screen at a time, then the CSV file will only contain the 50 subscribers shown on screen. If you want to download all of the lists, then change the
Lists per Page value so that all lists would be shown on one screen before downloading the CSV report. Also, if you are using any narrowing options, only the data that fits the search criteria is included in the CSV file.
The CSV Format (All) option, on the other hand, will include all the data in the CSV file regardless of the number of pages or any search or narrowing options.
If Show Subscribed Lists Only is selected (the default) from the
Show All Lists drop-down menu, then only lists that you are subscribed to are displayed. If
Show All Lists is selected, then all lists on the server that you are subscribed to and any public lists on the server that you are not subscribed to are displayed. The selection of lists is also subject to the setting of the
Narrow Selection field (if in Expert Mode). Lists that you are subscribed to will be highlighted with a clickable link.
The Lists per Page field controls how many lists will be displayed on a single page. The default is 50. If you want to show 10 lists per page, then enter "10" and click
[Submit].
To subscribe to one or more lists, click the Show All Lists drop-down menu and select
Show All Lists. Check the boxes next to the lists that you want to subscribe to, and then click the
Invert drop-down menu and select
Subscribe. Check the
Send email notification of changes option to have a notification email sent with information about the changes.
Finally, click the
[Submit] button.
Note: If you select the
Invert checkbox, then the changes selected will be applied to the lists that are NOT checked.
To unsubscribe to one or more lists, click the Show All Lists drop-down menu and select
Show Subscribed Lists Only. Check the boxes next to the lists that you want to unsubscribe from, and then click the
Invert drop-down menu and select
UnSubscribe. Check the
Send email notification of changes option to have a notification email sent with information about the deletions.
Finally, click the
[Submit] button.
Note: If you select the
Invert checkbox, then the changes selected will be applied to the lists that are NOT checked.
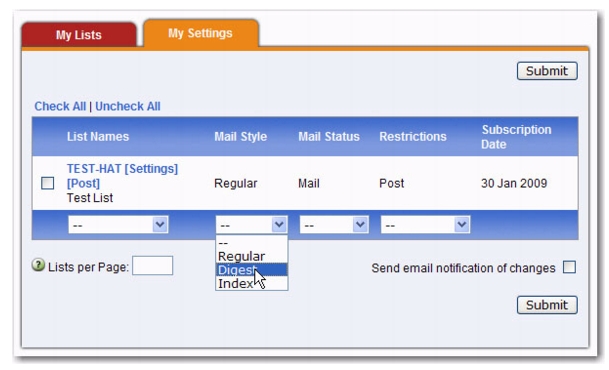
The My Settings tab on the Subscriber’s Corner screen lets you select which columns will be displayed in the list table. In addition, you’ll be able to change specific list settings for one or all of your lists.
To select the columns to view in the list table, check one or more boxes in the Report Columns section, and then click the
[Submit] button to display the relevant subscription options. To check all boxes, click on
Check All. To clear all of the selections click on
Uncheck All.
|
•
|
Mail Style – Check this box to report on whether subscriptions are set to receive individual postings ( Regular), or Digest or Index versions of the list.
|
|
•
|
Regular – You receive each individual posting as they are processed by LISTSERV. With this subscription type you may receive mail throughout the day. Each posting will arrive as an individual message in your mailbox. For small lists, or less active lists, this type of subscription works well. Large busy lists can send many messages throughout the day and it may become distracting or fill up you mailbox.
|
|
•
|
Digest – You receive a large message containing many individual posts bundled together into one, at regular intervals, usually once a day. Some very active lists will produce several digests a day. Receiving the digested version of a large active list will limit the number of messages you get during the day.
|
|
•
|
Index – You receive a short index of messages at regular intervals, usually once a day or once a week. The index displays the date, author's name, e-mail address, the subject of the message, and the number of lines in the message. You can download the full text of any messages that are of interest without having to receive every message. If you have limited inbox storage, this form of subscription will cut down on the amount of space messages take. You do, however, have to be online to retrieve any messages you wish to read.
|
|
•
|
Mail Status – Check this box to report on whether subscriptions are set to receive postings ( Mail) or not ( No Mail) from the list.
|
|
•
|
Restrictions – Check this box to report on what, if any, posting restrictions are in effect for the subscriptions. The following restrictions are available:
|
|
•
|
Post – Normal posting privileges according to the list's configuration.
|
|
•
|
No Post – The subscriber is not allowed to post to the list.
|
|
•
|
Editor – Posts bypass moderation on a list that is configured for moderation as policy.
|
|
•
|
Review – All posts are sent to a moderator for approval before being permitted on the list.
|
|
•
|
No Review – Posts are not sent to a moderator for approval before being permitted on the list.
|
|
•
|
Subscription Date – Check this box to report the date on which each subscription was registered. If this is blank, the subscription was registered before this feature became available (unlikely, other than on lists that have been in existence for many years).
|
|
•
|
Header Style – Check this box to report on the "header style" subscriptions that are set to receive for list postings. Possible header styles are:
|
|
•
|
Full – Normal headers for list postings. List name is always the To: header.
|
|
•
|
Subject – Same as Full, but a subject-tag identifying the list is added to the subject header of all postings.
|
|
•
|
Short – Only the bare minimum headers (To:, From:, Date:, and Subject:) are included.
|
Warning: This setting will break MIME messages; therefore, it should only be used on lists that allow plain text or for subscribers using mail clients that cannot handle MIME mail.
|
•
|
Dual – Same as Full, but the main headers are repeated inside the message text as well. This is to accommodate some old mail software that did not process Internet mail properly, and is mostly obsolete.
|
|
•
|
IETF – Headers are exactly the same as those sent by the original sender, with the possible exception of adding a "Sender:" line (depending on the list configuration). This may break filters on some mail clients that rely on all list mail having certain mail headers look the same on all list postings.
|
|
•
|
Full (822) – "Full" mail headers (like the default) except that the To: header contains the recipient's email address instead of the list address.
|
|
•
|
Short (822) – Only the bare minimum headers (To:, From:, Date:, and Subject:) are included. In addition, the To: header contains the recipient's email address instead of the list address.
|
Warning: This setting will break MIME messages; therefore, it should only be used on lists that allow plain text or for subscribers using mail clients that cannot handle MIME mail.
|
•
|
Conceal – Check this box to report on whether or not subscriptions are listed in a "Review" of the list of subscribers. This setting is only of interest for lists where the list of subscribers is viewable by other list members or the general public.
|
|
•
|
Topics – Check this box to report on which topics subscriptions are set to receive on lists configured with topics.
|
|
•
|
HTML – Check this box to report on whether or not subscriptions are set to receive Digest or Index versions of the list as HTML. This setting is irrelevant for subscriptions set to receive individual postings ("Regular" mail style).
|
|
•
|
MIME – Check this box to report on whether or not subscriptions are set to receive Digest versions of the list as MIME. This setting is irrelevant for subscriptions set to receive individual postings ("Regular" mail style). This setting is required for HTML Digests; therefore, it should be viewed in conjunction with the HTML setting.
|
|
•
|
Ack – Check this box to report on whether or not subscriptions are set to receive an "acknowledgement" message when they post to the list. For example:
|
|
•
|
Repro – Check this box to report on whether or not subscriptions are set to receive a copy of their own postings. Some subscribers want to receive a copy of their own postings, others are satisfied with just a short acknowledgement (see the Ack setting) and the copy that their mail client keeps, while others want both or neither.
|
|
•
|
Renew – Check this box to report on whether or not subscriptions are set to receive renewal notices on lists that are configured to request subscription renewals. This setting may only be changed by a list owner.
|
To change specific list settings for one or all of your lists, check the box that corresponds with that setting in the
Report Columns section and click
[Submit]. The My Settings tab refreshes, displaying the settings you selected. Next, click the box next the name of the list you want to change, click the drop-down arrow at the bottom of the column for the setting you want to change, and then click
[Submit].
For example, if you wanted to change the Mail Style setting on all of your lists, simply click that checkboxes for those list, click the drop-down arrow at the bottom of the
Mail Style column, select the setting you want (e.g.
Digest), and then click
[Submit].
To make updates to your options for a single list, click on the [Settings] option associated with that list on either the My Lists or My Settings tab. The Subscribe or Unsubscribe screen opens for that list. This screen not only allows you to subscribe or unsubscribe to a mailing list but to also change list specific options such as your name, email address, and other subscription settings.
|
•
|
Regular – With a "regular" subscription, you receive individual postings immediately as they are processed by LISTSERV.
|
|
•
|
Digest (Traditional), Digest (MIME format), Digest (HTML format) – With a "digest" subscription, you receive larger messages (called "digests") at regular intervals, usually once per day or once per week. These "digests" are collections of individual list postings. Some lists are so active that they produce several digests per day.
|
|
•
|
Index (Traditional), Index (HTML format) – With an "index" subscription, you receive short "index" messages at regular intervals, usually once per day or once per week. These "indexes" show you what is being discussed on the list, without including the text of the individual postings. For each posting, the date, the author's name and address, the subject of the message, and the number of lines is listed. You can then download messages of interest from the server (the index contains instructions on how to do that).
|
|
•
|
Normal LISTSERV-style header – "Full" mail headers (normally the default), containing Internet routing information, MIME headers, and so forth. The ('To:') header contains the address of the list.
|
|
•
|
LISTSERV-style, with list name in subject – "Full" mail headers (like the default) except that a "subject tag" is added to the subject line of mail coming from the list. If there is no subject tag defined in the list's configuration, the name of the list will be used. This can be very useful for sorting and filtering mail.
|
|
•
|
"Dual" (second header in mail body) – Dual headers are regular short headers followed by a second header inside the message body. This second header shows what list the message is coming from ('Sender:'), the name and address of the person who posted it ('Poster:'), the poster's organization, if present, and the message subject. Dual headers are helpful if your mail client does not preserve the original return email address.
|
|
•
|
sendmail-style (advanced option) – This option selects sendmail-style headers, i.e. an exact copy of the original, incoming mail header with the addition of a ('Received:') line and a ('Sender:') field. Some technical people prefer this type of header.
|
|
•
|
No acknowledgements – LISTSERV will not send any acknowledgement at all when you post to the list. This is probably not a good setting unless you really do not want any feedback from LISTSERV as to whether or not your posting was received and distributed.
|
|
•
|
Short message confirming receipt – Typically, this is the default setting, although it can be overridden by the list owner. If you choose this setting, LISTSERV will send you a short message whenever you post to the list, confirming the distribution of your message and telling you how many people it was sent.
|
|
•
|
Receive copy of own postings – Some people prefer this setting over the short acknowledgement message. It tells LISTSERV to send you a copy of your own postings so that you can see exactly how it appeared on the list (useful if you are behind an unreliable gateway or firewall).
|
|
•
|
Mail delivery disabled temporarily – This option toggles the receipt of mail from the list. You may want to disable mail delivery if you will be away from your mail for an extended period of time.
|
|
•
|
Address concealed from REVIEW listing – This option conceals you from the list of subscribers shown by the REVIEW command. Note that the list owner and the LISTSERV administrator can always get the complete list of subscribers, regardless of this setting. Nowadays, most lists are configured so that only the list owner can use the REVIEW command, but some lists still allow subscribers to get a listing of all the other participants.
|
For lists with topics enabled (if the topics section is not visible, topics are not enabled), this section allows you to subscribe or unsubscribe to all, some, or none of the available topics.
Most lists have some type of security engaged to prevent spoofing and spamming. Spoofing occurs when someone signs you up for a list without your knowledge and permission. Spamming is the act of cross-posting the same message to as many newsgroups and/or mailing lists as possible, whether or not the message is relevant to the stated topic of the newsgroups or mailing lists that are being targeted. It also refers to unwanted e-mail solicitations sent to an individual whose e-mail address has fallen into the wrong hands.
When you elect to join a list, you will usually be sent a confirmation message by email. Directions will be included in the message so that you can confirm that you did actually agree to be subscribed to the list. Follow the directions to confirm your subscription.
After you have subscribed to a list you will eventually want to participate in the discussion, assuming that you have joined a list where subscribers have permission to post (on some lists you are not allowed to post mail back to the other subscribers). For more information on the different types of mailing lists, see Section 1.4
Types of Mailing Lists.
|
•
|
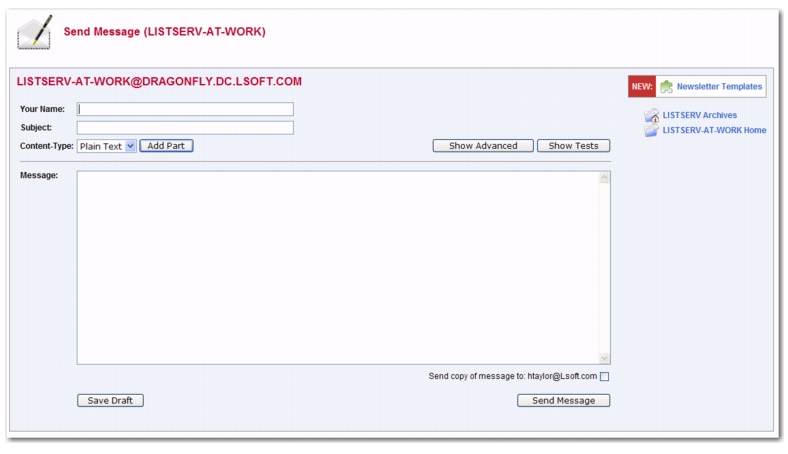
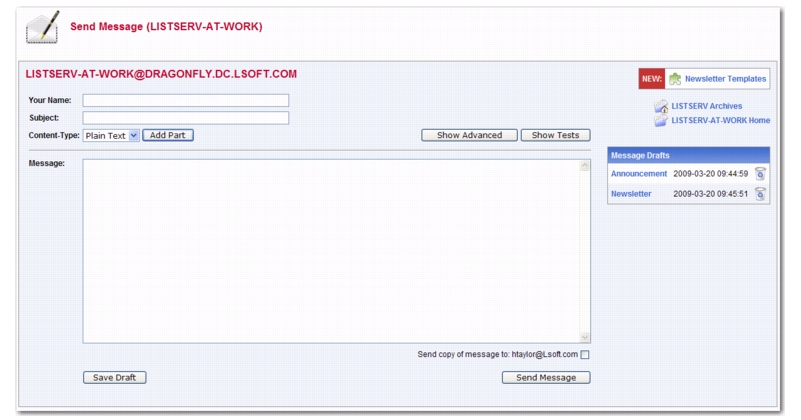
The archives for a list give you the option to post a message from the List Archive screen, the Archive Index, and the Archive Browsing screen. For more information on these screens, see Section 4.2 Viewing List Archives, Section 4.3 The Archive Index, and Section 4.4 Viewing an Archived Message. To access the list archives, click Email Lists on the Toolbar. To compose and send a message to the list from the archives, click the Post New Message option on any of the screens previously mentioned. The Send Message screen opens (shown in Figure 3-5), which is where you compose your plain text, HTML, or multi-part messages. See below for information on the Send Message screen.
|
|
•
|
The Subscriber’s Corner screen lets you see the lists that you’re subscribed to or all public lists on the server. To access the Subscriber’s Corner screen, simply click Subscriber’s Corner on the Toolbar. (For more information on the Subscriber’s Corner screen, see Section 3.3 The Subscriber’s Corner.) To display the lists that you are subscribed to, click the Show All Lists drop-down menu and select Show Subscribed Lists Only. Next, to compose and send a message to the list, click the Post option next to the list name (this option is located on both tabs). The Send Message screen opens (shown in Figure 3-5), which is where you compose your plain text, HTML, or multi-part messages. See below for information on the Send Message screen.
|
The Web Interface lets you compose a message using the Send Message screen. You can send plain text, HTML, or multi-part messages. If the list allows attachments, then you can add those as well.
Tip: LISTSERV comes with ready-to-use newsletter templates that let you create professional-looking HTML newsletters with or without HTML coding experience. You can access these templates by clicking the
Newsletter Templates option. For details, see Section 3.7
Creating Customized HTML Newsletters.
|
•
|
Your Name – Enter your name as you wish it to appear in the From field of the email header of the message. The email address that will be used in the From field is the one that is logged into LISTSERV and may not be changed.
|
|
•
|
To: If you are replying to an existing message from the archives, this option allows you to decide whether to reply to the list or to the poster. If you are posting a new message, this options is not available.
|
|
•
|
Topic – Select the topic, if any, that you want to apply to your message. This option will only be shown if topics are enabled for the list.
|
|
•
|
Subject – Enter the subject line for the email message posted to the list.
|
|
•
|
Content-Type – Use the drop-down menu to select the format of your email message. You may select Plain Text or HTML.
|
|
•
|
Plain Text – To add a plain text message, type directly into the text box or copy and then paste your text into the text box.
|
|
•
|
HTML – To create an HTML message, type directly into the text box or copy and then paste your HTML code into the text box. If you have the advanced options displayed, then you can also upload the HTML content (see below).
|
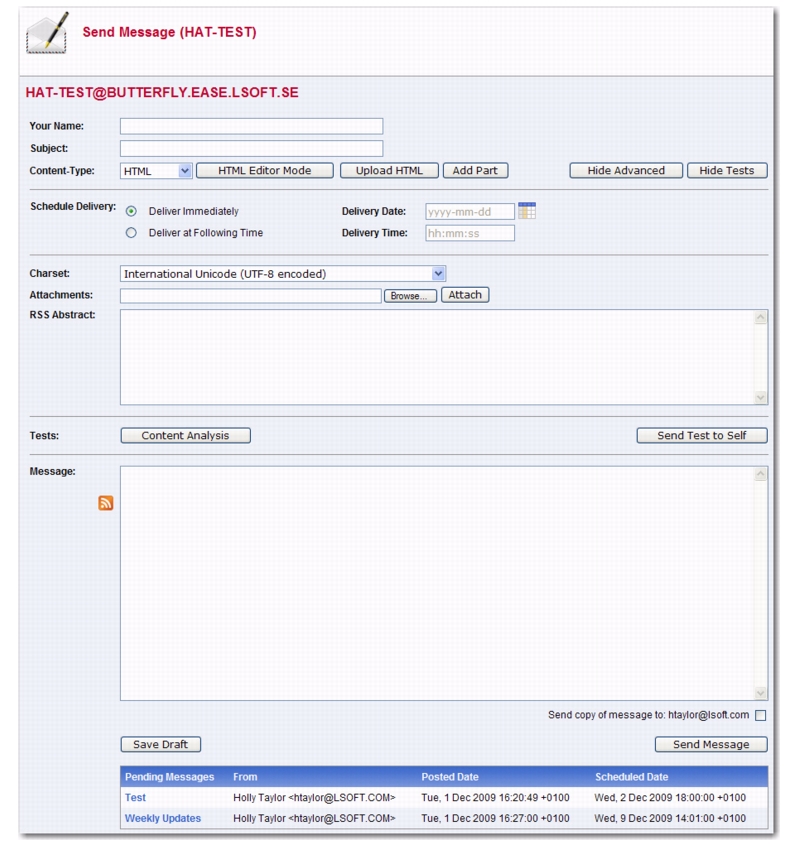
If you click the [Show Advanced] Button, you can also use the Upload Applet. To use this applet, click the
[Upload HTML] button. The applet will start and you can browse for your HTML file and then automatically upload it along with any inline image files. If your HTML file contains links to remote image files, the applet will check them for errors. After the upload is complete, your message will be displayed as HTML code in the text box. Any inline files will be displayed as attachments.
|
•
|
Add Part – Click the [Add Part] button to compose a multi-part message. Multi-part messages usually have a plain text part and an HTML part. To build a multi-part message, select the content type of the first part of your message. Next, click the [Add Part] button to open a second text box. Add the content using on of the methods described above.To delete an added part, click the [Delete] button associated with that part.
|
|
•
|
Show Advanced – Use the [Show Advanced] button to display the following advanced options:
|
|
•
|
Schedule Delivery – Select whether you want the message to be delivered immediately or at a specific time and date. The input format of the Delivery Date field is yyyy-mm-dd . The input format of the Delivery Time field is hh:mm:ss , using the 24-hour clock. The time zone used is that of the LISTSERV server. If you enter a delivery date or time that has already passed, then the message will be delivered immediately.
|
|
•
|
Upload HTML – Use this button to start an applet that will allow you to browse for your HTML file and then automatically upload it along with any inline image files. If your HTML file contains links to remote image files, the applet will check them for errors. After the upload is complete, your message will be displayed as HTML code in the text box. Any inline files will be displayed as attachments.
|
|
•
|
Charset – Use this drop-down menu to select the charset (character set) of the message. If your message requires a charset that is different from the default charset for LISTSERV (UTF-8), then you can use the drop-down menu to select the matching one before you type or paste in your message. This selection will not translate one charset to another. It is used to sync the charset of the original message with LISTSERV so that it can be encoded correctly for sending.
|
|
•
|
RSS Abstract – Many lists allow subscribers to read postings through RSS feeds. LISTSERV automatically creates RSS abstract from the text part of the message. By default, LISTSERV uses a maximum of 500 and a minimum of 250 words for an implicit RSS abstract. These default numbers can be changed either for the entire site or on a list-by-list basis. However, this screen also allows you to create explicit RSS abstracts, which can be HTML or text of any length. To provide an explicit RSS abstract, simply enter text here in the RSS Abstract text box. To use your text or HTML part in its entirety for the RSS abstract, click the Use as RSS Abstract icon next to the that particular section; the content will be automatically copied into the abstract text area.
|
|
•
|
Attachments – Use the [Browse...] button to find your file on a local drive. Click the [Attach] button to attach your file to your outgoing message. The attachment will be listed in a table beneath the Attachments field. To delete an attachment, click the [Delete] button associated with that item in the table.
|
Notes: Each list can have its own rules for accepting or rejecting messages with attachments. The
[Browse...] and
[Attach] buttons will function regardless of individual list settings. As a result, your message may be rejected or stripped of its attachment by the list. Be sure to check with the list owner if you have any questions.
|
•
|
Show Tests – Use the [Show Tests] button to display the following test options:
|
|
•
|
Content Analysis –If your LISTSERV license includes technical support, then you can use this button to check your message and evaluate the likelihood that it will be deemed to be spam by recipient mail systems. LISTSERV will connect to a hosted service at L-Soft, which runs the email message through SpamAssassin. The results will be shown on the screen. If necessary, you can then make adjustments and run the test again.
|
|
•
|
Send Test to Self – When constructing an email message and before sending it to your list, you can use this button to send a test message to yourself to make sure that the results are satisfactory. LISTSERV will send a copy of the message to the email address that you used to log in to the Web interface. This kind of test delivery can be particularly useful when creating HTML newsletters or multi-part messages. Email clients vary in their degree of HTML support. Sending a test message allows you to double-check that the message is rendered as you intended. If necessary, you can make adjustments to your message before posting it to the list.
|
|
•
|
Quote Original Message – When replying to a message that has been previously posted to a list, then the Quote Original Message icon is available below the message box. Clicking on this icon will place a quote of the original message in your reply.
|
|
•
|
Save Draft – If you have started working on an email message or newsletter and want to continue at a later time, you can click the [Save Draft] button to save a draft of the message. The subject line, the text part, and the HTML part (if applicable) are all stored. However, advanced options, such as attachments and RSS abstracts are not stored with the draft. The drafts, which are identified by their subject lines and shown with a timestamp, will be listed in a table on the right side of the screen. When you return to the Send Message screen, you can just click on the subject line to retrieve the draft. As a safety measure, LISTSERV automatically saves and updates drafts every time the message posting interface is refreshed. To delete existing drafts, click on the Recycling Bin icon next to the draft that you want to erase. Existing drafts are deleted automatically when you have posted them to the list.
|
Note: Drafts are automatically deleted after 30 days.
If you’ve selected HTML from the
Content Type drop-down menu and you have JavaScript enabled, then the
[HTML Editor Mode] button will be available on the Send Message screen. This button opens a WYSIWYG-style editor in place of the HTML source code text box. If you have already entered HTML code into the text box before you launch the editor, the editor will parse and rewrite the existing HTML code, which may introduce changes to the code. To return to the HTML source code text box, click the
[Source Code Mode] button.
To preview your HTML newsletter, click on the Preview icon on the HTML Editor toolbar. The message will open in a new window, letting you preview the finished product.
To send mail to the list by using your email client program, simply compose a message and address it to the list address in your email client. The list address is the one that sends mail to the list moderator, if there is one, or directly to all the other subscribers. List addresses are formatted with the name of the list followed by the domain address (e.g. listname@someserver.com).
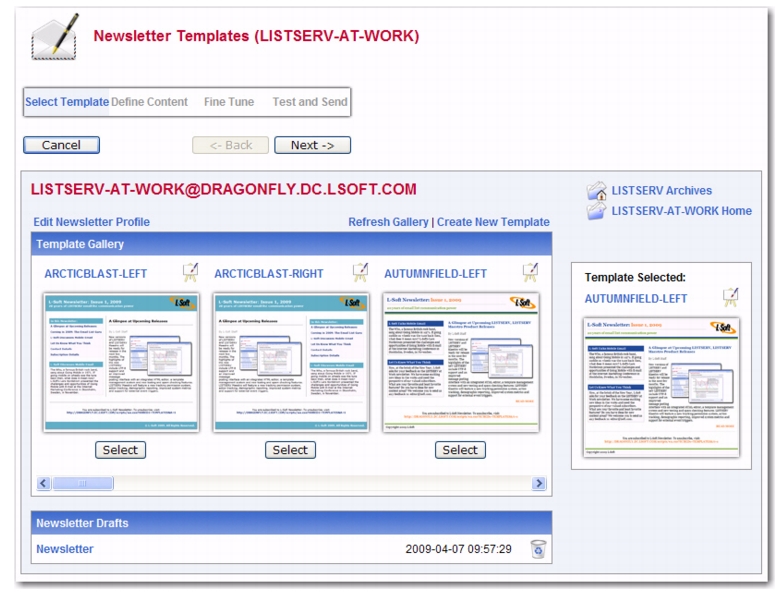
You can now create professional-looking HTML newsletters with or without HTML coding experience. LISTSERV comes with ready-to-use newsletter templates that contain placeholders that, when selected in the template designer, will let you fill in predefined areas with your own text and/or images.
To access the Newsletter Template wizard, go to the List Archives screen, the Archives Index screen, or the Archive Browsing screen for the list you want to post the newsletter to, and then click on the
Newsletter Template option.
To select a newsletter template, click the [Select] button associated with the template you want to use as your content. The Select Template screen will refresh with the selected template displayed in the
Template Selected box.
To edit a template, click the Easel icon. The Edit Newsletter Template screen opens, which is where you can make any changes necessary.
Notes: If you decide to edit an existing, default newsletter template on this screen, then you will no longer be able to edit colors on the Content Definition screen. Any color modifications should instead be done on this screen.
To create an all new template, click on the Create New Template option. The Create New Template screen opens, which is where you enter the content for the template.
To delete template, click on the Recycling Bin icon associated with that template.
To edit the profile for all of the newsletters, click on the Edit Newsletter Profile option. The Edit Newsletter Profile screen opens, which is where you can enter any changes you’d like to make to your newsletter profile. These changes will be applied to the entire newsletter template gallery and will be associated with your user account only.
The Newsletter Drafts section at the bottom of the screen contains any previously saved drafts. To continue working on an existing draft, click on the draft’s subject. To delete the draft, click on the
Recycling Bin icon associated with that draft.
Note: Drafts are automatically deleted after 30 days.
Once you’ve selected the newsletter template you want to work with, click the [Next] button to continue. To cancel the selection of the newsletter template and refresh the screen, click the
[Cancel] button.
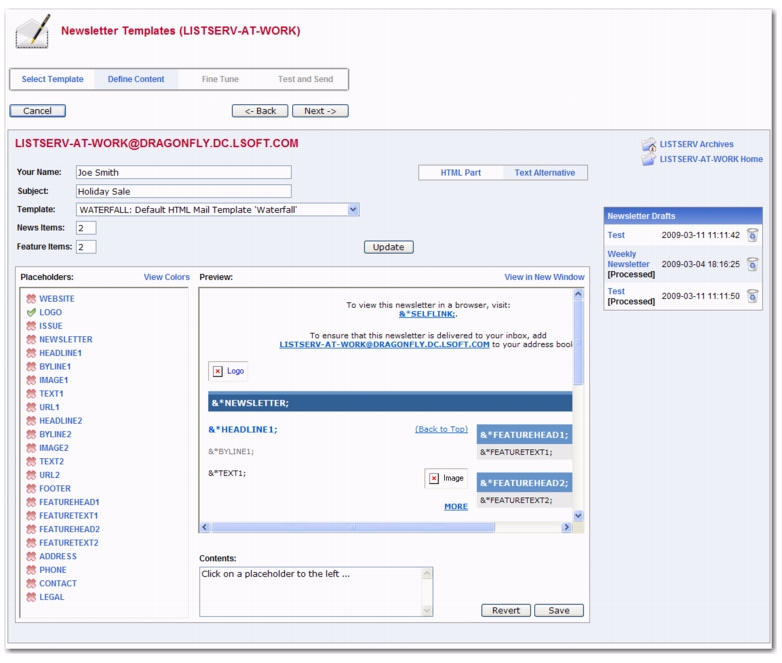
The Define Content screen is where you “fill in the blanks”. The templates were designed to make defining newsletters quick and easy; the majority of the options, settings, and coding are already in place. The only work left for you is to give the newsletter a customized feel by filling in special template placeholders.
|
•
|
Your Name – This field is automatically filled with the email address associated with your user account. To change this, simply delete the email address and enter your name as you wish it to appear in the From field of the email header of the newsletter. The email address that will be used in the From field is the one that is logged into LISTSERV and may not be changed.
|
|
•
|
Subject – The subject line for the newsletter.
|
|
•
|
Template – If you want to change the template you are currently using, click this drop-down menu and select a new template from the drop-down list.
|
|
•
|
News Items – Enter the number of news items you want to have in your newsletter. This will determine the amount of news item placeholders you will need to define. The maximum number allowed is 99.
|
|
•
|
Feature Items – If available, enter the number of feature items you want to have in your newsletter. This will determine the amount of feature item placeholders you will need to define. The maximum number allowed is 99.
|
To view the template in HTML format, click HTML Part. To view the text alternative, click
Text Alternative.
In the placeholders list, any placeholder without a value supplied is marked with a red x; these placeholders will require your attention. Placeholders where a value has already been supplied are marked with a green checkmark.
Note: If you leave a placeholder blank, then this content will not appear in the newsletter; however, there are some exceptions such as headers and text since they are expected to be defined. If you want to remove a header for a news item or feature item, simply adjust the value for those items in the appropriate field above.
The type and amount of placeholders available for definition will vary depending on the type of template and the number of news and/or feature items you have entered. The following placeholders are always available for definition and can also be defined in your newsletter profile:
&*NEWSLETTER; – This placeholder is used for the name of your newsletter.
&*ADDRESS; – This placeholder is used for the address of your organization.
&*PHONE; – This placeholder is used for the phone number of your organization.
&*CONTACT; – This placeholder is used for the contact email address of your organization.
&*WEBSITE; – This placeholder is used for a Website URL of your organization.
&*SLOGAN; – This placeholder is used for a slogan for your organization.
&*LOGO; – This placeholder is used for a logo of your organization.
&*FOOTER; – This placeholder is used for a short footer for your newsletter.
&*LEGAL; – This placeholder is used for any legal disclaimers, company registration numbers, or similar information for your newsletter.
&*SELFLINK; – This placeholder will be automatically replaced with a link to view the newsletter in a browser and does not need to be defined on this screen. This placeholder is only available for lists with archives.
Additional placeholders are available, depending on template, and are numbered according to how many news and feature items you have chosen for your newsletter. These additional placeholders include:
&*HEADLINEn; – This placeholder is used for the headline of the news item.
&*BYLINEn; – This placeholder is used for the byline of the news item. If you don't want to use a byline, you can leave this placeholder blank.
&*IMAGEn; – This placeholder is used for an accompanying image or graphic for the news item. If you don't want to use an image, you can leave this placeholder blank. When including images, they need to be uploaded to a public server before creating your newsletter. You should then enter the URL of the images, including the http:// or https:// part in the Contents field. It is recommended that you resize the images that you want to use to an appropriate size before uploading them although it is possible to resize them further on the Fine Tune screen if needed.
&*TEXTn; – This placeholder is used for the body text of the news item.
&*URLn; – This placeholder is used for the URL to a Web page if subscribers want to read more. If you don't want to use a URL, you can leave this placeholder blank. Since the URLs are hyperlinked from the newsletter, remember to enter the whole URL, including the http:// or https:// part as appropriate.
&*FEATUREHEADn; – This placeholder is used for the headline of the feature item, which are usually placed in a narrower side column in the newsletter.
&*FEATURETEXTn; – This placeholder is used for the body text of the feature item, which are usually placed in a narrower side column in the newsletter.
The placeholder that is currently selected in the placeholder list is highlighted both in the placeholder list and in the template preview pane. You can also move the mouse over the preview pane to see and select placeholders.
To define the selected placeholder, enter its value in the Contents text box below the template preview pane. Click
[Update] to fill the placeholder.
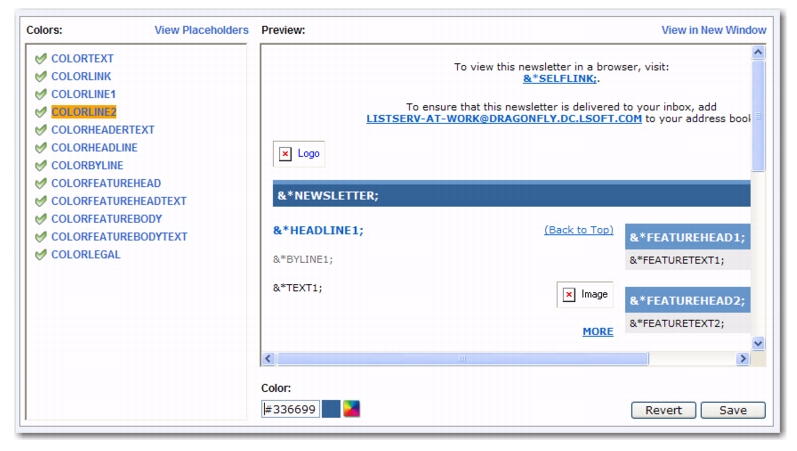
To re-define the colors used for the placeholders, click on the View Colors options. The placeholders list is replaced with the placeholder colors list. Select the placeholder color you want to re-define, and then enter the RGB color value in the
Color field. To view a color palette to help you select the color, click on the
Color Picker icon, and then click on the color you want to use. The color for that particular placeholder will be updated.
Once you are done filling out the placeholders, click [Save]. This makes your changes permanent, and places a copy of the newsletter in the
Newsletter Drafts section.
Note: Drafts are automatically deleted after 30 days.
To undo your changes, click the [Revert] button. The template will revert back to the previously saved version of the template (or the default version if no saved version is available).
To cancel the definition of the newsletter and return to the Select Template screen, click the
[Cancel] button. If you have a saved draft version of your newsletter and you click
[Cancel], then the saved version will still be available in the
Newsletter Drafts section.
For those who are familiar with HTML, LISTSERV gives you the ability to expand your limits and design profession-looking HTML newsletters that go above and beyond the everyday standards.
Note: Any changes you make on this tab will be lost if you use the
[Back] button.
|
•
|
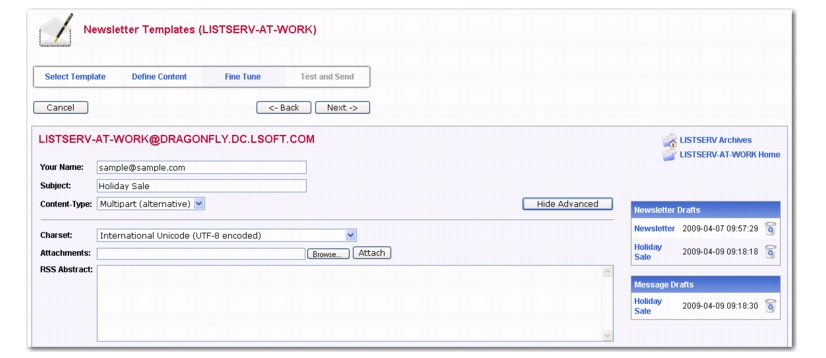
Your Name – This field is automatically filled with the email address associated with your user account. To change this, simply delete the email address and enter your name as you wish it to appear in the From field of the email header of the newsletter. The email address that will be used in the From field is the one that is logged into LISTSERV and may not be changed.
|
|
•
|
Subject – The subject line for the newsletter.
|
|
•
|
Content-Type – This drop-down menu is read-only unless the advanced options are activated. If available, you can re-define the format of the newsletter.
|
To view and define the advanced options, click the [Show Advanced] button. The following options are available:
|
•
|
Charset – Use this drop-down menu to select the charset (character set) of the newsletter. If your newsletter requires a charset that is different from the default charset for LISTSERV (UTF-8), then you can use the drop-down menu to select the matching one before you type or paste in your content. This selection will not translate one charset to another. It is used to sync the charset of the original newsletter with LISTSERV so that it can be encoded correctly for sending.
|
|
•
|
RSS Abstract – Many lists allow subscribers to read postings through RSS feeds. LISTSERV automatically creates RSS abstract from the text part of the message. By default, LISTSERV uses a maximum of 500 and a minimum of 250 words for an implicit RSS abstract. These default numbers can be changed either for the entire site or on a list-by-list basis. However, this option also allows you to create explicit RSS abstracts, which can be HTML or text of any length. To provide an explicit RSS abstract, simply enter text here in the RSS Abstract text box. To use your text or HTML part in its entirety for the RSS abstract, click the Use as RSS Abstract icon next to either the Plain Text Content-Type or HTML Content-Type section; the content will be automatically copied into the abstract text area.
|
|
•
|
Attachments – Use the [Browse...] button to find your file on a local drive. Click the [Attach] button to attach your file to your outgoing message. The attachment will be listed in a table beneath the Attachments field. To delete an attachment, simply click the [Delete] button associated with that particular item in this table.
|
Notes: Each list can have its own rules for accepting or rejecting messages with attachments. The
[Browse...] and
[Attach] buttons will function regardless of individual list settings. As a result, your newsletter may be rejected or stripped of its attachment by the list. Be sure to check with the list owner if you have any questions.
In the Plain Text Content-Type section, you can edit the plain text for the newsletter. Any changes you make in this section are not automatically made in the HTML section. Therefore, if you want these changes in the HTML section as well, you will need to manually enter them.
In the HTML Content-Type section, you can edit the HTML part of the newsletter. Any changes you make in this section are not automatically made in the Plain Text section. Therefore, if you want these changes in the Plain Text section as well, you will need to manually enter them.
If you have JavaScript enabled, then the [HTML Editor Mode] button will be available. This button opens a WYSIWYG-style editor in place of the HTML source code text box.
Note: If you have already entered HTML code into the text box before you launch the editor, the editor will parse and rewrite the existing HTML code, which may introduce changes to the code. To return to the HTML source code text box, click the
[Source Code Mode] button.
To preview your HTML newsletter, click on the Preview icon on the HTML Editor toolbar. The message will open in a new window, letting you preview the finished product.
If you have started working on a newsletter and want to continue at a later time, you can click the
[Save Draft] button to save a draft of the message. The subject line, the text part, and the HTML part are all stored. The drafts, which are identified by their subject lines and shown with a timestamp, will be listed in the
Newsletter Drafts section. When you return to the Newsletter Template wizard, you can just click on the subject line to retrieve the draft. To delete existing drafts, just click on the
Recycling Bin icon next to the draft that you want to delete. Existing drafts are deleted automatically when you have posted them to the list.
Important: The draft you save on the Fine Tune tab will not be the same draft you may have saved on a previous tab. Therefore, you may want to change the subject to reflect the version you are saving.
Note: Drafts are automatically deleted after 30 days.
When constructing a newsletter and before sending it to a list, you can send a test message to make sure that the results are satisfactory. This kind of test delivery can be particularly useful when creating HTML newsletters because email clients vary in their degree of HTML support. Sending a test message allows you to double-check that the newsletter is rendered as you intended. If necessary, you can make adjustments to your newsletter before posting it to the list.
|
•
|
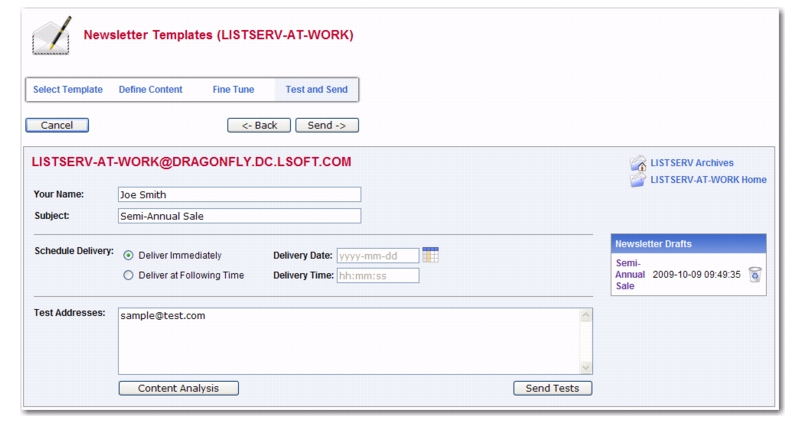
Your Name – This field is automatically filled with the email address associated with your user account. To change this, simply delete the email address and enter your name as you wish it to appear in the From field of the email header of the newsletter. The email address that will be used in the From field is the one that is logged into LISTSERV and may not be changed.
|
|
•
|
Subject – The subject line for the newsletter.
|
|
•
|
Schedule Delivery – Select whether you want the newsletter to be delivered immediately or at a specific time and date. The input format of the Delivery Date field is yyyy-mm-dd. The input format of the Delivery Time field is hh:mm:ss, using the 24-hour clock. The time zone used is that of the LISTSERV server. If you enter a delivery date or time that has already passed, then the newsletter will be delivered immediately.
|
|
•
|
Test Addresses – Enter the email addresses of those who will be receiving the test. Make sure to include your email address so you can view the newsletter as well. If you had entered delivery test email addresses in your Newsletter Profile, then these addresses will appear here.
|
|
•
|
Content Analysis – If your LISTSERV license includes technical support, then you can use this button to check your message and evaluate the likelihood that it will be deemed to be spam by recipient mail systems. LISTSERV will connect to a hosted service at L-Soft, which runs the email message through SpamAssassin. The results will be shown on the screen. If necessary, you can then make adjustments and run the test again.
|
|
•
|
Send Tests – Use this button to send a test message to the test addresses.
|
|
•
|
Back – Click this button if you want to navigate back and make changes.
|
|
•
|
Send – Click this button to send the newsletter once you are done testing it and are satisfied with its content and appearance.
|
Note: When you test a newsletter that has
&*SELFLINK;, then this link will not work in the test message because the message has yet to be archived.